RADWAG PUE 7.1.150.HRP User manual

Type
User manual

This manual is also suitable for

Quick Start
PUE 7.1
Indicator
ITKB-10-01-12-20-EN
To view the full user manual, go to the website or scan the QR code:
radwag.com/pl/manuals/B1G
1. ZAWARTOŚĆ
PUE 7.1
PUE 7.1P
Indicator
×1
Indicator
×1
Power supply*
×1
Power supply*
×1
2. NOTES AND WARNINGS
Operate the indicator in a room free from dust where the temperature ranges
-1040 °C (+14104 °F) and where the relative humidity is below 80%. Potential
temperature change shall occur gradually and slowly.
Place the scale on a table or a wall bracket ensuring stability. For the most stable
and repeatable results it is recommended to use an anti-vibration table.
Not intended for use within EX zones.
Not intended for weighing explosive or
flammable substances.
Place the scale away from heat
sources. Avoid exposing the scale to
the sunlight.
Avoid exposing the scale to the influ-
ence of a magnetic field. Do not weigh
magnetic substances.
-10
o
C
+14
o
F
+104
o
F
+40
o
C
*The type of plug may vary depending on the country.
up to 12 h
3. PREPARING FOR WORK
3.1. Indicator Temperature Stabilization
Prior to switching the indicator on let
it reach room temperature (estimated
stabilization time: 12 hours).
1 2 3
Place the indicator on the workstation and leave it until it reaches ambient temperature.
Press ON / OFF key to start the indicator.
3.2. Indicator Start-Up
Connect the power supply to a connector
located on the side of the indicator.
Connect the power
supply to the mains.
The indicator is ready for operation!
0%
Home
0.000
100%
Weighing
Supplementary unit
Tare
Gross
0.000 kg
0.000 kg
Packaging
Log in
!"# €$
%&%
)('&%
min max
-0-
kg
4. PANEL AND SCREEN
4.1. Keypad
4.2. Home Screen
Switching
on / off
Zeroing
Taring
Sending the weighing
result to a printer or a
computer.
Programmable key
Programmable key
Proximity sensor Proximi t y s en so r
Programmable key
Entering scale menu
Quick
access keys
Programmable
workspace
Weighing
result window
Status bar
Process-related information
Local
parameters
Set
Min and Max
Prod uc ts Edit lot
number
Edit batch
number
Statistics
Zero
0%
Home
Supplementary unit
Tare
Gross
0.0 g
0.0 g
Package
0.0
100%
SETUP
Log in
Weighing
5. BASIC OPERATIONS
Units
Supplementary unit
Tare
Gross
Packaging
We ighing
Working modes
Weighing
Parts counting
Percent weighing
Dosing
min ma x
-0-
1
2
3
4
5
6
Formulations
%
PGC
n
Press the current mass unit
pictogram to display the list
of all available units.
5.1. Working Modes / Unit Selection
Press the current working mode pic-
togram to display the list of all working
modes.
Weighing
Parts counting
Percent weighing
Dosing
Formulations
PGC
Density
Animal weighing
Vehicle scale
Transactions
SQC
Gram [g]
Kilogram [kg]
Carat [ct]
Pount [lb]
Ounce [oz]
Newton [N]
5.2. Working Modes Settings
3
1 2
Press the current mass unit pictogram to
display the list of all available units.
Press the working mode settings pictogram
to edit the current working mode.
Select working mode from the list.
A list of editable parameters of a given
working mode is displayed.
Working modes
Weighing
Parts counting
Percent weighing
Dosing
1
2
3
4
5
6
Formulations
%
PGC
Weighing
Save mode
Dispensing
Result control
Tare mode
1
2
3
4
5
6
Delete tare
Remove after weighing
-T-
Manual each
stable
None
Single
0%
Home
0.000
100%
We ighing
Supplementary unit
Tare
Gross
0.000 kg
0.000 kg
Packaging
Log in
!"#€$
%&%
)('&%
kg
0%
Home
0.000
100%
Weighing
Supplementary unit
Tare
Gross
0.000 kg
0.000 kg
Packaging
Log in
min max
-0-
-0123
kg
6. SETTINGS
6.1. Administrator’s Logging In
1
3
2
4
Some scale settings are only available to the Administrator.
Prior to setting scale parameters log in as the Administrator.
Press “Log in” to enter “Operators” menu. Select „Administrator” from the displayed
list of operators.
You have logged as the administrator.
0%
Home
0.000
100%
Weighing
Supplementary unit
Tare
Gross
0.000 kg
0.000 kg
Packaging
Zaloguj
-0123
kg
Log in
Operators
2
Admin
1
Admin
Name
0%
Home
0.000
100%
We ighing
Supplementary unit
Tare
Gross
0.000 kg
0.000 kg
Packaging
Admin
kg
When the field for filling the password in is
opened, confirm the empty field by pressing
key.
6.2. Proximity Sensors Configuration
Prior to configuring the proximity sensors, log in as the Administrator (see step 6.1.).
You can assign a function of your choice to each proximity sensor. In addition, you can assign various func-
tions to the sensor in different working modes. See the exemplary procedure for sensors configuration for the
“Weighing” mode.
3
1
4
2
Press the workspace to access current
working mode settings.
Select “Button functions” parameter.
0%
Home
0.000
100%
Weighing
Log in
min max
-0-
-0123
kg
Supplementary unit
Tare
Gross
0.000 kg
0.000 kg
Packaging
Display
Text data
1
3
i
Bar graph
Button functions
2
Button Functions
Proximity sensor, left
Proximity sensor, right
Proximity sensor -
hand motion to the left
Proximity sensor -
hand motion to the right
13
14
15
16
17
Set default
None
None
None
None
Funkcje przycisków
Czujnik zbliżeniowy lewy
Czujnik zbliżeniowy prawy
Czujnik zbliżeniowy - ruch wlewo
Czujnik zbliżeniowy - ruch wprawo
13
14
15
16
17
Ustaw domyślnie
Brak
Brak
Brak
Brak
Proximity sensor left
None
Select workflow
Local parameters
Select product
10 recently selected products
Follow the above procedure to configure proximity sensors for other working modes.
Select respective sensor (right or left) from
the list.
Select function to be assigned to the
sensor.
7. CONNECTING PERIPHERALS
DB15
Computer Computer
Computer
Printer
Printer
Printer
Barcode
scanner
Barcode
scanner
THB ambient
conditions sensor
Barcode
scanner
RFID card
scanner
RFID card
scanner
PLC
controller
Stack
light
8. CLEANING AND MAINTENANCE
Avoid using aggressive cleaning
agents (e.g. solvents, cleansers
containing chlorine, corrosive
substances and bleach).
• Plastic elements can be cleaned with a soft cloth slightly moistened with a solution of water
and a mild detergent (e.g. soap or dishwashing liquid).
•Drycleanedelementsusingsoftanddryclothorusedust-freepapertoweltoabsorbtheremainingmoisture.
•Donotinstallthecomponentsuntiltheyarecompletelydry.
Avoid using cleansers containing
abrasive substances or scouring
preparations.
Make sure that no dust or liquid
enters the sockets and the inside
of the indicator.
8.2. Cleaning Tips
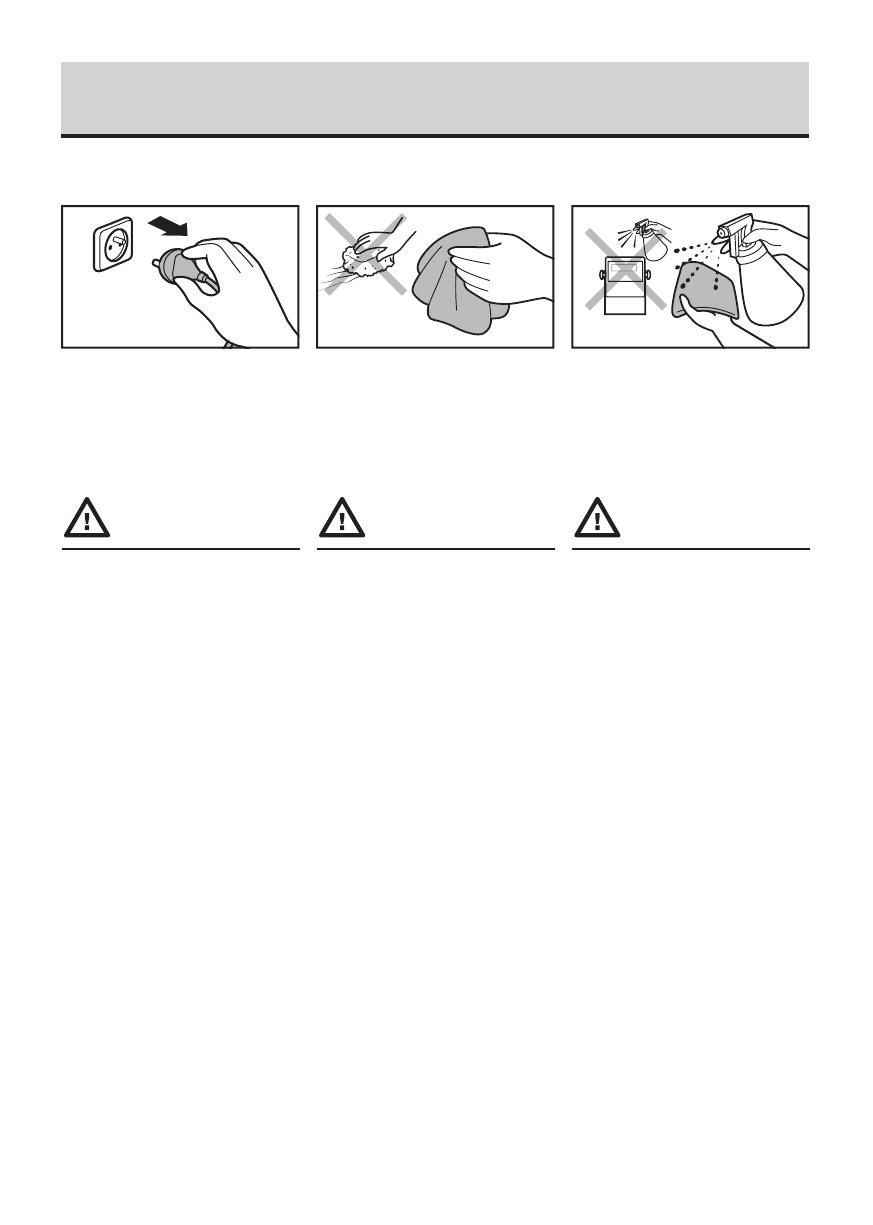
Prior to cleaning it is necessary to
disconnect the indicator from the
mains. Unplug the connector from the
electrical socket.
For cleaning use only soft cloths made
of microfiber. Do not use any abrasive
cloths or any material that may scratch
the surface!
Apply the cleanser onto the cloth first.
Avoid applying the cleanser directly
onto the device!
8.1. Notes and Warnings
www.radwag.com
  • Page 1 1
  • Page 2 2
  • Page 3 3
  • Page 4 4
  • Page 5 5
  • Page 6 6
  • Page 7 7
  • Page 8 8
  • Page 9 9
  • Page 10 10
  • Page 11 11
  • Page 12 12

RADWAG PUE 7.1.150.HRP User manual

Type
User manual
This manual is also suitable for

Ask a question and I''ll find the answer in the document

Finding information in a document is now easier with AI