Page is loading ...

Open the box
Pull the tabs on both release clips (A), one
on each side. Remove the clips from the
outer box by pulling them out. Lift the
outer box o the printer.
Remove the upper foam
support
Remove the upper foam support (B).
Carefully lift machine out of box (C).
Remove the bottom foam support (D).
Open peripheral boxes
Peripheral boxes contain: USB cable (A),
print platform (B), curing bulb (C), power
supply (D) and material cartridge (E).
Place Printer
Place printer in a place where there is not
too much natural sunlight and it is level.
Remove protective lm covering the
display (A).
Install curing bulb
Open curing door and hold the curing
bulb with tissue or paper towel, with
notch facing up. Insert end of bulb down
in hole behind carousel and insert bulb
base up into socket ensuring it locks in
place.
Remove the peripherals box
Lift o the peripherals box (A) and place it
to the side.
Install print platform
1. Rotate the print platform clamp lever
upward.
A
B
A
C
D
A
D E
C
A B
Hold bulb with tissue
or paper towel to
avoid damaging.
2. Insert the print platform under the
clamp lever until it is seated (A).
Rotate the print platform clamp lever
down to lock the print platform (B).
Remove Insert
Open the print door and pull up the
cartridge clamp lever (A) and remove
the plastic insert (B) from the material
cartridge support.
A
Installing Material Cartridge
1. Lift the material cartridge clamp lever
(A) up to raise the cartridge clamp.
2. Remove cartridge from foil package,
cut end with scissors.
NOTE: Look in the foil bag to
ensure there is no resin inside
bag. If resin is present do not insert
cartridge in the machine.
3. Check material cartridge to ensure
tab is folded over and facing the front
of machine, if not, fold over now.
A
4. Insert the material cartridge into the
material cartridge support and then
under the material cartridge clamp.
NOTE: The material cartridge will
set into a pocket on top of the
glass pane.
CAUTION: It is very important
that the cartridge be seated
correctly in the pocket or else
a leak can be created in the cartridge
which may damage the system.
A
B
ProJet 1200™ Setup
Please refer to the ProJet1200 User Guide for safety and comprehensive operating instructions. You can nd the ProJet 1200 User Guide on 3DSCentral.com.
SAVE ALL FOAM AND PACKING MATERIAL FOR FUTURE USE. SHIPPING WITHOUT THE ORIGINAL PACKING MATERIAL MAY CAUSE DAMAGE TO THE PRINTER.
NOTCH
B
5. Rotate the material cartridge clamp
lever (B) down to lower the cartridge
clamp (A).
NOTE: Ensure the clamp is locked.
If the clamp requires a lot of
pressure to lock, check that the cartridge
is seated properly in the pocket.
NOTE: Only put a cartridge in
the machine and clamp it once.
Repeating clamping can break the seal
between the lm and the cartridge.
A
B

3. Double click the Material, (A), to load,
when material appears in the top block, it
is loaded. Click on Next (B).
NOTE: If there already is material
loaded, you must rst unload that
material before loading anything new.
Click on loaded material and select
Unload.
Adding Printer
1. Open the 3DSPRINT application. Click on
the Print Setup module (A).
2. Select the printer you want to add (B).
Select Next (C).
NOTE: It may be necessary to
manually add the IP address in the
space provided (D) if the desired
printer is not on the list.
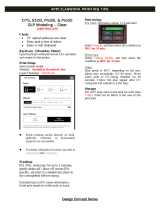
5. Test the connection under the Printer Tools
(A) by selecting Test Post Cure (B).
NOTE: The curing chamber
carousel should rotate if the
printer is connected and the display will
show Testing and information window
will say Testing.
NOTE: The door must be closed for
the UV chamber to work.
Printing a part
At this point, machine is ready to print a part.
Follow along in the User Guide to do so.
NOTE: Get more information about
the 3DSPRINT software by clicking
on the Help Command or pressing F1.
NOTE: Do not move the machine
with the cartridge inside once it is
opened.
ProJet 1200™ Setup
Please refer to the ProJet1200 User Guide for safety and comprehensive operating instructions. You can nd the ProJet 1200 User Guide on 3DSCentral.com.
SAVE ALL FOAM AND PACKING MATERIAL FOR FUTURE USE. SHIPPING WITHOUT THE ORIGINAL PACKING MATERIAL MAY CAUSE DAMAGE TO THE PRINTER.
Create Account
Type http://3dscentral.3dsystems.com in
your browser. You will need to create an
account (your email will be used as the
User ID) and choose an easy to remember
password. Your printers serial number
appears on the back of the machine. After
registration an email will be sent to you
with a link to the 3D Systems 3DS Central
login page.
Installing Software
1. Go to https://3dscentral.3dsystems.
com and enter your user name and
password.
2. Select Products.
3. Select Professional 3D Printers from
the left navigation bar.
4. Select ProJet 1200 from the drop-
down menu.
5. Download the 3DSPRINT software
by selecting the lename under the
software header.
6. Double-click le that was just
downloaded to begin installing
software.
7. Before leaving 3DS Central download
any documentation needed including
the User Manual.
Connecting Printer
1. Connect ONLY the A/C power cord
to utility power and then connect the
power supply to the power inlet (A) on
the printer. Ensure printer is fully booted
before proceeding.
2. If connecting to a network, connect the
printer Ethernet port (B) to the network
with an Ethernet cable. If connecting via
USB connection see Step 3.
A
3. If connecting via USB without a
network, f
ollow (previous) Step 1, when
LCD display shows ProJet 1200 Ready
connect machine via USB cable (C). Once
printer is connected, display will show USB
Connected.
B
C
Check Cartridge
The Check Cartridge command is used to check
the material level of cartridge as well as ensuring
the cartridge is properly inserted.
1. Click Check Cartridge on the Help tab.
2. A dialog window will appear showing
remaining material.
NOTE: If the cartridge is not properly
inserted, an error will appear. Check
that the cartridge with the chip is properly
inserted and try again.
Error
Failed to check cartridge. Please make sure the cartridge is
properly inserted.
OK
Activating Printer
Before any parts may be printed, you must rst
activate your printer.
1. Select Post Cure from the Printer Tools
screen.
2. Fill out the information in the activation
elds (A).
3. Select OK (B).
Printer is now activated and is able to print parts.
C
©2015 3D Systems, Inc. All rights reserved. pn 341411-00 Rev. F
A
B
A
B
A
B
A
B
4. The next window that will pop up is the
Print Mode screen. Double click the
desired Print Mode, (A), to load from the
list of available modes. Click on Set (B).
A
B
C
/