
1
For safe and correct use, be sure to read the Safety Information in Safety Information and Quick Installation Guide
before using the machine.
Version 1.3.1
RICOH
Ri 1000
User Manual

2
Where to Inquire
For inquiries, contact your sales or service representative.

3
Contents
How to Read the Manual ....................................................................................................................................................... 6
Safety Symbols for This Machine ........................................................................................................................................... 7
1 Before You Begin ............................................................................................................................................................ 8
1.2 Part Identification ................................................................................................................................................... 10
1.3 Important .................................................................................................................................................................... 12
1.4 Installation .................................................................................................................................................................. 13
Space Needed for Printer .............................................................................................................................................. 13
Setting Up Your Printer ................................................................................................................................................. 14
1.5 Control Panel Functions .............................................................................................................................................. 19
[Print Tab] ..................................................................................................................................................................... 19
[Status Panel] ................................................................................................................................................................ 20
[Maintenance] ............................................................................................................................................................... 21
[Alignment] ................................................................................................................................................................... 22
[Service Part Status] ...................................................................................................................................................... 23
[Settings] ....................................................................................................................................................................... 24
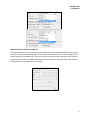
1.6 Configuring your printer via AnaRIP ........................................................................................................................... 25
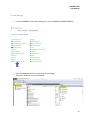
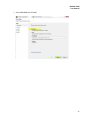
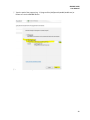
[Firewall Settings].......................................................................................................................................................... 26
[ Configure your printers IP Address] ............................................................................................................................ 32
Configuring the printer’s IP address (Windows) ............................................................................................................... 33
[Adding a new printer to AnaRIP] ................................................................................................................................. 35
2 Preparing Media for Printing ........................................................................................................................................ 37
2.1 Mounting Print Table onto Printer .............................................................................................................................. 37
2.2 Mounting Substrate onto Print Table ......................................................................................................................... 39
2.3 Setting the Print Table to Ready Position ................................................................................................................... 41
[Moving Table] .............................................................................................................................................................. 42
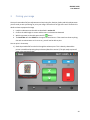
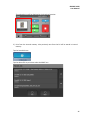
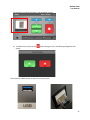
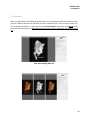
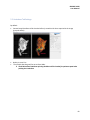
3 Printing your image ....................................................................................................................................................... 44
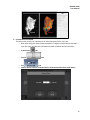
4 Using AnaRip to Print Light Color Garments ................................................................................................................. 48
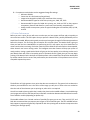
4.1 AnaRIP Raster Image Processor .................................................................................................................................. 48
4.2 Printer Performance ................................................................................................................................................... 49
4.3 AnaRIP Advanced features .......................................................................................................................................... 60
4.4 Removing Garments from the Print Table .................................................................................................................. 63
4.5 Set the Image with Heat ............................................................................................................................................. 64
5 Using AnaRip to Print Dark Garments ................................................................................................................................ 65
Pretreating Substrates (light and dark) ............................................................................................................................. 65

4
[Pre- treatment Application Procedure] ....................................................................................................................... 66
5.1 Underbase ................................................................................................................................................................... 68
5.2 Underbase Tab Settings .............................................................................................................................................. 69
5.3 Underbase Adjustments ............................................................................................................................................. 72
5.4 Choke .......................................................................................................................................................................... 74
5.5 Pure White .................................................................................................................................................................. 76
5.6 Select Border Color to be Removed ............................................................................................................................ 78
5.7 Set the Image with Heat Treatment ........................................................................................................................... 79
6 Maintenance ................................................................................................................................................................. 80
6.1. Nozzle check ............................................................................................................................................................... 81
6.2. Automatic Head Cleaning .......................................................................................................................................... 83
White Clean Freq. ............................................................................................................................................................. 84
6.3 Manual Head Cleaning ................................................................................................................................................ 85
6.4 Agitating White Cartridge ........................................................................................................................................... 87
6.5. Circulation .................................................................................................................................................................. 89
6.6. Empty the Waste Ink Bottle ....................................................................................................................................... 89
7 Adjustments .................................................................................................................................................................. 90
7.1 Adjusting Head ............................................................................................................................................................ 91
7.2 Adjusting Table ............................................................................................................................................................ 95
7.3 Adjusting the print position ........................................................................................................................................ 97
8 Replacing Service Parts ................................................................................................................................................. 99
8.1 Service part ................................................................................................................................................................. 99
8.2 Maintenance Schedule ........................................................................................................................................ 100
Daily............................................................................................................................................................................. 100
Weekly ........................................................................................................................................................................ 102
How to Clean the Maintenance Unit and the Flushing box ........................................................................................ 104
How to Clean the Cover of Head Nozzle Plate (the Nozzle Cover) ............................................................................. 113
How to Clean the Guide Rod and the Encoder Strip ................................................................................................... 119
8.3 Preparing Your Printer for Storage/Shipping .......................................................................................................... 128
8.4 Using Printer in 4-color mode (CMYK Only) ............................................................................................................ 129
8.5 Ink Path Guide ......................................................................................................................................................... 130
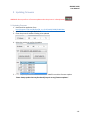
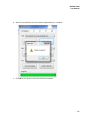
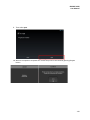
9 Updating Firmware ..................................................................................................................................................... 131
9.1 Updating Firmware ............................................................................................................................................... 131
10 About Open Source Software License ............................................................................................................................ 136
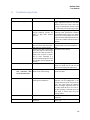
11 Troubleshooting Guide ............................................................................................................................................ 137

5

6
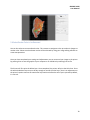
How to Read the Manual
Disclaimer
Contents of this manual are subject to change without prior notice.
To the maximum extent permitted by applicable laws, in no event will the manufacturer be liable for any damages
whatsoever arising out of failures of this machine, losses of the registered data, or the use or non-use of this product
and operation manuals provided with it.
Make sure that you always copy or have backups of the data registered in this machine. Documents or data might be
erased due to your operational errors or malfunctions of the machine.
In no event will the manufacturer be responsible for any documents created by you using this machine or any results
from the data executed by you.
Notes
Read this manual carefully before you use the product and keep it handy for future reference.
For safe and correct use, be sure to read Safety Information before using the machine.
The manufacturer shall not be responsible for any damage or expense that might result from the use of parts other
than genuine parts from the manufacturer with your products.
For good output quality, the manufacturer recommends that you use genuine ink from the manufacturer.
Some illustrations in this manual might be slightly different from the machine.
Certain options might not be available in some countries. For details, please contact your local dealer. Depending on
which country you are in, certain units may be optional. For details, please contact your local dealer.

RICOH Ri 1000
User Manual
7
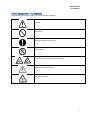
Safety Symbols for This Machine
The meanings of the safety symbols for this machine are as follows:
Caution
Prohibition
General mandatory action sign
Do not touch
Caution, risk of having hands or arms caught
Caution, risk of electric shock
Caution, hot surface

RICOH Ri 1000
User Manual
8
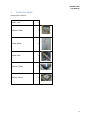
1 Before You Begin
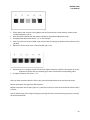
Accessory Box Contents:
Power cord
1
Ethernet cable 1
Genix
Waste Bottle 1
Genix
Waste tube 1
Medium Platen 1
Medium frame 1

RICOH Ri 1000
User Manual
9
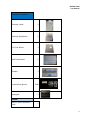
Maintenance Supplies
Cleaning Liquid 1
Cleaning Applicators 1
Lint Free Wipes 1
Heat Press Paper 1
Grease 1
Polyethylene gloves 5set
Squeegee 1
Manual
Safety & Quick Installation
Guide
1

RICOH Ri 1000
User Manual
10
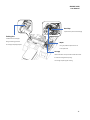
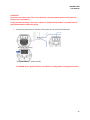
1.2 Part Identification
(option)
(option)
Rear air vent hole

RICOH Ri 1000
User Manual
11
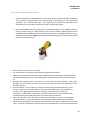
Carriage
Underneath there is the print head and the head nozzle.
It moves left and right when printing.
The carriage requires regular cleaning
Wiper
It is a gum plate that wipes the ink off
on the print head
Head Cap
It prevents the print head from drying
Flushing Box
It collects the ink discharged
during the flushing operation.
If a message is displayed, replace

RICOH Ri 1000
User Manual
12
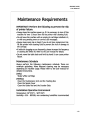
1.3 Important
DO NOT POWER OFF THE PRINTER
This printer periodically circulates ink internally and automatically performs head cleaning. If
you keep the printer power off for a long time (more than 12 hours), it will require charge/fill
the printer with cleaning solution.
Perform maintenance as outlined in the maintenance schedule
The printer will perform automatic maintenance periodically. But if you do not maintenance
periodically, the ink in the cartridge could settle and/or coagulate, causing poor image quality
or printer failure.
Some parts require periodical replacement
This printer includes parts that require replacement due to usage.
Parts that must be replaced by a service representative.
If the printer encounters an error message, be sure to resolve the issue before continuing use
as the self-maintenance functions will not work if there is a current error being experienced by
the printer.

RICOH Ri 1000
User Manual
13
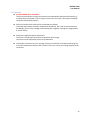
1.4 Installation
Space Needed for Printer
Installation
Space:
Top View
Installation
Space:
Side View
Installation
Space:
Side View

RICOH Ri 1000
User Manual
14
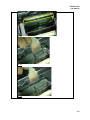
Setting Up Your Printer
1.

RICOH Ri 1000
User Manual
15
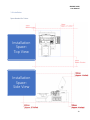
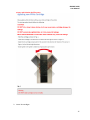
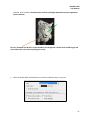
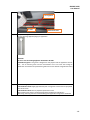
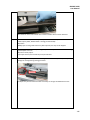
Your printer has a towelette taped over the waste drain valve use the following steps:

RICOH Ri 1000
User Manual
16
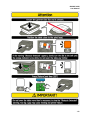
ATTENTION
The printer cannot determine if the waste ink bottle is connected, please make sure the waste ink
bottle is connected properly
During the initial ink charge, if the cover is opened, it will pause the procedure. To resume, hold the
power button down to reboot the printer
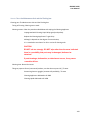
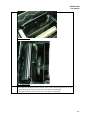
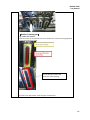
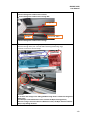
1. Connect the power cable to the back of the printer and to a functional wall outlet
[AC Power Connector]
[AC Power Switch] [Power On/Off]
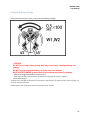
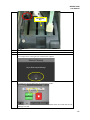
ATTENTION: Please agitate the White 1 and White 2 Cartridge before inserting them into the

RICOH Ri 1000
User Manual
17
printer and initiating the fill process.
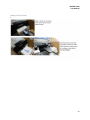
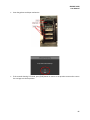
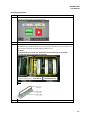
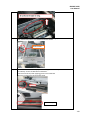
2. Insert ink cartridges

RICOH Ri 1000
User Manual
18
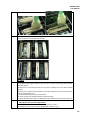
Please note, each cartridge is designed for its corresponding slot. WH1 will go
in the first slot (closest to the control panel) then WH2 then Black, Cyan,
Magenta, and lastly Yellow towards the back of the printer
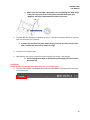
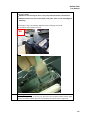
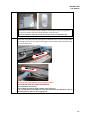
3. To power on, after flipping the I/O switch to | (on I ), hold down the power button on the front
near the LCD screen, for 3 seconds
.
To power off, hold down the power button on the front near the LCD screen, for more
than 3 seconds and return the I/O switch to O (off)
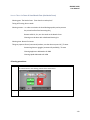
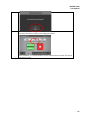
4. The printer is starting to boot.
5. After booting, the printer will perform initial charging if the printer is not charged.
Initial charging takes about 15-20 minutes and the display will show a status
percentage (%)
ATTENTION
During the initial ink charging, don’t open front cover or cartridge cover.
6. Once the initial charge is completed, the printer will show READY in the upper left-hand corner
of the LCD screen

RICOH Ri 1000
User Manual
19
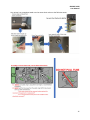
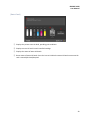
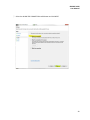
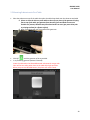
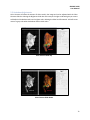
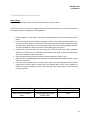
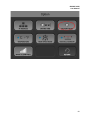
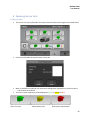
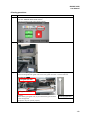
1.5 Control Panel Functions
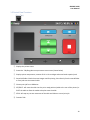
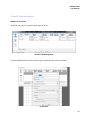
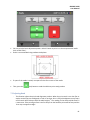
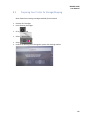
[Print Tab]
① Displays the printer status.
② Status Bar- TAP/Drag down to open status screen menu (shown below)
③ Displays printer temperature, amount of ink in ink cartridges and waste bottle capacity level.
④ Stored Job folder- Check the recent images used for printing. Print directly from the stored folder
or from jobs sent via network cable
⑤ Choose print job from USB device
⑥ SET/EJECT- will move the table into the print ready position (table to the rear of the printer) or
EJECT the table to allow the media to be place onto the table.
⑦ STOP- will stop any current movement of the table and allows to cancel print job
⑧ Function Tabs

RICOH Ri 1000
User Manual
20
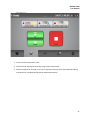
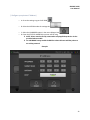
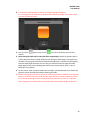
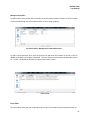
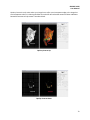
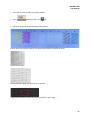
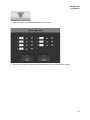
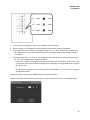
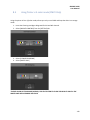
[Status Panel]
① Displays the printer status in detail, providing print readiness.
② Displays current ink levels in each installed cartridge
③ Displays the status of waste ink bottle.
④ Reset counts of waste ink bottle. Press the icon to initialize the waste ink bottle once waste ink
tank is manually drained/emptied
Page is loading ...
Page is loading ...
Page is loading ...
Page is loading ...
Page is loading ...
Page is loading ...
Page is loading ...
Page is loading ...
Page is loading ...
Page is loading ...
Page is loading ...
Page is loading ...
Page is loading ...
Page is loading ...
Page is loading ...
Page is loading ...
Page is loading ...
Page is loading ...
Page is loading ...
Page is loading ...
Page is loading ...
Page is loading ...
Page is loading ...
Page is loading ...
Page is loading ...
Page is loading ...
Page is loading ...
Page is loading ...
Page is loading ...
Page is loading ...
Page is loading ...
Page is loading ...
Page is loading ...
Page is loading ...
Page is loading ...
Page is loading ...
Page is loading ...
Page is loading ...
Page is loading ...
Page is loading ...
Page is loading ...
Page is loading ...
Page is loading ...
Page is loading ...
Page is loading ...
Page is loading ...
Page is loading ...
Page is loading ...
Page is loading ...
Page is loading ...
Page is loading ...
Page is loading ...
Page is loading ...
Page is loading ...
Page is loading ...
Page is loading ...
Page is loading ...
Page is loading ...
Page is loading ...
Page is loading ...
Page is loading ...
Page is loading ...
Page is loading ...
Page is loading ...
Page is loading ...
Page is loading ...
Page is loading ...
Page is loading ...
Page is loading ...
Page is loading ...
Page is loading ...
Page is loading ...
Page is loading ...
Page is loading ...
Page is loading ...
Page is loading ...
Page is loading ...
Page is loading ...
Page is loading ...
Page is loading ...
Page is loading ...
Page is loading ...
Page is loading ...
Page is loading ...
Page is loading ...
Page is loading ...
Page is loading ...
Page is loading ...
Page is loading ...
Page is loading ...
Page is loading ...
Page is loading ...
Page is loading ...
Page is loading ...
Page is loading ...
Page is loading ...
Page is loading ...
Page is loading ...
Page is loading ...
Page is loading ...
Page is loading ...
Page is loading ...
Page is loading ...
Page is loading ...
Page is loading ...
Page is loading ...
Page is loading ...
Page is loading ...
Page is loading ...
Page is loading ...
Page is loading ...
Page is loading ...
Page is loading ...
Page is loading ...
Page is loading ...
Page is loading ...
Page is loading ...
Page is loading ...
Page is loading ...
Page is loading ...
-
 1
1
-
 2
2
-
 3
3
-
 4
4
-
 5
5
-
 6
6
-
 7
7
-
 8
8
-
 9
9
-
 10
10
-
 11
11
-
 12
12
-
 13
13
-
 14
14
-
 15
15
-
 16
16
-
 17
17
-
 18
18
-
 19
19
-
 20
20
-
 21
21
-
 22
22
-
 23
23
-
 24
24
-
 25
25
-
 26
26
-
 27
27
-
 28
28
-
 29
29
-
 30
30
-
 31
31
-
 32
32
-
 33
33
-
 34
34
-
 35
35
-
 36
36
-
 37
37
-
 38
38
-
 39
39
-
 40
40
-
 41
41
-
 42
42
-
 43
43
-
 44
44
-
 45
45
-
 46
46
-
 47
47
-
 48
48
-
 49
49
-
 50
50
-
 51
51
-
 52
52
-
 53
53
-
 54
54
-
 55
55
-
 56
56
-
 57
57
-
 58
58
-
 59
59
-
 60
60
-
 61
61
-
 62
62
-
 63
63
-
 64
64
-
 65
65
-
 66
66
-
 67
67
-
 68
68
-
 69
69
-
 70
70
-
 71
71
-
 72
72
-
 73
73
-
 74
74
-
 75
75
-
 76
76
-
 77
77
-
 78
78
-
 79
79
-
 80
80
-
 81
81
-
 82
82
-
 83
83
-
 84
84
-
 85
85
-
 86
86
-
 87
87
-
 88
88
-
 89
89
-
 90
90
-
 91
91
-
 92
92
-
 93
93
-
 94
94
-
 95
95
-
 96
96
-
 97
97
-
 98
98
-
 99
99
-
 100
100
-
 101
101
-
 102
102
-
 103
103
-
 104
104
-
 105
105
-
 106
106
-
 107
107
-
 108
108
-
 109
109
-
 110
110
-
 111
111
-
 112
112
-
 113
113
-
 114
114
-
 115
115
-
 116
116
-
 117
117
-
 118
118
-
 119
119
-
 120
120
-
 121
121
-
 122
122
-
 123
123
-
 124
124
-
 125
125
-
 126
126
-
 127
127
-
 128
128
-
 129
129
-
 130
130
-
 131
131
-
 132
132
-
 133
133
-
 134
134
-
 135
135
-
 136
136
-
 137
137
-
 138
138
-
 139
139
-
 140
140


