Page is loading ...

1
DVR-PRO
Professional
Drive Recorder
DVR-PRO
Professional
Drive Recorder
DVR-PRO
Professional
Drive Recorder

2
Preface.
Safety instructions.
Packing list.
Technical specification.
Overview.
Schematic diagram.
Button and LEDs
Installation guide.
Record time table.
On/Off operation.
Smartphone app.
Tv-Out interface.
Snooper PC and MAC player.
SD Card information.
Firmware upgrade.
Information and Guidance.
Advanced connections.
Troubleshooting.
Service under warranty.
3
4
6
7
10
11
12
12
15
16
16
27
28
33
34
35
38
39
40
Index
DVR-PRo V1.0 EN 03/19

Preface
Thank you for purchasing the Snooper DVR-Pro dash Camera.
Before installing or using this product please familiarise yourself with this
user guide.
Performance Products Ltd holds the copyright to this user guide and no part
may be copied, reprinted or translated without the written permission of
Performance Products Ltd.
About this Guide
The contents of this document are for information purposes and may be
subject to change without prior notice. Performance Products Ltd has made
all reasonable efforts to ensure that the information contained in this user
guide , at the time of its creation and/or modification, is accurate.
Performance Products Ltd are not be responsible for any errors, omissions,
or inaccuracies and accept no liability whatsoever for any loss or damage
howsoever arising.
Please retain this manual for future reference.
3
DVR-PRo V1.0 EN 03/19

4
WEEE Notice
Disposal of Waste Electrical and Electronic Equipment and/or Battery
by users in private households in the European Union
• Never dismantle, crush, or pierce the battery. Do not expose the
battery to a high temperature environment.
• Keep the battery out of reach of children.
• Never dispose of batteries in a fire. Batteries may explode if exposed
to naked fire.
• There are no user serviceable parts inside the battery. It can only be
replaced by an authorised Snooper technical.
• Dispose of used batteries by observing local regulations.
• Snooper products meet the requirements for transportation under
967 Section II (UN3481, Lithium ion batteries packed with
equipment).
This symbol indicates that the product and/or packaging
cannot be disposed of as household waste. Rather, you must
dispose of your waste equipment and/or battery by handling
it over to the applicable take-back scheme. This ensures that
the electronic equipment and/or battery are recycled
appropriately. For more information please contact either
your municipal office, the shop where you purchased the
equipment or your household waste disposal service. The
recycling of materials will assist the conservation of natural
resources and the protection of human health and the
environment.
Battery Warning
DVR-PRo V1.0 EN 03/19

Caution
• It is unsafe for the driver to operate this device while the vehicle
is in motion.
• Ensure that the time zone is adjusted prior to the use of this device.
• The results of GPS positioning are only for reference, and should not
affect the actual driving situation.
• GPS positioning accuracy may differ depending on weather and
geographical restrictions such as high buildings, tunnels,
underpasses, or forests. GPS satellite signals cannot pass through
solid materials (except glass). Solar reflective glass will also affect the
performance of the GPS satellite reception.
• GPS reception performance on each device may differ.
• The values displayed in this device, such as speed and position, are for
guidance only due to the influence of surrounding environment.
• It is normal for the device to get warm during use.
• Improper use or operation of the product may result in damage of the
product or its accessories. This will void the warranty.
5
DVR-PRo V1.0 EN 03/19

Packing list
Before using please check the following items according to the model and
whether the following items are complete. If there are any omissions, please
contact customer services.
Note: SD Card minimum specification (not included) read and write speed
Class 10 or above. You should also consider using a high endurance SD
cards as this type of card can be written and overwritten many more times
than a standard SD card.
The new SD card must be formatted before using it (via the camera menu),
ensuring that any important data has been backed up. Formatting the
Micro SD card is the only regular maintenance that is required for a Dash
Cam. Most problems encountered with Dash Cams are SD card related and
not the Dash camera itself.
For the optimal performance of your Dash Cam and the SD card,
monthly formatting is recommended.
The fragmented nature of the files produced, caused by intermittent stop
and start recordings, will clog up the SD card. This may have a negative
impact on the quality of recordings as well as on the lifespan of the SD card.
It is the responsibility of the user to regularly review footage to check
that videos and data are recording correctly.
Snooper DVR-Pro
Dash camera
1 pc
Emergency record
button and cable
1 pc
Power cable 1 pc Key 2 pcs
2.5mm jack to female
RCA Video-in cable
1 pc Double-sided tape 1 pc
Card reader
1 pc
(Optional)
Manual 1 pc
6
DVR-PRo V1.0 EN 03/19

Technical specifications.
Technical indicators
Parameter Description
Size/weight/colour
L170mm*ø65mm / 120g / Black
Camera sensor
4M physical pixel CMOS image sensor, Seven groups
all-glass lens
Lens Angle
Front: 165 ° (horizontal: 130 °, vertical: 80 °)
Rear: Depending on the input camera
Second camera
Support composite video baseband signal(CVBS) camera
input.
Wi-Fi
Built-in Wi-Fi module (IEEE 802.11b/g/n, 2.412
GHz-2.4835 GHz)
Mobile terminal
app
Snooper app(IOS V8.0 and above, Android V4.0 and above)
Video
Normal recording (card capacity of 79%, this space is
automatically deleted after the old file coexistence of new
files)
Event recording (20% of card capacity, G-Sensor, SOS
button, alarm IN event triggered)
Parking guard recording (parking guard function is turned
on)
Sound recording
Built-in Microphone
Audio and video
format
Video: H.264 video encoding / MOV format; audio: AAC
Storage media
SD high-speed memory card (maximum support 128G,
make sure to use branded CLASS10 - Not included)
Speaker
Built-in speaker
7
DVR-PRo V1.0 EN 03/19

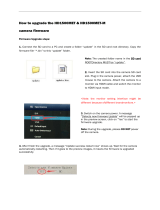
Button (s)
Power button/camera button/emergency recording
button Reset button.
Upgrade button (press the key to enter the upgrade mode
when the power is turned off or the card is removed).
Note: the upgrade button located above the SD card slot
LED
Red and Blue
G-Sensor
Built-in triaxial three-dimensional collision acceleration
sensor
GPS
Built-in high-quality GPS
RTC
Connect the device’s Wi-Fi, open the App or GPS for
time synchronisation .
Emergency record
button
Dash mounted, hard wired, emergency record button.
Parking guard
The recorder uses the vehicles battery for power during
parking guard once the ignition is switched OFF, if a vibration
is detected then the unit automatically starts to record
Video output
2-way TVOUT(NTSC/PAL)
Language settings
English,German, French, Dutch & Spanish.
Take pictures
Support JPG format photo capture
Resolution/Bit rate
/Frame rate
1920*1080 16M @30fps / 1280*720 12M @30fps
Note: resolution / frame rate / bit rate is currently only two of the defaults
Loop recording
1, 2 or 3 minutes optional
PC/MAC player
Snooper player
8
DVR-PRo V1.0 EN 03/19

Upgrade interface
SD card upgrade (upgrade process, power failure or r the
card cannot start, you need to press the upgrade button
to enter the upgrade mode)
Communication
Interface
UART / IR interface
HDMI interface
HDMI interface
Alarm I/O
Define input / output alarm line (active low)
Lock
Physical lock to protect the SD card, tamper resistant
Power
6V-32V car power socket or car direct wired
Static power
consumption
3.6W
Standby current
Less than 1mA
Note: the vehicle is off and after full charge (within 10 min)
Ideal operating
temperature
-25 ° C to 65 ° C
Operating
temperature
-40 ° C to + 85 ° C
storage
temperature
-40 ° C to + 90 ° C
9
DVR-PRo V1.0 EN 03/19

Definition of power cord.
Yellow
Red
Black
Emergency
record button
Orange*
Green*
Brown*
*Refer to advance connections on page #37
10
DVR-PRo V1.0 EN 03/19

Structural diagram.
Lock cover
Power cord
Front view
Double-sided tape
Rear camera
Video-In
Power Button
Rotary
shaft cover
Power cord
outlet hole
Lock
HDMI
Right view
Left view
Reset button
Red LED
Blue LED
Speaker
Rear view
GPS antenna
Ventilation holes
Shaft
Camera
Lens
11
DVR-PRo V1.0 EN 03/19

1. Firstly, decide the optimum
position for the unit, ensuring that
it des not obscure the drivers view.
The best position is usually in the
center of the windscreen at the
top,
Button and Indicator light definitions
Power button: press and hold to turn on.
Quick press to take a photograph. Press and hold to lock/unlock the current
video file when you boot up.
Reset button: press 'reset' to restart the device.
Upgrade button: This button does not need to be operated when the
device is working normally. Press the upgrade button until the unit enters
the upgrade mode (indicator LED flashes) then release it. The button
located above the SD card slot.
Status LED function.
Blue is flashing and the Red LED is solid – The device is switched On and it is
recording.
Blue and RED LEDs flashing rapidly – The device has registered an event (G-
sensor) or the emergency record button has been pressed. The LEDs will
continue to flash rapidly until the event recording has ended.
Blue LED lit and Red LED flashing – the unit is switched On, but the SD card
is not inserted in to the device or the SD card requires attention.
Blue and Red LEDs are both Off – the device is Off or in parking mode, if the
device is activated whilst in parking mode the Blue and Red LEDs will flash
rapidly.
Installing
the front camera.
12
DVR-PRo V1.0 EN 03/19

2. Secondly, clean the area of the
windscreen where the unit is to
be fitted.
3. Next, remove the protective
film from the double-sided tape
and attach the unit to the
windscreen. Note: Ensure that
the unit is positioned
perpendicular to the road.
4. Consult your owner's manual
for the location of the fuse box as
there are many different ways to
access a fuse box. In order to gain
access to the fuses, you may
need to remove some trim or
open some panels. Certain cars
allow you to do this by lifting a
tab or pulling a panel with your
fingers, whereas, other cars may
require prying with a trim tool.
5. Route the power cable by
tucking it neatly across the top of
the windscreen and down the A
pillar. This is located at the side of
the windscreen, down the same
side of the vehicle where the
fusebox is located.
preferably on the passenger side of the vehicle and behind the ear view
mirror. The dash cam must have view through the windscreen whilst
ensuring that it does not intrude within the wiper area. The maximum
intrusion into the wiper area is 40mm.
13
DVR-PRo V1.0 EN 03/19

ϱ͘ Once you have located the fuse box , you need to look at the layout of
the fuse box. If there are any spare or empty fuse holders, it is better to
utilize those. This should avoid removing any existing fuses. If this does not
apply, you should refer to the vehicle's fuse diagram to locate fuses that will
be safer to run an accessory from. We recommend looking for fuses such
as: power outlets, accessory fuses, interior lights, heated seats.
You should avoid using fuses for air bags, ECU, traction control and ABS or
any other safety related feature.
ϳ. Finding the correct fuse.
The device requires both a constant (permanent live) and a switched
ignition live. In order to test whether a fuse is ignition switched or always
on, you will need a circuit tester or similar. If you are testing an empty fuse
slot, put the tip of your tester into the slot directly. If you are testing on fuse
slots that have existing fuses in them, you can test using the openings on
the top of the fuse.
The Red (ACC) cable needs to be connected to an ignition switched fuse,
therefore you need to test that the power is live ONLY when the ignition is
switched ON. If the fuse stays live up even after you turn off the car, try to
use a different fuse slot.
The Yellow (B+) cable needs to be connected to a permanent live
(this is essential for parking mode). Turn the ignition OFF and remove the
key to find a fuse which remains live.
Note: Newer vehicles may have a battery save function. They have timed
'timed fuses' which stay live for a set number of minutes after the car
ignition is turned off.
WARNING: this type of installation should be performed by a
qualified or competent individual. Working with your vehicle's
electrical system can be dangerous.
If you have any doubts, please consult a professional
14
DVR-PRo V1.0 EN 03/19

Recording time table
1.Estimated recording duration (front camera only).
Camera and video
properties
Memory card capacity and recording time
8GB 16GB 32GB 64GB 128GB
Camera Res. fps bps Normal Event Normal Event Normal Event Normal Event Normal Event
Front
Camera
1080P 30fps 16M
49
Min
12
Min
99
Min
24
Min
199
Min
48
Min
399
Min
96
Min
799
Min
192
Min
Front
Camera
720P 30fps 12M
67
Min
16
Min
134
Min
32
Min
268
Min
64
Min
536
Min
128
Min
1072
Min
256
Min
Camera and video properties
Memory card capacity and recording time
8G 16G 32G 64G 128G
Camera Res. fps bps Normal Event Normal Event NormalEvent Normal Event Normal Event
Front
Camera
1080P 30fps 16M
39
Min
9
Min
79
Min
19
Min
159
Min
39
Min
319
Min
79
Min
639
Min
159
Min
The 2nd
Camera
720*480
25fps
or
30fps
4M
Front
Camera
1280P 30fps 12M
50
Min
12
Min
100
Min
24
Min
200
Min
48
Min
400
Min
96
Min
800
Min
192
Min
The 2nd
Camera
720*480
25fps
or
30fps
4M
2.Estimated recording duration if a 2d/rear camera is installed
Opening or closing and locking or unlocking will reset this timer.
If the selected fuse loses power after this period you will need to find an
alternative permanent fuse/source.
The Black (GND) cable needs to be connected to the metal chassis of the
vehicle. For this type of vehicle you will need to leave the vehicle door open
or interior light switched for 30 minutes to let the timer run out.
15
DVR-PRo V1.0 EN 03/19

Operating Instructions.
On/Off operation
As the device is wired directly to the vehicle, the unit should switch on
automatically when the ignition is switched ON.
If the unit is switched OFF when the vehicle ignition is switched OFF, the
unit will not automatically restart. You will need to switch the unit on by
pressing the power button (on the right hand side of the device).
Note: When the device is shutting down, the ignition must NOT be switched
back on until the unit shuts down completely (no LEDs lit). Once the unit has
shut down the ignition can be switched on. Failing do this may result in the
video files being corrupted.
Emergency record button.
Pressing the emergency record button will lock and
protect the current video file , this locked file will not be
overwritten unless the SD card id formatted or the file is
manually deleted .
The Red and Blue LEDs will flash rapidly when the button
is pressed.
Smartphone App.
1. Download and install the App.
For optimum user experience, download and install
Snooper DVR-Pro app from either the Apple or Android
App stores.
16
DVR-PRo V1.0 EN 03/19

For Apple users, search ''Snooper DVR-PRO'' in the App stre search to
download and install.
Android users go to the Google Play Store search for "Snooper DVR-Pro" to
download and install.
2. Connect the device via Wi-Fi
Once the app has been downloaded and installed, turn on the device and
connect it to your smart-phone. You must be within the Wi-Fi signal
coverage to connect. Next, using the phone, select 'system settings', open
'Wi-Fi settings' and click the Wi-Fi name that starts with ''Snooper-''. You
will then be required to enter the factory default password 12345678. To
enter the main user interface, select the "Snooper DVR-Pro" icon.
Note: Whilst connected to the devices' Wi-Fi network your smart phone
will be unable to access the internet via Wi-Fi.
17
DVR-PRo V1.0 EN 03/19

3. Live preview
Once Wi-Fi connection has been established, click on the home page
"realtime preview". The realtime preview window enables the view of live
images, displayed by horizontal screen.
Mute/Unmute
Record/ Stop
recording
Capture
Refresh
Apple App Live preview
Switch
between Front
and Rear
camera (if
fitted)*
Mute/Unmute
Record/ Stop
Capture Refresh
Android App Live preview
Snooper
Snooper
recording
Back
Current time
Fragment length
Record resolution
Transmission rate
Battery Power
Recording indicator
• Rec
Back
Record resolution
Fragment length
Transmission rate
Current date time
Battery Power
Recording indicator
Wi Fi status
• Rec
Switch
between Front
and Rear
camera (if
fitted)*
* To switch between front and rear camera view you
must STOP recording before switching.
18
DVR-PRo V1.0 EN 03/19

Switch: Click this icon to switch between the front and rear camera (if
fitted) preview image. (Note: The drive recorder system supports both
the front and back recordings when the button is highlighted. If it is
greyed out, no rear camera has been detected.)
Mute/Un-mute: You can turn the audio recording function on or off,
this button indicates the current audio recording status.
Record / Stopping Video: The icon is located at the upper left corner
of the video recording. If the icon is flashing, this indicated that the
drive recorder is recording.
Capture: Click this icon to take a still image in JPG format. Refresh: If
the real-time preview interface is lagging behind 'real time', you can
manually refresh the image.
Back: Click to exit the real-time preview interface to return to the
main interface.
Click the App home page "Settings" to enter the
settings page, you can set up the vehicle recorder
and query related information.
Note: Setting the black bold item in the
sub-menu indicates the default settings for the
recorder.
4. App settings
19
DVR-PRo V1.0 EN 03/19

1) Recording Resolution
2) Clip Time
The recording resolution setting is used to
adjust the front camera recording
resolution. The higher the resolution,
the sharper the image.
Note: The size of the resolution will
affect the amount of recording time on
the SD card. The higher the resolution,
the larger the file size will be.
Note: The rear camera (third-party
camera) recording resolution is fixed to
720x480.
Clip Time: Set the recording duration of
each video clip/file.
Option 1 minute, 2Minutes or 3 Minutes
Press OK to save.
Note: The video clip duration and
resolution can affect the transfer time,
via WiFi, between the device
any the
smart phone.
20
DVR-PRo V1.0 EN 03/19
/