Page is loading ...

User manual

Page
3 What’s included?
4 Overview
6 Registering
7 Start Up
System Requirements and Downloading
10 Downloading the AURA™ Camera Database
11 Installing Snooper
12 Power Connection & Charging
13 Charging the internal battery
Powering Snooper using the built-in battery
14 My Speed
My Speed XL
18 Version (Hardware & Software)
19 Digital Video Recorder
22 Bluetooth
Pairing
23 Phonebook
Dialing
Call History
24 Tyre Pressure Monitoring System (TPMS)
25 Selecting vehicle type
26 Pairing the Sensors
27 Installing 116 PSI sensors
30 Bluetooth Interface Installation
31 Settings
35 Troubleshooting Snooper Downloads
38 Specication 5 Series with DVR
40 Service Under Warranty
41 Accessories
Contents
2 • EN
MySpeed DVR V1.0 GB 08/17

3 • EN
Return to contents
What’s included?
1 x Snooper satellite navigation system
1 x Micro-SD Card
1 x Windscreen Mounting Bracket
1 x In-car Charger with TMC module
1 x USB Cable
1 x CD ROM
1 x Mounting disc for dash mounting the bracket
1 x Additional Micro SD card for DVR
PLEASE NOTE
Due to our desire to continually improve our products, the specication may change without notice.
MySpeed DVR V1.0 GB 08/17

4 • EN
Return to contents
Overview
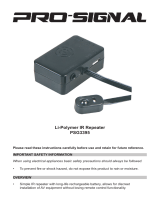
Front View
1. Power Button
Press and hold to switch on or o.
2. LED Power indicator
Status LED
On and Charging - Red LED
O and Charging - Red LED
On and using internal battery - Green LED
Fully charged - No LED
3 Touch screen LCD
4. Earphone jack (Earphones not included)
5. Micro-SD Card Slot
6. TMC/Video In socket ** TMC not used on MySpeed DVR
7. USB Socket
8. DVR Menu access
1
5
3
6
4
2
7
8
** Video In The video-in connection is for connecting a rear view or reversing camera (not supplied) to the unit. The socket on the
device is a 2.5mm jack.
The unit will automatically switch the screen image to show the image from the rear camera once the device receives a video signal
from the rear camera - please refer to the camera tting/wiring instructions for details on connecting the camera to the vehicle.
Rear view cameras are designed as a guide only and drivers should still be aware of their surroundings and take care when reversing.
MySpeed DVR V1.0 GB 08/17

5 • EN
Return to contents
Overview
My Speed DVR Rear View
9. MicroSD Card Slot**
10. Speaker
11. DVR HD camera lens
11
9
10
MicroSD for DVR
The microSD card is highly sensitive and can become defective due to changes in external environment or severe impact. Protect the
card against impact and damage. Snooper will not be held responsible in the event of microSD card damage due to user negligence
or external factors.
Specication for DVR MicroSD
Capacity up to 32GB
Speed Class 6 or above and support HD and SDHC
Estimated recording time 4GB: 1 to 1.5hrs 8GB: 1.5 to 3hrs 16GB: 3 to 5hrs 32GB: 5 to 10hrs
** The 1st time the My Speed DVR is used the DVR SD card will require formatting. Refer to page 73 for instruction on how to
format the card OR If a MicroSD card which was not supplied is going to be used it MUST be formatted using the Snooper player
BEFORE being used.
MySpeed DVR V1.0 GB 08/17

6 • EN
Return to contents
Registering
IMPORTANT!
PLEASE READ BEFORE USING.
To enable to locate Fixed Speed Cameras and Accident Black spots you will have to register and download the AURA™ Camera
Database.
Register Online
Go to the ocial website www.snooperneo.co.uk and register your unit online. Your unit should normally be activated within 30
minutes of registration.
Please Note: To register, you will need the serial number of your unit which can be found on the back of the device.
Monthly Debit or Credit Card payment of £2.99 inc VAT*
Quarterly Debit or Credit Card payment of £7.99 inc VAT*
Annual Debit or Credit Card payment of £29.99 inc VAT*
*Minimum subscription term of 12 months.
** Prices subject to change.
PLEASE NOTE
Due to our desire to continually improve our products, the specication may change without notice.
MySpeed DVR V1.0 GB 08/17

7 • EN
Return to contents
Start Up
Switch on the device by pressing and holding the standby power button located on
the top of the unit for 2 seconds. The Snooper will automatically synchronise with
the Micro-SD Card. Once the synchronisation is completed, the Micro-SD Card will
not function with any other device. Snooper is now ready to operate and the camera
database can be downloaded if necessary. NOTE: In most cases the Micro-SD card is
already installed in the device.
Please note that if the unit does not activate when you press and hold the standby power button for 2 seconds it may require
charging. Refer to the section ‘Charging the internal battery’ later in this manual.
System Requirements and Downloading
Before you can begin to download the AURA™ database onto Snooper, you will need to install the Snooper Updater software
provided on the software CD.
In order for the software to be installed successfully, there are certain minimum hardware and software requirements needed.
Minimum Hardware Requirements
The computer must have an Intel Pentium Class processor or equivalent, a minimum of 32MB of RAM, a monitor with 256 (8-bit)
colours or greater, a CD ROM drive, 20MB of free disc space and a spare USB connection.
Minimum Software Requirements
The software will only operate on the following Windows based operating systems:
Windows Vista
Windows 7, 8 and 8.1 and Windows 10
Mac iOS X - Yosemite, El Capitain and Sierra
Download software for Mac from: http://www.snooperneo.co.uk/SoftwareMac.cfm
NOTE: Snooper Updater software does not support Windows 95, 98, Millennium, 2000, XP.
Software Installation Instructions
Place the Software CD into a CD ROM or DVD drive. The CD should auto run and launch the Snooper menu.
To launch the CD manually: Click on ‘Start’ and then ‘Run’. In the dialogue box that opens click on ‘Browse’ – another dialogue box
will open. Locate your CD ROM or DVD drive (drive letter is normally D) using the ‘Look in’ option and select ‘Snooper’ from the lower
portion of the dialogue box. Once you have selected ‘Snooper’ click on ‘Open’ on the explorer box and then ‘OK’ on the Run dialogue
box.
Any updates to the speed camera updater software can be obtained from www.snooperneo.co.uk/software.cfm. If you have any
problems using this software please call 0333 240 1000 during oce hours and select Option 3.
Once the software is installed, you are ready to download the speed camera database onto Snooper. Once the initial setup is
completed the speed camera updater software icon is displayed on your desktop.
MySpeed DVR V1.0 GB 08/17

8 • EN
Return to contents
Downloading the AURA™ Camera Database
Please Note: You must register Snooper before you can perform a download.
Performing a download is simple.
1. Power up My Speed XL by pressing and holding the power button for
2 seconds and ensure that the computer is connected to the Internet.
2. Double left click the My Speed XL Camera Updater’ icon on your
desktop.
3. On the software in the top left hand corner, left click ’Menu’ and then
‘Download Settings’.
Note: When you run the program for the rst time, you will be
asked to select the program language and download settings
based on your vehicle type and what coverage of camera alerts you
require.
4. Connect the My Speed XL using the USB cable provided.
5. The updater software will then start to run automatically and
download the database les that you have selected onto your unit.
The download process is as follows:
The software will display the serial number of the Snooper and a progress bar will start to progress across the screen.
The software will then connect to our database server and then download** the speed camera database.
The Snooper will then save the data received.
The software will indicate that the download is complete and will instruct you to disconnect the Snooper from your PC. Close the
camera updater program by clicking the ‘x’ situated in the top right hand corner of the updater window.
**If you have a Firewall on your computer, the Firewall software may inform you that the updater software is trying to access the
internet. Please make sure that you grant/allow/permit access to the updater program through the Firewall.
Please read the messages supplied by your Firewall software carefully before choosing your option. If you do not allow the program
to access the internet through the Firewall, the download process will fail.
Plug the
USB cable into
the USB socket on the
side of the Snooper
MySpeed DVR V1.0 GB 08/17

9 • EN
Return to contents
Installing
Snooper comes with a windscreen bracket so that the unit can be mounted onto your vehicles windscreen.
When installing Snooper please ensure that:
The unit, with its built in GPS antenna has a clear view of the sky.*
It is located in a position where you can easily view the LCD display without having to take your eyes too far from the road ahead
and that you can reach the controls safely.
Does not interfere with the vehicles controls.
Does not jeopardise the drivers or passengers safety.
You will be able to remove the device to perform downloads.
For the optimum performance or the DVR, we recommend that the unit is placed in the centre of the windscreen (right to left)
either attached to the windscreen or the dashboard facia (using the mounting disc provided) The unit must not obscure you view
of the road ahead.
PLEASE NOTE: Be careful to choose a location that does not block the drivers view or where it might endanger the driver or
passengers should your vehicle suddenly come to a stop or be involved in an accident.
Installing Snooper using the Windscreen Suction Cup bracket
You can mount Snooper to the inside of your vehicles windscreen using the windscreen bracket provided.
Clean the area where you wish to position the bracket thoroughly with a good
quality glass cleaner. This allows a more secure seal on the windscreen.
Place the suction cup and bracket on the windscreen and push the locking lever
towards the windscreen to secure the bracket.
Adjust the angle of the bracket so that when the unit is attached to it you can view
the display and operate the controls safely.
Position Snooper onto the bracket, by inserting the bottom of the unit rst and
nally clipping the top of the bracket into the slot on the top of the unit. To remove
Snooper, simply unclip the unit by pushing the top of the bracket and taking the
unit from the holder.
Snooper can be powered directly either from the internal battery if it is fully
charged or powered from the cigarette lighter socket. To use the cigarette lighter
socket, plug the USB connector on one end of the power cable into the USB socket
on the side of Snooper and plug the larger plug into the cigarette lighter socket of
your vehicle.
Please Note: Only use the cigarette lighter power cable provided with Snooper. Snooper operates on 5V and using any other
cigarette lighter power cable will damage your device and void the warranty.
Locking
lever
Bracket
adjusters
MySpeed DVR V1.0 GB 08/17

10 • EN
Return to contents
Installing Snooper using the Dash Mounting Disk
If you prefer not to attach your MySpeed device to the windscreen, Snooper provides a dashboard mounting disc to x you Snooper
suction cup mount to your dashboard instead.
Instructions:
Clean the area where you want to install the disc on the vehicle’s dashboard with a damp cloth, then dry the dashboard.
Peel the paper backing away from the permanent mounting adhesive located on the disc bottom.
Press the disk onto the dashboard in the desired location, then set the GPS suction cup mount on top of the disk. Press the suction
cup mount’s lever down, in the direction of the disk. This locks the Snooper in to place.
Note: Take care when attaching the disc. This type of bracket is not intended to be moved from vehicle to vehicle and is classed
as a permanent xing.
THE USE OF THE DASH MOUNT DISC IS NOT RECOMMENDED FOR LEATHER DASHBOARDS.
Power Connection & Charging
Powering and charging Snooper from the cigarette lighter socket
Snooper comes with a power cable designed to plug into your vehicles cigarette lighter socket. The power cable is suitable for both
12v DC and 24v DC vehicles. This lead will power the device but will also charge Snooper’s internal battery.
1. Plug the smaller end of the lead into the USB socket on the side of Snooper
2. Plug the other end of the cigarette lighter adaptor into your vehicles cigarette lighter socket.
If Snooper is powered using the cigarette lighter socket a LED will illuminate on the left hand side of the unit. When the battery
is fully charged, the Red LED will switch o.
3. Press and hold the standby power switch on the top of Snooper for two seconds to switch the device ON.
Please Note: Do not leave Snooper plugged into the cigarette lighter socket when you start your vehicle. The cigarette lighter
socket is prone to power surges as the vehicle is started and this may cause damage to your unit.
If Snooper does not power up please check that the cigarette lighter socket is clean of any debris, remembering not to insert metal
objects into the socket. Check that the cigarette lighter adaptor is inserted all the way into the socket and check that the fuse in the
cigarette lighter adaptor is operational. If Snooper will still not power up, please check that the cigarette lighter in your vehicle is
functioning correctly.
Replacing the Fuse
If Snooper stops operating, the fuse in the cigarette lighter plug may have blown . If it has blown, follow these steps and replace it
with a 3 amp, 5mm x 20mm fast acting fuse.
Caution: Using a fuse that does not meet these ratings or defeating fuse protection can damage your unit, the power cable,
or the vehicles electrical system.
1. Grasp the ring near the tip of the cigarette lighter plug, and then carefully unscrew the ring by turning it counter clockwise.
Caution: If you must use pliers to loosen the ring, be careful not to crush the tip. Never use pliers or other tools to retighten the
ring on the cigarette lighter plug.
2. Pull the ring straight out, then remove the metal tip and old fuse.
3. Check the fuse to see if it has blown. If it has, replace it.
4. Replace the metal tip inside the ring, then place the fuse inside the cigarette lighter plug and screw the ring back onto the plug.
Make sure the metal tip is visible when you reassemble the cigarette lighter plug.
MySpeed DVR V1.0 GB 08/17

11 • EN
Return to contents
Charging the internal battery
Although Snooper can be charged using the cigarette lighter in your vehicle, an
alternative method of charging via a USB socket of a PC, or USB Mains charger
(output of 5v 1000mA) - not supplied.
The battery light on Snooper will illuminate and will take approximately 3 hours to
charge. When the internal battery is fully charged, the red LED will turn blue.
Note: The new battery’s full performance is only achieved after two or three
complete charges and discharges.
Powering Snooper using the built-in battery
Once Snooper is fully charged, it is ready for use. Press and hold the power switch on the top of the unit for 2 seconds to switch on
the device.
Note: the battery is designed to be a back up and Snooper recommends that the the MySpeed device is powered from the
vehicle charger.
Aan/uit-knop
Plug the
charger cable into
the USB socket on the
side of the Snooper
On and Charging - Red LED
O and Charging - Red LED
On and using internal battery - Green LED
Fully charged - No LED
MySpeed DVR V1.0 GB 08/17

12 • EN
Return to contents
Alerts and warnings
1
2
4 5
3 76
8
1
Direction of travel
2
Current vehicle speed
3
Road name or number
4
Road speed limit *
5
Outer ring will turn red when the vehicle speed limit exceeds the road speed limit
6
Distance to speed camera **
7
Type of speed camera **
8
Current time
* If the road speed limit is unknown then the speed linit will be replaced with an exclamation mark.
** Requires the AURA camera database to be downloaded to My-SpeedXL
Types of speed cameras:
SPECS or Point to Point average speed camera systems utilise state of the art video system with Automatic
Number Plate Reading (ANPR) digital technology. Each SPECS camera is features infra red illuminators tted on
gantries above the road, so they can work day or night.
SPECS speed cameras are located in multiple (at least 2 at a minimum of 200 metres apart) locations along a single
stretch of road for monitoring your average speed along that particular road. So unlike other xed speed cameras
which capture your speed at a certain point in the road, SPECS average speed camera work and track you speed
over a set distance, which may be several miles.
Fixed speed cameras such as Gatso, Truvello, DS2, Watchman, Peak and Speedcurb
Mobile speed cameras - usually laser. Typical uses of laser include motorway bridges, ‘road safety enforcement
camera van’s ‘at the side of the road with the back doors facing you or open, tripod mounted or handheld.
Variable speed cameras appear and are used on many motorways in the UK Unlike other xed cameras and average
speed cameras, variable speed cameras don’t tend to enforce the road speed limit 24/7, but are used when the
motorway’s national speed limit, normally 70mph, is temporarily lowered e.g. 60mph or 50mph. These temporary
speed limits are set and changed. Speed cameras are sited on overhead gantries above each lane of
moving trac, meaning gantries can have up to four or ve individual
speed cameras targeting each lane of the motorway.
To mute an alert press anywhere on the screen during the camear alert, a mute
symbol will appear on the top left hand side of the screen. This mute is temporary
and the unit will revert back to its normal state at the next camera alert.
MySpeed DVR V1.0 GB 08/17

13 • EN
Return to contents
1.0 Main Menu
1.1 Brightness Control
Snooper brightness can be adjusted using this function within the menu. To adjust the volume:
Press the ‘Brightness Control’ icon.
There are 3 settings: Auto, Day and Night.
Auto brightness
If ‘Auto’ is selected the device will automatically switch between the Day and
Night brightness setting. The time the device switches is pre-determined and
cannot be adjusted. This is the default setting.
Day
If you select ‘Day’ you can adjust the day time brightness of the LCD screen.
To adjust the daytime brightness:
Press ’Day’.
Adjust the screen brightness using the
and buttons.
To save the setting press OK.
Night
If you select ‘Night ‘ you can adjust the night time brightness of the LCD screen.
To adjust the night brightness:
Press ’ Night’.
Adjust the screen brightness using the
and buttons.
To save the setting press OK.
Once you have adjusted both ‘Day’ and ‘Night’ brightness you should select ‘Auto’ then OK to save the setting.
If Auto is not selected then the screen will not switch between day and night automatically.
MySpeed DVR V1.0 GB 08/17

14 • EN
Return to contents
1.2 Volume Control
Snooper volume can be adjusted using this function within the menu.
To adjust the volume:
Press the ‘Volume Control’ icon.
To increase the volume press the
icon.
To decrease the volume press the icon.
To test the volume before saving, press the icon.
To reset the volume to the factory default press the icon.
Press ‘OK’ at the bottom of the screen to save your setting.
1.3 Language
Snooper comes with a choice of voice prompts and alerts in several languages.
Changing the language also changes the language of the menu items as well
on the unit. To use this facility:
Press the centre of the screen to enter the menu.
Press the ‘Change Language’ icon.
Using the up and down arrows search for the voice you require.
If you would like to listen to a sample of any voices simply press the ‘Test’
button.
Press ‘OK’ to save your setting.
1.4 Vehicle type
The speed limit of nearly every road across Europe can now be clearly
displayed on your Snooper at all times.
To select the correct speed limits for your vehicle type:
Car - Advisory speed limits for a vehicle will be displayed
Caravan - Advisory speed limits for a vehicle towing a caravan will be displayed
Motorhome - Advisory speed limits for motor homes will be displayed
Truck 3.5t - 7.5t - Advisory speed limits for vehicles from 3.5T to 7.5T will be displayed
Truck 7.5t - 12t - Advisory speed limits for vehicles from 7.5T to 12T will be displayed
Truck > 12t - Advisory speed limits for vehicles greater than 12T will be displayed
Select the option you require by pressing the radio button next to the vehicle type. Press ‘OK’ to save the setting.
WARNING: These are advisory speed limits and are subject to change.
It is the responsibility of the driver to check the road side speed limit signs and
abide by local driving regulations.
1.4.1 Over speed
It is possible for My Speed to alert the driver, via an audible warning, that
they have exceeded the speed limit. To set the over speed warning:
Press the
to increase or decrease the over speed warning
Press OK to save.
MySpeed DVR V1.0 GB 08/17

15 • EN
Return to contents
1.5 Settings
The ‘Settings’ function allows you to customise the visual information provided by the MySpeed screen. To alter any of these
settings:
Press the ‘Settings’ icon where you will see the list of options below.
Select the option you wish to change on the left.
There are number of dierent pieces of information that you can have displayed on the MySpeed screen at any one time as follows:
Note: Text or settings highlighted in Orange are the current options selected.
1.5.1 Time
Use this to change the time format for the clock on the main screen - Select 12H or 24 H
1.5.2 MPH/KMH
This option allows you to switch the information on Snooper between imperial and metric measurement.
1.5.3 Alert sound
If set to Yes a sound will be emitted if the vehicle exceeds the over sped limit (set in section 1.4.1)
Beep tone
Choose between a hard and soft beep tone for the alert sound
1.5.4 Touch Tone
You can choose between the following options:
Yes: The unit emits a conrmation tone each time the screen is touched.
No: This will turn o the conrmation beep when the screen is touched.
1.5.5 Mute
These functions are only applicable if the Aura speed camera database has been downloaded to the MySpeedXL
Smart Mute
When this mode is switched O your unit will alert you via your chosen audible alert as well as visual alerts of xed cameras
on both sides of the road.
When this mode is switched On your unit will alert you via your chosen audible alert as well as visual alerts of xed cameras on
yourside of the carriageway only. The unit will not indicate the presence of cameras or monitoring vehicles on the opposite side
1.5.6 Auto Mute
On: If you are travelling below the posted speed limit the unit will not provide an audible alert only a visual one .
As the unit counts down the distance to the Fixed Speed Safety Camera the alert is visual only. If you are travelling above the
posted speed limit however you will receive both an audible and a visual alert as normal. Once you drop below the posted
speed limit for that Fixed Speed Safety Camera the audible alert will cease and the unit will only provide a visual alert.
O: Irrespective of the vehicle speed or speed limit the unit will emit an audible warning whne a speed camera is
encountered.
MySpeed DVR V1.0 GB 08/17

16 • EN
Return to contents
5.15 Version
This option allows you to view the hardware and software version numbers of your unit. To view this information:
Press the centre of the screen to enter the menu.
Press the ‘Congure’ button.
Press the arrow
twice.
Press the ‘Version icon.
The following screen will be displayed.
Displays the hardware version
Displays the current software version
Displays the current map version
Displays the date the AURA™ camera database was last downloaded*.
Displays the unit serial number
MySpeed DVR V1.0 GB 08/17

17 • EN
Return to contents
5.17 Digital Video Recorder
The My Speed DVR will automatically record the view in front of your vehicle
and will record all audio within range of the built-in microphone using the
integral high denition camera and recording software which can record
continuously.
The built in GPS antenna will automatically record your journey and all video,
audio and trip information can be reviewed later using the Snooper Player
software included on the Micro-SD card.
To enter the DVR menu:
Press the centre of the screen to enter the ‘to’ menu.
Press the ‘Congure’ button.
Press the arrow
twice.
Press the ‘DVR’ icon.
Options in the DVR menu
Key:
1. Lock button.
Press this to manual lock the DVR video le.
NOTE:A locked le can not be overwritten by the DVR and it can
only be deleted by either the DVR PC viewer Or by Formatting the
MicroSD card
2. Playback
Press this button to playback stored images or video les. Use
button (1) to choose between video and still image les. Use
the navigation buttons (3) to scroll through images of video
les. To play video les press OK (3).
NOTE: Images and video footage can also be viewed on a PC, refer to the section PC Viewer for more details.
To exit playback mode press the playback button (2) again.
3. Navigation buttons and OK button - use the up, down, right and left arrows to scroll through stored les. To view les press OK.
4. Main screen. For full screen press anywhere on the main screen and to return to ‘menu view press’ the screen again .
5. Displays the status of the DVR.
6. Displays the date and time
7. Displays the microphone status On or O (o is shown as a microphone with a line through it).
8. Returns you to the MySpeed menu*.
*If DVR View has NOT been launched from quick launch (see below). If not these buttons will return you to the DVR congure screen.
9. Press to enter the DVR setting menu
1 2
3
4
5
6
7
1. Save settings.
2. Return to prevoius screen.
3. Switches audio recording On or O.
4. Changes frame rate - we recommend that is not
changed
5. Adjust the sensitivity of the shock (G) sensor.
6. Switch auto record On or O, if set to ON the DVR
will start to record once the unit is switched On.
7. This will reformat the DVR MicroSD card. CAUTION
this will erase ALL of the data from the DVR
MicroSD card
MySpeed DVR V1.0 GB 08/17

18 • EN
Return to contents
Quick launch menu
To access the DVR view screen without entering the congure
menu (as described above) press the button on top of the device
next to the power button.
PC Viewer
Reviewing video and audio recordings using the Snooper Player.
1. Carefully remove the Micro-SD card from the device and insert it in to a
USB socket on your PC using an appropriate micro SD card reader.
2. A pop-up window should appear on your PC (see right)
If the pop up window does not appear click ‘Start’ then ‘Computer’. Look
for ‘Devices with removable storage’.
The drive containing the Micro-SD card should be in this area.
3. Click on ‘Open folder to view les’.
4. Double click on the ‘Snooper Player’ icon to launch the player.
NOTE: this is NOT an installer and software will not be installed on to your PC .
5. The Snooper player screen will be displayed on your computer screen:
User Tip: if the following pop-up box appears, click ‘Continue without
scanning’. Any ‘broken’ les on the SD card can be repaired using the
Snooper Player software. Clicking ‘Scan and x (recommended)’ may result
in les being deleted and data permanently lost.
MySpeed DVR V1.0 GB 08/17

19 • EN
Return to contents
Snooper Player Explained
1. Click to take a snap shot from any section of video
recorded.
2. Save route data. Select a folder to export it from
the Snooper Player and save it to your PC.
3. Delete routes recorded and no longer required,
from the Snooper Player.
4. Change settings such as Language and set up a
password to protect your data (refer to setting
section).
5. View video footage in ‘slow motion’.
6. Stop video footage playing.
7. Play/pause video footage.
8. Increase speed of video footage.
9. Adjust volume of audio.
10. Run video footage on repeat.
11. Rotates video footage 180 degrees.
12. Export GPS coordinates to your PC in KML format.
13. Hides or displays Google Map view window.
14. Hides or displays G-sensor information.
15. Repairs broken les.
16. Unlock ‘Incident/Event’ video footage.
17. Adjust Brightness, Contrast and Saturation of the
displayed video.
18. GPS Coordinates.
19. Your speed reading. Click to switch between mph and km/h.
20. Video footage.
21. Compass heading.
22. Adjust size of Snooper Player window.
23. Google Map view. Shows route track using coordinates collected and saved by MySpeed DVR antenna.
24. G-sensor information window. Displays any event information such as hard breaking, impacts or sharp turns that might indicate
that an incident has occurred on a recorded route.
25. Main route folders listing.
26. Sub route les listing.
Settings
Click on button 5 to access the settings options:
1. Change the path to Micro-SD card.
2. Formats the Micro-SD card - this will remove all data
from the card.
NOTE: if a MicroSD card which was not supplied with
the MySpeed DVR then it MUST be formatted using
this software BEFORE it is used in the device. We also recommend that all SD cards used for the DVR should be formatted every
6-8 weeks.
3. Firmware upload> If new rmware for the DVR should be released, click on this button and follow the on screen instructions.
Check on the Snooper website for available updates: www.snooperneo.co.uk
4-6 Add or change a password. The password protects the DVR les from deletion by unuthourised users.
7. Saves password setting to the Micro-SD card.
8. Changes the Map.
9. If a replacement Micro-SD card is used it needs to be of a sucient class or speed - click this button to test the card.
10. Changes the Snooper player language.
11. Apply and save any changes made to the setting menu.
12. Click to show Snooper player version number.
20
23
24
25
26
15
1
16
2
17
3 4 5 6 7 8 9 10 11 12 13 14
18 19
21
22
1
2
3
4
5
6
7
8
9
11
10
12
MySpeed DVR V1.0 GB 08/17

20 • EN
Return to contents
10. Bluetooth
This Snooper is equipped with Bluetooth functionality. You can use it as a
hands free system for a mobile phone that is equipped with Bluetooth.
Press the centre of the screen to enter the ‘to’ menu.
Press the ‘Congure’ button.
Press the ‘Bluetooth’ icon.
The phone menu screen is displayed:
Phone book - Opens the phone book.
Dial - Opens the keypad for dialing.
Disconnect - Disconnects devices
Setting - Enters the setting menu.
Search - Enters the search menu for connecting/pairing devices.
Pairing
Please ensure that Bluetooth is active and that the phone is in ‘discovery mode’
(refer to the mobile phone user guide for instructions) before starting
the pairing process.
Not all mobile devices are compatible with all of the features of the Snooper
Press ‘Search’ : the following screen will be displayed.
Press ‘Search’ to discover compatible BT devices.
A list of ‘discovered’ Bluetooth devices will be shown.
Click the device you wish to pair with followed by the Connect button.
Enter the 4 digit (4) PIN number on the BT device to complete the pairing
process. Additional steps may be required on the BT device to compete the
process (refer to the manufacturer for specic instructions).
Once pairing has completed press the return button (5).
Note: some icons are greyed out as no device is
currently connected
Note: All icons are now operable as a device is
connected
1.
2.
3.
4.
5.
MySpeed DVR V1.0 GB 08/17
/