Page is loading ...

User Manual

Streaming HD Recorder
Welcome to use Streaming HD Recorder, this product uses
10-inch IPS high-resolution display, 1080P HD recording, touch
operation, simple UI design, make your use more convenient.
This product not only can be used for HD video recording, but
also provides a high-definition rear view image for the driver.
Let the driver view the rear image of the vehicle at any time.
For a quicker understanding of product features, please read
this instruction in detail.
If you encounter any problems in use, please feel free to
contact us through the shopping platform. We will reply and
solve your problems within 24 hours.
Wish you a pleasant shopping!

Content Guide
1.Test Before Installation .................... 1
2.Auto On & Off.................................... 1
3 . M a i n I n t e r f a c e D i s p l a y . . . . . . . . . 1
4.Video Playback................................... 4
5 . S e t t i n g s . . . . . . . . . . . . . . . . . . . . . . . . . . . . . . . . . . . 5
6.Reverse image................................ 6
7.About Installation............................. 7
8.Attention........................................... 9
9.Product Specifications...................... 10

1
1.Test Before Installation:
Please test the machine before installing. The steps are as follows:
1. Insert the TF card and connect the car charger, it will automatically
turn on;
2. Remove the front lens protector and you can see the effect of the
front lens;
3. Remove the rear lens protector and connect to the host with the
plug;
4. Slide screen left and right to change between front and rear lenses
views,you can see the effect of the rear lens.
2.Auto On & Off:
After installation, the dash cam will boot into the interface start
recording when the car starts. When stall the car, the dash cam will save
the video and automatically shut down after 5 seconds.
Note: When the dash cam is turned on, The rear lens view is
displayed by default, but Front and Rear lenses are recorded at the same
time. Slide screen left and right to change between front and rear lenses
views. If you do not connect the rear lens , it will only show the front
lens view.
3.Main Interface Display:

2
Slide screen up and down to change the range of screen display.
Slide screen left and right to change between front and rear lenses
views.
2 mode of display: ONLY FRONT / ONLY REAR.
1. Recording/Pause: In-recording: , Non-recording: ;
2. Photograph: Click to take a photo;
3. One-key Recording Sound: In-recording sound: ,Non-recording
sound: ;
4. One-key lock: Non-recording, the icon is gray and inoperable,
In-recording, touch the , the video will be locked ,the screen will
show the icon. ( Locked video clips are not deleted by loop).

3
5. Video Playback: In recording , the icon is gray and inoperable, Before
entering this menu, you must pause the recording. For details, see the
[Video Playback] function in the following section;
6. Settings: In recording , the icon is gray and inoperable , Before
entering this menu, you must pause the recording. For details, see the
[Settings] in the following section;
7. Date: Time and date can be set in the [Settings- Clock Settings];
8. G-sensor lock icon: This icon will only be displayed when [Settings→
Protect Level] is turned on, This icon is inoperable;
9. Parking monitoring icon: The icon will only be displayed when the
[Settings→Parking Monitoring] is turned on. The icon is inoperable;
10. Night mode icon: The icon will only be displayed when
[Settings-Night mode] is turned on. The icon is inoperable;
11. Recording icon: In-recording : Flashing ; Non-recording: Do not
show ;
12. Power port: Can be powered by a car charger or other adapter;
13. AV-IN port: Connect the rear camera to this port, and the dash cam
can record the rear view of the vehicle;
14. TF card port: Supports up to 64GB TF card Class 10 .
15. GPS Antenna port: This model does not support this feature.
16. Power button: Short press the power button to change the screen
mode: Normal mode / Screen Saver mode / LCD Power Save, In all three
modes, the dash cam can record normally. Press and hold the power
button (about 2 seconds) to turn off the dash cam.

4
17.Front Lens: Please pull out the front lens before installation to avoid
length limitation and cannot be installed;
4.Video Playback:
Main Interface→Pause recording→Click” ”Enter the video playback
menu, Click“ ”Exit the video playback menu.
1. Front camera normal videos(Can be deleted by loop)
2. Rear camera normal videos(Can be deleted by loop)
3. Front camera locked videos(Cannot be deleted by loop)
4. Rear camera locked videos(Cannot be deleted by loop)
5. Photos
6. Manually lock video
7. Manually delete video
8. Play selected video

5
Note: The locked clip is cannot be deleted cyclically. Please format
and clean it regularly to avoid the memory space occupied by the
locked video being too large, resulting in insufficient memory of the
memory card.
5.Settings:
Main Interface→Pause recording→Click“ ”Enter Settings menu
Click“ ”Exit the setting menu
1. Movie Mode: FHD(1080P) / HD(720P);
2. Movie Clip Time(Loop recording): Set the loop duration, 1/3/5 Min;
3. Night mode: When this function is turned on, the dash cam will
automatically adjust the number of video frames according to the
brightness of the outside light,make night recordings even better;
4. Exposure: Manually adjust the exposure, default 0.
5. Smart LCD Brightness: The screen brightness auto adjustment
function is turned on by default, and the screen will automatically
adjust the display brightness. After turn off this function, you can
manually adjust the screen brightness .
6. Protect Level (G-sensor): you can be adjusted according to the
vibration damping effect of the individual vehicle and the external road
environment, the default level - medium; It is not recommended to set
too high to avoid useless locked video, such as driving through the
speed bump quickly.
7. Parking Monitoring: When this function is turned on, the dash cam
will automatically turn on and record video when the vehicle is

6
subjected to external collision or vibration. The dash cam will be turned
off after about 30 seconds, and the recorded video will be locked;
8. LCD Power Save: 1/3 min or off . For example, set to 1 min, if the
dash cam do not be operated within 1 minute. After 1 minute, the
screen will be automatically turned off , but the dash cam is still
recording . You can click the screen or press the power button to wake
up the screen again. If you do not need the screen saver function, select
Off.
9. Language: Default English, support multiple language choices.
10. Volume: Can set the volume level, or Mute.
11. Flicker: 50Hz / 60Hz Optional.
12. Clock Settings: Clock Settings→Click Setting Date/Time→touch
to set the time and date, Press the OK to confirm.
13. Format SD-Card: Format can erase all video clips on the memory
card (including locked video clips)
14. Reset Setup: Restored to factory settings.
15. FW Version: Software version.
6.Reverse image:
After the rear lens is installed, when the vehicle is engaged in the
reverse gear, the dash cam will automatically switch to the reverse
image , which can clearly check the image of the rear of the vehicle and
improve the safety of the reverse.

7
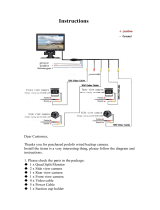
7.About Installation:
The rear lens cable is 6.5 meters and is only suitable for 12V power
supply models. Do not connect the trucks(24V), if not may damage the
rear lens.
<1> dash cam installation:

8
1. Please pull out the front lens before installation to avoid length
limitation and cannot be installed;
2. Insert the TF memory card and remove the recorder lens protector;
3. Attach the dash cam to the original rear view mirror using the
included rubber straps;
4. Insert the car charger cable into the dashcam's power port and the
other end into the car cigarette lighter socket;
5. Start the car, the dash cam will automatically turn on and start
recording;
6. Hide the car charger cable in the car roof and car seals to complete
the wiring;
<2> Rear Lens installation:
1. Insert the rear lens into the dash cam AV-IN port;
2. Cable concealed wiring as shown, or along the roof sealing strip to
the rear of the car;
3. Connect the red power cable of the rear lens to [the positive
electrode of the Reversing Light] (important). Do not connect other

9
lines to avoid abnormal operation;
4. Use the double-sided adhesive tape or the supplied screws to fix the
rear lens near the license plate light;
5. Please remove the rear lens protector, otherwise it will block the
rear lens;
Note: After the rear lens is installed, please adjust the angle of the rear
lens so that the reversing image function has a better rear view angle
when reversing.
Adjustment method:
Step on the brakes, hang into the reverse gear, and then the dash cam
will automatically pop up the reverse image. At this time, you can adjust
according to the reverse screen. If the image is close to the ground,
adjust the rear lens upwards; if the image is close to the sky, adjust the
rear lens down.
8.Attention:
1. The dash cam has a built-in lithium battery, but the battery is mainly
used for memory time and emergency save video. Please connect the car
charger or external power supply for normal use, otherwise the recorder
will automatically shut down after 5 seconds.
2. The dash cam does not support connecting to computer. Please use
card reader connect computer to obtain video files on the TF card. The
dash cam supports up to 64GB CLASS10 TF Card.
3. Please format the memory card regularly to remove the useless video
clips generated by gravity lock (cannot be deleted by loop), such as
quickly passing the speed bump. If the memory card is full, you need to

10
format the memory card;
4. The dash cam is equipped with a dedicated HD camera, and other
style cameras may not be compatible with this device.
5. The new card is used for the first time on the machine, please format
it before use. Method: Main Interface→Pause recording→Click“ ”
→Format SD-Card.
6. The rear lens cable length is 6.5 meters, and it is only suitable for 12V
power supply models. Do not connect the truck 24V, it may damage the
rear lens.
7. If the dash cam automatically turns on and off, pay attention to
whether the parking monitoring function is enabled. When this function
is turned on, the dash cam will automatically start up when it is vibrated.
8. During the recording process, do not pull out the memory card directly.
Please pause the recording and then remove the memory card.
9. The dash cam will generate a certain amount of heat when it is
working. This is normal. Its operating temperature range is 10-140 °F.
9.Product Specifications:
Motherboard configuration
MSTAR ARM Cortex A7 ,Single core
Display
10 Inch LT_WT IPS MIPI 320(RGB)*1280
Lens angle
Front 170°, Rear 140°
Language
English/Español/Português/Pусский/Deutsch/Italian
o/Français//Japanese/ᨳ
Rear lens resolution
Optional 1080P/720P
Front lens recording resolution
1080P
Front lens Photographic resolution
2M
Video format
MOV
Photo format
JPG

11
Loop recording
Seamless looping video
Reverse image
Support
Parking monitoring
Support
Synchronous double recording
Support
Recording Sound
Support
One-key lock
Support
Time watermark
Support
Gravity sensor
Support
Photo mode
Only support front lens to take pictures
Frequency
50HZ/60HZ
Car power supply DC
5V/ 2A
Operating temperature
10-140 °F
Memory card
TF (Max support 64GB), Recommend class 10
Accessories
Dash Cam / Car charger / USB cable /Rubber
Straps / Manual / Rear lens / Packing box
Thank you again for choosing our Streaming HD Recorder!
If you encounter any problems during use, please feel free to
contact us through the shopping platform. We will do our best
to solve your problem. Thank you for your support.
/