Page is loading ...

INSTALLATION AND OPERATING INSTRUCTIONS
72-0113 08-03-18 4211-149 7014363 314 SYRA 77 D
Page 1
WARNING
SECTION 1: GENERAL INFORMATION
Do not take a sauna if using
alcohol, drugs or
medications.
Pregnant women or persons
with poor health should
consult their physician before
using any sauna.
Caution re hazard: Do not
use the sauna room for
drying clothes, bathing suits,
etc. Do not hang towels
above heater or place any
object other than the rocks
supplied on the heater. If any
darkening of the wall around
the heater is noticed
discontinue sauna use
immediately.
Inspect sauna regularly for
required maintenance to
heater, control and benches.
Replace wood surfaces
which show any signs of
deterioration.
The heater gets extremely hot
during operation and should
not be touched or burns may
result.
Minors should be adequately
supervised whenever near a
hot or warming sauna.
Sauna Control Models Premium, Premium Club,
A60, and A60 Club Control
(Type # 1601-33 and 1601-33-1)
Read all instructions carefully before installation. Please leave all
instructions and warranty with the owner.
WARNING
Prolonged exposure to elevated temperatures is capable of inducing
hyperthermia. Hyperthermia occurs when the internal temperature of the
body reaches several degrees above the normal body temperature of
98.6°F. The symptoms of hyperthermia include an increase in the normal
temperature of the body, dizziness, lethargy, drowsiness, and fainting. The
effects of the hyperthermia include failure to perceive heat, failure to
recognize the need to exit the room, unawareness of impending hazard,
fetal damage in pregnant women, physical inability to exit the room and
unconsciousness.
WARNING
The use of alcohol, drugs, or medication is capable of greatly increasing
the risk of fatal hyperthermia.
These controls are ETL approved by Intertek for permanent installations
and electrical connections. Refer to the heater “Installation and Operation
Instructions” for complete information about the electrical wiring. All wiring
must be performed in accordance with national and local codes.
Premium / A60 Control
1601-33 or 1601-33-1

INSTALLATION AND OPERATING INSTRUCTIONS
72-0113 08-03-18 4211-149 7014363 314 SYRA 77 D
Page 2
A. - Off Button
B. - On Button
C. - Set Point Room Temperature
D. - Current Room Temperature
E. - Home Button
F. - Temperature Button
G. - Favorites Button
H. - Calendar Button
I. - Settings Button
A. B.
C.
D.
E.
F.
G. H. I.
To Start Immediately
1. Press the icon in the upper right corner
2. Icon will change color
3. System has started
Note: The sauna room set point temperature is D.
The sauna room current temperature is E.
SECTION 2: PREMIUM/A60 CONTROL (1601-33 or 1601-33-1) OPERATION
Home Screen
The Home button: touch this to return to the main screen. Here you will see the current temperature in the sauna room, the
temperature setting, the remaining sauna time (if any) and the time of day. Touch the screen to show the sauna length and Start
on/off buttons, too.
The Settings button: touch this to display the Settings screen. Here you can adjust the temperature and duration for the current
bath. You can also manually turn on the installed options when the bath is on (and turn on some options, such as Lights, when the
sauna is off). You can also save your settings as a favorite so you can always have them available for your sauna without having to
change settings after someone else has a sauna.
The Favorites button: Here you can select a sauna with your favorite settings, once you've saved it.
The Calendar button: Here you schedule a sauna session to start and run at a later time. You can select by the day of the week or
using a calendar month and select for one time sauna or recurring.
The Tool button: here you make the many selections for what functions and options are available to be used, and much more.
The Change Menu arrows are used to move between related menu screens. Press < to return to the previous screen or > to
continue to the next one.

INSTALLATION AND OPERATING INSTRUCTIONS
72-0113 08-03-18 4211-149 7014363 314 SYRA 77 D
Page 3
SECTION 2: PREMIUM/A60 CONTROL (1601-33 or 1601-33-1) OPERATION, Continued
Temperature and Room Light
Change temperature by pressing +
or - to desired temperature.
Press the Lighting icon to turn On
or Off the room light.
Press Screen
Press button in upper right
corner to start sauna.
Temperature Screen Options
Sauna Duration
Change sauna length by pressing
the Stop After button
Change to desired length (normal
setting is 1 hour)
Press the to accept the change
Creating Favorites
Ensure temperature and sauna
length are correct.
Press Save as Favorite
Type in Name and press
Press the to accept information.
Favorites Screen Options
Favorites
Select the Favorite to edit or start
program
Favorite’s Settings
Click on Title to change name
Change temperature by pressing +
or - to desired temperature.
Change to desired length (normal
setting is 1 hour)
Press to activate program.
Home Screen
Home Screen will appear with
sauna heater started to favorites
setting.

INSTALLATION AND OPERATING INSTRUCTIONS
72-0113 08-03-18 4211-149 7014363 314 SYRA 77 D
Page 4
Calendar Screen Options
SECTION 2: PREMIUM/A60 CONTROL (1601-33 or 1601-33-1) OPERATION, Continued
Adding Custom Event
Click the date for the event.
Adding Custom Event
Click the + to add event.
Adding Custom Event
Select the sauna duration
and temperatures.
Press the to accept
information.
Calendar Showing Event
Scheduled
The indicated a programs
is scheduled on the date.
Adding Recurring Event
Select the button at the top of screen
to chose Recurring Event
Click the day of the week for the event.
Select the + to add event.
Adding Recurring Event
Select the sauna duration and temperatures.
Press the to accept information.
Next screen will show 1 event created for the day of the week.

INSTALLATION AND OPERATING INSTRUCTIONS
72-0113 08-03-18 4211-149 7014363 314 SYRA 77 D
Page 5
Calendar Screen Options
WiFi Setup Screen
SECTION 2: PREMIUM/A60 CONTROL (1601-33 or 1601-33-1) OPERATION, Continued
Setting Screen Options
Viewing Scheduled Events
Click the in the upper
right corner to see events.
Setting Options
Select the icon in the lower right corner of the control to access
settings.
Connect Control to
WiFi Network
Select the WiFi option
from Setting Screen
Select Network Option
Select Name
Select Name and name
the Control
Enter Name and select
to accept.
Choose WiFi Network
Select Scan to see all
Wi Networks
Select network to
connect
Connect Control to
WiFi Network
Select Password
Enter password and
select
to accept
WiFi Network
Check mark indicates
control is connected to
network
Networking: This control can connect to a Local WiFi Network to be operated by a Phone Application or PC Application.
Download the application from the Google Playstore or Apple Store. Search for sauna brand name and download the free
application.

INSTALLATION AND OPERATING INSTRUCTIONS
72-0113 08-03-18 4211-149 7014363 314 SYRA 77 D
Page 6
SECTION 3: INSTALLATION PREMIUM/A60 CONTROL (1601-33 or 1601-33-1)
CONTROL OPTIONS: This heater has two different control options. A Premium/A60 Control (1601-33 or 1601-33-1) or
Trend/A30 Control (1601-31 or 1601-31-1) can be connected to the heater. This heater can support both at the same time as
another option.
INSTALLATION ROUGH IN: Place the control inside or outside the sauna room. If the control is installed inside a sauna room,
the top of the unit cannot be higher than 48 inches above oor. Maximum control cable length is 100 feet.
String the provided low voltage control cable through 1” holes in the wall studs or ceiling joists from the control location to the
heater. Do not use staples to secure the low voltage cable, it may damage the cable!
Plug the control cable into the control and TEST the control BEFORE mounting!!
Premium/A60 Control can be SURFACE MOUNTED or RECESSED MOUNTED.
SURFACE MOUNTING CONTROL: After testing is complete, CLEAN the mounting surface to ensure it is free from dust.
Remove the adhesive tape from the back of the control, push any excess cable into wall cavity and press the control to the
mounting surface. (Do not use the Mounting Box or Trim Ring for this installation.)
RECESS MOUNTING: See page 9 for information.
For troubleshooting or service questions call 1-888-780-4427 and ask to speak with service. Prior to calling,
please have the Model and Type number available. You may also email us at
techsuppor[email protected]
SECTION 4: TROUBLESHOOTING
Trim Ring
Control
Recess Mounting Box

INSTALLATION AND OPERATING INSTRUCTIONS
72-0113 08-03-18 4211-149 7014363 314 SYRA 77 D
Page 7
SECTION 2: PREMIUM/A60 CONTROL PHONE APPLICATION
Phone Application Setup Screen
Application Home Screen
Select the Settings icon.
Network
Select network
Choose Sauna Control
Phone must be connected to the
same network as Sauna Control
Press Find System
Choose Control
Connect to Control
Select connect
Network Screen to Home Screen
Select the < in upper left corner to go back on screen to Network Screen
Select the < in upper left corner to go back on screen Home Screen.

INSTALLATION AND OPERATING INSTRUCTIONS
72-0113 08-03-18 4211-149 7014363 314 SYRA 77 D
Page 8
Page Intentially Left Blank
SECTION 5: INSTALLATION PREMIUM/A60 CONTROL (1601-33 or 1601-33-1) CONT.

INSTALLATION AND OPERATING INSTRUCTIONS
72-0113 08-03-18 4211-149 7014363 314 SYRA 77 D
Page 9
SECTION 5: INSTALLATION PREMIUM/A60 CONTROL (1601-33 or 1601-33-1) CONT.
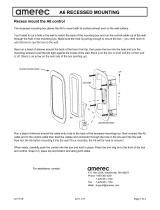
Recessed Mounting For the Premium Control
The recessed mounting box allows the control to mount with its surface almost even to the wall surface. Print this page to “Actual” Size on
Printer Options. (This will ensure the size of the opening is correct). Cut out the middle of this page on the dotted lines. The hole will be the
size of the mounting box. Insert the mounting box in the hole of this page to ensure it is the correct size.
Trace the paper cut out on the wall. Cut a hole in the wall to match the inner dotted line for the mounting box. Run the control cable out of
the wall through the hole in the mounting box. Ensure the hole is just big enough to mount the box. Push the mounting box into the hole and
turn the mounting screws to pull the tab tight against the inside of the wall. Ensure the box is level and the correct end is UP (there is an
arrow on the wall side of the box pointing up).
Connect the Control coupler to the control cable then feed the cables and connector through the hole in the box and into the wall. Test the
Control before mounting it into the wall! Once mounted, the Control will be hard to remove!
When ready, apply a small amount silicone to the back of the control, carefully push the control into the box, and hold in place.
Note: Do not use the adhesive tape between control and mounting box. It will be too think and will cause issues with snapping
on the Trim Ring.
Press the trim ring on to the front of the box and control. Snap it in, place top and bottom and along both sides.
Print Page as “Actual” Size
Cut on Dotted Line and remove this part of page
Trace This Inner Opening on the Wall
Solid Line represents the outline of the housing lip.
Print page to “Actual Size”;
do not select “Fit” to page
on printer Page Sizing.
Level Line
/