
Date 2015-12-03 Rev. 1 Factory: HSIVIE
E
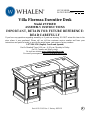
Villa Florenza Executive Desk
Model # VF66ED
ASSEMBLY INSTRUCTIONS
IMPORTANT, RETAIN FOR FUTURE REFERENCE:
READ CAREFULLY
If you have any questions regarding assembly or if parts are missing, DO NOT return this item to the
store where it was purchased. Please call our toll-free customer service number and have your
instructions and parts list ready to provide the model name, part name or factory number:
1-877-494-2536 (English, French and Spanish)
Pacific Standard Time: 8:30 a.m. - 4:30 p.m., Monday to Friday
(In US, Canada, and Mexico only)
Or visit our website www.whalenfurniture.com
Or e-mail your request to parts@whalenfurniture.com
LOT NUMBER:
DATE PURCHASED: / /

2
E
1. This product is for indoor domestic use only.
2. Please read the Assembly Instructions prior to assembling this product.
3. To avoid damage, assemble the product on a non-abrasive surface such as a carpet surface.
4. Refer to your assembly manual for maximum weight capacities. Load drawers and shelves from the
bottom to the top. Place heavier items in lower drawers and/or shelves. Unload drawers and shelves from
the top to the bottom before moving the furniture.
5. Do not push furniture, especially on carpeted floor. Have someone help you lift the item and place it in its
new location. Remove any glass tops or shelves before moving.
MANUFACTURER: Whalen Furniture Manufacturing
CATALOG: Villa Florenza Executive Desk
(VF66ED)
MADE IN VIETNAM
MAXIMUM RECOMMENDED WEIGHT LOADS
THIS UNIT IS INTENDED FOR USE ONLY WITH THE MAXIMUM
WEIGHTS INDICATED. USE WITH LOAD HEAVIER THAN THE MAXIMUM
WEIGHTS INDICATED MAY RESULT IN INSTABILITY, CAUSING POSSIBLE INJURY.
MAXIMUM LOAD 181.4 kg / 399.9 lb
MAXIMUM LOAD 4.6 kg / 10.1 lb
MAXIMUM LOAD 22.7 kg / 50 lb
MAXIMUM LOAD 13.7 kg / 30.2 lb
MAXIMUM LOAD 6.9 kg / 15.2 lb
Please make sure you have all parts before beginning assembly. Do not fully tighten all bolts until you
finish assembling all parts. Once assembled, go back and fully tighten all bolts. This will make the assembly
easier. We recommend using two people for assembly.
GENERAL INFORMATION & TIPS

3
E
FURNITURE POWER DISTRIBUTION CENTER
IMPORTANT SAFETY INSTRUCTIONS
Carefully read all instructions installing and operating fixture.
IF YOU HAVE ANY QUESTIONS REGARDING THE PROPER INSTALLATION
CONSULT A QUALIFIED ELECTRICIAN.
TO REDUCE THE RISK OF FIRE, ELECTRICAL SHOCK OR
INJURY TO PERSONS, PLEASE FOLLOW THE NEXT:
• Use only insulated staples or plastic ties to secure the cords.
• Route and secure cords so that they will not be pinched or damaged when the desk is pushed to the wall.
• Make sure cord is not pinched between desk and floor.
• Use the unit for indoor use only.
• Do not use an extension cord to connect this unit to a wall outlet.
• Use power strip with integral over current protection to supply other electrical devices or accessories in
desk.
• This unit must be plugged into a properly grounded outlet.
• The socket-outlet shall be installed near the equipment and shall be easily accessible.
• Maximum load of connected equipment cannot exceed a total of 12 amps.
• Do not open or disassemble this unit for any reason.
SAVE THESE INSTRUCTIONS

4
E
Furniture Power Distribution Unit User Guide
Please read this user guide before installing and using your power distribution center.
INTRODUCTION
The integrated 3-Port USB 2.1 Desktop Hub offers 480
Mbps high transmission rate and can connect up to three
devices, such as a digital camera, MP3 player, cell
phone or wireless mouse. With plug-and-play capability,
you can add a device without restarting your computer.
SPECIFICATIONS
cULus listed, rated for: 120 V AC, 12 A, 60 HZ
INSTALLATION
The hub installs automatically. Once the default drivers are
installed, the red LED status indicator light will glow and
you can connect devices to the hub.
NOTES
• To reach USB 2.1 high speed, your computer or host
adapter card must support USB 2.1. This hub is also
backwards compatible with USB 1.1.
• When using the hub with a computer that has a version
1.1 USB interface, all of the devices attached to the hub
will run at USB 1.1 speed.
NOTE: This equipment has been tested and found to
comply with the limits for a Class B digital device,
pursuant to part 15 of the FCC Rules. These limits are
designed to provide reasonable protection against harmful
interference in a residential installation. This equipment
generates, uses and can radiate radio frequency energy and,
if not installed and used in accordance with the instructions,
may cause harmful interference to radio communications.
However, there is no guarantee that interference will not
occur in a particular installation.
If this equipment does cause harmful interference to radio
or television reception, which can be determined by turning
the equipment off and on, the user is encouraged to try to
correct the interference by one or more of the following
measures:
• Reorient or relocate the receiving antenna.
• Increase the separation between the equipment and receiver.
• Connect the equipment into an outlet on a circuit
different from that to which the receiver is connected.
• Consult the dealer or an experienced radio/TV technician
for help.
This device complies with Part 15 of the FCC Rules.
Operation is subject to the following two conditions: (1)
This device may not cause harmful interference, and (2)
this device must accept any interference received,
including interference that may cause undesired
operation.
This Class B digital apparatus complies with Canadian
ICES-003.
SYSTEM REQUIRMENTS
• Windows
®
98SE / ME / 2000 / XP / Vista / 7 / 8 / 10
• Pentium
®
233 MHz or higher
• At least 64 MB RAM
• Available USB port
• Mac
®
OS 9 or later for USB 1.1 mode
• Mac
®
OS X or later for USB 2.1 mode
WARNINGS
! Your hub automatically shuts off any port with a low
or excessive current.
! If USB Hub Current Limit Exceeded appears on your
screen, disconnect the affected USB device, click
Reset on the screen, and reconnect the device.
! If one of your hub ports is disabled, but USB Hub
Current Limit Exceeded does not appear:
• Disconnect and reconnect the affected device.
• If the port still does not work, disconnect the hub
and the device, and then reconnect.
! Keep your desktop hub dry; if it gets wet, wipe it dry
immediately.
! Do not modify or tamper with your desktop hub’s
internal components. It may cause a malfunction and
invalidate its warranty.
! Modifications not approved by the party responsible
for compliance could void user’s authority to operate
the equipment.
Windows is a trademark of Microsoft corporation in the U.S. and/or
other countries.
Pentium is a trademark of Intel Corporation in the U.S. and/or other
countries.
Mac OS 9 and OS X are trademarks of Apple Inc., registered in the
U.S. and other countries.
Product: Furniture Power Distribution Unit
Model No: TY111
Company: Whalen Furniture Mfg., Inc.

5
E
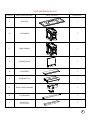
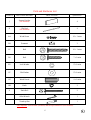
Parts and Hardware List
PART # PART DESCRIPTION PART FIGURE QUANTITY
A Desk Top
1
B Left Pedestal
1
C Right Pedestal
1
D Modesty Panel
1
E Fixed Shelf
1
F Keyboard Tray
1
G Power Center Container
1
H Top Stretcher
1
I
Pencil Tray
(Pre-attached)
2

6
E
Parts and Hardware List
PART # PART DESCRIPTION PART FIGURE QUANTITY
J
Drawer Divider
(Pre-attached)
4
K
File Rod
(Pre-attached)
4
AA Wood Screw
16 + 1 extra
BB Grommet
2
CC Bolt
10 + 1 extra
DD Bolt
7 + 1 extra
EE Lock Washer
17+1 extra
FF Flat Washer
17+1 extra
GG Wood Dowel
4 + 1 extra
HH Knob
2
II Knob Bolt
2
Allen Wrench
1
Touch-up Pen
1
Tools required: Allen wrench (included) and Phillips screwdriver (not included).

7
E
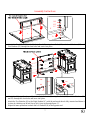
Assembly Instructions
1. Attach the Fixed Shelf (E) to the Modesty Panel (D) using three Bolts (DD) with Lock Washers (EE) and
Flat Washers (FF) through the cleat holes and screw into place.
2. Attach the Modesty Panel assembly to the Right Pedestal (C) using five Bolts (CC) with the Washers (EE
and FF) through the cleat holes and screw into place.
3. Attach the Top Stretcher (H) to the Right Pedestal (C) with the end wood dowels fully inserted and fasten it
in place by inserting one Wood Screw (AA) from top through figure “8”.
4. Repeat the same procedure to attach the Left Pedestal (B) at the opposite end.
B
C
D
E
H
D/E
B/C
FF
CC
EE
H
B/C
AA
D
E
E
D
FF
EE
DD

8
E
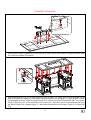
Assembly Instructions
5. Fit the Power Center Container (G) to the cut out of Desk Top (A) and attach it in place with four Bolts
(DD) and four Washers (EE and FF).
6. Before placing Desk Top (A) in place make sure that the figure “8” (metal piece you see attached on top
ends of the panels) is facing out. If necessary loosen the screw so that the figure “8” can be pivoted outward
for attachment to the top. Insert the Wood Dowels (GG) into the top holes of Pedestals(B and C) as a guide.
Place the Desk Top (A) on the installed Wood Dowels (GG). Proceed to screw from underneath by using
the Wood Screws (AA) through figure “8” and the metal brackets on the Modesty Panel (D) to attach the
Top.
FF
EE
DD
A
G
A
G
AA
A
B
C
D
H
E
G
A
B/C/D
GG

9
E
Assembly Instructions
7. Place two Grommets (BB) over the top holes of the Desk Top (A).
8. If necessary, adjust the pre-attached Floor Levelers on the bottom of the Pedestals to level the desk.
9. Attach the Knobs (HH) to the front side of the Keyboard Tray (F) using the Knob Bolts (II) provided and
tighten with a Phillips screwdriver.
10. Extend the Sliding Tracks on the Pedestals (B and C) all the way forward (including ball bearing cart).
Then align the Slide Runners on the Keyboard Tray (F) with the Slide Tracks and push the drawer carefully
inside until it stops.
NOTE: If the keyboard tray does not go in smoothly, please take it out and repeat the step. If you need to
remove the drawer, please pull the drawer all the way out, then simultaneously push the plastic release lever
of the ball bearing slide up on one side and down on the other side, and then pull it completely out.
11. When you open the Keyboard Tray (F), you can flip down the keyboard front by pushing down the Drop-
down Latches on the keyboard front hardware on both ends.
12. The integrated power centre is pre-attached inside the Power Center Container (G) for your convenience.
Plug the power centre into a properly grounded outlet. Open the flip panel and you can connect devices to
the power centre.
NOTE:
The Key and File Rod are
tied together when shipping.
B
C
F
A
B/C
F
BB
BB
B/C
F
HH
II
A
B
C
F
G
I
J
K

10
E
Care and Maintenance
Use a soft, clean cloth that will not scratch the surface when dusting.
Use of furniture polish is not necessary. Should you choose to use polish, test first in an inconspicuous area.
Using solvents of any kind on your furniture may damage the finish.
Never use water to clean your furniture as it may cause damage to the finish.
Always use coasters under beverage glasses and flowerpots.
Liquid spills should be removed immediately. Using a soft clean cloth, blot the spill gently. Avoid rubbing.
Always use protective pads under hot dishes and plates. Heat can cause chemical changes that may create
spotting within the furniture finish.
In the event that your furniture is stained or otherwise damaged during use, we recommend that you call a
professional to repair your furniture.
Check bolts/screws periodically and tighten them if necessary.
Further advice about wood furniture care
It is best to keep your furniture in a climate-controlled environment. Extreme temperature and humidity
changes can cause fading, warping, shrinking and splitting of wood. It is advised to keep furniture away from
direct sunlight as sun may damage the finish.
Proper care and cleaning at home will extend the life of your purchase. Following these important and helpful
tips will enhance your furniture as it ages.
A Touch-up Pen has been provided to repair any small nicks or scratches that may occur during assembly or
shipping.
We hope you enjoy your purchase for many years.
Thank you for your purchase!
QUALITY GUARANTEE
We are confident that you will be delighted with your Whalen Furniture purchase.
Should this product be defective in workmanship or materials or fail under normal use, we will repair or
replace it for up to one (1) year from date of purchase. Every Whalen Furniture product is designed to meet
your highest expectations. We guarantee that you will immediately see the value of our fine furniture.
This warranty gives you specific legal rights and you may also have other rights which vary from State to State.
AUSTRALIA: Our goods come with guarantees that cannot be excluded under the Australian Consumer
Law. You are entitled to a replacement or refund for a major failure and for compensation for any other
reasonably foreseeable loss or damage. You are also entitled to have the goods repaired or replaced if the goods
fail to be of acceptable quality and the failure does not amount to a major failure.
Customer Service: 1-877-494-2536
(English, French and Spanish)
Pacific Standard Time: 8:30 a.m. - 4:30 p.m., Monday to Friday
(In US, Canada, and Mexico only)
www.whalenfurniture.com
MADE IN VIETNAM / FABRIQUÉ AU VIETNAM / HECHO EN VIETNAM
-
 1
1
-
 2
2
-
 3
3
-
 4
4
-
 5
5
-
 6
6
-
 7
7
-
 8
8
-
 9
9
-
 10
10


Ask a question and I''ll find the answer in the document
Finding information in a document is now easier with AI
Related papers


Other documents
-
 ClosetMaid 1374 User manual
-
Hooker 638-10006 Assembly Instructions
-
Bremen Cabinetry SE-W1842 Installation guide
-
 Lauraland L Shaped Desk 55", Corner Computer Desk, Laptop Study Table, Morden Workstation, Gaming Table, Oak Installation guide
-
Convenience Concepts 203534GY User manual
-
Home Decorators Collection BF-25656-WA Installation guide
-
-
-
Costway HV10009 User manual
-

