Toro Debris Kit, STX-38 EFI Stump Grinder Installation guide

Type
Installation guide

Toro Debris Kit, STX-38 EFI Stump Grinder is designed to enhance your grinding experience by effectively managing debris and dust while you work. The kit includes a cylinder cover, hose cover, and hydraulic cover that work together to protect vital components of your stump grinder from debris accumulation. Additionally, the kit features a new muffler guard that safeguards against hot surfaces, ensuring your safety during operation. With this kit, you can expect cleaner performance, extended component life, and a safer grinding process.

Toro Debris Kit, STX-38 EFI Stump Grinder is designed to enhance your grinding experience by effectively managing debris and dust while you work. The kit includes a cylinder cover, hose cover, and hydraulic cover that work together to protect vital components of your stump grinder from debris accumulation. Additionally, the kit features a new muffler guard that safeguards against hot surfaces, ensuring your safety during operation. With this kit, you can expect cleaner performance, extended component life, and a safer grinding process.

CV
FormNo.3436-227RevB
DebrisKit
STX-38EFIStumpGrinderwithIntelli-Sweep
®
ModelNo.140-3624
InstallationInstructions
Installation
LooseParts
Usethechartbelowtoverifythatallpartshavebeenshipped.
ProcedureDescription
Qty.
Use
1
Nopartsrequired
Preparethemachine.
Muferguard
1
Bolt(5/16x2-1/2inches)
2
2
Locknut(5/16inch)
2
Replacethemuferguard.
Topbracket1
Bottombracket1
Leftbracket
1
Hookandloopfasteners(fromcylinder
cover)
4
3
Hookandloopfasteners(fromhose
cover)
4
Drillthebracketholes.
Cylindercover
1
Hosecover1
Bolt(1/4x1inch)
5
Nut(1/4inch)
5
4
Hydrauliccover1
Installthecovers.
Guardmount
1
Clampplate
2
Bolt(5/16x1-1/4inches)
2
5
Locknut(5/16inch)
2
Replacetheguardmount.
©2020—TheToro®Company
8111LyndaleAvenueSouth
Bloomington,MN55420
Registeratwww.T oro.com.
OriginalInstructions(EN)
PrintedintheUSA
AllRightsReserved
*3436-227*B
1
PreparingtheMachine
NoPartsRequired
Procedure
1.Parkthemachineonalevelsurface.
2.Engagetheparkingbrake.
3.Raisethegrinderandsupportitusing
jackstands.
4.Shutofftheengineandremovethekey.
5.Allowtheenginetocoolcompletely.
WARNING
Contactwithhotsurfacesmaycause
personalinjury.
Keepyourhands,feet,face,clothingand
otherbodypartsawaythemuferand
otherhotsurfaces.
2
ReplacingtheMufer
Guard
Partsneededforthisprocedure:
1
Muferguard
2
Bolt(5/16x2-1/2inches)
2
Locknut(5/16inch)
Procedure
1.Removeanddiscardtheexistingmuferguard
andfasteners(Figure1).
Important:Ensurethatyoudonotdamage
thefuellineasyouremovetheguard.
g309583
Figure1
1.Bolt(4)3.Washer(4)
2.Muferguard4.Nut(4)
2.Installthenewmuferguardusing2bolts(5/16
x2-1/2inches)and2nuts(5/16inch)intherear
holes(Figure2).
g309582
Figure2
1.Muferguard3.Nut—5/16inch(2)
2.Bolt—5/16x2-1/2inches
(2)
2
3
DrillingtheBracketHoles
Partsneededforthisprocedure:
1Topbracket
1Bottombracket
1
Leftbracket
4
Hookandloopfasteners(fromcylindercover)
4
Hookandloopfasteners(fromhosecover)
Procedure
Figure3andFigure4showthe2coversandthe
lengthsoftheirhookandloopfasteners.
g323225
Figure3
Cylindercover
1.8.9cm(3-1/2inches)3.15.2cm(6inches)
2.22.2cm(8-3/4inches)4.22.9cm(9inches)
g323226
Figure4
Hosecover
1.15.6cm(6-1/8inches)3.13.3cm(5-1/4inches)
2.10.8cm(4-1/4inches)4.8.9cm(3-1/2inches)
1.Removetheexistinghydrauliccover(Figure5).
Retainthebolts.
g309727
Figure5
1.Bolt—5/16x1-1/4inch(2)
2.Existinghydrauliccover
3
2.Placetheleftbracketatthebottomofthewelds
ofthewraprod.Usingthebracketasatemplate,
markanddrillholes(1/4inchdiameter)intothe
frame(Figure6.
g323307
Figure6
1.Leftbracket
3.Wraprod
2.Drillahole(1/4inch
diameter)here.
3.Usingtheupperandlowerbracketsas
templates,markanddrillholes(1/4inch
diameter)intotheframe(Figure7).
g323100
Figure7
1.Drillahole(1/4inch
diameter)here.
3.Lowerbracket
2.Upperbracket
4.Cleanthesurfacesontheframenearthe
hydrauliccylinderandthehydraulichoses.
5.Removethefastenerstripsfromthecylinder
andhosecovers,removethebackings,and
adherethestripstotheframeandhydraulic
cover(Figure8andFigure9).Trimthefastener
stripsasneeded.
Note:Donotinstallthe15.6cm(6-1/8inch)
fastenerstripfromthehosecoveratthistime.
g323099
Figure8
FastenerStripLocationsforCylinderCover
1.15.2cm(6inch)fastener
strip
3.8.9cm(3-1/2inch)
fastenerstrip
2.22.9cm(9inch)fastener
strip
4.22.2cm(8-3/4inch)
fastenerstrip
g323224
Figure9
FastenerStripLocationsforHoseCover
1.8.9cm(3-1/2inch)
fastenerstrip
3.10.8cm(4-1/4inch)
fastenerstrip
2.13.3cm(5-1/4inch)
fastenerstrip
4
4
InstallingtheCovers
Partsneededforthisprocedure:
1
Cylindercover
1Hosecover
5
Bolt(1/4x1inch)
5
Nut(1/4inch)
1Hydrauliccover
Procedure
1.Installthehosecoveraroundthehoses,withthe
taperedendup(Figure10).
g323098
Figure10
1.Hosecover
2.Bolt(1/4x1inch)andnut
(1/4inch)
2.Aligntheholesonthebottomofthecoverwith
theholesintheframe.Adhereittothehookand
loopfastenerstrip.
3.Securethecoverusingtheleftbracket,2bolts
(1/4x1inch),and2nuts(1/4inch)asshown
inFigure10.
4.Securethecovertothehosesusingthecable
tie.
5.Aligntheholesinthecylindercoverwiththe
holesintheframeandadhereittothehookand
loopfastenerstrips(Figure11).
Note:Thetaperedendofthecoverextends
overthecylinderrod.
g322789
Figure11
Cylindercoverattachedtoframefastenerstrips
6.Wrapthelongerlengthsofthecoverbetween
thehydrauliccylinderandgrinderpivotand
adherethemtogether(Figure12).
g322790
Figure12
1.Longerlengthoncylindercover
5
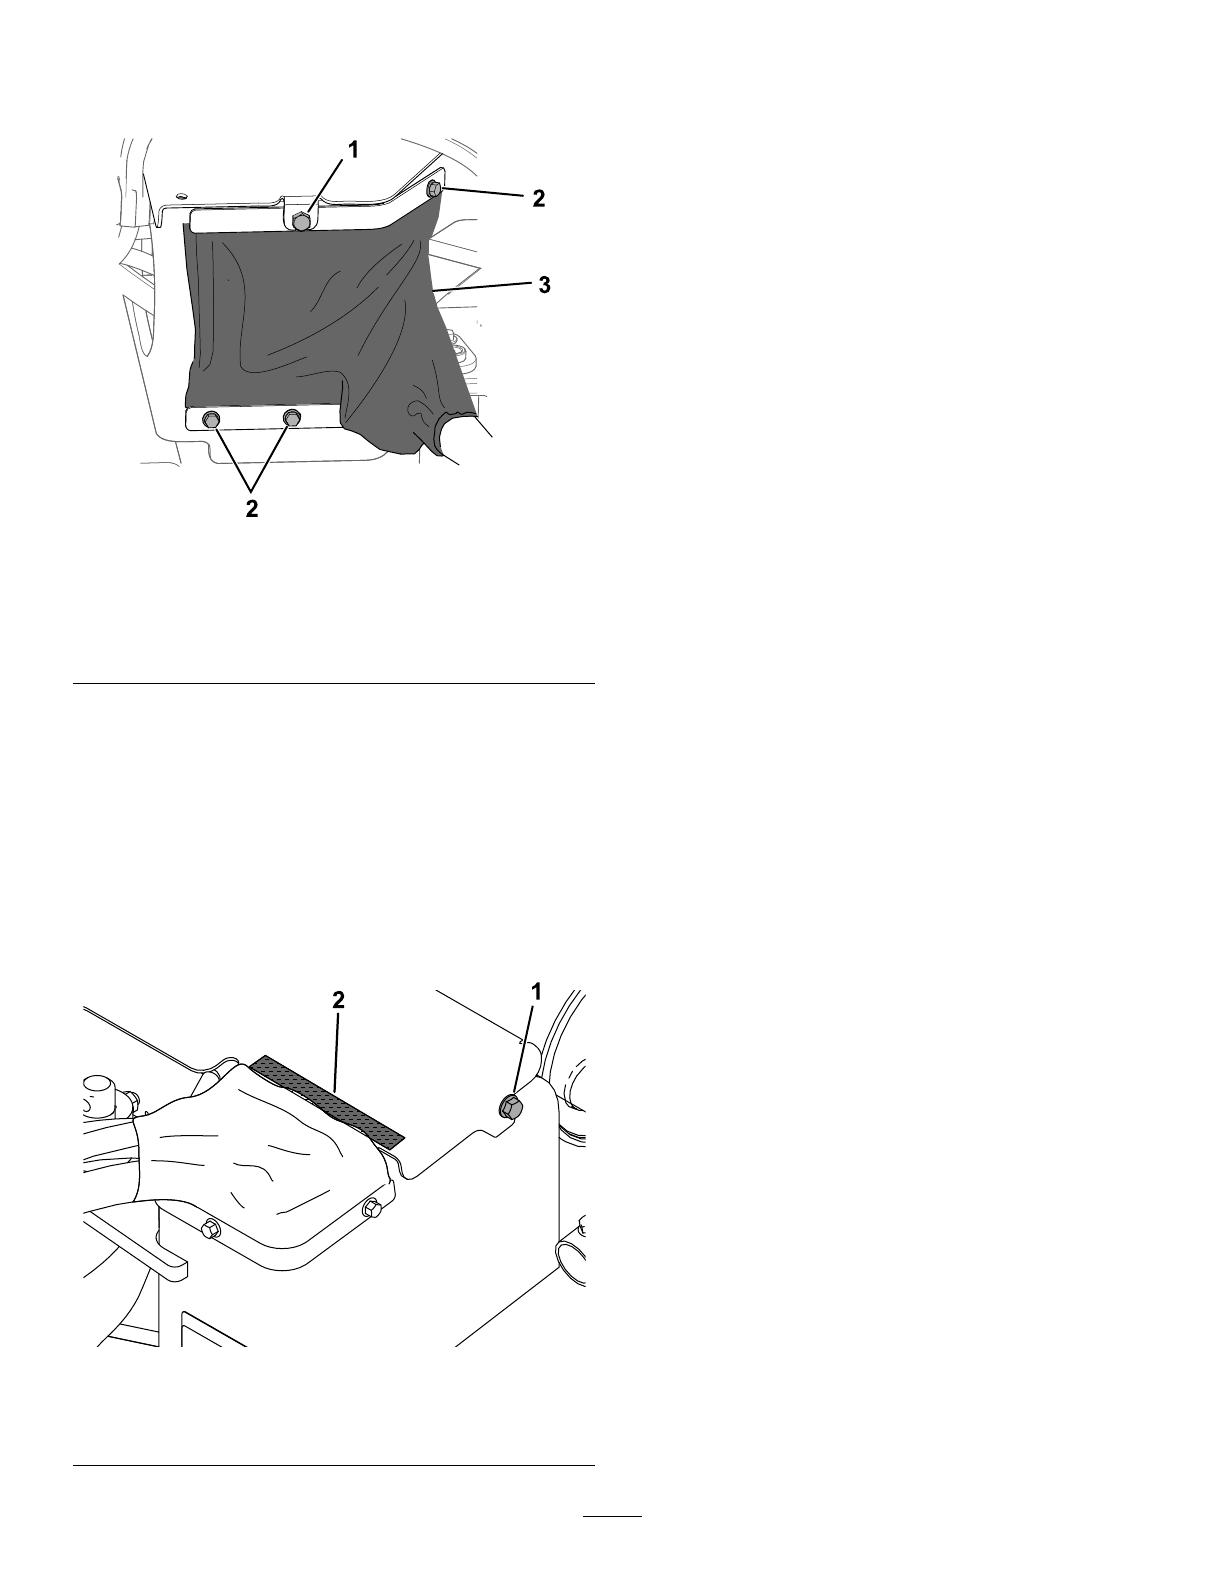
7.Securethebottomofthecoverusingthebottom
bracket,2bolts(3/8inchx1-1/4inch),and2
nuts(1/4inch)asshowninFigure13.
g309895
Figure13
1.Existingbolt(3/8inchx
1-1/4inch)
3.Cylindercover
2.Bolt(1/4x1inch)andnut
(1/4inch)
8.Placethehydrauliccoverontheframe,and
securethetopofthecylindercoverusingthe
topbracket,2bolts(5/16x1-1/4inch,previously
removed,and1/4inchx1-1/4inch)and1nut
(1/4inch)asshowninFigure13.
Note:Positionthetabonthehydrauliccover
overthetopbracket.
9.Securethehydrauliccoverusing1bolt(5/16
x1-1/4inch,previouslyremoved)asshownin
Figure14.
g323291
Figure14
1.Bolt(5/16x1-1/4inch)2.15.6cm(6-1/8inch)
fastenerstrip
10.Cleanthesurfaceofthehydrauliccoverwhere
youareadheringthefastenerstrip(Figure14).
11.Removethebackingfromtheremaininghook
andloopfastenerstripandadhereitonthe
hydrauliccover(Figure14).
12.Adherethehosecovertothefastenerstrip.
6
5
ReplacingtheGuardMount
Partsneededforthisprocedure:
1
Guardmount
2
Clampplate
2
Bolt(5/16x1-1/4inches)
2
Locknut(5/16inch)
Procedure
1.Removetheshieldassemblyfromthegrinder
head(Figure15).Retainthefasteners.
g309639
Figure15
1.Bolt—5/16x1-1/4inches
(8)
3.Shieldassembly
2.Locknut—5/16inch(8)
2.Removebothshieldsandclampplatesfromthe
guardmount(Figure16).Retainthefasteners
andshields.
g309640
Figure16
1.Bolt—5/16x1-1/4inches
(12)
4.Locknut—5/16inch(12)
2.Clampplate(2)5.Guardmount
3.Shield(2)
3.Installthenewguardmountusing8boltsand8
nutsthatyouremovedinstep1(Figure17).
g309638
Figure17
1.Bolt—5/16x1-1/4inches
(8)
3.Locknut—5/16inch(8)
2.Guardmount
4.Installbothshieldstotheguardmountusing
aclampplateandthe6boltsand6nutsyou
removedfromeachshieldinstep2(Figure18).
Note:Donotusetherearholeintheclamp
platesinthisstep.
7
g309637
Figure18
1.Bolt—5/16x1-1/4inches
(12)
4.Guardmount
2.Clampplate(2)5.Locknut—5/16inch(12)
3.Shield(2)
5.Usingtheclampplateandguardmountasa
template,drillahole(5/16inchdiameter)into
bothshields(Figure19).
g309636
Figure19
1.Drillahole(5/16inchdiameter)here.
6.Installaboltandnutinbothholes.
8
  • Page 1 1
  • Page 2 2
  • Page 3 3
  • Page 4 4
  • Page 5 5
  • Page 6 6
  • Page 7 7
  • Page 8 8

Toro Debris Kit, STX-38 EFI Stump Grinder Installation guide

Type
Installation guide

Toro Debris Kit, STX-38 EFI Stump Grinder is designed to enhance your grinding experience by effectively managing debris and dust while you work. The kit includes a cylinder cover, hose cover, and hydraulic cover that work together to protect vital components of your stump grinder from debris accumulation. Additionally, the kit features a new muffler guard that safeguards against hot surfaces, ensuring your safety during operation. With this kit, you can expect cleaner performance, extended component life, and a safer grinding process.

Ask a question and I''ll find the answer in the document

Finding information in a document is now easier with AI