Page is loading ...

1
SECTION I–MAINTENANCE
SUBJECT PAGE NO.
1. Specifications . . . . . . . . . . . . . . . . . . . . . . . . . . . . . . . . . . . . . . . . . . . . . . . . . . . . . . . . . . . 3
2. Side Views. . . . . . . . . . . . . . . . . . . . . . . . . . . . . . . . . . . . . . . . . . . . . . . . . . . . . . . . . . . . . . 4
3. Fluid Requirements. . . . . . . . . . . . . . . . . . . . . . . . . . . . . . . . . . . . . . . . . . . . . . . . . . . . . . . 6
4. Clutch . . . . . . . . . . . . . . . . . . . . . . . . . . . . . . . . . . . . . . . . . . . . . . . . . . . . . . . . . . . . . . . . . 7
5. Rear Preload Adjustment . . . . . . . . . . . . . . . . . . . . . . . . . . . . . . . . . . . . . . . . . . . . . . . . . . 8
6. Ignition Timing. . . . . . . . . . . . . . . . . . . . . . . . . . . . . . . . . . . . . . . . . . . . . . . . . . . . . . . . . . . 9
This section explains procedures unique to 1997 model S1 Lightnings. Any procedures not found
in this supplement are covered in the 1996 S1 Lightning Service Manual (Part No. 99490-96Y).


3
SPECIFICATIONS
NOTE
Gross Vehicle Weight Rating (GVWR) (maximum allowable
loaded vehicle weight) and corresponding Gross Axle Weight
Ratings (GAWR) are given on an information decal located on
the front frame steering head.
I
*Final gear ratios indicate number of mainshaft revolutions
required to drive output sprocket one revolution.
**Overall gear ratios indicate number of engine revolutions
required to drive rear wheel one revolution.
1
WARNING
Do not inflate any tire beyond its maximum inflation
pressure as specified on tire sidewall. Overinflation may
cause tire to suddenly deflate leading to personal injury.
DIMENSIONS IN. MM
Wheel base 55 1397
Overall length 79.5 2019
Overall width 30 762
Road clearance 5.2 132
Seat height 29.5 749
CAPACITIES U.S. LITERS
Fuel tank (including reserve) 4.0 gallons 15.14
Reserve 0.6 gallons 2.27
Oil tank 2.0 quarts 1.89
Transmission 1.0 quart 0.95
WEIGHT LBS. KG
S1 shipping weight 446 202
GVWR 820 372
GAWR - Front 340 154
GAWR - Rear 480 218
ENGINE
Number of cylinders 2
Type 4-Cycle, 45 Degree V-Type
Bore 3.498 in. 88.849 mm
Stroke 3.8125 in. 96.838 mm
Piston displacement 73.4 cu. in. 1203 cc
Compression ratio 10.0 to 1
Horsepower @ RPM 91 @ 5800
Torque ft-lb @ RPM 87 @ 5200
IGNITION SYSTEM
Spark plugs No. 6R12
Size 12 mm
Gap 0.038-0.045 in. 0.97-1.14 mm
TRANSMISSION
Type Constant Mesh, Foot Shift
Speeds 5 Forward
NUMBER OF SPROCKET TEETH
Engine 35
Clutch 56
Transmission 27
Rear wheel 61
Belt 128
TRANSMISSION GEAR RATIOS FINAL* OVERALL**
First (low) gear 2.69 9.717
Second gear 1.97 7.118
Third gear 1.43 5.180
Fourth gear 1.18 4.269
Fifth (high) gear 1.00 3.615
TIRE AND POSITION
PRESSURE
FOR SOLO
RIDING
PRESSURE
AT GVWR
Front-Dunlop Sportmax
Radial II 120/70 ZR 17
32 PSI
(2.2 bar)
36 PSI
(2.5 bar)
Rear-Dunlop Sportmax
Radial II 170/60 ZR 17
36 PSI
(2.5 bar)
38 PSI
(2.8 bar)

4
SIDE VIEWS
Figure 1. 1997 S1 Lightning, Right Side View
Figure 2. 1997 S1 Lightning, Right Side View (Body Removed)
5806
5
6
4
7
1112131415
9
10
1
8
32
16
1. Right rear turn signal
2. Tail/stop lamp
3. Rear brake master cylinder/
reservoir
4. Air cleaner cover
5. Fuel filler cap
6. Front brake master cylinder
7. Front brake hand lever
8. Right front turn signal
9. Headlamp
10. Front brake caliper
11. Timer cover
12. Rear shock absorber
13. Rear brake pedal
14. Rider footrest
15. Belt guard(s)
16. License plate light
1. Rear axle adjuster nut
2. Rear sprocket and secondary
drive belt
3. Ignition module
4. Fuse block and spare fuse
5. Turn signal flasher
6. Remote idle adjuster
7. Front brake master cylinder
8. Front brake hand lever
9. Front brake caliper
10. Oil pump
11. Battery
12. Voltage regulator
13. Rider footrest
14. Passenger footrest
5808
3
7
1
2
8
9
4 5
6
1011121314

5
Figure 3. 1997 S1 Lightning, Left Side View
Figure 4. 1997 S1 Lightning, Left Side View (Body Removed)
5807
1
2
3 6 7 8
9
10
1112131415
1. Left front turn signal
2. Headlamp
3. Clutch hand lever
4. Fuel filler cap
5. Horn
6. Ignition/headlamp key switch
7. Fuel supply valve
8. Tail/stop lamp
9. Left rear turn signal
10. Rear brake caliper
11. Passenger footrest
12. Rider footrest
13. Gear shift lever
14. Exhaust muffler
15. Oil filter
54
5809
6 84
2 31
7
11121314
10
5 9
15
1. Steering head lock
2. Instruments
3. Clutch hand lever
4. Ignition coil
5. Enrichener knob
6. Starter relay
7. Oil filler plug/dipstick
8. Oil tank
9. Rear brake caliper
10. Rear axle adjuster nut
11. Oil tank drain hose
12. Gear shift lever
13. Exhaust muffler
14. Oil filter
15. Speedometer drive

6
FLUID REQUIREMENTS
GENERAL
United States System
Unless otherwise specified,
all fluid volume measurements
in this Service Manual are expressed in United States
(U.S.) units-of-measure
. See below:
●
1 pint (U.S.) = 16 fluid ounces (U.S.)
●
1 quart (U.S.) = 2 pints (U.S.) = 32 fl. oz. (U.S.)
●
1 gallon (U.S.) = 4 quarts (U.S.) = 128 fl. oz. (U.S.)
Metric System
Fluid volume measurements in this Service Manual include
the metric system equivalents. In the metric system, 1 liter
(L) = 1,000 milliliters (mL). Should you need to convert from
U.S. units-of-measure to metric units-of-measure (or vice
versa), refer to the following:
●
fluid ounces (U.S.) x 29.574 = milliliters
●
pints (U.S.) x 0.473 = liters
●
quarts (U.S.) x 0.946 = liters
●
gallons (U.S.) x 3.785 = liters
●
milliliters x 0.0338 = fluid ounces (U.S.)
●
liters x 2.114 = pints (U.S.)
●
liters x 1.057 = quarts (U.S.)
●
liters x 0.264 = gallons (U.S.)
STEERING HEAD BEARING
GREASE
Use WHEEL BEARING GREASE (Part No. 99855-89).
BRAKE FLUID
1
WARNING
D.O.T. 5 SILICONE HYDRAULIC BRAKE FLUID can cause
eye irritation. In case of contact with eyes, flush with
plenty of water and get medical attention. KEEP BRAKE
FLUID OUT OF THE REACH OF CHILDREN!
Use only D.O.T. 5 SILICONE HYDRAULIC BRAKE FLUID
(Part No. 99902-77).
FRONT FORK OIL
Use only WP FORK OIL, 5 WEIGHT.
FUEL
Use a good quality leaded or unleaded gasoline (91 pump
octane or higher). Pump octane is the octane number usually
shown on the gas pump.
ENGINE OIL
Use the proper grade of oil for the lowest temperature
expected before the next oil change.
PRIMARY DRIVE/TRANSMISSION
LUBRICANT
Use only SPORT-TRANS FLUID (Part No. 98854-96 quart
size or Part No. 98855-96 gallon size).
Table 1. Recommended Oil Grades
HARLEY-
DAVIDSON TYPE
VISCOSITY
HARLEY-
DAVIDSON
RATING
LOWEST
AMBIENT
TEMP.
COLD
WEATHER
STARTS
BELOW
50
°
F
H.D. Multi-Grade
SAE
10W40
HD 240
Below 40
°
F
(4
°
C)
Excellent
H.D. Multi-Grade
SAE
20W50
HD 240
Above 40
°
(4
°
C)
Good
H.D. Regular Heavy
SAE
50
HD 240
Above 60
°
(16
°
C)
Poor
H.D. Extra Heavy
SAE
60
HD 240
Above 80
°
(27
°
C)
Poor

7
CLUTCH
MODEL YEAR CHANGE
See Figure 5. All 1997 model year motorcycles use the new
style clutch release ramp introduced on late 1996 vehicles.
The clutch adjustment and lever freeplay procedures remain
the same. The change was made to provide additional clear-
ance between the coupler and the primary cover.
Figure 5. Ramp Change
New style Old style
5671

8
REAR PRELOAD ADJUSTMENT
GENERAL
Rear suspension spring preload must be adjusted before any
other adjustments can be attempted. This adjustment assures
that the rear suspension has the proper amount of travel.
Spring preload is the most important suspension adjustment
on the S1 Lightning. Improper preload will adversely affect
both the handling and motorcycle ride. Correct preload set-
ting will result in motorcycle handling that suits the rider’s size
and weight.
ADJUSTMENT
You will need three people to carry out this adjustment.
1. Verify correct front and rear tire pressure. See SPECIFI-
CATIONS on page 3.
2. Remove all accessories from motorcycle including tank
bag and/or saddlebags.
3. Take the motorcycle off the side stand and bounce the
rear up and down a few times to be sure the suspension
is free and not binding.
4. See Figure 6. Measure the distance from the center of the
rear axle nut to the rear turn signal mounting bolt
without
rider/passenger/cargo/accessories on the motorcycle.
5. Install items removed in Step 2. Load all cargo.
6. Bounce a few times on the seat to be sure the suspen-
sion is free and not binding.
7. With the help of an assistant, take the same measure-
ment with the vehicle fully loaded (rider/passenger/lug-
gage/cargo). The assistant should help balance the
motorcycle so the rider can keep both feet on the foot-
rests.
8. Subtract the second measurement from the first. The dif-
ference, which is the squat, should be 0.25-0.75 in. (6.4-
19.1 mm). If it is not, you will have to adjust the spring
preload.
1
CAUTION
●
Be sure to apply the same number of turns to each
preload adjusting nut to ensure that the drawing
rings do not become misaligned. Misaligned drawing
rings will cause the shock absorber spring to bind
against the adjustment rods
●
Be sure the drawing rings are parallel within 1/64 in.
(0.4 mm). Misaligned drawing rings will cause the
shock absorber spring to bind against the adjust-
ment rods.
9. See Figure 7. Change the spring preload by adjusting
both preload adjusting nuts (1) (metric) behind the rear
drawing ring (2).
a. Increase the preload by tightening the nuts.
b. Decrease the preload by loosening the nuts.
Figure 6. Checking Rear Preload
Figure 7. Adjusting Rear Preload
Rear turn signal
mounting bolt
Rear axle nut
b0269xox
1
1. Preload adjusting nut (2) (metric)
2. Rear drawing ring
3. Adjustment rod (2)
2 3
b0283x2x

9
IGNITION TIMING
MODEL YEAR CHANGE
See Figure 8. All 1997 model year motorcycles have the
remote idle adjuster introduced on late 1996 vehicles. Using
this adjuster, it is no longer necessary to use the CARBURE-
TOR IDLE ADJUSTMENT TOOL (Part No. HD-33413) and
TIP (SNAP-ON Part No. TMP23A) to adjust engine idle
speed.
NOTE
The new idle adjuster changes Step 4 of IGNITION TIMING,
INSPECTION in Section 1 the 1996 manual.
See REMOTE IDLE ADJUSTER on page 21 for more infor-
mation.
Figure 8. Remote Idle Adjuster
5853


11
SECTION II–CHASSIS
SUBJECT PAGE NO.
1. Vehicle Identification Number . . . . . . . . . . . . . . . . . . . . . . . . . . . . . . . . . . . . . . . . . . . . . . . 13
2. Front Wheel. . . . . . . . . . . . . . . . . . . . . . . . . . . . . . . . . . . . . . . . . . . . . . . . . . . . . . . . . . . . . 14
3. Front Brake Caliper . . . . . . . . . . . . . . . . . . . . . . . . . . . . . . . . . . . . . . . . . . . . . . . . . . . . . . . 15
4. Swingarm . . . . . . . . . . . . . . . . . . . . . . . . . . . . . . . . . . . . . . . . . . . . . . . . . . . . . . . . . . . . . . 16
This section explains procedures unique to 1997 model S1 Lightnings. Any procedures not found
in this supplement are covered in the 1996 S1 Lightning Service Manual (Part No. 99490-96Y).


13
VEHICLE IDENTIFICATION NUMBER
MODEL YEAR CHANGE
See Figure 9. A 17-digit serial number, or Vehicle Identifica-
tion Number (V.I.N.), is stamped on the right side of the steer-
ing head (ex., 4MZSS11J1V3200001). Also affixed to the
steering head at this location is an information decal bearing
the V.I.N. code.
An abbreviated V.I.N. is stamped on the front left side of the
crankcase.
NOTE
Always give the V.I.N. or abbreviated V.I.N. when ordering
parts or making inquiries about your Buell motorcycle.
Figure 9. Vehicle Identification Number (V.I.N.)
00001-20000 = World
20001-25000 = California
4MZSS 11 J* V 32 00001
*
Varies - can be 0 thru 9 or X
Sample V.I.N. as it appears on the steering head - 4MZSS11J1V3200001
Sample abbreviated V.I.N. as it appears on the left side crankcase- SS11V200001
11 = World
56 = California
Manufacturer: Buell Motorcycle Company
Type Designation
Horsepower Code
Engine
Model Year - 1997
Sequential Number

14
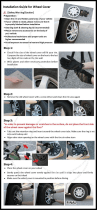
FRONT WHEEL
MODEL YEAR CHANGE
See Figure 10. All 1997 model year motorcycles have new
fasteners on the front brake rotor/carrier assembly.
Separate the carrier from the rotor only when necessary. Use
new
clips when reassembling.
NOTE
The new rotor/carrier assembly changes Step 4 of FRONT
WHEEL, REMOVAL and Step 2 of FRONT WHEEL, ASSEM-
BLY in the 1996 manual.
REMOVAL/INSTALLATION
1. See Figure 10. Remove and discard the clip (2).
2. Remove the wave washer (3).
3. Remove the drive pin (1). Repeat this procedure for the
other five fasteners to separate the carrier (4) from the
rotor (5).
4. Assemble in reverse order. Use
new
clips upon assembly.
Figure 10. 1997 Rotor to Carrier Fastener
5874
1
1. Drive pin (6)
2. Clip (6)
3. Wave washer (6)
4. Carrier
5. Rotor
2
3
5
4

15
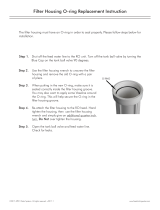
FRONT BRAKE CALIPER
TOOL INFORMATION
Use the BRAKE CALIPER PISTON REMOVER (Part No. B-
42079) to simplify front caliper piston removal.
NOTE
The following instructions expand upon Step 9 of FRONT
BRAKE CALIPER, REMOVAL/DISASSEMBLY in the 1996
manual.
1. Attach caliper half to tool.
a. See Figure 11. Attach outside caliper half using two
screws.
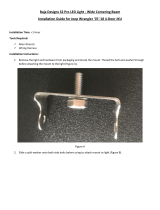
b. See Figure 12. Attach inside caliper half using two
screws and two nuts.
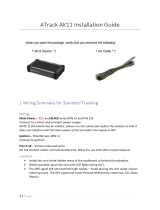
1
WARNING
When using air pressure to remove pistons from caliper,
pistons may be ejected with considerable force. Wear
safety glasses and heavy gloves to prevent personal
injury.
1
CAUTION
Exercise care to avoid dropping piston on hard surface.
Any damage requires piston replacement.
2. If removing pistons from outside caliper half, place a
gloved finger over the banjo bolt hole.
3. See Figure 13. Apply low pressure air to force the pistons
from the caliper bores.
Figure 11. Outside Caliper Half
Figure 12. Inside Caliper Half
Figure 13. Using Air Pressure to Remove Pistons
b0265x2x
Banjo bolt hole
b0266x2x
b0297x2x

16
MODEL YEAR CHANGE
All 1997 model year motorcycles use a revised swingarm
pivot assembly. The modifications allow preload to be
adjusted without using the PIVOT SHAFT BEARING
ADJUSTER (Part No. B-41175).
NOTE
See Figure 14. The threaded rod (1) replaces a pivot shaft
used on 1996 models. This new part changes the SWING-
ARM, ASSEMBLY and SWINGARM, INSTALLATION proce-
dures in the 1996 manual.
ASSEMBLY
1. See Figure 14. If necessary, draw
new
roller bearing
cups (5) into swingarm using BEARING INSTALLATION
BOLT (Part No. B-35316-5) and STEERING HEAD
BEARING RACE INSTALLER (Part No. HD-39302).
NOTE
Timkin roller bearing assemblies should be replaced as a
unit. Do not intermix components. Mark all components so
they may be correctly installed.
2. Coat bearing components with WHEEL BEARING
GREASE (Part No. HD-99855-89) and assemble.
3. Install a
new
swingarm seal (3) flush to the swingarm.
4. Slide swingarm assembly into position.
NOTE
See Figure 14. The left side bearing adjustment bolt (6) has
additional internal threads.
5. Install both bearing adjustment bolts (2, 6) and the
threaded rod (1). Insert the rod from the air cleaner side
of the motorcycle.
6. Tighten the left pinch screw on the swingarm mount
block. Do not tighten the right side pinch screw at this
time.
INSTALLATION
1. See Figure 15. Adjust swingarm preload by tightening
the threaded rod. Preload should measure 3.5-5.5 lbs
(1.6-2.5 kg).
2. Follow the remaining installation instructions in the 1996
manual.
Figure 14. Swingarm
Figure 15. Adjusting Preload
b0290a2x
1. Threaded rod
2. Bearing adjustment
bolt, right
3. Swingarm seal (2)
4. Roller bearing (2)
5. Bearing cup (2)
6. Bearing adjustment
bolt, left
1
2
3
4
5
6
Threads
b0294x2x
SWINGARM


19
SECTION IV–FUEL SYSTEM
SUBJECT PAGE NO.
1. Remote Idle Adjuster. . . . . . . . . . . . . . . . . . . . . . . . . . . . . . . . . . . . . . . . . . . . . . . . . . . . . . 21
2. Air Cleaner . . . . . . . . . . . . . . . . . . . . . . . . . . . . . . . . . . . . . . . . . . . . . . . . . . . . . . . . . . . . . 22
This section explains procedures unique to 1997 model S1 Lightnings. Any procedures not found
in this supplement are covered in the 1996 S1 Lightning Service Manual (Part No. 99490-96Y).

/