Page is loading ...

1
FORCE-PRO-SSPYPOINT
v.1.0
USER MANUAL
FORCE-PRO-S

2
FORCE-PRO-SSPYPOINT
ABOUT US
SPYPOINT’s mission is to oer you products that are easy to use, innovative,
aordable, and of exceptional quality. Our products are mainly used in the
hunting eld and residential and commercial safety elds. They are distributed
and appreciated on all continents and are continuously growing. Prosperous
and respected, SPYPOINT is a company that is constantly developing new
technologies and that remains attentive to its customer’s needs to oer
cutting-edge products with concrete solutions to improve hunting and
outdoor activities.
THANK YOU FOR CHOOSING A SPYPOINT PRODUCT
This User Manual will introduce you to the features of your new FORCE-PRO-S
and will guide you through the acquisition of its functionalities so that you
can use it to its full potential.
Our priority is to oer outstanding service to our customers. If you need
technical support for your camera, here is how to contact us:
Contact our chat service directly on the SPYPOINT site (in the lower right-
hand corner of the Support section, by clicking on the “Start Chat” window,
www.spypoint.com).
• Monday to Friday — 8:30 a.m. to 8:00 p.m.
• Saturday-Sunday — 8:30 a.m. to 5:30 p.m.
Go to www.spypoint.com/en/support for more information
about our devices.
JOIN THE SPYPOINT COMMUNITY
www.facebook.com/SPYPOINT
www.twitter.com/SPYPOINTcamera
www.youtube.com/SPYPOINTtrailcam
www.instagram.com/spypointcamera
www.tiktok.com/@spypointcamera
introduction
FORCE-PRO-S PRESENTATION
The FORCE-PRO-S is a reliable, high-performance, aordable trail camera that
has all the features to meet the most demanding hunter’s expectations:
• Exceptionally clear 30 MP still photos
• 4K videos enabling hunters to see what is happening in the woods
in detail as if they were there
• An ultra-fast 0.2-second trigger speed
• 110-foot (34-meter) detection range ensuring that many animals
will be in the photos or videos
• Up to 128 GB of storage space for photos and videos,
which enables storing a very high number of images

3
FORCE-PRO-SSPYPOINT
Components ..........................................................................................4
Features ...................................................................................................6
Power ........................................................................................................7
Memory Card ........................................................................................8
Setup ...................................................................................................... 10
Installation and Updates .............................................................. 15
Transferring Files to a Computer .............................................. 16
Oered Accessories ........................................................................ 17
Troubleshooting ............................................................................... 18
Warranty ............................................................................................... 22
Regulation ........................................................................................... 23
Disposal ................................................................................................ 24
Table Of Content

4
FORCE-PRO-SSPYPOINT
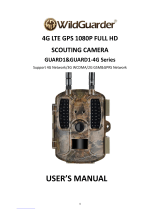
qSolar panel
wNo glow ash
eRed LED indicator
rPhoto lens
tDetection lens
yCable lock hole
uSlot for installation strap
iLockable door latch
o12 V jack
aScrew-thread for standard ¼"-20
sLCD screen
dOK button
fSwitch ON/SETUP/OFF
gNavigation buttons
SD card slot
Battery compartment
Door
Components

5
FORCE-PRO-SSPYPOINT
SOLAR PANEL
Solar energy sensor for charging the internal lithium battery.
NO GLOW FLASH
Night lighting to obtain black-and-white photos and videos.
RED LED INDICATOR
When the button is in the SETUP position and you’re done adjusting
your settings, the red light at the front of the camera will ash to
conrm a motion detection. When moved to the ON position, the red
light will ash for 30 seconds to allow the user to walk away without
being photographed.
PHOTO LENS
Image sensor.
DETECTION LENS
Enlarges the detection area of the camera’s motion sensor.
CABLE LOCK HOLE
Allows you to install a #CLM-6FT padlock cable to secure the unit
(sold separately).
SLOT FOR INSTALLATION STRAP
Allows the camera to be installed using
the included installation strap.
LOCKABLE DOOR LATCH
Allows you to lock and open the door of the camera.
12 V JACK
Allows you to insert a power cord connected
to an external 12 V source.
SCREWTHREAD FOR STANDARD ¼”20
Allows you to attach a standard tripod from ¼“-20.
LCD SCREEN
Allows the user to access the camera's settings menu.
OK BUTTON
Allows the user to conrm a selection.
SWITCH ON/SETUP/OFF
Allows the user to turn the camera ON and OFF, as well as access
the conguration menu.
NAVIGATION BUTTONS
Buttons to navigate the camera’s menus and set the camera.
SD CARD SLOT
Space to insert the SD card needed to save photos and videos.
BATTERY COMPARTMENT
Space to insert 8 AA batteries.
DOOR
Provides access to the battery compartment, ON/SETUP/OFF switch,
navigation buttons, conguration screen and SD card slot.
Components

6
FORCE-PRO-SSPYPOINT
PHOTO RECORDING
Photo resolution 4, 16 or 30 MP (4 MP as default)
Photo le format JPG
Time-lapse mode 5, 10, 15 or 30 minutes intervals
Multi-shot mode Up to 6 photos per detection
Info bar Date, time, temperature (°C/°F), moon
phase, SPYPOINT logo, and camera model
Capture mode Colors by day, black and white by night
VIDEO RECORDING*
Video resolution VGA, HD, FHD, QHD, 4K
(see p.8 for more details)
Video le format AVI
Sequence length Adjustable from 10 to 60 seconds
Capture mode Colors by day, black and white by night
AUDIO RECORDING
Audio mode Yes
MEMORY
Internal memory None
External memory SD/SDHC/SDXC card up to 128 GB
(16 GB SD card included)
VIEWING
Built-in screen LCD (for conguration only)
POWER SOURCES
Alkaline or lithium AA
non-rechargeable batteries 8 x AA (not included)
External 12 V battery
12 V battery
Optional accessories available at SPYPOINT:
#KIT6V-12V, #KIT-12V, #BATT-12V)
Solar panel lithium battery Solar panel lithium battery #SPLB-22
(not included)
DETECTION SYSTEM
Movement detector Infrared
Detection angle 40°
Detection range Up to 34 meters/110 feet
Trigger speed 0.2 seconds
Delay between each detection Adjustable from Instant to 60 minutes*
ILLUMINATION OPTIONS
LED 54 LED
Night light range Up to 27 meters/90 feet
Exposure Automatic adjustment of the infrared
illumination
PHYSICAL DIMENSIONS
10.2 cm (W) x 19.3 cm (H) x 8.3 cm (D)
4 “ (W) x 7.6 “ (H) x 3.3 “ (D)
RECOMMENDATIONS
Operating temperature -30 °C to 50 °C (-22 °F to 131 °F)
Storage temperature -40 °C to 60 °C (-40 °F to 140 °F)
Features
*When selecting a “Video Length” over 20 seconds, only daytime videos will be aected .
Nighttime videos are limited to 20 seconds to preserve battery life.

7
FORCE-PRO-SSPYPOINT
BATTERY LEVEL ICON
There will be two battery icons in the upper
right hand corner of the screen while the
camera is in setup mode. The battery icon on
the left represents the internal battery and the
battery icon on the right represents the AA
power source. The camera will use the internal
battery before using the AA power source. If
both power sources are low (showing only a
single bar) the camera will continue to take photos.
However, we strongly recommend charging the camera or replacing the AA
batteries before either is drained of power. If a video is being recorded and the
battery level reaches 0%, the camera saves the le before shutting down.
CHOOSING A POWER SOURCE
4 options are available to you:
• Internal Battery:
It will need to be charged for rst use. To charge the device, use the supplied
cable and plug into the 12 V port on the camera. It will take approximately
12hours to fully charge the battery, you can check if the camera is fully
charged by sliding the power switch to the “SETUP” position and look at the
battery indicator on the screen. 4 bars indicates it is fully charged.
• Alkaline or lithium AA batteries
• Rechargeable battery 12 V (#KIT-12V sold separately)
• Solar panel lithium battery 12 V (#SPLB-22 sold separately)
Make sure to insert the AA batteries according to their polarity
(+) and (-) as shown in the battery compartment.
FOR BEST RESULTS AND NO LEAKAGE
• Use only new alkaline or lithium batteries.
• Do not mix new and old batteries.
• Do not use rechargeable AA batteries
(their lower voltage can generate operational issues).
SPLB-22 – SOLAR PANEL
LITHIUM BATTERY COMBO UNIT
• Combines solar panel and lithium
battery into one unit to reduce wires
and setup time.
• Plugs directly into camera to provide
extensive, ongoing battery life for
your camera so you can avoid visits.
• Additional jacks and plugs allows for
device exibility.
MANAGING VARIOUS CAMERA POWER SUPPLY
If you choose to plug an external 12 V battery (#KIT-12V, sold separately) into
your camera, it becomes your camera’s new primary power source. Once the
12 V has been depleted, the camera will opt to use the internal solar powered
battery. Only once that is power source is depleted will the AA be used.
Power

8
FORCE-PRO-SSPYPOINT
INSTALLING A MEMORY CARD
The use of a memory card is necessary for the operation of the camera.
It allows you to save photos and videos. For better performance, we
recommend that you insert only an SD/SDHC/SDXC card with a capacity
of 128 GB. Avoid using a microSD card with an SD adapter.
Once the SD card reaches its storage limit, your camera will stop taking photos
or videos. Replace it or transfer its content on another media.
When the camera is turned ON and no memory card is inserted, the screen will
display the message “No card”
Here is three tables showing the approximate number of videos that can be
saved, based on dierent memory card capacities.
PHOTOS RESOLUTIONS
4 MP 16 MP 30 MP
8 GB 9 450 3 025 1 860
16 GB 18 900 6 050 3 721
32 GB 37 800 12 100 7 442
64 GB 75 600 24 200 14 884
128 GB 151 200 48 400 29 768
CAPACITY FOR ONE-MINUTE VIDEOS
VGA HD FHD QHD 4K
8 GB 70 30 25 25 20
16 GB 140 60 50 50 40
32 GB 280 120 100 100 80
64 GB 560 240 200 200 160
128 GB 1 120 480 400 400 320
VIDEOS RESOLUTIONS
VGA HD FHD QHD 4K
640 x 480 1 280 x 720 1 920 x 1080 2 560 x 1 440 3 840 x 2 160
Memory Card

9
FORCE-PRO-SSPYPOINT
INSERTING YOUR MEMORY CARD
Before inserting the SD card into your camera, it must be formatted via a computer to ensure proper
operations. Visit www.spypoint.com/en/support if you need help formatting your SD card.
• Make sure the camera is turned OFF to prevent any loss or damage to photos already saved on
the memory card. Also, make sure the switch on the side of the SD card is not set on LOCK.
• Locate the SD card slot. It is on the bottom right corner of the camera (see diagram).
• Insert a standard SD memory card (up to a 128 GB capacity) in the SD card slot placing
the bevelled corner on the upper right-hand side (see diagram).
• The card is inserted correctly when a click is heard.
REMOVING YOUR MEMORY CARD
• Before removing a memory card, always turn your camera OFF
to prevent les from on the card from being deleted or damaged.
• To remove the card, push it lightly into the camera until you hear a click.
Then take it out of the device.
Memory Card

10
FORCE-PRO-SSPYPOINT
Setup
GENERAL SETTINGS SETUP
Use the buttons to switch to the LCD display or to change options, and press OK to select.
Several setup pages will be displayed.
1. To turn the camera ON/OFF, use the ON/SETUP/OFF switch.
In the ON position, the camera turns on. In the OFF position, the camera turns o.
2. The switch must be on SETUP to make your initial changes.
3. When the switch is on SETUP, press OK to open the MENU:
• Set the language (English, Français, Deutsch)
• Set the date (MM/DD/YY or DD/MM/YY)
• Set the time (12 h or 24 h)
• Set the temperature (°F/ °C)

11
FORCE-PRO-SSPYPOINT
ADJUST THE SETTINGS FOR THE 3 MODES OF OPERATION
PHOTO MODE
1. Camera icon showing the Photo mode.
2. The number of mega pixels selected (4, 16 or 30 MP).
3. Battery power level icon.
4. Time.
5. Number of shots available on the SD card
(photos taken so far/number of shots left).
6. Press OK to access the settings.
DELAY
Instant ; 3 seconds ; 5 seconds ;
10 seconds ; 20 seconds ;
30 seconds ; 1 minute ; 5 minutes ;
10 minutes ; 30 minutes ; 60 minutes
Allows you to choose the period of time to wait before the camera detects again and records the next picture.
A longer delay minimizes the number of photos taken and therefore maximizes battery life. A shorter delay
maximizes surveillance in the area but consumes more power. Shorter delays are recommended when the camera
is used for security purposes. Once you have selected the delay, press OK.
QUALITY
4 MP ; 16 MP ; 30 MP Allows you to select a resolution of 4, 16 or 30 MP. Once your selection is made, press OK.
MULTI
1 ; 2 ; 3 ; 4 ; 5 ; 6
Allows you to take up to 6 consecutive photos per detection with a delay of 5-second between each photo.
Once your selection is made, press OK.
DETECT
Low ; Normal ; High ; Auto
Allows you to choose the detection sensitivity of the device. A higher sensitivity allows you to detect movement
in front of the camera more eectively, so the camera will take more pictures. Once your selection is made, press OK.
SETUP

12
FORCE-PRO-SSPYPOINT
VIDEO MODE
1. Icon showing the Video mode.
2. Battery power level icon.
3. Time.
4. Approximate video time available for recording.
5. Press OK to access the settings.
DELAY
Instant ; 3 seconds ; 5 seconds ;
10 seconds ; 20 seconds ;
30 seconds ; 1 minute ; 5 minutes ;
10 minutes ; 30 minutes ; 60 minutes
Allows you to choose the period of time to wait before the camera detects again and records the next video.
A longer delay minimizes the number of videos taken and therefore maximizes battery life. A shorter delay
maximizes surveillance in the area but consumes more power. Shorter delays are recommended when the camera
is used for security purposes. Once you have selected the delay, press OK.
QUALITY
VGA ; HD ; FHD ; QHD ; 4K Allows the user to choose between VGA, HD, FHD, QHD or 4K. Once your selection is made, press OK.
DURATION
10 seconds ; 20 seconds ;
30 seconds ; 60 seconds
Allows the user to select the duration of the recording when the camera is in Video mode.
Once your selection is made, press OK.
DETECT
Low ; Normal ; High ; Auto
Allows you to choose the detection sensitivity of the device. A higher sensitivity allows you to detect movement
in front of the camera more eectively, so the camera will take more videos. Once your selection is made, press OK.
SETUP

13
FORCE-PRO-SSPYPOINT
TIME-LAPSE MODE
1. Camera icon showing the Time-lapse mode.
2. Battery power level icon.
3. Time.
4. Number of shots available on the SD card
(photos taken so far/number of shots left).
5. Press OK to access the settings.
TLDELAY
5 minutes ; 10 minutes ;
15 minutes ; 30 minutes
Allows the camera to take photos at regular preset intervals. For example, if “5 minutes“ is selected in the Time-lapse
mode, the camera takes a photo every 5 minutes even if there is no detection.
Note: The Time-lapse mode only applies for photos, not videos. When the Time-lapse mode is selected, the Delay option and the Multi-shot mode are
disabled.
SETUP

14
FORCE-PRO-SSPYPOINT
OTHER OPTIONS
NAME Allows you to name the camera for easy identication.
This function is very useful for users with more than one camera.
ABOUT Displays the software version and allows for updates.
DEFAULT Allows you to reset the camera to its original state.
FORMAT
Allows the camera to format the SD card the next time it is used.
Note: Reformatting the SD card will delete all photos and videos on the card. Only format the card if you are sure you want to delete everything on it.
Transfer all data to your computer beforehand.
INFORMATION ON THE PHOTOS
(xed, not congurable)
Displays the date, time, temperature, moon phase, SPYPOINT logo, and camera model on each photo.
New moon First quarter Full moon Last quarter
Waxing crescent Waxing gibbous
Waning gibbous
Waning crescent
NIGHT
Allows to select the best lighting option for nighttime photos and videos.
Choose the BOOST option for maximum brightness at night, select OPTIMAL to reduce fuzziness at night, and MIN BLUR to
minimize the blurriness of moving objects. Once you have made your selection, press OK.
Note: Regardless of the mode, the ash remains invisible.
Optimal mode
Battery life
Flash range
Blur reduction
Boost mode Min blur mode
SETUP

15
FORCE-PRO-SSPYPOINT
CAMERA SOFTWARE UPDATES
Go to www.spypoint.com/en/support for instructions on how to perform
camera software updates.
OPERATION
Once the setup is complete, turn the button from SETUP to ON. You may also
switch from SETUP to OFF and turn the device ON later.
RED LED INDICATOR
In SETUP mode: The light ashes when motion is detected. It also allows
the user to verify that the targeted detection distance is adequate during
installation.
In ON mode: The light ashes for 30 seconds to allow the user to leave the
area, after the installation, without being photographed. When the light turns
o, the camera is ready for use.
Red LED
indicator
Installation and Updates
INSTALLING YOUR CAMERA
1. To install the camera, loop the installation strap through the intended slot
(see diagram).
2. Choose a solid tree that does not move in the wind, as movement will
cause false detections.
3. Make sure the area immediately in front of your camera is free of branches
or twigs that could be blown away by the wind.
4. The camera should be at the same height of the animal’s mid-body.
5. The targeted animal should be at 25 feet (7.5 meters)
away from the camera.
6. To produce brighter photos at night, there should be items reecting the
camera's ash in the background.
INSTALLATION WITH THE
SUPPLIED STRAP
The dimensions of the included strap
are 2.5 cm (1’’) X 152 cm (60’’).
1. Thread the strap through the slot
for the installation strap found at
the back of the camera.
2. Press and hold down the latch.
3. Thread the strap through the latch
from behind, as shown below.

16
FORCE-PRO-SSPYPOINT
Transferring Files to a Computer
Access the folder where you want to save your photos and videos or create
a new folder by clicking on the “New folder” button. (You can also click on
“Ctrl”, “ Shift”, and “N” to create a new folder, or right-click in a blank space in
the “Pictures” folder and choose “New”, then, in the following menu, click on
“Folder”. )
Enter a name for your new folder, click on “Enter”, then double-click on the
folder to open it. In the “Home” tab, choose “Paste” (or click simultaneously on
the “Ctrl” and “V” keys). The photos and videos will be copied in the new folder.
ON A MAC
Click on the search tool in the “Toolbar”. Click the “Go” Tab, then select
“Computer”.
Locate your device under the “Locations” tab and click to access it. Then click
on “DCIM” and “100DSCIM” to nd all saved photos and videos.
Click on “Edit” in the toolbar at the top of the screen, then click on “Select all”
to highlight all individual les on the device. You can also access the “Select all”
option by simultaneously clicking “Cmd” and “A”. If you don’t want to import
everything, you can highlight the desired photos or videos individually. Transfer
photos and videos by clicking on “Cmd” and on the le name. Click on “Edit
again” and then “Copy” (or “Cmd” and “C”) to copy the highlighted les.
Access the folder where you want to save your photos and videos, or create a
new folder by right-clicking and pressing “Cmd” at the same time, then select
“New folder” from the menu.
Click on “Modify”, then on “Copy” (or “Cmd” and “V”) to copy your chosen
les in the selected folder. The photos and videos can take a few minutes to
download, depending on the size and the number of the le you are importing.
Once your photos and videos are transferred, click on the “Eject” icon beside
the name of your device, than unplug the device from your MAC.
TRANSFERRING FILES TO A COMPUTER
• Turn the camera OFF.
• Remove the SD card from the camera.
• Insert the SD card in the SD computer slot, or use a USB adapter for SD cards.
• If the computer doesn't detect the SD card, this means
the memory card is corrupt and needs to be replaced.
ON A PC
On your desktop, click on “My Computer” or “This PC”.
Locate your device under “Removable Disk” and click to access it. Then, click
on “DCIM” and “100DSCIM” to nd all saved photos and videos. If you do
not see the photos or videos in the folder you checked, try again in the other
“Removable Disk” folder.
Select the les you want to copy. With some Windows versions, the simplest
way is to select them by clicking on the “Home” tab and choosing “Select all”
on the right side. With some Windows versions, you can press on “Ctrl” and “A”
or click on the “Edit” menu and choose “Select all”.
Click on the “Copy” icon on the left of the ribbon (or hold the “Ctrl” and “C” keys).
Once your photos and videos are transferred, click the “Safely remove
hardware and eject media” button located in the task bar, then click
“Eject mass media storage device”.
If you do not want to select all photos or videos, hold down the “Ctrl” key and
click on the les you want to select before clicking on the “Copy” icon.

17
FORCE-PRO-SSPYPOINT
LITHIUM BATTERY SOLAR PANEL
Compatible with all SPYPOINT devices with
a 12 V socket. DC power adapter, mounting
bracket and installation strap.
#SPLB-22
12 V BATTERY, CHARGER & HOUSING KIT
Compatible with all SPYPOINT devices with a
12 V socket. Case, AC charger, 12 ft (3.6 meters)
power cable (#PW-12FT) and strap included.
#KIT-12V
STEEL SECURITY BOX FOR 48 LEDS
AND UP CAMERAS
Fits all 48 LEDs and up SPYPOINT cameras.
#SB-400
ADJUSTABLE MOUNTING ARM
Fits any camera with a standard ¼"-20
screw-in tripod mount.
#MA-500
12 V POWER CABLE
12 feet (3.6 meters) cable with alligator clips
to connect to a 12 V camera battery.
#CB-12FT
CABLE LOCK
6 feet (4.57 meters) cable lock compatible with
all cameras and security boxes from SPYPOINT.
#CLM-6FT
32 GB SD CARD
32 GB SDHC UHS-1 memory card. 10-year
warranty. Ultra high speed class 10.
#SD-32GB
Offered Accessories
For more information about other available accessories,
go to www.spypoint.com.

18
FORCE-PRO-SSPYPOINT
PROBLEMS POSSIBLE SOLUTIONS
IMPOSSIBLE TO TURN THE CAMERA ON
1. Check if the chosen power source is fully charged.
2. If using AA, ensure they are correctly installed
3. Replace AA batteries
4. Install the latest update (available on www.spypoint.com under the SUPPORT section).
THE CAMERA'S SCREEN SHUTS OFF Turn OFF the camera and turn it ON again.
THE CAMERA IS NO LONGER RESPONDING 1. Turn OFF the camera and turn it ON again.
2. If using AA, remove them and reinsert them.
THE CAMERA DOESN’T TAKE PICTURES/VIDEOS
1. Make sure the camera is turned ON.
2. Check if there are batteries in the camera.
3. Replace the batteries.
4. If it is not already done, remove the protective sticker
on the detection lens of your camera.
5. Format the SD card. Do not choose the “Quick format” option.
6. If none of the previous solutions works, reset the
camera and the settings.
BLURRY PHOTOS Low-lighting conditions and fast-moving subjects may produce streaks on the photo;
try setting the “Night mode“ to “Min blur“.
THE RED LIGHT IN FRONT OF THE CAMERA FLASHES
1. During the installation, the delay light ashes for 30 seconds to allow the user
to walk away without being photographed.
2. The camera is in TEST mode and detects movement.
Troubleshooting

19
FORCE-PRO-SSPYPOINT
PROBLEMS POSSIBLE SOLUTIONS
NO ONE OR NO ANIMALS ON PHOTOS/VIDEOS
1. Make sure the camera is not pointing the sunrise or sunset, which could
cause false detections.
2. At night, the motion detector can detect beyond the range of the infrared
LEDs. Reduce camera sensitivity.
3. Small animals may trigger the camera. Reduce the sensitivity and/or
increase the height of the camera.
4. The motion detector can detect animals through the foliage.
5. Verify if the tree against which the camera is installed is stable and does not move.
6. Make sure the area immediately in front of your camera is free of branches
or twigs the wind could move. This would result in false detections.
THE CAMERA TAKES DARK
PHOTOS/VIDEOS AT NIGHT
1. Verify the charge level of the batteries, as the night lighting may be
malfunctioning if the charge level is low.
2. Make sure the subject is within range of the night lighting (approximately 80 feet).
3. To get better photos at night, try setting the “Night mode“ to “Boost“
to increase the strength of the infrared LEDs.
4. Make sure there are elements in the background for the light of the infrared LEDs to reect on.
5. Test the night lighting in a dark room to see if you are able to get good quality
photos in black and white.
THE CAMERA TAKES BLACK
PHOTOS/VIDEOS
1. Check the battery level to see if battery power is full as the ash will stop operating near the end
of the battery life, especially if you're recording a video.
2. Make sure there are elements in the background for the light of the infrared LEDs to reect on.
3. Test the night lighting in a dark room to see if you are able to get good quality
photos in black and white.
troubleshooting

20
FORCE-PRO-SSPYPOINT
MESSAGES DISPLAYED ON THE SCREEN DESCRIPTIONS / SOLUTIONS
NO CARD A memory card is required to save videos and photos. Make sure the camera is turned OFF,
then insert the SD memory card and turn the camera back ON.
CARD ERROR
The camera cannot access the memory card:
1. Turn OFF the camera and turn it back ON again.
2. Remove the memory card and reinsert it.
3. Check if the gold contacts are clean.
4. Make sure the switch on the side of the card is not in LOCK position.
5. Format the memory card (so that you don’t delete your les,
copy them externally before formatting the card).
6. Replace your SD card.
BATTERY LOW
Appears on the screen just before the camera turns OFF :
1. Replace the batteries with new ones.
2. Plug the device into a 12 V power source.
FORMATTING IN PROGRESS Wait until the formatting process is completed.
FORMATTING COMPLETED No further action is required.
troubleshooting
/