Page is loading ...

©2007 RUTHERFORD CONTROLS INT’L CORP. WWW.RUTHERFORDCONTROLS.COM
U
SA: 2
69
7 INTERNATIONAL PARKWAY, PKWY 5, VIRGINIA BEACH, VA 23452 • CANADA: 210 SHEARSON CRESCENT, CAMBRIDGE, ON N1T 1J6
P
HON
E • 1.800.2
65.663
0 • 5
19.621.7651 • FAX: 1.800.482.9795 • 519.621.7939 • E-MAIL: SALES@RUTHERFORDCONTROLS.COM
INSTALLATION
8310/8320
8330/8340
Electromagnetic Locks
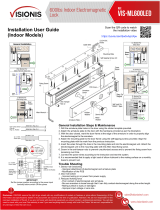
Pre-Installation Instructions
1. This product must be installed according to all applicable
building and life safety codes.
2. Due to the variety of mounting configurations available with
this product, a survey and assessment of the physical area
in which the pr
oduct will be installed must be performed.
3. The door frame must be inspected and deemed structurally
sound prior to installation of the electromagnetic lock. The
structural integrity of the mounting surfaces must be strong
enough to meet or exceed the holding force of the product.
4. The product must be protected from potential damage due
to intruders or tampering.
5. The product should be installed in a location that will not
hinder or create a potential safety hazard to authorized
personnel accessing the protected area.
6. Because electromagnetic locks are used in a variety of
applications and different door frame configurations, an
experienced installer with knowledge of this product must
make a determination of the optimal mounting method for
this specific application.
7. The components, hardware, installation instructions and
mounting template included with this product are intended
for use on outswinging doors.
8. Do not install this product on the exterior of buildings.
9. Separate accessories not included with this pr
oduct must be
used in the following applications:
• Inswinging doors
• Narrow head jamb situations or center-hung doors
• Wherever there is insufficient space on the door frame
header to mount the lock
• Glass or Herculite doors that do not have a door frame
• Hollow metal or wood frames where the door stop is
not thick enough to allow the product to be installed
• Wherever an obstruction in the door prevents
installation of the armature plate at a proper height
• Doors that do not permit the armature plate to be
mounted low enough to meet the magnet surface
Refer to the Product Accessories Guide section of the
Installation Instructions for further information.
10. Installation of this product should be done by an
experienced installer with knowledge of this product.
NOTE: It is highly recommended that thread locking compound
be applied to all screws during installation to reduce chance of
screws loosening over extended time.
®
IS8310-40
PCN070022-B
P11/07DA
1. Mount the electromagnetic lock to the door frame as outlined
on the installation template included with the product.
NOTE: During installation of the armature plate to the door it is
essential that the ar
matur
e plate remains movable. The armature
plate must be allowed to pivot on the center-mounting bolt to
allow pr
oper alignment with the magnet sur
face. If the plate is
not aligned with the magnet sur
face, the lock may lose holding
force or not lock at all.
The head of the armature mounting bolt ships with a rubber
washer af
fixed to it. This washer should pr
oject slightly beyond
the surface of the armature plate. This is to allow the washer to
expand when power is removed and break the air vacuum
between the plate and the magnet sur
face. If this washer is
removed or trimmed the lock will appear to have some holding
force even when power is removed.
For added safety, thread locking compound has been provided for
the armature plate bolt and the four captive electromagnetic lock
mounting scr
ews.
WARNING: Improper installation, maintenance, inspection or
usage of the product or any related accessories or parts may cause
the electromagnetic lock, armature plate and associated hardware
to disengage and fall, causing serious bodily injury and property
damage. Ruther
for
d Contr
ols Int'l Corp. will not be liable to the
installer
, pur
chaser
, end user or anyone else for damage or injur
y
to person or pr
oper
ty due to improper installation, care, storage,
handling, maintenance, inspection, abuse, misuse or act of God or
natur
e involving this pr
oduct or any related accessories or parts.
2. Route the power supply connecting wire through the door
frame and into the wire access hole in the top of the magnet
housing. Connecting wir
e should be of suf
ficient gauge for
the lock being installed and the distance being run. See table
for current draw specifications and wiring gauge chart.
Installation Instructions
PLEASE DELIVER ALL INSTALLATION INSTRUCTIONS TO
THE END-USER UPON COMPLETION OF THE INSTALLATION.

3. Once wiring has been routed into the lock cavity, connect wire
to terminal blocks as shown in Fig. 1. If optional SCS and/or
DSS features are being used these can also be wired at this
time as shown in Fig. 1.
4. Delayed Relock Feature - Should the built-in delayed relock
feature be required for the installation, a Normally Open
Momentary switch such as an RCI 909 will need to be installed
and connected to the two blue wires from J4 on the circuit board
as illustrated in Fig.1.
The delayed relock feature can be used to momentarily
release the lock and keep it unlocked for a time period from 0
to 110 seconds. The time delay for this feature can be
adjusted by carefully turning the potentiometer (R11) in a
counterclockwise direction to increase delay time. Factory
setting is zero seconds.
NOTE: On the 8320 double-door model the potentiometer in
the right-hand wiring cavity must be turned clockwise and the
left one counterclockwise to increase the relock delay.
If the delayed relock feature is not required the blue wires
may be unplugged from the circuit board @ J4. NOTE: If R11
is not set to zero seconds, the lock will enter delayed relock
mode each time power is applied even if J4 has been
removed.
8310, 8320, 8330 & 8340 Electromagnetic Lock
Installation Instructions (Continued)
2
To Ensure Instant Release All switching devices must be wired in
between the DC power source and the positive terminal of the lock
in Fig 2.
Switching the negative power supply line will not allow the lock to
release immediately. RCI electromagnetic locks contain MOV's for
surge suppression and do not require any additional suppression
to be added during installation. The installation of diodes across
the lock input terminals will cause a delay in release.
Fig. 2 – Power Connections
SWITCH
+
-
INCORRECT
CORRECT
+
-
SWITCH
FIL
TERED DC SUPPLY
FILTERED DC SUPPLY
J4
+24
+12
GND
NO
NC
COM
Delayed Relock Adjustment R11
Turn counterclockwise to increase delay
(Turn clockwise to increase delay on the right
end board of the 8320 Double lock)
Common
Normally Closed
Normally Open
- Common Ground
+12VDC Input
+24VDC Input
}
}
Lock Power from a
filtered and regulated DC
power supply
Optional SCS Sensor
SPDT Output contacts rated
for maximum 1.25Amperes
at 24VDC
J4
J4
J4
J4
Two 8310 Locks to release together using the delayed relock feature.
N/O
Momentary Switch
Blue Wires
Blue Wires
Blue Wires
N/O
Momentary Switch
Both sides of an 8320 Lock to release together using delayed relock feature.
Left circuit board Right circuit board
Optional Delayed Relock Wiring
J4
N/O
Momentary Switch
Single lock to release using the delayed relock feature.
RED - Normally Closed
GREEN - Normally Open
BLACK - Common
Optional DSS reed switch contacts rated at
0.20A@12VDC and 0.12A @ 24VDC
Both the SCS and DSS options are shown with Door Open
Fig.1 – Lock Wiring

8310, 8320, 8330 & 8340 Electromagnetic Lock
Installation Instructions (Continued)
3
Lock Assembly
The 8310 and 8320 Electromagnetic Locks come with screws
installed in the housing. These screws, when in place, inhibit the
insertion of an Allen wrench into the mounting screw openings on
the underside of the lock. These screws will need to be removed
prior to installing the lock so as to allow the mounting plate to be
removed from the top of the lock. Fig 3 illustrates the location of
these screws. One screw acts solely to inhibit tampering while the
screw on the other end discourages tampering while holding the
cavity cover in place.
Lock Options
The 8310, 8320, 8330, and 8340 locks can each be equipped with
remote indication features that operate as follows. See Fig.1 for
wiring diagram. Each of these features will provide indication as
to the lock status. Status is indicated locally via an LED mounted
on the bottom of the lock housing. Remote notification can also
be achieved by connecting a monitoring device to the SPDT relay
included on the lock circuit board.
SCS (Security Condition Sensor)
This feature can detect the quality of the locking bond between the
surface of the magnet and the armature plate. The sensitivity of
this feature is such that a foreign object with a thickness of .007”
(.18mm) is sufficient to allow the sensor to detect a problem.
Due to the sensitivity of this feature and the necessity to maintain
a reliable locking bond, these surfaces must be kept free of
contaminating materials. Both the lock surface and the armature
plate must be cleaned periodically with a non-abrasive cleanser.
Alignment of armature plate and magnet is required to ensure
proper function of sensor.
Low Voltage Detection
Each SCS circuit board also includes a low voltage detection
cir
cuit when shipped fr
om the factory. This feature will cause the
alarm relay and status LED to activate should the lock input
voltage drop below 10.3VDC if wired for 12VDC or 20.5VDC if
wired for 24VDC. That signals a monitored system or guard
station that the holding force of the lock may have been
compromised.
DSS (Door Status Sensor)
The DSS option monitors the position of the door upon which the
lock is installed. A SPDT r
eed switch mounted within the lock
cavity eliminates the need for extra sensors to be installed on the
door for notification of security or access control systems. The
DSS option comes with a magnet pr
e-installed into the lock
armature plate for signaling the reed switch in the housing when
the door is closed. Care should be taken during the final testing of
the lock to ensure that the DSS option is operating in the desired
manner.
Inspection and Maintenance
This product and all related accessories or parts must be
inspected and maintained on a quarterly basis. Contacting
surfaces of the electromagnetic lock and armature plate must be
kept free of contaminating materials. Surfaces must be cleaned
periodically with a non-abrasive cleaner.
All mounting fasteners must be inspected on a quarterly basis.
When properly installed, the ends of the armature plate allow a
slight movement but the plate will feel secure when grasped at the
bolt. There should be no movement to the mounting bracket or
housing of the electromagnetic lock.
For added safety, thread locking compound has been provided for
the armature plate bolt and the four captive electromagnetic lock
mounting screws.
WARNING: Improper installation, maintenance, inspection or
usage of the product or any r
elated accessories or parts may cause
the electromagnetic lock, armature plate and associated hardware
to disengage and fall, causing serious bodily injur
y and pr
oper
ty
damage.
PLEASE DELIVER ALL INSTALLATION INSTRUCTIONS TO
THE END-USER UPON COMPLETION OF THE INST
ALLA
TION.
For product support, parts and ordering information contact:
Rutherford Controls Int’l Corp.
USA:
2697 Inter
national Parkway
, Pkwy 5
Virginia Beach, VA 23452
Canada: 210 Shearson Crescent
Cambridge, ON N1T 1J6
Phone: 1-800-265-6630 / 1-519-621-7651
Fax:
1-800-482-9795 / 1-519-621-7939
E-mail: [email protected]
W
ebsite:
www.rutherfordcontrols.com
Fig. 3 – Lock Assembly View
anti-tamper
screw
cavity screw

Specifications
MECHANICAL (
Including 1/4” [6.4mm] mounting bracket)
:
8310 Lock Dimensions:
1 5/8”D x 2 7/8”W x 10 1/2”L (41mm x 73mm x 268mm)
8320 Lock Dimensions:
1 5/8”D x 2 7/8”W x 21”L (41mm x 73mm x 533mm)
8330 Lock Dimensions:
1 5/8”D x 2 7/8”W x 34 1/2”L (41mm x 73mm x 876mm)
8340 Lock Dimensions:
1 5/8”D x 2 7/8”W x 46 1/2”L (41mm x 73mm x 1181mm)
NOTE: Both 8330 and 8340 housings may be cut to length on site
Standard Armature plate dimensions:
5/8”D x 2 3/8”W x 7 7/16”L (16mm x 60mm x 189mm)
DSS Armature plate is 10”L (254mm)
ELECTRICAL:
V
oltage:
12VDC or 24VDC
(Selected by choosing appropriate wiring terminals)
Cur
rent:
0.28A @ 12VDC
0.28A @ 24VDC
NOTE: 8320 lock contains 2 control boards
that will each draw 0.28A
SCS Output Relay: SPDT relay. Contacts rated at 1.25A@24VDC
DSS Reed Switch: Magnetically actuated SPDT switch.
Contacts rated for 0.20A @12VDC and 0.12A @ 24VDC
ENVIRONMENTAL: Not for use in outdoor environments.
Circuit board operating temperature: -14 to 140˚F (-10 to 60˚C)
NOTE: Specifications may change without notice.
8300 Series Troubleshooting Guide
Problem Solution
Remove anti-tamper screw and cavity screw. Insert supplied Allen wrench into
mounting bolt holes in the bottom of the lock housing and turn. (See Fig.3)
- Check power supply. DC power should be slightly over the voltage
specifications outlined on the packaging. eg: for 12VDC operation
supply should be set at 12VDC-13VDC.
-
Check connections at power supply
, connected r
eleasing devices, lock
ter
minals and lock cir
cuit board to magnet core.
- Check delayed relock wiring and time setting
-
Check that the momentar
y switch does not include a shunted light option
Check to see that armature plate is correctly aligned with the
electromagnetic lock. If there is improper alignment, make a 1/4” turn of the
armature plate mounting bolt and check for alignment.
CAUTION: The
armature plate must remain affixed securely to the door or serious bodily
injury or property damage may occur. Bolt should be tight enough to hold
the armature plate to the door while still allowing for alignment with the
electromagnetic lock.
This generally indicates that the lock is either operating on AC voltage or there
is some AC voltage present in the DC supply. A properly filtered and regulated
DC power supply is required to achieve optimal operation from the lock.
Ensur
e that switching devices ar
e inter
r
upting the DC power and not the
AC power supply voltage.
Ensure rubber washer on armature plate mounting bolt has not been
r
emoved or damaged
- Check that switching device interrupts the positive wire and not the
negative wir
e (See Fig. 2)
-
Remove any Diodes or other suppr
ession devices that may be installed
Cannot remove the lock mounting bracket from top of
magnet for installation.
Lock is installed but has no holding force at all.
Lock has enough holding force to lightly hold a
screwdriver or set of pliers but door will not lock.
Lock is operating and locking but the armature plate is
“humming” against the surface of the lock.
Lock is not releasing immediately upon removal of power
8310, 8320, 8330 & 8340 Electromagnetic Lock
Installation Instructions (Continued)
4
NOTE: All RCI electromagnetic locks must be powered with filtered and regulated DC power supplies such as the RCI 10 Series UL
Listed power supply. RCI offers a full line of power supplies and switching devices that are suitable for use with the 8300 Series locks.
Voltage 8310 8320 8330 8340
12VDC 0.28A 0.28A x 2= 0.56A 0.28A 0.28A
24VDC 0.28A 0.28A x 2= 0.56A 0.28A 0.28A
Power Supply

Product Accessories Guide (Separate installation instructions provided with accessories.)
Top Jamb bracket and angle bracket kit is required for
use when mounting the lock on a door that swings
inwards. Magnet mounts to the underside of an angle
bracket mounted on the frame. Armature plate mounts
to “Z” bracket assembly mounted to door face.
Available for all 8310 and 8320 locks.
Used in a narrow head jamb situation or for center-
hung doors. Any place where there is insufficient
frame depth to mount the lock.
Available in several different sizes and finishes.
Available for all 8310 and 8320 locks.
Required wherever there is insufficient space on the
frame header to mount the lock. The lock mounts to
the underside of the “L” bracket and the “L” bracket
then gets mounted to the doorframe.
Available in several different sizes and finishes.
Available for all 8310 and 8320 locks.
Allows an armature plate to be mounted to a glass or
Herculite door that does not have a frame. The Glass
Door Bracket is a “U”-shaped piece of 1/16” thick
material that slips over the top of the glass panel and
tightens to the glass with setscrews. The Armature
plate mounts directly to the surface of the bracket by
means of a threaded hole in the bracket assembly
plate.
Available for both 1/2” and 3/4” thick glass doors.
Top Jamb Bracket
Angle Bracket
“L” Bracket
Glass Door Bracket
Part Usage Example
8310, 8320, 8330 & 8340 Electromagnetic Lock
Installation Instructions (Continued)
5

Product Accessories Guide Continued
Used for traffic control applications where two doors
are to be used with a single 8310 lock. The Split
Armature plates are half the length of a standard
armature. Each of these is mounted on one of a pair of
doors with an 8310 lock centered on the frame
between the doors.
Note: Use of split armature plates will reduce
holding force.
Used to provide extra mounting space in a hollow
metal or wood frame where the door stop of the frame
is not thick enough to allow a lock to be installed.
Available in several different heights and widths.
For use when an obstruction in the door prevents the
installation of the armature plate at a proper height. If
the armature plate needs to be lowered then a spacer
bar can be used to lower the lock from the frame.
Available in several different heights.
For use with doors that do not permit the armature
plate to be mounted low enough to meet the magnet
surface. Eg: Some aluminum framed commercial
glass doors. The armature holder can be mounted to
whatever frame is available and the armature plate in
turn mounted to the holder.
Available in both flat (shown) and pocket styles.
Split Armature
Plates
Filler Bars
Spacer Bars
Armature Holder
Part Usage Example
Also A
vailable
DSS Retrofit Kit- Allows a DSS option to be added to a lock that was not originally equipped with DSS. Cover Tamper Switch - Can be used to
monitor the opening of the lock cavity cover
.
Cover Security Scr
ew
- A spanner
-head security scr
ew to prevent the opening of the wiring cavity
cover. Requires a special security driver to open the cavity. (Sold Separately)
8310, 8320, 8330 & 8340 Electromagnetic Lock
Installation Instructions (Continued)
6

©2007 RUTHERFORD CONTROLS INT’L CORP. WWW.RUTHERFORDCONTROLS.COM
USA: 2697 INTERNATIONAL PARKWAY, PKWY 5, VIRGINIA BEACH, VA 23452 • CANADA: 210 SHEARSON CRESCENT, CAMBRIDGE, ON N1T 1J6
PHONE • 1.800.265.6630 • 519.621.7651 • FAX: 1.800.482.9795 • 519.621.7939 • E-MAIL: SALES@RUTHERFORDCONTROLS.COM
8310, 8320, 8330 & 8340 Electromagnetic Lock
Installation Instructions
(Continued)
Total One Way
Length of 1/4A 1/2A 3/4A 1A 1-1/4A 1-1/2A 2A 3A
Wire Run (ft.)
100 24 20 18 18 16 16 14 12
150 22 18 16 16 14 14 12 10
200 20 18 16 14 14 12 12 10
250 18 16 14 14 12 12 12 10
300 18 16 14 12 12 12 10 --
400
18 14 12 12 10 10 -- --
500 16 14 12 10 10 -- -- --
750 14 12 10 10 -- -- -- --
1000 14 10 10 -- -- -- -- --
1500 12 10 -- -- -- -- -- --
Total One Way
Length of 1/4A 1/2A 3/4A 1A 1-1/4A 1-1/2A 2A 3A
Wire Run (ft.)
100 20 18 16 14 14 12 12 10
150 18 16 14 12 12 12 10 --
200 16 14 12 12 10 10 -- --
250 16 14 12 10 10 10 -- --
300 16 12 12 10 10 -- -- --
400
14 12 10 -- -- -- -- --
500 14 10 10 -- -- -- -- --
750
12
10 -- -- -- -- -- --
1000 10 -- -- -- -- -- -- --
1500
10
--
-- -- -- -- -- --
Load Current @24V
Load Current @12V
Wire Gauge Chart courtesy of Electronic Locking Devices by John L. Schum
WIRE GAUGE SELECTIONS
7

8310, 8320, 8330 & 8340 Electromagnetic Lock
Installation Instructions (Continued)
Maintenance Schedule
COMPANY NAME:
DOOR LOCATION DATE NOTES INITIAL
/