Page is loading ...

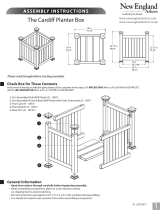
1. Preassembled Arch (2) - 12009
2. Arch Rafters (6) -
12007
3.
4.
5.
6.
Braces (4) - 12005
Preassembled Side Panels (2)
- 12008
Hardware:
a)
1 1/2” (38 mm) Wood Screws (12)
To attach rafters to arch
Tools You Will Need
• Cordless Drill
• Tape Measure
• Level
• Short Ladder
• Shovel
General Information
Read Instructions through carefully before beginning assembly.
• When assembling components, place on a non-abrasive surface
(i.e. shipping box)
to avoid scratching.
•
We recommend an area approx 10’x 8’ (3 m x 2.4 m) for unobstructed assembling.
• You should not need to use excessive force when assembling components.
Please read through before starting assembly.
Check Box for These Contents
In the event of missing or defective parts please call our customer service dept. at 1 800 282 9346 (Mon. to Fri. 8:00 AM to 4:00 PM EST).
(UK Tel: (44) 2038 687160 (Mon. to Fri. 1:00 PM to 10:00 PM GMT).
b) 1 1/2”
(38 mm) Wood Screws (8) To attach ground stakes to posts
c) 2” (51 mm) Wood Screws (4) To attach braces to arbor posts
d) 3” (76 mm) Wood Screws (4) To attach braces to swoop top arch
e) 3 1/2” (89 mm) Wood Screws (8) To attach swoop top arches to posts
Ground Stakes (4) - 12006
ASSEMBLY INSTRUCTIONS
The Westwood Arbor / Arch
1
5
a
Not to Scale
b
V1.5
/081517
4
1
2
3
c
6
14 in
(36 cm)
18 in
(46 cm)
5 in
(13 cm)
3 in (8 cm)
59 in
(150 cm)
3 in (8 cm)
42 in
(107 cm)
82 in
(208 cm)
78.4 in
(199 cm)
47 in
(119 cm)
86 in
(218 cm)
d
e
www.newenglandarbors.com
www.newenglandarbors.co.uk
59 in
(150 cm)

STEP O N E
2
1
The Westwoo
d Arbor / Arch
Connect Arch System to Side Panels
Lay down the side panels and arches as shown aside. Align the
notch on the underside of the arch as shown. Make sure the side
panels and arch are flush to each other.
1
2
2
3
Fasten
the
arch
es to the posts using the provided 3½” (89
mm) screws (two per post).
STEP TWO
Attach Braces and Rafters
Stand arbor upright, pl
ace and align the braces to the posts and
arches. Ensure that the faces of the posts and braces are flush to each
other. Fasten the brace to the post using the provided 2” (51 mm)
screws; fasten the brace to the swoop top arch using the provided
3“ (76 mm) screws as shown below.
Fasten the six arch rafters onto
the arches using two 1½” (38 mm)
screws per rafter. Align to pre-drilled holes to ensure proper
spacing.
3
4
4
2” (51 mm) Screw
1 1/2” (38 mm) Screw
3” (76 mm) Screw

3
Into Earth For Permanent Installation
STRONGLY RECOMMENDED
STEP THREE
Temporary Arbor Installation
Arbors must be well secured to prevent tipping over from wind load etc.
We have provided four ground stakes for securing the arbor.
If you are installing your arbor on concrete or a wood deck, visit your
hardware store to purchase the appropriate galvanized bracketing
hardware.
Attach Ground Stakes
1
2
Permanent Arbor Installation
A
B
Fasten all four ground stakes to the base of the posts using the
provided 1 1/2” (38 mm) screws (2 screws per anchor) as
shown
aside.
For
a temporary ar
bor installation, carefully lift the arbor and
place into final location. Push the anchors into the ground by
pushing down on the posts. Do not step on the side panel
bottom rail as the rail is not meant to carry a load. If the soil is
hard, you may need to excavate a 4 inch (10 cm) holes prior,
or pour
some water to soften the ground.
Ensure the arbor opening is set at 42” (106.7 cm) and that the
arbor is plumb and level.
For
a
permanent installation, measure and dig four-8” (20 cm)
diameter holes, 14“ (36 cm) deep where the ground stakes will be
located. The centers of the holes should be a rectangular
pattern with dimensions of 44 1/2” x 15 1/2” (113 cm x 39 cm)
Fill excavated holes with mixed concrete and carefully lift arbor
into place. Plumb and level the arbor.
Note: The posts should not be set in the concrete.
Arbor Post
Ground Stake
Concrete
Ground
1
14
in. (36 cm)
www.newenglandarbors.com
www.newenglandarbors.co.uk
North America Toll Free Phone: 1 800 282 9346
United Kingdom Tel: (44) 2038 687160
/