Tripp Lite TRIPP-LITE WEBCARDLX UPS Smart Online 1000VA 900W 120V LCD USB DB9 User manual

Type
User manual
1
Installation and User Manual
PowerAlert® Manager
URCap
Note: PowerAlert is not required to operate your UPS System.
For the latest PowerAlert updates, go to tripplite.com
1111 W. 35th Street, Chicago, IL 60609 USA • tripplite.com/support
Copyright © 2021 Tripp Lite. All rights reserved.
WARRANTY REGISTRATION
Register your product today and be
automatically entered to win an ISOBAR®
surge protector in our monthly drawing!
tripplite.com/warranty
1. Overview 2
1.1 Parts List 2
1.2 System Requirements 2
2. Install Hardware 3
2.1 UPS Quick Start Guide 3
2.2 Network Card Installation 4
3. Determine Connection 5
3.1 Connection Using a 5
Network Switch
3.2 Direct Connection 6
4. Initial UPS Network 7
Configuration
4.1 Static IP Address Assignment 7
4.2 Dynamic IP Address Assignment 8
5. Install PowerAlert URCap 9
5.1 Download 9
5.2 Installation on PolyScope 9
6. PowerAlert URCap 10
Configuration
6.1 UR PolyScope Configuration 10
6.2 UPS Configuration 11
7. Operation 13
7.1 Monitor 13
7.2 Filter View 14
7.3 Current Alerts 14
7.4 Pop-Ups 15
7.5 Data Log 15
8. Troubleshooting 16
9. Technical Support 16
Appendix 17
2
1.1 Parts List
This guide will help you set up the optional PowerAlert Manager URCap software for monitoring information from a
Tripp Lite UPS on your Polyscope Pendant for your UR system. For more detail on how to setup and run your UPS
system, refer to its manual.
Required Tripp Lite Products
PowerAlert URCap, UPS, WEBCARDLX
1.2 System Requirements
• Tripp Lite LX Platform UPS with WEBCARDLX running PowerAlert Device Manager version 20.0.0 or greater.
Note: PowerAlert Device Manager (PADM) applies the following security policy: On initial login with any of the pre-configured local
users and localadmin, PADM will force the user to change the default password.
Note: If the device is running 15.5.1 or earlier, update it to 15.5.7 prior to updating to PADM version 20.
• Ethernet network that supports the TCP/IP protocol
• One of the following web browsers for remote configuration, monitoring and control:
• Chrome
• Firefox
• Internet Explorer
• Safari
Desktop and mobile environments are supported.
UPS System WEBCARDLX
(if not pre-installed)
Computer Ethernet Cable USB Thumb Drive
(at least 70MB)
Network Switch
1. Overview
Required from Customer
Computer, Ethernet Cable (Can purchase from Tripp Lite), USB Thumb Drive, Network Switch (Recommended; Can
purchase from Tripp Lite)
3
2.1 UPS Quick Start Guide
Note: For a complete UPS installation and operation guide, including important safety instructions, refer to its owner’s manual.
2. Install Hardware
  
  
1
2
3
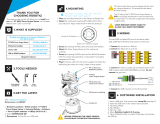
1 Plug your UPS line cord into an electrical outlet.
Your UPS must be connected to a dedicated circuit of sufficient
amperage. Note that select models may be fitted with different
plug types. Refer to the rating table on top of your UPS for
more details on each selectable operating voltage.
Once your UPS is plugged in, all indicator LEDs will flash
momentarily and the fan will turn on. The LCD display will
scroll two message screens for 2 seconds each:
 
  
  
  
Note: Until the UPS is connected to a powered AC outlet for the first
time, COLD START (startup in battery mode during a power failure) is
not available.
Power is not supplied to the UPS outlets in STANDBY mode
in the factory configuration. Bypass output can be enabled in
standby mode via the built-in LCD configuration screens.
2 Plug your equipment into your UPS.
Your UPS is designed to support computer and UR controller-
related equipment only. You will overload your UPS if you
connect motors and heating devices to the UPS outlets.
3 Turn your UPS ON.
• Press the “ON/MUTE” button
• Hold it for several seconds until you hear a beep
• Release it
After successful completion of startup diagnostics, your UPS
will begin providing power to its outlets. The INPUT, AC/
DC (converter), DC/AC (inverter) and OUTPUT LEDs will
illuminate and the LCD screen will display:
  
 
If you are having trouble turning the UPS on, you may
be pressing the ON button too long. Release the button
during the beep (not after it stops).
Note: UPS system will function properly upon initial startup. However,
maximum runtime for the unit’s battery will only be accessible after it
has been charged for 24 hours.
4
2.2 Network Card Installation
The optional network card adds capabilities for monitoring and controlling your UPS as a network device, including remote
management. Refer to your network card’s manual for complete installation instructions.
Contact Tripp Lite Customer Support at 773.869.1234 for more information about the WEBCARDLX.
2. Install Hardware
1 Make sure the network card is installed.
Some UPS systems include a pre-installed network
card. If your UPS system does not, you must install
manually by following the installation instructions
included with the card.
2 Confirm the firmware version is 20.0.0 or later.
To access the UPS setup screens, press the SCROLL ( ) and SELECT ( ) buttons simultaneously and hold for 3
seconds.
The OUTPUT VOLTAGE selection screen will appear.
The INFORMATION screen will appear.
The ORIGINAL UPS SET-UP EXIT/ENTER screen will appear.
INFORMATION refers to a series of 3 information screens that are viewable
via the LCD interface: Firmware version, UPS serial number and SNMP IP
address. These values are for viewing only and cannot be modified via the
LCD interface
Press SELECT ( ) to EXIT this
section. Press SCROLL ( ) to
advance to the next information
screen.
Available Information: FIRMWARE
VERSION, UPS SERIAL #, SNMP IP
ADDRESS
Scroll through available values and
press SELECT ( ) to EXIT.
Press EXIT ( ) to exit the UPS SET-UP section.
Press ENTER ( ) to re-enter UPS SET-UP screens.
To Advance to
the Next Screen:
Press SCROLL ( )
To Change This
Setting:
Press SELECT ( )

 
  
 
 
 
5
3. Determine Connection
3.1 Connection Using a Network Switch (recommended method)
The UPS can connect to the UR controller directly or over the network. For direct connection instructions, go to section
3.2 Direct Connection. See below for network connection instructions.
1 Connect to Network Switch.
The UPS has a RJ45 port for
connecting to the network switch.
Use a Cat 6 or higher Ethernet
cable for this connection.
Note: Not compatible with PoE (Power
Over Ethernet) applications.
2 Connect the UR Controller.
Use a Cat 6 or higher Ethernet cable
to connect the UR Controller to the
same network or switch as the UPS.
3 Connect to the Local Area
Network (LAN) (Optional).
Connect the network switch
to the LAN. This will enable
remote access to the UPS for
later configuration changes and/or
maintenance purposes.
Teach Pendant
Robot Arm
UPS (Back View)
Comms Data
TCP/IP
Connection Points
Building Supply
120V 60 Hz Switch Connected Locally or to the Network
Power
6
3. Determine Connection
3.2 Direct Connection
1 Connect to UR Controller.
Use a Cat 6 or higher Ethernet
cable to connect the RJ45 port of
the UPS/WEBCARDLX to the UR
controller.
Note: see Appendix for guidance setting
up a direct connection between your
computer and UPS.
Teach Pendant
Robot Arm
Comms Data
TCP/IP
Connection Points
Building Supply
120V 60 Hz
Power
UPS (Back View)
7
PADM supports both dynamic (DHCP) and static IP address assignment; refer to the appropriate section.
4.1 Static IP Address Assignment
PADM supports a single static IPv4 address (requires setting the IP address, subnet mask and gateway). If PADM is not
assigned an IP address manually or via DHCP, it will use the default static IP address of 169.254.0.1 with a subnet mask
of 255.255.0.0.
Note: It is recommended to use a network switch for the initial UPS network configuration (see 3.1 Connection Using Network Switch).
If using a direct connect of the UPS to a computer, see this manual’s Appendix.
1 Using a standard Ethernet patch cable, connect the WEBCARDLX’s Ethernet port to the network environment.
2 From a computer operating in the same environment, launch a web browser and enter 169.254.0.1 in the address bar.
3 When the PADM login screen appears, enter localadmin for both the name and password.
Note: Upon initial login, you will be required to change the password.
4 Navigate to the Network > Internet menu and enter the desired IPv4 Manual (Static IP) information.
4. Initial UPS Network Configuration
8
4. Initial UPS Network Configuration
4.2 Dynamic IP Address Assignment
This section is for dynamic (DHCP). If uncertain as to which method to use, contact your network administrator for
assistance.
This section provides instructions for configuring the device’s network access parameters. During the process, the
device’s MAC address may be required. The 12-character address (in the format XX XX XX XX XX XX) is printed on a
label found on the WEBCARDLX.
• For devices using WEBCARDLX, the label is attached to the underside of the card
• For devices with an embedded LX interface, the label is typically affixed to the device enclosure
1 Using a standard Ethernet patch cable, connect the LX Platform device’s Ethernet port to the network environment in
which the DHCP server is running. The device will attempt to obtain an IP address via DHCP; this may take several
minutes, depending on network performance.
2 To learn which IP address has been assigned, contact your network administrator and provide the device’s MAC
address.
3 When the PADM login screen appears, enter localadmin for both the name and password.
Note: Upon initial login, you will be required to change the password.
9
5. Install PowerAlert URCap
5.1 Download
1 Download the latest Power Alert UR CAP Installer from tripplite.com under Management Solutions / Utilities.
2 Load the software files in the root directory of a USB thumb drive. 5.92 MB of space is required.
5.2 Installation on PolyScope
1 Insert the USB thumb drive into the UR Pendant or
UR controller.
2 In the PolyScope Header, tap the menu on the
top right. Go to Settings > URCaps and press the
(+) sign.
3 Navigate to the PowerAlert UR CAP Installer on the
USB thumb drive.
4 Once installed, press the restart button to restart
the system.
5 If installed correctly, PowerAlert will appear in the
Installation tab under URCaps.
Note: Refer to the UR system manual for more details on
installing URCaps.
10
6. PowerAlert URCap Configuration
6.1 UR PolyScope Configuration
Determine the IP address for the PolyScope Configuration
Go to the menu on the top right of PolyScope on the Pendant. Go to Settings > Network to take note of the current UR
Controller IP address or set your own static IP address.
If the device obtained an IP address via DHCP, learn which IP address has been assigned by contacting your network
administrator.
Note: Refer to your UR system’s manual for more details on setting up the network.
Enter the PolyScope IP address
1 Go to Installation > URCaps > PowerAlert.
2 Enter the IP address noted above in the IP address field under PolyScope Configuration.
11
6. PowerAlert URCap Configuration
6.2 UPS Configuration
Enter the UPS IP address
1 Go to Installation > URCaps > PowerAlert.
2 Enter the IP address you noted above in the IP address field under UPS Configuration.
3 Protocol and Port are set to default values; contact your network administrator to determine if changes are needed.
4 Enter the Username and Password set in section 3.2 Direct Connection, then select Save Changes.
Note: All fields need to be populated.
12
6. PowerAlert URCap Configuration
When Setup is Complete
Ready to work state: UR Polyscope Configuration Status is `Running’ and UPS Configuration Status is `UPS is reachable’.
It may take a few seconds to show reachable. A field highlighted green indicates information has been entered correctly. A
field highlighted red indicates information has been entered incorrectly.
Check UR+ Dashboard
After successful configuration, the user should be able to view appropriate data in the PowerAlert URCap Dashboard.
See section 7. Operation for details
13
7. Operation
7.1 PowerAlert > Monitor
This window contains information about environmental and operating conditions: Battery Age, Battery Capacity, Battery
Status, Inputs and Outputs, Runtime. Information such as Input Voltage is updated periodically. PowerAlert continually
queries the device for status information and updates the console as changes are reported. A status indicator appears
next to each operation condition. If the indicator is green, all functions within that category are operating within normal
parameters. If the indicator changes color, one of the variables in that category is outside normal parameters.
Default Expanded View
Collapsed View
14
7. Operation
7.2 Power Alert > Filter View
Click the Filter Views tab to select which variables you would like to display on the monitor tab.
7.3 Power Alert > Current Alerts
Click the Alerts tab to see Events and their info—Critical, Warning, Status, Info and Offline—each with its own icon.
This icon will display in the left side of the Alarm Status section in the PowerAlert Console window when an event of that
category occurs.
15
7. Operation
7.4 Pop-Ups
Messages will pop-up to show you alert severity and details. Click OK to remove a pop-up. There will be a brief delay
before each pop-up window appears.
7.5 Logs > Data Log
Click the Logs menu button to display the Logs > Data Log. Each event displays an icon that identifies its category:
“Critical,” “Warning,” “Info” or “Offline.”
16
8. Troubleshooting
9. Technical Support
If you are unable to resolve an issue using the Troubleshooting guide, you can reach Tripp Lite Technical Support here:
E-mail
Phone
773.869.1234 7AM – 6PM CST
Web
The latest PowerAlert Local software updates are available at tripplite.com/products/power-alert-local
Technical Support Assistance
tripplite.com/support
Problem Possible Solution
The IP address of the
WEBCARDLX is unknown
If your network’s DHCP server assigned an IP address to the LX Platform device,
contact your network administrator to learn the IP address assigned to the card or
view it during terminal session at boot-up. You will need to know the MAC address of
the LX Platform device. If your network does not use DHCP, or if you need to assign a
static IP address for another reason, follow the instructions for assigning a static IP
address via terminal mode configuration. Refer to the printed manual included with
your LX platform device for more information.
UPS is unreachable Check if the IP address is correct and if the UPS is connected to the UR controller,
either directly or through network switch. If still unreachable, make sure you have the
correct username and password. You will need to change password after first login.
Unable to access PADM on
connected computer
Check to make sure you are using the correct firmware version. See section
2.2 Network Card Installation.
1. Confirm that Ethernet cables are properly connected and port LEDs show activity
2. Ensure the LX Device is running firmware version 20.0.0 or later
17
Appendix
Direct Connection Between Computer and UPS
For a computer to be able to communicate with the UPS when directly connected by Ethernet cable, the computer must
be in the same subnet.
1. Make note of the IP address and Subnet mask configuration of the UPS, as described in section 4.1 Static IP Address
Assignment.
2. In the computer environment, open Settings and select Network and Sharing Center. In the window that opens,
select “Change adapter settings”.
Alternatively, click on the Network icon in the computers task bar and select “Network & Internet settings”. In the
window that opens, select Ethernet from the left menu. In the options that appear at right, select “Change adapter
options”.
3. In the window that opens, select the Ethernet card being used for communication with the UPS.
18
Appendix
1111 W. 35th Street, Chicago, IL 60609 USA • tripplite.com/support
21-08-066 933FC8_RevA
4. In the Ethernet Status window that opens, select Properties to open the Ethernet Properties window. Find “Internet
Protocol Version 4 (TSP/IPv4)”, select it, then click Properties.
5. Select the “Use the following IP address” option. Enter an IP address in the same subnet as the UPS (step 1). For
example, if the IP address of the UPS is 192.168.10.10, enter 192.168.10.20 – the last octet must be different. Next,
enter the Subnet mask – it must identically match the Subnet mask of the UPS. Click OK.
6. Open a browser window and enter the IP address of the UPS in the search bar to access the PowerAlert Device
Manager login screen.
Once the direct connection between your computer and UPS is established, you can proceed with IP setup with your
UPS and UR Cap (see section 4. Initial UPS Network Configuration for more information).
  • Page 1 1
  • Page 2 2
  • Page 3 3
  • Page 4 4
  • Page 5 5
  • Page 6 6
  • Page 7 7
  • Page 8 8
  • Page 9 9
  • Page 10 10
  • Page 11 11
  • Page 12 12
  • Page 13 13
  • Page 14 14
  • Page 15 15
  • Page 16 16
  • Page 17 17
  • Page 18 18

Tripp Lite TRIPP-LITE WEBCARDLX UPS Smart Online 1000VA 900W 120V LCD USB DB9 User manual

Type
User manual

Ask a question and I''ll find the answer in the document

Finding information in a document is now easier with AI