
Robotiq Insights
Instruction Manual robotiq.com | leanrobotics.org
Original Notice
© 2018 Robotic Inc.

Table of Contents
1. General Presentation 7
2. Safety 9
2.1. Intended Use 9
2.2. Network Security Warning 10
2.3. Insights Edge Gateway Warning 11
2.4. Remote Access Warning 12
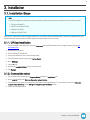
3. Installation 13
3.1. Installation Steps 13
3.1.1. URCap installation 13
3.1.2. Connect the robot 13
3.1.3. Robot pairing 14
3.1.4. URCap upgrade 14
3.1.5. Remote Access (Advanced plan only) 16
Requisites and compatibility 16
Web browser 16
Whitelisting 16
Web cameras 16
Initial setup by robot owner 17
Starting a remote session 19
Remote robot side 19
Web application side 19
3.2. Using the Insights Edge Gateway 20
3.2.1. Scope of delivery 20
3.2.2. Wiring 20
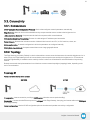
3.3. Connectivity 21
3.3.1. Nomenclature 21
3.3.2. Topology 21
Topology #1 21
Topology #2 22
Topology #3 23
3.3.3. Edge Gateway Configuration 24
Insights - Instruction Manual
2

Insights - Instruction Manual
3
Default configuration 24
Custom configuration 24
4. Using Insights 27
4.1. Web application interface 27
4.1.1. Real-Time Robot Overview 27
Robot Status 27
Notifications button 28
Add robot button 28
4.1.2. Robot management 29
About 29
Shifts 30
Access 32
Subscription 32
4.1.3. My Alerts Settings 34
4.1.4. Email Reports Scheduler 35
4.1.5. Robot alerts 36
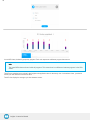
4.1.6. Performance Timeline 38
4.1.7. Key Performance Indicators (KPIs) 39
4.1.8. Robot digital I/Os 41
Controller General Purpose Digital Inputs 41
Tools Digital Inputs 41
4.1.9. Signals 42
4.1.10. Downloadable events logs 42
4.2. Teach pendant interface 44
4.2.1. Insights node 44
4.2.2. Custom events 44
Create 44
Alerts 44
Manage 45
4.3. Remote Access 46
5. Specifications 47
5.1. Insights Edge Gateway 47
6. Troubleshooting 48


Revisions
Robotiq may modify this product without notice, when necessary, due to product improvements, modifications or changes in
specifications. If such modification is made, the manual will also be revised, see revision information. See the latest version of this
manual online at support.robotiq.com.
Revision 2018/07/03
Section modified:4.1 Web application interface
Revision 2018/03/15
Section modified: 1. General Presentation
Section modified: 3.1 Installation steps
Section modified 4.1 Web application interface
Revision 2018/02/05
Section modified: 3.1 Installation steps
Section modified: 4.1 Web application interface
Section modified: 4.2 Teach pendant interface
Revision 2017/09/11
Official release
Insights - Instruction Manual
5

Insights - Instruction Manual
6
Copyright
© 2017 Robotiq Inc. All rights reserved.
This manual and the product it describes are protected by the Copyright Act of Canada, by laws of other countries, and by
international treaties, and therefore may not be reproduced in whole or in part, whether for sale or not, without prior written consent
from Robotiq. Under copyright law, copying includes translation into another language or format.
Information provided by Robotiq in this document is believed to be accurate and reliable. However, no responsibility is assumed by
Robotiq for its use. There may be some differences between the manual and the product if the product has been modified after the
edition date.
The information contained in this document is subject to change without notice.

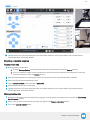
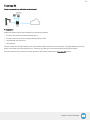
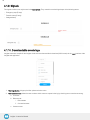
1. General Presentation
Robotiq Insights is a web application that provides a digital representation of Universal Robots in operation. Once registered, the
user can connect a UR robot to the web application and get a 360-degree view of the robot’s performance with real-time monitoring,
analysis, and diagnosis tools.
Insights’ rich data set and analytics allow manufacturers to continuously improve productivity and quality while reducing the level
of supervision required during operation.
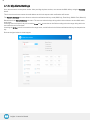
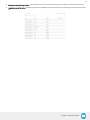
Insights comes in two subscription plans. The features comprised in each plan are displayed in the table below:
Feature Free Plan Advanced Plan1
Real-Time Robot Overview Included Included
Email Reports Scheduler Included Included
Robot SMSAlerts Default downtime alerts Custom alerts
Production Performance Timeline &KPIs Top 5 cobot KPIs Top 5 cobot KPIs
Custom KPIs
Robot Digital I/Os Not included Included
Downloadable Events Log Not included Included
Insights Edge Gateway Sold separately2Complimentary
Using their laptops, smartphones or tablets, Insights users can:
oRemotely monitor a UR robot’s state in real time;
oOptimize robot performance using real-time, operational key performance indicators (KPIs);
oAnalyse performance trends using robot performance data over time periods that narrows from years to minutes (Advanced sub-
scription plan);
oReceive daily performance reports sent by email;
oReceive notification messages (SMS) for events such as emergency stops, protective stops, safeguard stops, or when the
robot is disconnected;
oDiagnose work cell events like bottlenecks, faults or exceptions using digital I/O states and external sensor readouts;
oAccess a dedicated, downloadable log of Insights events;
oShare the robot dashboard with others (co-workers, partners, etc.).
Info
Insights is only available for Universal Robots UR3, UR5 & UR10. It is compatible with controller version CB3.1 or later,
and with PolyScope version .3.4.0-39 and later.
11-year term only
2One-time purchase
Insights - Instruction Manual
7

Insights - Instruction Manual
8
Log in or create an account by visiting insights.robotiq.com. Users need to connect their robot to the Insights cloud service via an
Internet connection and then pair the robot to their account. The following are the main components of the product:
oInsights web application (insights.robotiq.com), a platform that provides a dashboard to view all paired robots and each robot’s
performance data.
oInsights URCap to be installed on the UR robot, which in turn will be paired to an Insights account. The URCap enables the con-
nection to the Insights web application.
oInsights Edge Gateway that ensures an easy and secure connection of your robot to the cloud.

2. Safety
2.1. Intended Use
Insights is designed to work only with Universal Robots arms. Robotiq Insights is intended to be used for the following purposes:
oMonitor robot status in real time
oMonitor robot performance indicators in real time and via reports
oGet SMS alerts for robot events
Warning
Insights should not be used as a safety parameter for the robotic cell.
Caution
Always comply with local and/or national laws, regulations and directives on automation safety and general machine
safety.
Robotiq will not be liable for any damages resulting from any improper or unintended use.
Insights - Instruction Manual
9

Insights - Instruction Manual
10
2.2. Network Security Warning
Connecting your robot to an unsecured Internet network represents a high security risk. Make sure you use the Insights Edge
Gateway or secure the robot by yourself to protect it from being remotely accessed or controlled by a third party.
Warning
Strong security should be provided to the communicating channel. Communication between your robot cell, the gateway
and the cloud must be secure in order to prevent any data tampering or unrestricted access.
Using the Insights Edge Gateway properly will protect your robot from being remotely accessed or controlled by a third party. It is
designed to allow:
lOnly outbound communication to the cloud (no inbound connectivity)
lTargeted outbound connectivity (only the necessary ports are open)
Refer to the Installation section for guidelines on how to install the Edge Gateway correctly.
Refer to the Appendix section for privacy policy and end-user terms of use and license agreement.

Insights - Instruction Manual
11
2.3. Insights Edge Gateway Warning
Caution
Do not use the Edge Gateway in premises that can be submerged by water.
Caution
Do not use the Edge Gateway during an electrical storm to avoid electrical shock.
Compliance is required with respect to voltage, frequency, and current requirements. Connection to a different power source than
those specified may result in improper operation, damage to the equipment or fire hazard if the limitations are not followed.
This equipment is provided with a detachable power cord which has an integral safety ground wire intended for connection to a
grounded safety outlet.
oDo not substitute the power cord with one that does not correspond to the approved type. If a 3-prong plug is provided, never use
an adapter plug to connect to a 2-wire outlet as this will defeat the continuity of the grounding wire.
oThe equipment requires the use of the ground wire as a part of the safety certification, modification or misuse can provide a
shock hazard that can result in serious injury or death.
oProtective grounding/earthing is provided by the listed AC adapter. Building installation shall provide appropriate short-circuit
backup protection.
oProtective bonding must be installed in accordance with local national wiring rules and regulations.
Refer to the Installation section for guidelines on how to install the Edge Gateway correctly.
Refer to the Appendix section for privacy policy and end-user terms of use and licence agreement.

Insights - Instruction Manual
12
2.4. Remote Access Warning
Safety
The remote sessions are provided at your sole risk and Robotiq will not be liable to you for any loss, costs, expenses or
damages incurred by you, including but not limited to any direct, indirect, incidental, consequential, or special damages.
Moving the robot remotely without the visual stream provided by the web camera(s) is not recommended. Having one
ore two web cameras connected and working allows for safer remote operation and control of the robot. Robotiq
disclaims itself from any material damage and/or bodily injury caused by the remote operation and control of the robot.
Make sure an operator stands next to the robot at all times during a Remote Access session, with the emergency stop
(E-Stop) button within arms reach.
Safety
Make sure the robot is calibrated before going into Freedrive mode remotely.
Confidentiality
A Remote Access session provides the remote expert with complete access to the robot (programs, installation file,
etc.)
Revoke access to the robot to stop sharing robot data.

3. Installation
3.1. Installation Steps
Info
In order for Insights to connect to the Internet properly, make sure these ports are opened on your corporate firewall:
lTCP port 443 (MQTT)
lUDP/TCP port 443 (HTTPS)
lUDP port 123 (NTP)
lDNS port 53 (UDP/TCP)
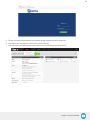
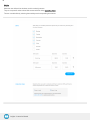
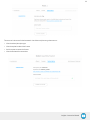
First, log in or create an account on insights.robotiq.com. You will access the Dashboard that contains the Insights Demo robot.
Follow these three steps in order to install Insights on a robot and pair it to your account.
3.1.1. URCap installation
1. From the Insights web application, press the Add robot button OR download from the Insights product page at sup-
port.robotiq.com
2. Download the .urcap file
3. Put the URCap on a USB stick
4. Connect the USB stick in the robot teach pendant
5. From the PolyScope home page, go to Setup Robot
6. Go to URCaps
7. Tap the +sign
8. Choose the Insights URCap file from the USB stick
9. Tap Restart
3.1.2. Connect the robot
1. From the URteach pendant, go to Program Robot and tap the Installation tab
2. Go to Insights and tap the Start configuration wizard button
3. The wizard will then guide you through the wiring steps of the Edge Gateway. For more details, refer to the Using the
Insights Edge Gateway sectionUsing the Insights Edge Gateway section
4. Follow the connection steps
Insights - Instruction Manual
13

Insights - Instruction Manual
14
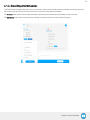
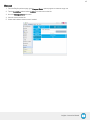
3.1.3. Robot pairing
Simultaneously:
From the Insights web application From the teach pendant
a. From the Dashboard, go to Add robot
b. Click on Start pairing
c. Use the serial number shown in the pairing wizard on
the robot teach pendant
d. Fill in the robot information
e. Confirm and get the pairing code to enter on the robot
teach pendant
a. Open a robot program an go to the Installation tab
b. Go to Insights and launch the robot pairing wizard
c. The robot serial number will appear on the teach pendant;
enter it in the web application pairing window
d. Get the pairing code from the web application and enter it
in the wizard.
e. Tap Next.
The pairing will be completed and the robot will appear on your Dashboard.
Info
It is possible to pair a robot that has already been paired. Doing so will delete the previous pairing. A message in the
pairing wizard will display who the current owner is and will ask you if you wish to pair the robot to another account, thus
deleting the current one.
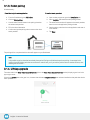
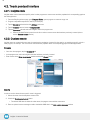
3.1.4. URCap upgrade
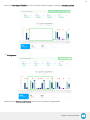
The robot cards in the Real-Time Robot Overview (refer to the Real-Time Robot Overview section) display a gear icon in the
upper-right corner.
If there is a red dot next to the gear icon, it means that the latest Insights URCap has not been installed on that particular robot's
teach pendant.

Insights - Instruction Manual
15
Clicking the gear icon brings up the About section (refer to the About section) of the Insights web application and the URCap
version row indicates that a new URCap version is available for download on that particular robot's teach pendant.
From the teach pendant, follow the instructions below to upgrade the Insights URCap:
lIn PolyScope, open a robot program, go to the Installation tab and select Insights from the menu on the left
lTap the Dashboard sub-menu; Insights will notify you if an upgrade is available
lIf so, tap the Download button (otherwise, Insights will display that the software is up to date)
lAfter the download, Insights will display that the software is ready to be installed
lRefer to point 5 of the URCap installation section to complete the upgrade

Insights - Instruction Manual
16
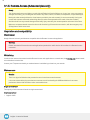
3.1.5. Remote Access (Advanced plan only)
Safety
The remote sessions are provided at your sole risk and Robotiq will not be liable to you for any loss, costs, expenses or
damages incurred by you, including but not limited to any direct, indirect, incidental, consequential, or special damages.
Moving the robot remotely without the visual stream provided by the web camera(s) is not recommended. Having one
ore two web cameras connected and working allows for safer remote operation and control of the robot. Robotiq
disclaims itself from any material damage and/or bodily injury caused by the remote operation and control of the robot.
Make sure an operator stands next to the robot at all times during a Remote Access session, with the emergency stop
(E-Stop) button within arms reach.
Requisites and compatibility
Web browser
Google Chrome is the only web browser compatible with the Remote Access web application.
Warning
Please note that the Remote Access web application opened with a mobile device will not allow for a Remote Access
connection.
Whitelisting
In order for the remote robot network and the Remote Access web application to communicate, the *.robotiq.com domain needs
to be whitelisted on both sides.
Contact your IT department should you need assistance in whitelisting a domain on your network.
Web cameras
Caution
There is no physical limitation that prevents the use of more than two web cameras.
It is not recommended to plug more than two cameras to avoid overloading the USBbandwidth as it can cause
performance issues with the robot or other connected devices.
Single camera feed
The majority of web cameras will work for single camera feed.
Dual camera feed
lLogitech C920

Insights - Instruction Manual
17
Initial setup by robot owner
1Install Insights (please refer to the Installation Steps section).
2Click on the remote access icon in the lower right corner of the robot card in the Real-Time Robot Overview.
3In the new Remote Access browser tab, click on the Get Started button.

Insights - Instruction Manual
18
4Download the Remote Access software (compressed files).
5Decompress the files at the root of a USBstorage device.
6Insert the USBstorage device in the robot controller or teach pendant.
7Wait for the Remote Access application to start.
8Plug one or two USBcameras in the robot controller (plugging more than two cameras to the robot controller has a negative
impact on robot performance).
9Adjust camera positioning with the camera feed on the teach pendant.

Insights - Instruction Manual
19
10 Tapping the close icon (X) in the upper right corner of the teach pendant or removing the USBkey will close the Remote
Access application on the teach pendant.
Starting a remote session
Remote robot side
1Grant access to a remote expert
aGo to the Manage Robots menu and share the robot with a remote expert (refer to the Access section).
bIf you do not want the remote access to be able to access the robot at all times after the remote session, revoke the
access to that person (refer to the Access section).
2Insert the USB storage device containing the Remote Access software in the robot teach pendant or controller.
3Wait for the Remote Access application to start.
4Tap the Launch session button to generate a passcode.
5Share the passcode with the remote expert.
6Tapping the close icon (X) in the upper right corner of the teach pendant or removing the USBkey will close the Remote
Access application on the teach pendant.
Web application side
1Browse to the Remote Access web application by logging in to an Insights account (please refer to step 2 of the Initial setup
by robot owner section).
2Select a robot to which the access has previously been granted (see Remote robot side section).
3Click on the Launch session button.

Insights - Instruction Manual
20
4Enter the passcode generated by the Remote Access robot application.
5Click on the Connect button.
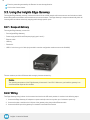
3.2. Using the Insights Edge Gateway
The Insights Edge Gateway securely connects the robot LAN to a WAN network with Internet access and includes an inbuilt
firewall that protects and allows restricted and secure communications. The Edge Gateway is setup to automatically block all
incoming traffic and allow exclusively outgoing traffic through specific ports.
3.2.1. Scope of delivery
The Insights Edge Gateway comes with:
oPreconfigured Edge Gateway
oPower supply with USA and European plugs (types A and C)
oEthernet cable
oUSB key
oFixation kit
oUSB 2.0 micro b to type A Cable (only needed in case the configuration needs access to the WebGUI)
The user needs to provide an Ethernet cable to supply Internet connectivity.
Caution
The operating temperature of the Edge Gateway is between 0°C and 50°C. Make sure you install the gateway in an
environment that respects this condition.
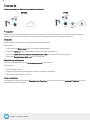
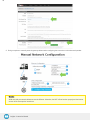
3.2.2. Wiring
The Edge Gateway wiring is done via the connection wizard on the URteach pendant. It consists in the following steps:
1. Connect the Edge Gateway AC adapter to a power outlet (the device may take up to 3 minutes to power up)
2. Connect the robot controller to the LANport of the gateway using the provided Ethernet cable
3. Connect the WAN port of the gateway to a network connected to the Internet
Page is loading ...
Page is loading ...
Page is loading ...
Page is loading ...
Page is loading ...
Page is loading ...
Page is loading ...
Page is loading ...
Page is loading ...
Page is loading ...
Page is loading ...
Page is loading ...
Page is loading ...
Page is loading ...
Page is loading ...
Page is loading ...
Page is loading ...
Page is loading ...
Page is loading ...
Page is loading ...
Page is loading ...
Page is loading ...
Page is loading ...
Page is loading ...
Page is loading ...
Page is loading ...
Page is loading ...
Page is loading ...
Page is loading ...
Page is loading ...
Page is loading ...
-
 1
1
-
 2
2
-
 3
3
-
 4
4
-
 5
5
-
 6
6
-
 7
7
-
 8
8
-
 9
9
-
 10
10
-
 11
11
-
 12
12
-
 13
13
-
 14
14
-
 15
15
-
 16
16
-
 17
17
-
 18
18
-
 19
19
-
 20
20
-
 21
21
-
 22
22
-
 23
23
-
 24
24
-
 25
25
-
 26
26
-
 27
27
-
 28
28
-
 29
29
-
 30
30
-
 31
31
-
 32
32
-
 33
33
-
 34
34
-
 35
35
-
 36
36
-
 37
37
-
 38
38
-
 39
39
-
 40
40
-
 41
41
-
 42
42
-
 43
43
-
 44
44
-
 45
45
-
 46
46
-
 47
47
-
 48
48
-
 49
49
-
 50
50
-
 51
51


Ask a question and I''ll find the answer in the document
Finding information in a document is now easier with AI
Related papers
-
 ROBOTIQ 2F-85 and 2F-140 Grippers User manual
-
 ROBOTIQ Screwdriving Solution User manual
-
 ROBOTIQ Insights Quick start guide
-
 ROBOTIQ FT 300 User manual
-
 ROBOTIQ FT 300-S Force Torque Sensor Quick start guide
-
 ROBOTIQ FT 300-S Force Torque Sensor User manual
-
 ROBOTIQ 2F-85 and 2F-140 Grippers User manual
-
 ROBOTIQ Wrist Camera User manual
-
 ROBOTIQ PE Series User manual
-
 ROBOTIQ Wrist Camera User manual


Other documents
-
 Educational Insights Artie 3000™ The Coding Robot Product Instructions
-
ATI Technologies 9105-NET-AXIA80-M20 Software Installation And Setup Manual
-
 Educational Insights Robot Face Race™ Product Instructions
-
Tripp Lite TRIPP-LITE WEBCARDLX UPS Smart Online 1000VA 900W 120V LCD USB DB9 User manual
-
Datalogic IMPACT Robot Guidance Owner's manual
-
SICK sBot Stop – URCap, sBot Speed – URCap Safety System Operating instructions
-
-
whisker Litter Robot 4 WiFi-Enabled Automatic Litter Box User manual
-
Sharper Image Artificial Intelligence Robot STEM Kit User manual
-
Meccano Meccabrain 2.0 Operating instructions

