Page is loading ...

1.WHAT IS SUPPLIED?
6.SOFTWARE INSTALLATION
5.WIRING
4.MOUNTING
Visit support.robotiq.com
3.GET THE LATEST
• Download and uncompress the content of the
corresponding UCC-X.X.X version directly on
a USB stick.
• Get the latest instruction manual.
For e-Series:
• Have a USB stick that contains the UCC-X.X.X uncom-
pressed content (see step 3).
• With the controller on, insert the USB stick in the 4
ports USB hub.
• On the teach pendant, tap the triple bar icon in the
upper right corner of the teach pendant and select
Settings, then System in the left pane.
• Tap the URCaps submenu and then tap the + sign at
the bottom of the screen.
• Open Robotiq_Wrist_Camera-X.X.X.urcap from
the USB stick. Tap the Restart button.
• When PolyScope reopens, tap the Installation button.
• Select the URCaps menu in the left pane and tap the
Camera button.
• Go to the Dashboard to verify that the system is up
and running.
• Connect the red wire of the device cable to a 24V pin of
the robot controller.
• Connect the black wire of the device cable to a 0V pin
of the robot controller.
• Connect the 4 ports USB hub to the robot controller.
• Connect the Wrist Camera’s USB cable in the USB hub.
• Connect the USB license dongle in the USB hub.
THANK YOU FOR
CHOOSING ROBOTIQ
!
LEAVE ENOUGH EXCESS CABLE TO
ALLOW FULL ROBOT MOVEMENT.
1. Mount the Wrist Camera on the robot arm.
2. Align the dowel pin.
3. Secure by inserting the M6 screws and tooth lock
washers.
4. Mount the gripper directly on the Wrist Camera
using the M5 screws and tooth lock washers
provided with the gripper.
2 mm
Slotted Screwdriver
2.TOOLS YOU NEED
4 mm
Hex Key
Power
PWR
GND
24V
0V
24V
CI0
24V
CI1
CI3
24V
CI2
24V
CI
24V
CI4
24V
CI5
CI7
24V
CI6
24V
CI
0V
CO0
0V
CO1
CO3
0V
CO2
0V
CO
0V
CO4
0V
CO5
CO7
0V
CO6
0V
CO
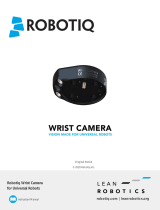
This step-by-step guide will allow you to install
and test your Wrist Camera on Universal Robots.
Standard upon delivery of
a Wrist Camera for Universal Robots
(RWC5-UR-KIT)
Robotiq Wrist Camera unit
Pattern tool plate*
USB Stick
RWC5-CAM-001
RWC-TOOL-062
ACC-USB-16G
USB Software License Dongle
ACC-USB-DONGLE
4-ports USB hub ACC-USB-4-HUB
Calibration board ACC-CALIB-BOARD
Colored background ACC-TEACH-BACK
Wrist Camera Tags (5) ACC-TAG-1BAG5
Necessary Hardware
* The pattern tool plate is not required and not supplied if purchased in a combo.

WRIST CAMERA
QUICK START GUIDE
7. TEST WRIST CAMERA
8. CALIBRATION
For e-Series:
• Tap the Installation button and select the URCaps
menu in the left pane.
• Select Camera and
go to the Dashboard to verify that the
system is running.
• Go to the Camera tab.
• The output image from the camera will display.
9. TEACH OBJECT
For e-Series:
• Tap the Program button.
• Select the URCaps menu in the left pane.
• Tap the Cam Locate button.
• Select the Cam Locate node in the program tree and
tap the Teach object button in the Command tab
to launch the object teaching wizard.
• You will need to select the previously taught
calibration.
!
DO NOT REMOVE THE USB STICK AND THE USB
LICENSE DONGLE, EVEN AFTER THE INSTALLATION
HAS BEEN COMPLETED.
For e-Series:
• Tap the URCaps menu in the left pane and select
Camera.
• Go to the
Snapshot
tab.
• Tap the button to choose the calibration method.
• Follow the steps shown in the Teach Pendant.
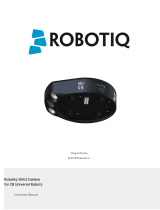
For installation on
Universal Robots
T: 1.418.380.2788 ext. 3
robotiq.com/support
May 2021
X-990021-F
elearning.robotiq.com
X-990021-F
For CB-Series:
• Have a USB stick at hand that contains the UCC-X.X.X
uncompressed content (see step 3).
• With the controller on, insert the USB stick in the 4
ports USB hub.
• From the PolyScope home page, tap Setup Robot.
• Go to URCaps Setup and tap the + sign.
• Open Robotiq_Wrist_Camera-X.X.X.urcap from
the USB stick.
• Tap the Restart button.
• When PolyScope reopens, go to Program Robot and
tap the the Installation tab.
• Choose Camera and go to Dashboard.
• Verify that the system is up and running.
For CB-Series:
• Go to
Camera
and then to the
Snapshot
tab.
• Tap the button to choose the calibration method.
• Follow the steps shown in the Teach Pendant.
For CB-Series:
• From your robot program, go to the Structure tab.
• Go to the URCaps submenu.
• Tap the Cam Locate button.
• Go to the Command tab and tap Teach object to
launch the object teaching wizard.
• You will need to select the previously taught
calibration.
For help with troubleshooting, visit
robotiq.com/support
and the instruction manual for further information on how
to program the Wrist Camera.
For CB-Series:
• From a robot program, go to the Installation tab and then
select Camera.
• Select the Dashboard tab and verify that the vision system is
running.
• Go to the Camera tab.
• The output image from the camera will appear.
/