
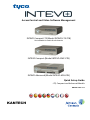
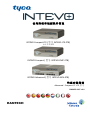
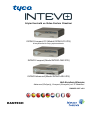
Access Control and Video Software Management
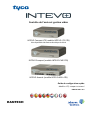
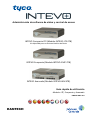
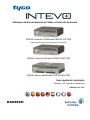
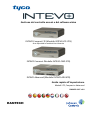
INTEVO Compact LTE (Model INTEVO-LTE-2TB)
Not available for sale in North America
INTEVO Compact (Model INTEVO-CMP-2TB)
INTEVO Advanced (Model INTEVO-ADV-4TB)
Quick Setup Guide
LTE, Compact and Advanced Models
DN2055-1807 v2.0
KANTECH

2
Contents
Copyright 3
Notice of use 3
Warranty 3
Important 3
Safety instructions 3
Technical support 5
Technical specifications 7
Quick setup guide 8
What is in the box? 8
Installation 8
Desktop installation 8
Wall Mount Installation 8
Rack Mount Installation (not included) 8
Connections 9
First start configuration 13
Usernames and passwords 13
Steps to follow for local access 13
Steps to follow for remote access: 14
How to activate IP camera channels on INTEVO using Illustra IP cameras 14
How to activate IP camera channels on INTEVO using an INTEVO-IPCAM01 license 15
Auto update 16
© 2018 Tyco Security Products. All rights reserved.

Copyright
Under copyright laws, the contents of this manual may not be copied, photocopied,
reproduced, translated or reduced to any electronic medium or machine-readable form, in
whole or in part, without prior written consent of Tyco Security Products.© 2018 and its
respective companies. All rights reserved.
Notice of use
Read this manual carefully before use. All requirements should be followed before using
this product.
l We reserve the right to change the product and manuals without prior notice.
l Keep this document for future reference.
l The product is for indoor use only.
l Keep the product and other accessories in a dry environment.
l We are not responsible for any damage caused by inappropriate use.
l The Installer shall instruct the USER regarding ALL THE SAFETY INSTRUCTIONS
that shall be observed during the use of the equipment.
Warranty
l The Advanced and Compact models offers a warranty period of 3 years starting
the date of installation.
l The Compact LTE model offers a warranty period of 12 months starting the date of
installation.
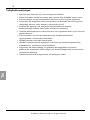
Important
l This INTEVO device shall be used and installed within an environment that
provides the pollution degree max. 2 and overvoltages category II NON
HAZARDOUS LOCATIONS, indoor only. The equipment is FIXED or DESKTOP and
CORD CONNECTED and is recommended to be installed by service persons only.
l There is no ON/OFF SWITCH for the power supply. The AC power supply coupler
serves as a means of disconnection from the supply mains.
Safety instructions
l Select a place that is free from vibration and shock.
l Do not locate this product where persons can walk on the cables.
l Do not connect the product to electrical outlets on the same circuit as large
appliances.
3
© 2018 Tyco Security Products. All rights reserved.

4
l Do not select a place that exposes the product to direct sunlight, excessive heat,
moisture, vapors, chemicals or dust.
l Do not install this equipment near water. For example, bathtub, wash bowl,
kitchen/laundry sink, wet basement, or near a swimming pool.
l Do not install this equipment and its accessories in areas where there is a risk of
explosion.
l Do not connect this product to electrical outlets controlled by switches or
automatic timers.
l AVOID sources of radio interference.
l AVOID setting up the equipment near heaters, air conditioners, ventilators, and/or
refrigerators.
l Ensure that cables are positioned so that accidents can not occur. Connected
cables must not be subject to excessive mechanical strain.
l Use the included AC power supply and cord only.
© 2018 Tyco Security Products. All rights reserved.

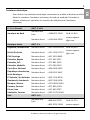
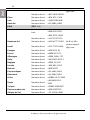
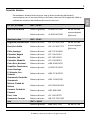
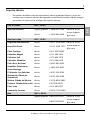
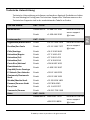
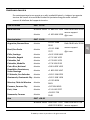
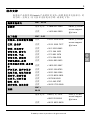
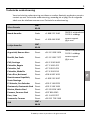
Technical support
For technical assistance with this and other Kantech products, contact Technical
Support, Monday to Friday. See the following table for the Technical Support
phone numbers.
USA and Canada
GMT -
05:00
North America Toll Free +1 888 222 1560
Direct +1 450 444 2030
08:00 to 20:00
access-support
@jci.com
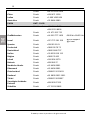
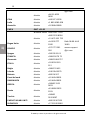
Latin America
GMT -
03:00
Argentina, Buenos Aires Direct +54 11 5199 3104
Brazil, Sao Paolo Direct +55 11 3181 7377
08:00 to 20:00
access-support
@jci.com
Chile, Santiago Direct +56 2 3210 9662
Colombia, Bogota Direct +57 1 344 1422
Colombia, Cali Direct +57 2 891 2476
Colombia, Medellin Direct +57 4 204 0519
Costa Rica, National Direct +506 4 000 1655
Dominican Republic, Santo
Domingo
Direct +1 829 235 3047
El Salvador, San Salvador Direct +503 2 136 8703
Guatemala, Guatemala City Direct +502 2 268 1206
Mexico, Mexico City Direct +52 55 8526 1801
Panama, Panama City Direct +507 836 6265
Peru, Lima Direct +51 1 642 9707
Venezuela, Caracas Direct +58 212 720 2340
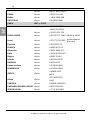
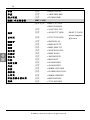
Asia
GMT +
08:00
Toll free +800 CALL TYCO 09:00 to 17:00
+800 2255 8926
access-support
5
© 2018 Tyco Security Products. All rights reserved.

6
@jci.com
Direct +86 21 6023 0650
China Direct +400 671 1528
India Direct +1 800 1082 008
Australia Direct +02 9684 3980
EMEA
GMT +
01:00
Toll free +800 CALL TYCO
+800 2255 8926
Direct +31 475 352 722
United Kingdom Direct +44 330 777 1300
Israel Direct +972 772 201 350
08:00 TO 18:00
access-support
@jci.com
Spain Direct +900 99 31 61
France Direct +0800 90 79 72
Germany Direct +0800 1806 757
Italy Direct +39 0230 510 112
Belgium Direct +0800 76 452
Ireland Direct +180 094 3570
Bahrain Direct +800 04127
Nordic countries Direct +45 4494 9001
Denmark Direct +45 4494 9001
Greece Direct +00800 3122 9453
Russia Direct +81 0800 2052 1031
Turkey Direct +00800 31923007
United Arab Emirates Direct +800 03107123
South Africa Direct +27 21100 3882
© 2018 Tyco Security Products. All rights reserved.

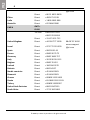
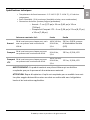
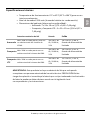
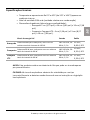
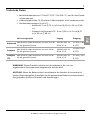
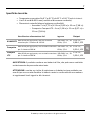
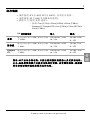
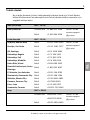
Technical specifications
l Operating Temperatures: 0°C to 40°C (32°F to 104°F) for indoor use only.
l Humidity Level: 93% max. (relative humidity non-condensing).
l Cabinet Dimensions (Height-Width-Depth):
-
Advanced: 7cm (2.75 in) x 24 cm (9.45 in) x 19 cm (7.48 in).
-
Compact and Compact LTE: 6 cm (2.36 in) x 21cm (8.27 in)
x 19 cm (7.48 in).
PoE power ratings Input
Output
Advanced
Max. 30W for each port, but with a system total
maximum of 120W.
100-240 Vac, 50-
60 Hz, 2.5A
24 Vdc, 6.66
A, LPS
Compact
Max. 30W for each port with a system total
maximum of 60W.
100-240 Vac, 50-
60 Hz, 2.5A
19 Vdc, 6.31
A, LPS
Compact
LTE
Max. 30W for each port with a system total
maximum of 60W.
100-240 Vac, 50-
60 Hz, 2.5A
12 Vdc, 3.33
A, LPS
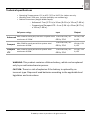
WARNING: This product contains a lithium battery, which can be replaced
only by an authorized service person.
CAUTION: There is a risk of explosion if the battery is replaced by an
incorrect type. Dispose of used batteries according to the applicable local
legislation and instructions.
7
© 2018 Tyco Security Products. All rights reserved.

8
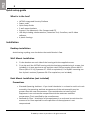
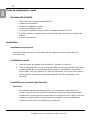
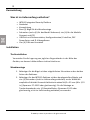
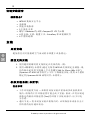
Quick setup guide
What is in the box?
l
l
l
l
l
l
l
INTEVO Integrated Security Platform
Power cords
Quick Setup Guide
2 wall mount brackets
Screws, 6 for Advanced; 4 for Compact and LTE
USB Key including: documentation, Detection Tool, EntraPass, and IP video
software
4 plastic footings
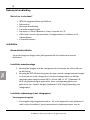
Installation
Desktop installation
Avoid storing anything near the device that could block air flow.
Wall Mount Installation
1. Fix the brackets on each side of the housing with the supplied screws.
2. Fix to the wall the INTEVO housing with the brackets provided using 4 screws (not
included). It is best practice to use stainless steel Phillips tapping screws M4.2 x
32mm (#8 x 1.25 in) (Spaenaur ST- 631P or equivalent). For drywall mounting use
four 4 plastic anchors (Spaenaur EX-S5 or equivalent; not included).
Rack Mount Installation (not included)
Precautions
l Elevated Operating Ambient - If you install the device in a closed or multi-unit rack
assembly, the operating ambient temperature of the rack assembly may be
greater than the room temperature. Give consideration to installing the
equipment in an environment compatible with the maximum ambient
temperature (Tma) specified by the manufacturer.
l Reduced Air Flow - Installation of the equipment in a rack must be such that the
amount of air flow required for safe operation of the equipment is not
compromised.
© 2018 Tyco Security Products. All rights reserved.

l Mechanical Loading - If you are mounting the equipment in the rack, it must be
such that an hazardous condition is not achieved due to uneven mechanical
loading.
l Circuit Overloading - You must give consideration to the connection of the
equipment to the supply circuit and the effect that overloading of the circuits
might have on overcurrent protection and supply wiring. Appropriate consideration
of equipment nameplate ratings must be used when addressing this concern.
l Reliable Earthing - Reliable earthing of rack-mounted equipment must be
maintained. Particular attention must be given to supply connections other than
direct connections to the branch circuit. For example, use of power strips.
Note: The maximum install height for the wall mounting installation is 2m.
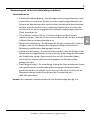
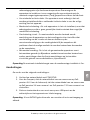
Connections
Proceed with the following connections:
1. Connect your network cable to ETH1/ETH2.
2. For the Compact, connect your camera network cable to PoE ports 3-6. For the
Advanced, connect your camera network cable to PoE ports 3-6 for cameras and
PoE ports 7-10 for cameras and controllers.
3. Connect a keyboard and a mouse to a USB port, on the back of the device, for local
access.
Note: You can use INTEVO without a monitor or mouse with remote access.
9
© 2018 Tyco Security Products. All rights reserved.

10
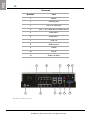
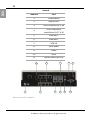
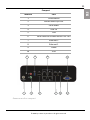
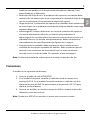
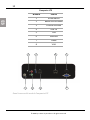
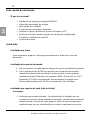
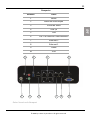
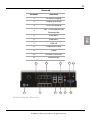
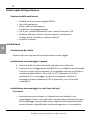
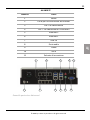
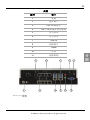
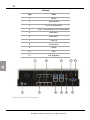
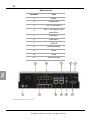
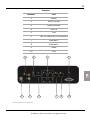
Advanced
Number Port
1 Power
2 Display port
3 PoE 3-6 cameras
4 PoE 7-10 cameras and controllers
5 Ethernet 2
6 Ethernet 1
7 USB 3.0
8 Audio ports
9 HDMI
10 Serial
11 Power button
1
5
3 6
8
10
2
7
9
11
4
Advanced back panel
© 2018 Tyco Security Products. All rights reserved.

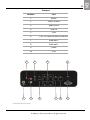
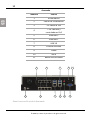
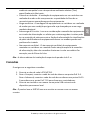
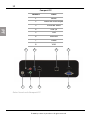
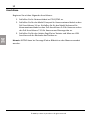
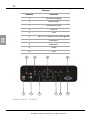
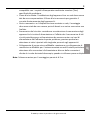
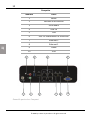
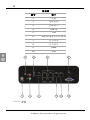
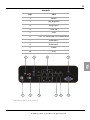
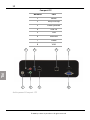
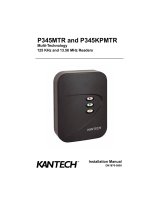
Compact
Number Port
1 Power
2 Power button
3 Audio ports
4 USB 3.0
5 USB
6 PoE 3-6 cameras and controllers
7 Ethernet 2
8 Ethernet 1
9 HDMI
10 VGA
5
7 8
10
31
2 4 6
9
Compact back panel
11
© 2018 Tyco Security Products. All rights reserved.

12
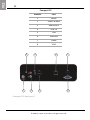
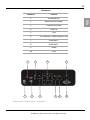
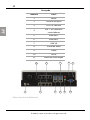
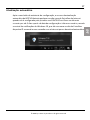
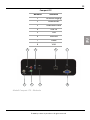
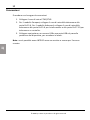
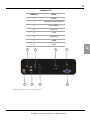
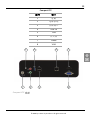
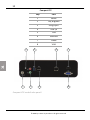
Compact LTE
Number Port
1 Power
2 Power button
3 Audio ports
4 USB 3.0
5 USB
6 Ethernet
7 HDMI
8 VGA
2 7
6
4
3
1
5
8
Compact LTE back panel
© 2018 Tyco Security Products. All rights reserved.

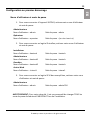
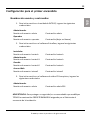
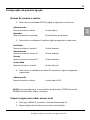
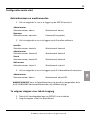
First start configuration
Usernames and passwords
1. To log on to the INTEVO unit, enter the following credentials:
Administrator
Username: admin Password: admin
Operator
Username: operator Password: (leave blank)
2. To log on to the EntraPass software, enter the following credentials:
Installer
Username: kantech Password: kantech
Administrator
Username: kantech1 Password: kantech
Guard
Username: kantech2 Password: kantech
Web Access
Username: intevo1 Password: intevo1
3. To log on to the IP Video software Exacqvision, enter the following credentials:
Administrator
Username: admin Password: admin256
WARNING: For your security protection, it is best practice that you change ALL
DEFAULT manufacturer passwords upon installation.
Steps to follow for local access
1. To power on the INTEVO, connect the AC power cable.
2. Follow the steps in the First Boot Wizard.
13
© 2018 Tyco Security Products. All rights reserved.

14
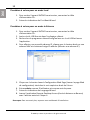
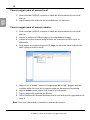
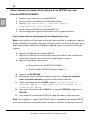
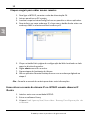
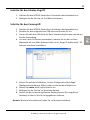
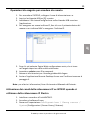
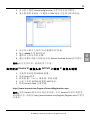
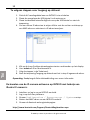
Steps to follow for remote access:
1. To power on the INTEVO, connect the AC power cable.
2. Insert the included USB key in the remote PC.
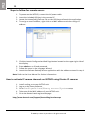
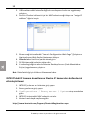
3. Locate the IntevoConfigTool.exe file on the USB key and launch the application.
4. To assign a new IP address, right-click on a MAC address and select assign IP
address.
5. Click the Launch Configuration Web Page button located on the upper right side of
the display.
6. Enter admin as an ID and password.
7. Follow the steps in the Language Wizard.
8. Launch the Remote Desktop Access application with the address entered in step 4.
Note: Refer to the User Manual for further information.
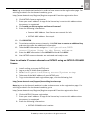
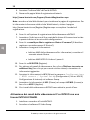
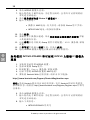
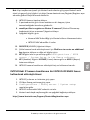
How to activate IP camera channels on INTEVO using Illustra IP cameras
1. Install and log on to your INTEVO unit.
2. Log on to the Exacq software.
3. Go to Configurations/Exacq server/System setup.
4. Take note of the MAC address of your INTEVO unit.
5. Go to the Kantech web registration page:
http://www.kantech.com/Support/KantechRegistration.aspx
© 2018 Tyco Security Products. All rights reserved.

Note: Log on to the Kantech website in order to have access to the registration page. For
valid log on details for the Kantech website, go to
http://www.kantech.com/Register/Register.aspx and fill out the registration form.
6. Click INTEVO Camera registration
7. Enter your email address. A copy of the license key is sent to this address when
the process is completed.
8. Click would you like to register an Illustra IP camera?
9. Enter the following information:
• Camera MAC Address. See Illustra user manual for info.
• INTEVO MAC address. See step 4.
10. Click REGISTER.
11. To activate multiple camera channels, click Click here to create an additional key
and enter the other the additional information.
12. Take the KEY information and go to: Configurations/HDVR
server/System Setup in the Exacq software.
13. Enter the KEY information in the LICENSE field and click APPLY.
14. Your INTEVO camera channels are activated and ready to use.
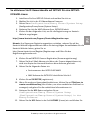
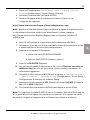
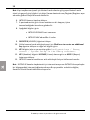
How to activate IP camera channels on INTEVO using an INTEVO-IPCAM01
license
1. Install and log on to your INTEVO unit.
2. Log on to the IP Video Exacq software.
3. Go to Configurations/Exacq server/System setup.
4. Take note of the MAC address of your INTEVO unit.
5. To go to the Kantech web registration page, click the following link:
http://www.kantech.com/Support/KantechRegistration.aspx
Note:Log on to the Kantech website in order to have access to the registration page. For
valid log on details for the Kantech website, go to
http://www.kantech.com/Register/Register.aspx and fill out the registration form.
6. Click on INTEVO Camera registration
7. Enter your email address. A copy of the license key is sent to this address when
the process is completed.
8. Enter the following information:
• INTEVO-IPCAM01 serial number
15
© 2018 Tyco Security Products. All rights reserved.

16
• INTEVO MAC address. See step 4.
9. Click REGISTER.
10. To activate multiple camera channels, click Click here to create an additional key
and enter the other the additional information.
11. Take the KEY information and go to: Configurations/Exacq
server/System Setup in the Exacq software.
12. Enter the KEY information in the LICENSE field and click APPLY.
13. Your INTEVO camera channels are now activated and ready to use.
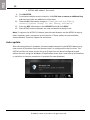
Note: To register the INTEVO IP channel open the web browser on the INTEVO or by any
other computer with a connection to the internet. If these options are not available,
contact Kantech Technical Support for assistance.
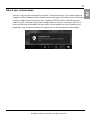
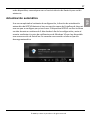
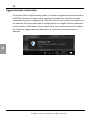
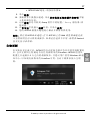
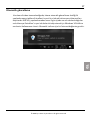
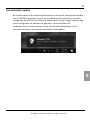
Auto update
After the setup wizard is complete, the auto-update feature for the INTEVO detects any
new version of EntraPass from the Internet once it is configured for the first time. The
INTEVO verifies the latest version for up to 5 days from the day of configuration and
advises the user using the Windows 10 notification center that a new version of EntraPass
is available. An internet connection is required for auto download.
© 2018 Tyco Security Products. All rights reserved.
Page is loading ...
Page is loading ...
Page is loading ...
Page is loading ...
Page is loading ...
Page is loading ...
Page is loading ...
Page is loading ...
Page is loading ...

10
Avancé
Numéro Port
1 Alimentation
2
Display Port
3 Ports caméras PoE 3 à 6
4
Ports caméras et
contrôleurs PoE 7 à 10
5 Ethernet2
6 Ethernet1
7 USB3.0
8 Ports audio
9 HDMI
10 Série
11 Bouton Marche/Arrêt
1
5
3 6
8
10
2
7
9
11
4
Panneau arrière avancé
© 2018 Tyco Security Products. All rights reserved.

Compact
Numéro Port
1 Alimentation
2 Bouton Marche/Arrêt
3 Ports audio
4 USB3.0
5 USB
6 Ports caméras et contrôleurs PoE 3 à 6
7 Ethernet2
8 Ethernet1
9 HDMI
10 VGA
5
7 8
10
31
2 4 6
9
Panneau arrière compact
11
© 2018 Tyco Security Products. All rights reserved.

12
Compact LTE
Numéro Port
1 Alimentation
2 Bouton Marche/Arrêt
3 Ports audio
4 USB3.0
5 USB
6 Ethernet
7 HDMI
8 VGA
2 7
6
4
3
1
5
8
Panneau arrière compact LTE
© 2018 Tyco Security Products. All rights reserved.
Page is loading ...
Page is loading ...
Page is loading ...
Page is loading ...
Page is loading ...

© 2018 Tyco Security Products. All rights reserved.
Page is loading ...
Page is loading ...
Page is loading ...
Page is loading ...
Page is loading ...
Page is loading ...
Page is loading ...
Page is loading ...
Page is loading ...
Page is loading ...
Page is loading ...
Page is loading ...
Page is loading ...
Page is loading ...
Page is loading ...
Page is loading ...
Page is loading ...
Page is loading ...
Page is loading ...
Page is loading ...
Page is loading ...
Page is loading ...
Page is loading ...
Page is loading ...
Page is loading ...
Page is loading ...
Page is loading ...
Page is loading ...
Page is loading ...
Page is loading ...
Page is loading ...
Page is loading ...
Page is loading ...
Page is loading ...
Page is loading ...
Page is loading ...
Page is loading ...
Page is loading ...
Page is loading ...
Page is loading ...
Page is loading ...
Page is loading ...
Page is loading ...
Page is loading ...
Page is loading ...
Page is loading ...
Page is loading ...
Page is loading ...
Page is loading ...
Page is loading ...
Page is loading ...
Page is loading ...
Page is loading ...
Page is loading ...
Page is loading ...
Page is loading ...
Page is loading ...
Page is loading ...
Page is loading ...
Page is loading ...
Page is loading ...
Page is loading ...
Page is loading ...
Page is loading ...
Page is loading ...
Page is loading ...
Page is loading ...
Page is loading ...
Page is loading ...
Page is loading ...
Page is loading ...
Page is loading ...
Page is loading ...
Page is loading ...
Page is loading ...
Page is loading ...
Page is loading ...
Page is loading ...
Page is loading ...
Page is loading ...
Page is loading ...
Page is loading ...
Page is loading ...
Page is loading ...
Page is loading ...
Page is loading ...
Page is loading ...
Page is loading ...
Page is loading ...
Page is loading ...
Page is loading ...
Page is loading ...
Page is loading ...
Page is loading ...
Page is loading ...
Page is loading ...
Page is loading ...
Page is loading ...
Page is loading ...
Page is loading ...
Page is loading ...
Page is loading ...
Page is loading ...
Page is loading ...
Page is loading ...
Page is loading ...
Page is loading ...
Page is loading ...
Page is loading ...
Page is loading ...
Page is loading ...
Page is loading ...
Page is loading ...
Page is loading ...
Page is loading ...
Page is loading ...
Page is loading ...
Page is loading ...
Page is loading ...
Page is loading ...
Page is loading ...
Page is loading ...
Page is loading ...
Page is loading ...
Page is loading ...
Page is loading ...
-
 1
1
-
 2
2
-
 3
3
-
 4
4
-
 5
5
-
 6
6
-
 7
7
-
 8
8
-
 9
9
-
 10
10
-
 11
11
-
 12
12
-
 13
13
-
 14
14
-
 15
15
-
 16
16
-
 17
17
-
 18
18
-
 19
19
-
 20
20
-
 21
21
-
 22
22
-
 23
23
-
 24
24
-
 25
25
-
 26
26
-
 27
27
-
 28
28
-
 29
29
-
 30
30
-
 31
31
-
 32
32
-
 33
33
-
 34
34
-
 35
35
-
 36
36
-
 37
37
-
 38
38
-
 39
39
-
 40
40
-
 41
41
-
 42
42
-
 43
43
-
 44
44
-
 45
45
-
 46
46
-
 47
47
-
 48
48
-
 49
49
-
 50
50
-
 51
51
-
 52
52
-
 53
53
-
 54
54
-
 55
55
-
 56
56
-
 57
57
-
 58
58
-
 59
59
-
 60
60
-
 61
61
-
 62
62
-
 63
63
-
 64
64
-
 65
65
-
 66
66
-
 67
67
-
 68
68
-
 69
69
-
 70
70
-
 71
71
-
 72
72
-
 73
73
-
 74
74
-
 75
75
-
 76
76
-
 77
77
-
 78
78
-
 79
79
-
 80
80
-
 81
81
-
 82
82
-
 83
83
-
 84
84
-
 85
85
-
 86
86
-
 87
87
-
 88
88
-
 89
89
-
 90
90
-
 91
91
-
 92
92
-
 93
93
-
 94
94
-
 95
95
-
 96
96
-
 97
97
-
 98
98
-
 99
99
-
 100
100
-
 101
101
-
 102
102
-
 103
103
-
 104
104
-
 105
105
-
 106
106
-
 107
107
-
 108
108
-
 109
109
-
 110
110
-
 111
111
-
 112
112
-
 113
113
-
 114
114
-
 115
115
-
 116
116
-
 117
117
-
 118
118
-
 119
119
-
 120
120
-
 121
121
-
 122
122
-
 123
123
-
 124
124
-
 125
125
-
 126
126
-
 127
127
-
 128
128
-
 129
129
-
 130
130
-
 131
131
-
 132
132
-
 133
133
-
 134
134
-
 135
135
-
 136
136
-
 137
137
-
 138
138
-
 139
139
-
 140
140
-
 141
141
-
 142
142
-
 143
143
-
 144
144
-
 145
145
-
 146
146
-
 147
147
-
 148
148
-
 149
149
-
 150
150
-
 151
151
-
 152
152
-
 153
153
-
 154
154
-
 155
155
-
 156
156
-
 157
157
-
 158
158
-
 159
159
-
 160
160


Tyco INTEVO Advanced Quick Setup Manual
- Type
- Quick Setup Manual
- This manual is also suitable for
Ask a question and I''ll find the answer in the document
Finding information in a document is now easier with AI
in other languages
- italiano: Tyco INTEVO Advanced
- français: Tyco INTEVO Advanced
- español: Tyco INTEVO Advanced
- Deutsch: Tyco INTEVO Advanced
- Nederlands: Tyco INTEVO Advanced
- português: Tyco INTEVO Advanced
- Türkçe: Tyco INTEVO Advanced
Related papers
-
Tyco KT-200 User manual
-
-
-
-
-
-
-
-
-
Other documents
-
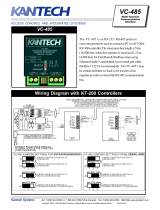 Kantech Multi-function Communication Interface VC-485 User manual
-
Pulse ExacqVision User manual
-
 Kantech KT-1 Installation guide
-
Johnson Controls tyco exacqVision Standard C-Series Quick start guide
-
 American Dynamics Hybrid Digital Video Recorder User manual
-
-
Axis exacqVision Edge Quick start guide
-
-
 American Dynamics KT-400 User manual
-
 Kantech P345KPMTR Installation guide


