Page is loading ...

exacqVision Edge/Axis Quick Start Guide
www.exacq.com
+1.317.845.5710
+5255.56080817
+44.1438.310163
+31.485.324.347
USA (Corporate Headquarters)
Mexico
Europe/Middle East/Asia
Central Europe
Page 1 of 5
5/2/2012
Introduction
exacqVision Edge is a variation of the standard exacqVision Server application that operates on a compatible Axis camera. It can
record video from the local camera directly to the SD memory card in the camera or remote drives. The exacqVision Client
application can connect to any combination of embedded and standard servers simultaneously; however, the exacqVision Web
Service cannot be supported on an embedded camera because of processing requirements.
Requirements
A one-channel license from Exacq Technologies must be obtained for each embedded camera.
exacqVision Edge is compatible with Axis ACAP cameras:
The camera must be running version 5.2 firmware or later (5.4 or later if remote storage drives are used).
An SDHC class 10 or better SD memory card no larger than 32GB, purchased separately, is required for each camera.
NOTE: Up to 2GB is reserved for exacqVision Edge operations and cannot be used for exacqVision Edge data storage.
Block Diagram

www.exacq.com
+1.317.845.5710
+5255.56080817
+44.1438.310163
+31.485.324.347
USA (Corporate Headquarters)
Mexico
Europe/Middle East/Asia
Central Europe
Page 2 of 5
5/2/2012
Installation and Configuration
CAUTION: Connecting exacqVision Edge to another exacqVision server will result in unpredictable camera and server behavior. Do
not attempt.
1. Install the Axis camera and insert the SD memory card in the camera.
NOTE: SD cards are normally pre-formatted to the FAT32 file system and automatically mounted when inserted. However,
you can re-format the card using the camera, if desired, by following the instructions provided by Axis.
2. Configure the camera’s network parameters to communicate with a PC-based browser using the Axis Camera Finder utility
found on the CD shipped with the camera, or downloaded from the Axis website.
3. If necessary, upgrade the camera firmware to the latest version from the Axis website.
4. Download the latest exacqVision Client application from the Exacq website at www.exacq.com/support/downloads.html.
5. Install the client software on your computer.
6. Download the latest exacqVision Edge server application from https://www.exacq.com/support/downloads.html.
NOTE: exacqVision Edge server software is available for both ARTPEC 3 and ARTPEC 4 processors. (ARTPEC 3 processors can
host one application at a time, whereas ARTPEC 4 processors can host multiple applications simultaneously.) The download
page contains a list of cameras supported by each exacqVision Edge ARTPEC version. Make sure you download the correct
version for your camera.
7. Open a browser to the camera and log in. The default username and password are root and pass.
8. Select Setup. Under System Options, select Storage.
9. Ensure the Total Size for SD Card is greater than zero, which means the camera is communicating with the SD card.
10. From the Setup menu, select Applications.

www.exacq.com
+1.317.845.5710
+5255.56080817
+44.1438.310163
+31.485.324.347
USA (Corporate Headquarters)
Mexico
Europe/Middle East/Asia
Central Europe
Page 3 of 5
5/2/2012
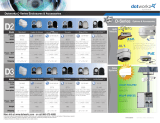
11. Complete the following steps on the Application Packages page, as shown in the following illustration:
a. Select Browse or Choose File (depending on the firmware version) and then locate the .eap file downloaded in step 6.
b. Select Upload Package. It may take up to five minutes for the package to load and install.
c. After successfully installing exacqVision Edge, exacqVision Server is displayed in the Installed Applications list.
d. The License Installed column lists “no” because exacqVision software is licensed separately.
e. Select exacqVision Server and click Start. The Status should now be “Running.” Note that after the first installation, or
after the SD card is replaced, up to five minutes could elapse before the server software is ready to connect.
f. The Log file lists any exacqVision Edge messages and errors.
12. In the local exacqVision Client, add the remote embedded server on the Add System page using the default exacqVision
Server username (admin) and password (admin256). This allows the local client on your computer to communicate with
the embedded server on the camera. When complete, the server’s status is displayed as Connected.
13. Add the exacqVision camera license to the camera’s server on the System Setup page. When complete, the status is
displayed as Licensed.
d
b
a
e
c
f

www.exacq.com
+1.317.845.5710
+5255.56080817
+44.1438.310163
+31.485.324.347
USA (Corporate Headquarters)
Mexico
Europe/Middle East/Asia
Central Europe
Page 4 of 5
5/2/2012
14. On the IP Cameras page, verify that the camera is associated with its embedded server:
The IP address must be 127.0.0.1 so that the embedded server communicates with the local camera.
The camera’s credentials are root and pass by default.
The status is displayed as Connected when complete.
15. See the exacqVision user manual for additional configuration steps, such as configuring recording settings.
Using Network Storage
exacqVision Edge can also save data to network attached storage (NAS) provided by the camera’s operating system. (An SD card
must be installed even if you use NAS because critical exacqVision Edge processes run on the card.) To use NAS, make sure that:
the NAS is compatible with the camera and camera firmware.
the NAS is properly configured on the camera’s web page.
the NAS provides adequate, stable Input/Output Per Second capacity for the camera's search, read, write, and delete
functions.
The procedure for enabling the NAS for use with exacqVision Edge is similar to the procedure in the previous section. To use NAS
with exacqVision Edge, complete the following steps:
1. Configure the NAS as described in the camera instructions provided by Axis.
2. Confirm that the NAS is properly mapped. To do this, open the camera’s web page and select Setup, System Options, and
then Storage. Verify that the Total Size for Network Share is greater than zero, which means the camera is communicating
with the NAS. If the Network Share is “not defined,” click the link to open Storage Management, enter the required
information, and click Ok.
3. Restart the exacqVision Edge server from the camera’s Applications page by selecting Stop and then Start.
4. Verify that the exacqVision Edge server appears on the Storage Setup page in exacqVision Client and that its Enabled box is
selected.
NOTE: On exacqVision Edge systems with multiple drives (NAS and local SD card), data is initially saved to the drive with the
largest amount of free space. For example, if the NAS contains more free space than the SD card, exacqVision Edge saves data to
the NAS until the SD card has more free spaceоĂŶĚƚŚĞŶŝƚƐĂǀ ĞƐĚĂƚĂƚŽƚŚĞ^ ĐĂƌĚƵŶƟůƚŚĞE ^ŚĂƐŵŽƌĞĨƌĞĞƐƉĂĐĞ͘ t ŚĞŶĂůů
storage locations are full, exacqVision Edge deletes video from both locations to create free space. If the connection to the NAS
is broken, exacqVision Edge continues to save data to the local SD card.

www.exacq.com
+1.317.845.5710
+5255.56080817
+44.1438.310163
+31.485.324.347
USA (Corporate Headquarters)
Mexico
Europe/Middle East/Asia
Central Europe
Page 5 of 5
5/2/2012
Troubleshooting
If you encounter a write error, complete the following steps:
1. Stop the exacqVision Edge server on the camera’s Applications page.
2. Unmount the SD card on the Storage Setup page.
3. Check the SD card. If necessary, repair and format the card.
4. Remount the SD card.
5. Restart the exacqVision Edge server on the camera’s Applications page.
/