Whelen Engineering Company Lo-Pro SA40 Installation guide
- Type
- Installation guide

Page 1
Installation Guide:
Lo-Pro™ Siren Speaker
Models SA40 & SA41
(for Edge® Series Lightbars)
©1994 Whelen Engineering Company Inc.
Form No.13004F (050608)
®
ENGINEERING COMPANY INC.
51 Winthrop Road
Chester, Connecticut 06412-0684
Phone: (860) 526-9504
Fax: (860) 526-4078
Internet: www.whelen.com
Sales e-mail: autosale@whelen.com
Canadian Sales e-mail: autocan@whelen.com
Customer Service e-mail: custserv@whelen.com
Automotive: Sirens/Switches
For warranty information regarding this product, visit www.whelen.com/warranty
DANGER! Sirens produces extremely loud emergency warning tones! Exposure to these
tones without proper and adequate hearing protection, could cause ear damage and/or hearing
loss! The Occupational Safety & Health Administration (www.osha.gov) provides information
necessary to determine safe exposure times in Occupational Noise Exposure Section 1910.95.
Until you have determined the safe exposure times for your specific application, operators and
anyone else in the immediate vicinity should be required to wear an approved hearing protection
device. FAILURE TO FOLLOW THIS RECOMMENDATION COULD CAUSE HEARING LOSS!
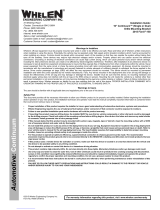
Safety First
This document provides all the necessary information to allow your Whelen product to be properly and safely installed.
Before beginning the installation and/or operation of your new product, the installation technician and operator must
read this manual completely. Important information is contained herein that could prevent serious injury or damage.
• Proper installation of this product requires the installer to have a good understanding of automotive electronics,
systems and procedures.
• If mounting this product requires drilling holes, the installer MUST be sure that no vehicle components or other
vital parts could be damaged by the drilling process. Check both sides of the mounting surface before drilling
begins. Also de-burr any holes and remove any metal shards or remnants. Install grommets into all wire
passage holes.
• If this manual states that this product may be mounted with suction cups, magnets, tape or Velcro®, clean the
mounting surface with a 50/50 mix of isopropyl alcohol and water and dry thoroughly.
• Do not install this product or route any wires in the deployment area of your air bag. Equipment mounted or
located in the air bag deployment area will damage or reduce the effectiveness of the air bag, or become a
projectile that could cause serious personal injury or death. Refer to your vehicle owner’s manual for the air bag
deployment area. The User/Installer assumes full responsibility to determine proper mounting location, based
on providing ultimate safety to all passengers inside the vehicle.
• For this product to operate at optimum efficiency, a good electrical connection to chassis ground must be
made. The recommended procedure requires the product ground wire to be connected directly to the NEGATIVE
(-) battery post.
• If this product uses a remote device to activate or control this product, make sure this control is located in an
area that allows both the vehicle and the control to be operated safely in any driving condition. DO NOT
ATTEMPT TO ACTIVATE OR CONTROL THIS DEVICE IN A HAZARDOUS DRIVING SITUATION.
• It is recommended that these instructions be stored in a safe place and
referred to when performing maintenance and/or reinstallation of this
product.
• FAILURE TO FOLLOW THESE SAFETY PRECAUTIONS AND
INSTRUCTIONS COULD RESULT IN DAMAGE TO THE PRODUCT OR
VEHICLE AND/OR SERIOUS INJURY TO YOU AND YOUR PASSENGERS!
CAUTION
Loud siren noise can cause
hearing damage and/or loss.
Refer to OSHA Section 1910.95 prior
to putting ANY siren into service!
Wear
Protection!
ACTIVATION OF THIS
SIREN MAY DAMAGE
UNPROTECTED EARS!

Page 2
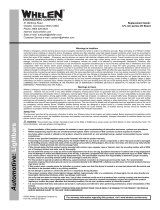
1
2
3
8
6
7
4
5
12
9
13
11
10
2
3
N/A
1
ITEM PART NUMBER DESCRIPTION
#10 x 1¼” Phillips PH Screw
Lo-Pro Siren Housing
Lo-Pro Mounting Flange
Foam Gasket
AMP Guide Hole
Fastex® Plasti-Grommet
Grommet Hole
AMP Connectors
#6 x ¼” Phillips PH Screw
Dust Cover
SD210R Siren Driver
Rubber Gasket
Fiber Gasket
N/A
72-1380792-07
N/A
N/A
N/A
N/A
38-0160691-00
21-17060704-3
N/A
11-280566-000
43-0263146-00
38-0222180-00
38-0222181-00
QTY
11
12
13
1
1
4
5
6
7
8
9
10
N/A
4
N/A
N/A
3
1
1
1
14
15.625"
15.50"
1. Feed the AMP connector (8) coming from the lightbar,
through the guide hole in the Neoprene Foam Gasket (5).
Connect the lightbar’s AMP connector to the Lo-Pro’s AMP
connector. A recessed area is provided to keep wires
from being pinched between the lightbar and the Lo-Pro.
2. Align Gasket Mounting Holes with the installation grommets
(6). Make sure that these grommets are securely installed
in their respective holes.
3. Position the foam gasket (4) over the four grommets (6).
Now align the sirens mounting flange (3) so that the pan
head screws (1) may be inserted into their mounting
grommet’s.
IMPORTANT NOTE! Do NOT use mounting screws longer than
those provided with the Lo-Pro or they wil come into contact
with your lightbar’s power supply, causing damage and
interfering with proper lightbar operation.
4. Tighten the pan head screws securely.
Installation of the Whelen Lo-Pro™ Siren Speaker is very simple, provided you follow the directions. Your lightbar has
been prepared at the factory to accept the Lo-Pro, so all that’s left to be done is the actual mounting of the siren.
-
 1
1
-
 2
2


Whelen Engineering Company Lo-Pro SA40 Installation guide
- Type
- Installation guide
Ask a question and I''ll find the answer in the document
Finding information in a document is now easier with AI
Related papers
-
 Whelen Engineering Company CANWCTA Installation guide
-
 Whelen Engineering Company 10” Continuum Single Installation guide
-
 Whelen Engineering Company Edge 9M Series Installation guide
-
 Whelen Engineering Company LFL LC Series Replacement Manual
-
 Whelen Engineering Company Micro Edge Installation guide
-
Whelen Engineering Company Cenator WeCan Installation guide
-
 Whelen Engineering Company Outer Edge Installation guide
-
 Whelen Engineering Company ION Installation guide
-
 Whelen Engineering Company M2 Series Installation guide
-
 Whelen Engineering Company PCC10W1 Installation guide


Other documents
-
 Ultra-tow 40509 Owner's manual
-
 Code 3 C3100 Installation guide
-
 Code 3 C3100 Install Instructions
-
 Plasti Dip 112126 User guide
-
 Cell2 1516.6mm Kuiper Lightbar User manual
-
 ARIZE Factor Vertical Farming Troubleshooting guide
-
 ONLINE LED STORE 8 User manual
-
Ecco 10 Series Mounting instructions
-
Directed Audio A404 User manual
-
Directed Audio A404 User manual


