Page is loading ...

THANK YOU
We appreciate the trust and con dence you have placed in Husky through the purchase of this heavy-duty storage unit. We strive to continually
create quality products designed to enhance your home. Visit us online to see our full line of products available for your home improvement
needs. Thank you for choosing Husky!
USE AND CARE GUIDE
5-SHELF HEAVY-DUTY STORAGE UNIT
48 in. W x 24 in. D x 78 in. H
60 in. W x 24 in. D x 78 in. H
Questions, problems, missing parts?
Before returning to the store, call
Husky Customer Service
8 a.m. - 6 p.m., EST, Monday - Friday
1-888-43-HUSKY
HUSKYTOOLS.COM
Item #672-405
Model #MR482478W5
Item #672-141
Model #MR602478W5

2
Table of Contents
Table of Contents . . . . . . . . . . . . . . . . . . . . . . . . . . . . . . . . . . . 2
Safety Information . . . . . . . . . . . . . . . . . . . . . . . . . . . . . . . . . . 2
Warranty . . . . . . . . . . . . . . . . . . . . . . . . . . . . . . . . . . . . . . . . . . 2
Pre-Assembly . . . . . . . . . . . . . . . . . . . . . . . . . . . . . . . . . . . . . . 2
Tools Required . . . . . . . . . . . . . . . . . . . . . . . . . . . . . . . . . . . . 3
Assembly Options . . . . . . . . . . . . . . . . . . . . . . . . . . . . . . . . . . . 4
Beam Orientation Options . . . . . . . . . . . . . . . . . . . . . . . . . . . 4
Shelf Orientation Options . . . . . . . . . . . . . . . . . . . . . . . . . . . . 4
Alternative Con guration . . . . . . . . . . . . . . . . . . . . . . . . . . . . 5
Assembly. . . . . . . . . . . . . . . . . . . . . . . . . . . . . . . . . . . . . . . . . . 5
Safety Information
CAUTION: Place the unit on a level surface. Failure to do
so can result in a safety hazard. This unit should be securely
anchored to a wall or oor with suitable fasteners, which are
not included.
CAUTION: Do not use this unit for anything other than the
manufacturer’s intended purpose. Do not stand on any part
of the unit, or use it as a ladder. Use care when working with
metal parts.
CAUTION: Evenly distribute the weight on each level and
always keep the heavier loads on the bottom.
Warranty
GUARANTEED FOREVER
If your Husky storage unit ever fails bring it back and we will replace it for free. This full warranty gives you speci c rights which vary from
state to state. If this product is defective contact the manufacturer for replacement parts.
Contact the Husky Customer Service Team at 1-888-43-HUSKY or visit www.huskytools.com.
Pre-Assembly
PLANNING ASSEMBLY
Assembly of this unit is done by tting the rivets of the beams and braces into the slots of the posts.
The wire deck will rest on the ledge surface of the beam or brace depending upon the orientation of the shelf level.
The rivet should engage and t rmly into the tapered slot of the post. This engagement will apply resistance as it engages. A visual
inspection should be made to show that the rivet is properly engaged in the slot.
A rubber mallet should be used on the ledge of the beams and braces to properly seat the rivets. If a hammer is used care should be taken
to protect the beam or brace surface to avoid damage by using a protective cloth or block of wood. Tap gently to assure that all rivets are
straight and engaged. After assembly re-check each beam and brace for engagement.

3 HUSKYTOOLS.COM
Please contact 1-888-43-HUSKY for further assistance.
Pre-Assembly (continued)
TOOLS REQUIRED
Rubber
mallet
(or) Hammer
NOTE: If a hammer is used, care should be taken to
protect the beam or brace surface.
PACKAGE CONTENTS
A
E F G
B C D
Part Description Part Number Size Quantity
A Beam TBE48SF
TBE60SF
48 in. or 60 in. 10
B Brace TBE24SF 24 in. 10
C Post UPT39SF 39 in. 8
D Wire Deck RWS2448SF
RWD2460SF
24 in. x 48 in. or 24 in. x 60 in. 5
E Post Coupler MPC0409SF N/A 4
F Post Cap RLPC N/A 4
G Post Foot RLPF N/A 4

4
Assembly Options
BEAM ORIENTATION OPTIONS
This unit can be assembled by positioning the beams and braces in one of two different orientations and combinations:
□ Beams and braces facing upwards
□ Beams and braces facing downwards
A rubber mallet should be used on the ledge of the beams and braces to properly seat the rivets.
Beam side prole view
Shelf Position (upwards) Tray Position (downwards)
SHELF ORIENTATION OPTIONS
Each shelf level can then be used as
Standard Flush Wire Deck placement
Recessed Tray Wire Deck placement
Combination Wire Deck placement

5 HUSKYTOOLS.COM
Please contact 1-888-43-HUSKY for further assistance.
Assembly Options (continued)
ALTERNATE CONFIGURATION
This shelf unit can be split into two units side by side. Couplers are not required. Position the beams and braces in the top and bottom
two post holes of each section for stability.
Vertical Conguration
Horizontal Conguration
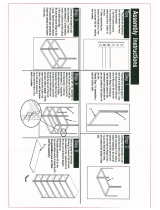
Assembly
1
Preparing for assembly
□ Check that each post (C) is in the proper orientation.
□ Position the post (C) so that the tapered end of the hole is
pointing downward.
□ Place the post feet (G) on the bottom of each of the four
lower posts (C).
□ Check that the at surface of the beam (A) and brace (B)
ledge is facing in the desired orientation.
G
C
A
Post slot points down

6
Assembly (continued)
2
Assembling the bottom level
□ Assemble one brace (B) to two lower posts (C) skipping one
hole from the bottom of each post (C).
□ Place the rivets on the braces (B) into the posts (C), and tap
lightly to seat the rivets.
□ Repeat this with the other two lower posts (C) and braces
(B).
□ Assemble the beams (A) into the two posts and brace
assemblies.
□ Place a wire deck (D) on the ledge of the assembled beams
and braces with the at side facing upwards.
B
B
B
A
C
D
A
D
3
Assembling the next level
□ Connect another two braces (B) and two beams (A) to the
posts (C) for the next level.
□ Check that each beam (A) and brace (B) is spaced equally
(see chart).
□ Place a wire deck (D) on the ledge of the assembled beams
and braces with the at side of the wire deck upwards.
Shelf Position and Location Recommended Holes Between
Levels
top (1) top hole
intermediate top (2) 10 holes
middle (3) 10 holes (above coupling)
intermediate bottom (4) 10 holes
bottom (5) 1 hole from bottom

7 HUSKYTOOLS.COM
Please contact 1-888-43-HUSKY for further assistance.
Assembly (continued)
4
Connecting the posts to the couplers
□ Position the couplers (E) on the top edge of each bottom
post (C).
□ Tap the couplers (E) down to the mid-point of the coupler.
□ Position another post (C) into the top half of the coupler (E)
and tap down until the two posts (C) connect fully into the
coupler (E).
E
Inside View
Top Post
Bottom Post
Outside View
C
E
5
Assembling the remaining three
levels
□ Connect additional braces (B) and beams (A) to the posts
(C) for each level.
□ Check that each beam (A) and brace (B) is level and
properly spaced.
□ Place a wire deck (D) on the ledge of the assembled beams
(A) and braces (B) for each level with the at side of the
wire deck (D) upwards.
D
C
A
B
6
Completing the assembly
□ Check each beam and brace connection to be sure that the
rivets are properly seated.
□ Place and fasten the post caps (F) to the top of each post
(C).
F
C

Questions, problems, missing parts? Before returning to the store,
call the Husky Customer Service
8 a.m.-6 p.m., EST, Monday-Friday
1-888-43-HUSKY
HUSKYTOOLS.COM
Retain this manual for future use.
/