BrandMotion FVMR-1150 Installation guide

Type
Installation guide

BrandMotion FVMR-1150 is a versatile mirror system that enhances your driving experience with its wide-angle rear camera and full-touch screen. It eliminates blind spots, records your drives, and seamlessly integrates with your vehicle's existing systems. Enjoy unobstructed HD views, a wider field of vision, and the convenience of a built-in DVR.

BrandMotion FVMR-1150 is a versatile mirror system that enhances your driving experience with its wide-angle rear camera and full-touch screen. It eliminates blind spots, records your drives, and seamlessly integrates with your vehicle's existing systems. Enjoy unobstructed HD views, a wider field of vision, and the convenience of a built-in DVR.

Installation Instructions - FullVUE™ Mirror Page 1/8AR_12_22_20
FullVUE™ Commercial Camera
Mirror System
FVMR-1150
Install Time
Product Features
Recommended Tools
1hr 30m - 2hr
Wrench
Socket SetScrew Driver Panel Removal Tool Zip Ties
Wire Strippers Wire Cutters Electrical Tape
Questions? Call the Brandmotion technical support line at (734) 619-1250 or CLICK HERE
Installation Instructions - FullVUE™ Mirror Page 1/9AR_08_05_20



Install Time
Product Features
Recommended Tools
Diculty Level






1hr 30m - 2hr
Wrench
Socket SetScrew Driver Panel Removal Tool Zip Ties
Wire Strippers Wire Cutters Electrical Tape
Questions? Call the Brandmotion technical support line at (734) 619-1250 or CLICK HERE
Kit A
Components for installing the FullVUE™ Mirror
Kit B
Components for installing the Rear Camera
Kit Contents
Installation Instructions - FullVUE™ Mirror Page 2/8AR_12_22_20
x1 Rear Camera x1 Video/Power Harness
x1 FullVue™ Mirror
x1 Power Harness
Vehicle Application:
Universal
Part Number: FVMR-1150
Mirror Installation
Mounting Mirror
Mirror Connections
Part 1
Part 2
1. Remove your factory rear view mirror per the
manufacturer’s instructions.
2. Loosen the set screw located on the D-Tab mount
of the mirror stem and slide into position on the
windshield mount. If you do not have a standard
D-Tab mount on the windshield, you will need to
mount a new D-Tab or acquire the proper adaptor.
3. Carefully tighten the set screw using a hand tool.
Be careful not to overtighten, as it can cause
damage to the windshield.
1. Connect the short harness from the back of the
mirror to the included power harness.
2. Route power harness across the headliner to
the desired power location. (Ignition switch is
recommended for most vehicle types).
3. Connect the RED wire to a 12V+ accessory circuit.
4. Connect the YELLOW wire to a 12V+ battery or
constant circuit.
5. Connect the BLACK wire to a solid chassis
ground. If you cannot find one, a wire ground will
work as well.
6. Test the mirror by turning the key to ACC. The
mirror should power on and show the front
camera. Turn key to OFF. If yellow wire is
connected properly, the mirror will then display a
power down message.
Vehicle Application:
Universal
Part Number: FVMR-1150
Installation Instructions - FullVUE™ Mirror Page 3/8AR_12_22_20
12V Constant
12V Accessory
Ground
Camera Installation
Mounting Camera
Part 1
1. Remove the allen screws that are located on the
sides of the camera then remove the camera
bracket.
2. Find an appropriate place to mount the rear
camera. Line up the foot bracket to ensure that
there is enough space to attach the camera to the
body.
3. Attach the mounting foot using either self-apping
screws or a bolt and nut.
4. Use a XX” hole saw to drill a hole for the camera
harness.
5. Then, feed the harness through the drilled hole.
Fit the grommet to the inside of the hole. If the
camera is being mounted on a vehicle body panel,
it is highly recommended that the grommet
be filled with a waterproof sealing agent (Not
included).
6. Reattach camera to the mounting bracket. Make
sure the camera is oriented up by seeing the sun
shade is on top of the camera.
7. Connect the camera harness to the supplied
chassis harness, the side with a red wire coming
from the harness, and move on to the next
section.
Vehicle Application:
Universal
Part Number: FVMR-1150
Installation Instructions - FullVUE™ Mirror Page 4/8AR_12_22_20
Camera Installation
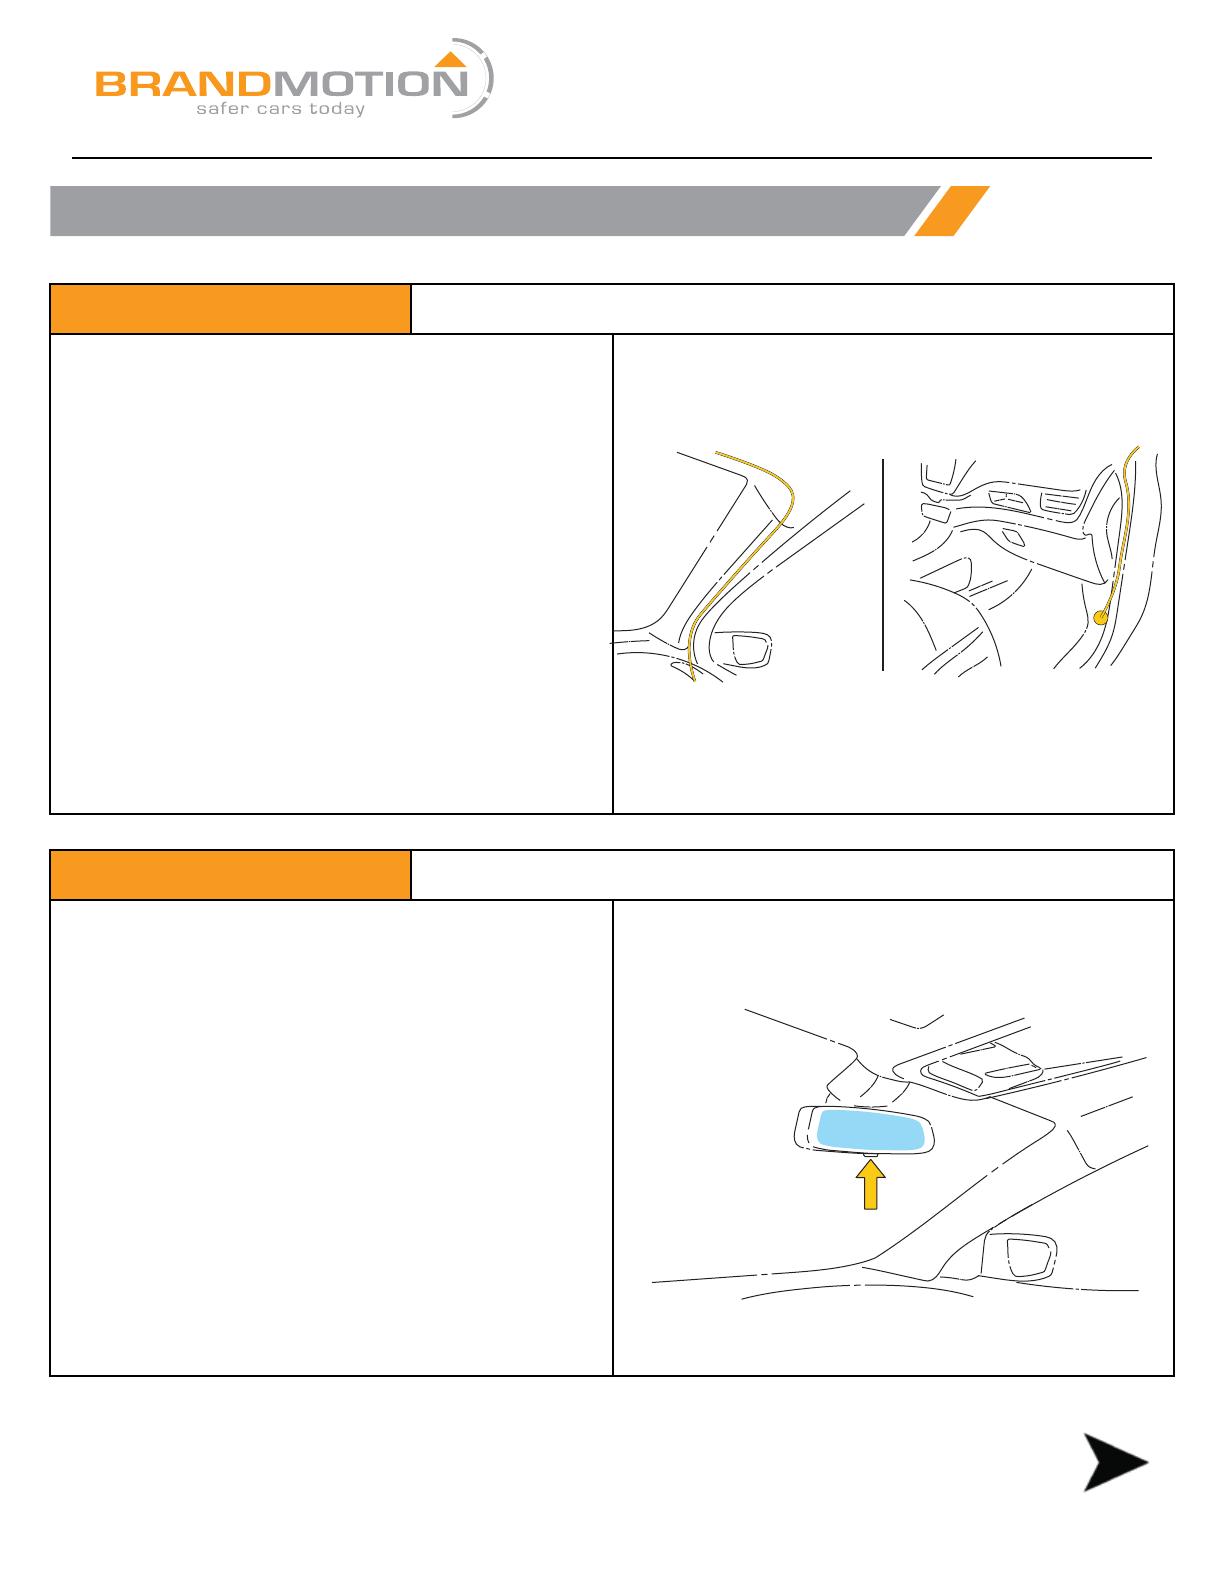
Running Chassis Harness
Test the System
Part 2
Part 3
1. If reverse mode functionality is desired, connect
the red wire found and the rear of the chassis
harness to a reverse controlled 12V+ circuit. This
can typically be found at the reverse light bulb.
2. Continue routing the chassis harness along the
factory harness towards the front of the vehicle.
The connection for the chassis harness will be
made near the mirror so running the harness
up to the headliner then towards the front is
recommended if possible.
3. Connect the chassis harness to the open
connector near the mirror/power harness
connection.
1. See Section 1B, step 6, for the final power test.
2. After powering up, the display should show a
split view of front and rear for a moment before
showing the rear camera in full screen mode.
3. If the red wire in the rear of the vehicle was
connected to reverse, test the functionality by
placing the vehicle in reverse. The display should
show the rear camera, zoomed out, to show the
complete camera image.
4. If all functionality is correct, install and format
the SD card using the system menu’s and the
installation will be complete.
Vehicle Application:
Universal
Part Number: FVMR-1150
Installation Instructions - FullVUE™ Mirror Page 5/8AR_12_22_20
Continue to
FullVUE™ Mirror Settings Section
FullVUE™ User Interface Guide
Touch screen once to bring up User Interface
Use +/- on left side of screen to adjust brightness
Use icons below for respective controls
1.
2.
3.
4.
FullVUE™ Mirror Settings
Vehicle Application:
Universal
Part Number: FVMR-1150
Installation Instructions - FullVUE™ Mirror Page 6/8AR_12_22_20
FullVUE™ Settings
Streaming Media
-
image on mirror)
- Choose: StandardVideo for regular use/EnhancedVideo for crisp
color/Evening Light for sunset or dusk lighting conditions
Protect Level
- Select sensitivity for auto locked event recording for DVR. When the
G-Sensor feels shock, it will automatically lock the recording on the SD
card for later use
Parking Monitoring
locked and record for 1 min
Volume
- Adjust UI control and video playback volume
Clock Settings
- Set date and time for UI
LCD Power Save
-
- Screen will go black after 1 min or 3 min of no use, if selected
Format SD
- Format/Reformat Card. Be sure to save all wanted footage on another
device before reformatting
Refresh Rate
- Adjust video frame rate 50Hz or 60hz (frames per second)
- This setting will change how smooth the video will play back and will
excessively, try changing this setting.
Factory Reset
- Reset all settings
Menu Item Instructions
- Choose: On / O
FullVUE™ Settings
Video Recording Menu Instructions
Normal Video
-
folder will be overwritten if SD card runs out of space. DVR will overwrite
Lock Video
- Pushing the “Lock Recording button on the main user interface (shown
this folder will not be overwritten, even if the SD card runs out of space.
Photo
- This folder will hold all screenshots taken using the “Screen Capture
button on the main user interface shown on page 3.
Front and Rear
- Front and Rear camera views are separated in each main folder. Use
front or rear button to view recordings or photos of the desired camera
view.
Protect and Unprotect
- These functions will not protect the video from being overwritten.
Protecting a photo or recording means that if the “Delete All” function is
of the folder. See “Delete All” for functional details.
Delete
-
Delete All
-
camera view you have open.
Installation of the Rear Vision Camera
Continue to
FAQ Section
FullVUE™ Mirror Settings
Vehicle Application:
Universal
Part Number: FVMR-1150
Installation Instructions - FullVUE™ Mirror Page 7/8AR_12_22_20
FAQ Section
1.
Yes! Simply tap the bottom button 1 time ( 2 times if you have the time stamp screen) and the mirror will function as a traditional mirror. As a
vehicle from reverse, it will return to the setting that was selected before shifting!
2.
Can I use an auxiliary camera with the FullVUE mirror?
At this time, you can only use the provided FullVUE™ Camera with the FullVUE™ Rear Camera Mirror. Please visit our website for new information.
3.
My wire harness is a little short. Can I extend the wires?
At this time you cannot extend the wires. We have tested up to 16.5ft 4 pin cable extensions onto our 6m harness. We do not recommend adding
an extension to our 9m harness at this time.
4.
Installation of the Rear Vision Camera
WARNING: Cancer and Reproductive Harm -
www.P65Warnings.ca.gov
Vehicle Application:
Universal
Part Number: FVMR-1150
Installation Instructions - FullVUE™ Mirror Page 8/8AR_12_22_20
  • Page 1 1
  • Page 2 2
  • Page 3 3
  • Page 4 4
  • Page 5 5
  • Page 6 6
  • Page 7 7
  • Page 8 8

BrandMotion FVMR-1150 Installation guide

Type
Installation guide

BrandMotion FVMR-1150 is a versatile mirror system that enhances your driving experience with its wide-angle rear camera and full-touch screen. It eliminates blind spots, records your drives, and seamlessly integrates with your vehicle's existing systems. Enjoy unobstructed HD views, a wider field of vision, and the convenience of a built-in DVR.

Ask a question and I''ll find the answer in the document

Finding information in a document is now easier with AI