Savant WIB-LAS106-00 Reference guide

Type
Reference guide
Savant Lighting and Keypad Programming Guide | 009-1810-00
Copyright © 2019 Savant Systems, LLC
45 Perseverance Way, Hyannis, MA 02601
Savant.com | 508.683.2500
- 1 -
Lighting and Keypad Programming Guide
Document Number: 009-1810-00
Document Date: March 2019
Document Supports: da Vinci 9.0 and Higher
This document outlines the software-side programming process for Savant Lighting products using the RacePoint Blueprint Lighting and Keypad Manager.
The Lighting and Keypad Manager interface has been fully redesigned as of the da Vinci 9.0 runtime software release.
Details covered in this Programming Guide include:
General information on network discovery and binding for keypads and other SavantLighting components (refer to the relevant Product
documentation for device-specific deployment information, available via the Product page on the Savant Store, or on the Savant Customer
Community Knowledge Base).
Programming settings for loads and lighting scenes.
Programming keypad buttons for control of lighting or other services.
Configuring Smart Groups for Bluetooth Low Energy (BLE) Smart Bulbs and LED Strips, and DMX/0-10V lighting.
To access the Lighting and Keypad Manager within Blueprint, navigate to: Tools > Savant Lighting and Keypads, or select the Manage
Lighting option from the main toolbar by clicking the icon shown at left.
2 of 24
Savant Lighting and Keypad Programming Guide
009-1810-00 | 190315
Copyright © 2019 Savant Systems, LLC
Contents
For a link to any section within this document, click the corresponding entry in
the Table of Contents below.
1. RacePoint Blueprint (Preliminary Setup) ........................................................ 3
1.1 Enable Lighting Controller Function on Host ....................................... 3
1.2 Enable Access to the Lighting and Keypad Manager ....................... 3
2. Lighting and Keypad Manager Overview ........................................................ 4
2.1 Search Fields ......................................................................................................4
2.2 Keypads and Controllers Tab .......................................................................4
2.3 Loads Tab ............................................................................................................ 6
2.4 Lighting Scenes Tab ........................................................................................ 7
3. Adding, Configuring, and Binding Lighting Devices ...................................9
3.1 Adding Lighting Devices via Network Discovery ................................9
3.2 Adding Lighting Devices Manually .......................................................... 10
4. Discovery and Binding Status Indicators ........................................................11
5. Programming Savant Keypads ...........................................................................12
5.1 Name Keypad and Load ...............................................................................12
5.2 Define Keypad Settings ................................................................................13
5.3 Configuring Button Actions ...................................................................... 14
5.4 Assigning a Custom Workflow to a Keypad Button ..........................16
6. Discovery and Grouping for BLE, DMX, and 0-10V Lighting ..................17
6.1 Discovery and Smart Grouping for BLE Bulbs and Strips ...............17
6.2 Smart Grouping for DMX and 0-10V Lighting ......................................19
7. Configuring Lighting Scenes ............................................................................. 20
7.1 Load Chooser Dialogue ................................................................................21
8. Syncing the Lighting Data Table ......................................................................22
9. System Monitor - Upload Configuration File to Host ...............................23
Important Notice .........................................................................................................24
3 of 24
Savant Lighting and Keypad Programming Guide
009-1810-00 | 190315
Copyright © 2019 Savant Systems, LLC
1. RacePoint Blueprint (Preliminary Setup)
The sections below show initial steps required within RacePoint Blueprint prior to adding and configuring lighting devices.
1.1 Enable Lighting Controller Function on Host
For the Savant Host to function as a lighting and/or fan controller, the resource
for the appropriate controller functionality must be enabled. By default, this
functionality is disabled. Follow the steps below to enable the resources on the Host.
1. Open the Smart or Pro Host Inspector (Double-click the Host in RacePoint
Blueprint).
2. Select Resources from the Show: drop-down menu as shown below.
3. Click the checkboxes to enable the Lighting Controller Source and/or Fan
Controller Source resources.
4. Close the Inspector window.
1.2 Enable Access to the Lighting and Keypad Manager
In order for the Lighting and Keypad Manager to be accessible, a valid Lighting Control Service must be generated for the configuration with the Savant
Host as the source. Ensure that the Savant Host and a Generic Network Switch have been added to the layout window and a connection has been made
between the Host ethernet port and a port on the switch. With the Lighting Controller Source resource enabled as shown in the section above, select
the Generate Services icon from the RacePoint Blueprint toolbar to generate a Lighting Control Service.
The color of the State icon in the RacePoint Blueprint toolbar displays the current state of services as shown below:
The Manage Lighting icon will be grayed out and Lighting and Key-
pad Manager cannot be accessed.
There are either no valid service paths connected within the
configuration to generate a service or,
Services must be regenerated due to a change in the
configuration.
The Manage Lighting icon will be selectable, given
that the resource has been enabled on the Savant
Host.
Services have been generated and are up to date
with the current configuration.
NOTE - The example shows the Resources to enable
on the SVR-5100S Pro Host and SHC-2000 Smart
Host with Control. The resources and their locations
are the same for other Host types not shown here.
4 of 24
Savant Lighting and Keypad Programming Guide
009-1810-00 | 190315
Copyright © 2019 Savant Systems, LLC
2. Lighting and Keypad Manager Overview
The Savant Lighting and Keypad Manager within RacePoint Blueprint allows the installer to discover Savant Lighting devices on the local network, add
devices to the configuration, bind them to specific device UIDs, and program their behavior. Configured lighting devices and settings can then be exported
to the Lighting Data Table for the configuration, and represented within Savant user interfaces such as the Pro App, Pro Remote, or Touch Panel. The
diagrams and tables in the subsections below show a high-level overview of the main features of the Lighting and Keypad Manager.
2.1 Search Fields
All search fields within the Lighting and Keypad Manager allow for dynamic filtering based on an array of variables relevant to the tab or frame. For
example, configured devices can be filtered by location, device type, name, or UID. See details on specific search features within relevant sections below.
2.2 Keypads and Controllers Tab
The Keypads and Controllers tab is the main tab used within the Lighting and Keypad Manager for adding lighting devices to the configuration and
setting names, groupings, and programming, in addition to other device specific settings. This subsection provides a simple overview of the tab.
Specific workflows for adding and programming devices in full detail can be found in the later sections of this document.
A
Main tab selector - click to toggle between Keypads and Controllers (shown in example above), Loads, and Lighting Scenes.
B
Configured Devices frame - shows lighting devices that have been added to the configuration, either manually or via network discovery.
I
J
F
G
H
C
B
D
E
K
L
A
Table Continued on next page
5 of 24
Savant Lighting and Keypad Programming Guide
009-1810-00 | 190315
Copyright © 2019 Savant Systems, LLC
C
Discovered Devices frame - shows lighting devices that have been discovered on the network by the Lighting and Keypad Manager application. Must be on
the same subnet as the SDE running RacePoint Blueprint.
D
Discovery controls - Select the frame icon to toggle the Discovery frame open or closed, (minimizing when not running active Discovery will improve usability
and UI space). Select Discover to begin scanning for Savant Lighting devices on the local network.
E
Discovered devices visible on the local network are displayed in this frame by Product Category. Use the disclosure triangle next to the category name to
show or hide devices of that category.
F
Configured devices display in this frame using the same product category headings as the Discovery panel. Devices in this frame have been added to the
configuration. It is possible for a device to be Discovered but not Configured, or vice versa. See Section 3 below for more details.
G
Configured Devices options:
- Select to manually add a new lighting device to the configuration.
- Select with a configured device highlighted to remove that device from the configuration.
- Select to view further options for configured devices - Expand All, Collapse All, Unbind All, Remove All, or group by
device type, Location, or by Zone Grouping (must be configured).
H
Overview panel for selected configured device - The content and options displayed here will vary depending on the device selected. This pane deals with
general device settings such as minimum/maximum dimmer level settings, whether a keypad is wired, tracked, or acting as a BLE gateway, or whether a Panel
Bridge Controller load is energy-only.
I
Programming overview graphical UI (Keypad Only) - the content displayed in this area will vary depending on the type of configured device selected. In the
example image above, a keypad is selected, and the graphical frame here displays an overview of the button layout. Click a button to select and define the
programmed eects (see item J below).
J
The content displayed in this area will vary depending on the type of selected configured device. In the example above, a keypad is selected and this frame
allows for programming of the button or dial selected in item I above. The drop-down menus can be used to configure the eects of each button.
K
Select this button to open the Services Requests States (SRS) window. This allows a state or service request to be assigned to the selected field or button by
dragging and dropping.
L
Select the Sync button once all Lighting and Keypad Manager programming is complete to sync data and settings to the Lighting Data Table automatically.
See Section 8 below for further detail.
The images below show the frames described in items
I
and
J
above with a DMX Controller and a Lamp Controller (BLE Gateway) selected,
respectively. DMX, 0-10V, BLE, and Panel Bridge controllers will all display Smart Grouping options for the loads they control, while programmable
devices like Keypads or Lamp Controllers being used as BLE Gateways will display both a graphical/programming interface and a BLE Smart Group
frame. For details on the process for adding and grouping lights with a BLE, DMX, or 0-10V controller, see Section 6 below.
6 of 24
Savant Lighting and Keypad Programming Guide
009-1810-00 | 190315
Copyright © 2019 Savant Systems, LLC
2.3 Loads Tab
The Loads Tab provides a high level view of all configured dimmable lighting loads (simple On/O switched loads will not display here), as well as
information on their groupings, and options for any available settings. The specific settings displayed will vary based on the type of load and its
controller. Load settings that can be changed from this tab, such as Minimum and Maximum dimmer values or the Force Forward Phase and Driver Jump
Start options for supported loads can also be changed from the Keypads and Controllers tab. Smart Groups displayed for supported load types are set
within the Keypads and Controllers tab. For details on specific keypad-based load settings, see Section 4 below. For details on Smart Groups for DMX,
0-10V, and BLE lighting, refer to Section 6 below.
7 of 24
Savant Lighting and Keypad Programming Guide
009-1810-00 | 190315
Copyright © 2019 Savant Systems, LLC
2.4 Lighting Scenes Tab
The Lighting Scenes tab allows for the creation, removal, and settings configuration of Lighting Scenes. Dierent from Savant Pro App Scenes, Lighting
Scenes must be programmed and configured by the installer within RacePoint Blueprint. This subsection will provide a high-level overview of the tab
within the Lighting and Keypad Manager. For a detailed description of the recommended process for adding and configuring Lighting Scenes, refer to
Section 7 of this document.
A
Lighting Scene list - displays all currently configured Lighting Scenes. The Scene column shows the name given to each, and the Type column displays an
icon which indicates whether this is a default load scene, or a user created scene (“All O” and “New Scene Low Light” respectively in the example above).
B
- Select to add a new scene
- With an existing scene highlighted, select to remove the scene.
Show Load Scenes - Click this checkbox to include the default Lighting Scene for each individual load. Load Scene settings define the general behavior of
the given lighting load, and are not altered from the default settings in most cases.
A
B
C
D
E
F
G
Table Continued on next page
HELPFUL INFORMATION: Hover over the text of any field for tool tips on its usage,
8 of 24
Savant Lighting and Keypad Programming Guide
009-1810-00 | 190315
Copyright © 2019 Savant Systems, LLC
C
Scene Default Settings - this row defines values for Hold Cycle Time and LED Behavior applied to all lights within the selected scene.
Hold Cycle Time - the amount of time (in seconds) for a light to go from min to max (or max to min) when tied to a button with this function.
LED Behavior - Defines the way the scene will toggle when used with a touch panel.
D
Dimmer Scene Defaults - Defines the default settings for all dimmable lights added to the scene. All settings aside from Step Value can be defined
individually for each dimmer within the Scene.
Min / Max % - Defines the lower and upper limits for dimmer value, 0 being o and 100 being full power. For example with the minimum set to 25%
and maximum set to 75%, the default dimming range for the scene or light would be only the middle half of the possible range for the fixture. This
adjusts the range covered during one Hold Cycle when using that function.
Preset - The default dimmer level that light(s) will be set to when the scene is made active.
Fade On / Fade O - Time in seconds the light(s) will take to fade on or o when the scene is activated or deactivated.
Step Value (Scene Defaults only) - Default percentage change in dimmer value from a single button press up or down when the raise or lower functions
are assigned.
Apply to All / Defaults (single load only) - these options are enabled only when the settings for at least one load included in the scene deviate from the
scene defaults.
E
Switch Scene Defaults - Define values for any switched loads (On/O only) included in the scene.
State - Defines whether the load will be on or o when the scene is made active
Delay On / Delay O - Delay in seconds before the light(s) switch on or o when the scene is activated or deactivated.
F
Fan Scene Defaults - Default settings for any fan control loads included in the scene. State the Fan controller will set the load to when scene is made
active.
G
Add or remove loads from the selected Scene.
- Select to add a load (open list of available loads by Location).
- With an existing load highlighted, select to remove from the scene.
9 of 24
Savant Lighting and Keypad Programming Guide
009-1810-00 | 190315
Copyright © 2019 Savant Systems, LLC
3. Adding, Configuring, and Binding Lighting Devices
The following section describes the processes related to adding lighting devices to the RacePoint Blueprint configuration via the Lighting/Keypad Manager,
including a general overview of Discovery and Configuration. For product-specific information, including details on Product-specific Discovery, Binding, and
basic configuration, refer to the corresponding products documentation, available via the Savant Customer Community.
With the updated Lighting and Keypad Manager (da Vinci 9.0 and higher Savant runtime software releases) there are now two possible workflows for
discovery, configuration, programming, and binding of Savant Lighting devices, each outlined in one of the subsections below.
On-Site Configuration - All RacePoint Blueprint configuration of Savant Lighting components is completed on-site, after physical deployment and
network provisioning of the relevant devices (follow product Deployment Guides and/or Quick Reference Guides available on the Savant Customer
Community).
Pre-Configuration - Lighting devices are added to the Blueprint configuration manually before on-site deployment. Once physical installation and
network provisioning are complete, devices can be discovered on the network and bound to the corresponding pre-configured components.
3.1 Adding Lighting Devices via Network Discovery (Configure On-Site)
Follow the steps below to configure lighting components in Blueprint on-site after physical deployment is complete, and all components are connected
to the local network.
1. Within the RacePoint Blueprint configuration for the site,
access the Lighting and Keypad Manager by navigating to
Tools > Savant Lighting and Keypads from the main menu, or
by selecting the Manage Lighting icon from the quick access
toolbar.
2. Expand the Discovery panel by selecting the
icon at the
upper left corner of the window (see example image).
3. Click the Discover button to begin the network discovery
process. This may take up to several minutes to complete.
4. Once a component has been discovered on the network
and populates in the Discovered frame, right click
(command+click) then select Add to Configuration. The
component will then appear in the Configured frame with its
UID bound.
5. Stop Discovery and proceed to any programming of keypad
functions or Smart Groups.
HELPFUL INFORMATION - For module controlled Low Voltage Keypads,
click on the Control Module in the Discovered frame and select the
disclosure triangle to view keypads and add to configuration.
2
3
4
10 of 24
Savant Lighting and Keypad Programming Guide
009-1810-00 | 190315
Copyright © 2019 Savant Systems, LLC
3.2 Adding Lighting Devices Manually (Pre-Configure and Discover/Bind On-Site)
To add devices manually, follow the steps outlined below. This can be useful for pre-configuring components before being physically on site. It is
recommended in this case to complete the binding process to save UIDs to the configuration when on site with physically deployed components.
1. From the open RacePoint Blueprint configuration file, access the Lighting and
Keypad Manager by navigating to Tools > Savant Lighting and Keypads, or by
selecting the Manage Lighting Icon shown below. If the Lighting and Keypad
Manager is not accessible, refer to Section 1 above.
2. Ensure that the Keypads and Controllers tab is selected, (this should be the default
when Lighting and Keypad Manager is opened).
3. To add lighting devices manually, select the
icon at the lower left corner of the
Configured Devices frame. This will bring up the device selection window.
4. Scroll through the list of available lighting devices. For each device type being
added to the configuration, double-click the # To Add field and enter the number of
each device type.
5. Once all devices have been selected and the appropriate numbers populated, select
Add at the lower right corner of the window to return to the main Keypads and
Controllers tab.
6. Confirm that all selected devices have been added to the Configured frame.
7. Proceed with any further o-site programming such as keypad button configuration, etc.
When on site, with physical installation and network provisioning of all devices complete:
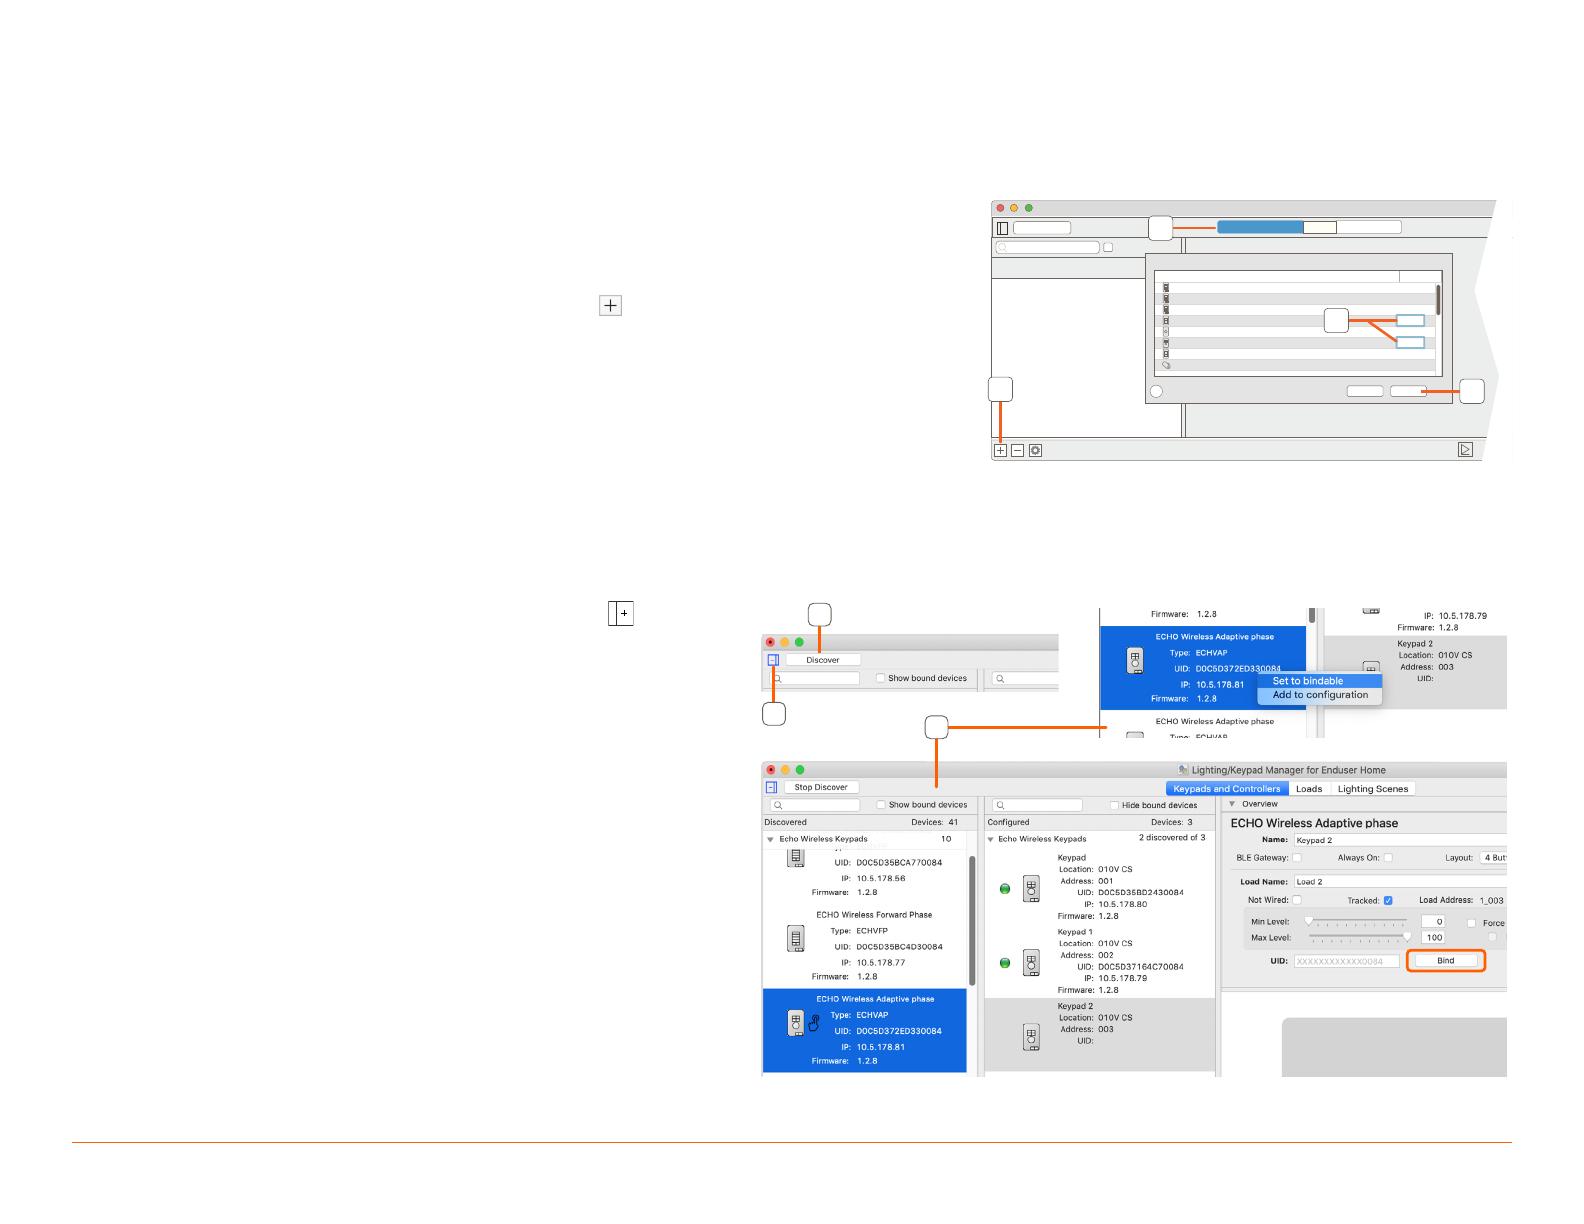
8. Expand the Discovery panel by selecting the
icon at the
upper left corner of the window (see example image).
9. Click the Discover button to begin the network discovery
process. This may take up to several minutes to complete.
10. Discovered devices will populate in the Discovered frame.
To associate these with the corresponding Configured
components and bind their UIDs, there are two possible
workflows:
With Discovery running, press a physical button on
any keypad. A button press icon will appear on the
device in the Discovered list (see example image).
Select the corresponding pre-configured device from
the Configured list. Select Bind within the Overview
panel to populate the UID and pair the Discovered and
Configured keypad.
To Bind components without a physical button press,
right-click (command+click) the Discovered device and
select Set to Bindable. This option simulates a physical
button press - the button press icon will appear
on the device in the Discovered frame. Select the
corresponding Configured device and click Bind in the
Overview frame to populate the UID.
Lighting/Keypad Manager for Enduser Home
Keypads and Controllers
Loads Lighting Scenes
Discover
Hide bound devices
Configured Devices: 1
Sync....
2
3
Keypads and Controllers Loads Lighting Scenes
Type # to Add
ECHO Adaptive phase
ECHO Forward Phase
ECHO Switch
Metropolitan Wireless Fan Controller
Metropolitan Wireless Keypad with Dial
Metropolitan Wireless Switch
Savant Wireless Dimmer Lamp Control
Metropolitan Wireless Dimmer
Cancel Add
0
0
0
0
0
1
0
?
1
4
5
9
8
10
11 of 24
Savant Lighting and Keypad Programming Guide
009-1810-00 | 190315
Copyright © 2019 Savant Systems, LLC
4. Discovery and Binding Status Indicators
The process of binding lighting devices within Lighting and Keypad Manager refers to saving the device Unique Identifier (UID) within the RacePoint
Blueprint configuration. A general overview of the two main recommended methods of binding are described in the previous section of this document. The
specific steps of this process may vary depending on the individual lighting device type, and are covered in detail within the relevant product documentation
(Product Deployment Guides, available via the Savant Customer Community). Binding a device ensures that when the configuration is uploaded to the
Savant Host, the Host is able to locate and communicate with the bound device on the local network. This section will briefly describe how to recognize a
Bound vs. Unbound device within Lighting and Keypad Manager.
A
Enable checkbox to show Bound devices
within Discovery frame.
B
Enable checkbox to hide Bound devices
within Configured frame.
C
UID field will be populated for Bound devices.
LED icon indicator shows Binding/network
discovery status:
None - Not Bound (no UID assigned).
Green - Bound and Discovered.
Yellow - Bound, but Discovery not yet run.
Red - Bound, not Discovered with
Discovery process completed.
D
The device UID will display here for Bound
devices with the option to Unbind with
the button to right. Manually add a UID
or populate via Discovery and select same
button to Bind.
E
UID will also display here within Keypad
Properties frame for Bound devices.
Lighting/Keypad Manager for Enduser Home
Keypads and Controllers
Loads Lighting Scenes
Discover
Show bound devices
Discovered Devices: 2
?
Sync....
Hide bound devices
Configured
Devices: 2
2
Dimmer - Kitchen
Type:
WID
28C2DDC3C833001D
002
Location:
Address:
UID:
Metro Keypads
Metro Keypads
2 discovered of 2
Overview
Name:
Load Name:
Not Wired: Tracked:
Load Address:
1_002
BLE Gateway:
Always On:
Layout:
Metropolitan Wireless Keypad with Dial
4 Button & Rotary Dial Keypad
Min Level:
Max Level:
Unbind
Properties for Device: Keypad
Name: Keypad
WIK
4 Button & Rotary Dial Keypad
Kitchen
Metropolitan Wireless Keypad with Dial
001
Backlight Full
Type:
Board Name:
Device Name:
Location:
Address:
Backlighting:
LED Intensity:
Ambient:
UID:
Property
Control
100
0
Force Forward Phase
Driver Jump Start
80A5893674B5001D
Recessed Cans - Kitchen
Keypad with Dial - Kitchen
UID:
Dial
Top Left
Bottom
Left
Bottom
Right
Top Right
Auxiliary Control
Value
Lighting
Keypad with Dial - Kitchen
Type:
Location:
Address:
WIK
Kitchen
001
UID:
80A5893674B5001D
Kitchen
80A5893674B5001D
A B
C
D
E
12 of 24
Savant Lighting and Keypad Programming Guide
009-1810-00 | 190315
Copyright © 2019 Savant Systems, LLC
5. Programming Savant Keypads
Once lighting devices have been added to the Configured list, assigning actions to keypad buttons can be completed at any point prior to syncing the
Lighting Data Table and uploading the configuration to the Savant Host. This section provides an overview of general keypad programming within the
Lighting and Keypad Manager. For simple, device-specific instructions on how to assign a lighting scene to a keypad button, refer to the Deployment Guide
for the relevant device, available on the Savant Customer Community:
009-1807-xx Wireless Lighting Deployment Guide
009-1731-xx Low-Voltage Keypad Deployment Guide
To add a programmed action to a button, dial, or other interface component for a configured programmable lighting device, refer to the diagrams and follow
the steps outlined below.
NOTE: Depending on the action being assigned to a button, it may be necessary to refer to later sections of this document, or to complete other steps outlined in
Product-specific documentation first in order to create or configure the action.
5.1 Name Keypad and Load
The example here shows an Echo Wireless
Keypad being programmed. While certain
options or settings may vary slightly across
devices, the general programming process is the
same.
1. Select a keypad or controller from the
Configured list.
2. Double-click the Name field and edit the default
assigned name. Savant recommends using a
naming scheme which identifies the physical
location of the keypad.
3. Double-click the Load Name field and edit
the name of the lighting load attached to the
keypad.
If there is no physically wired load attached
to the keypad, check the option for Not
Wired. This will disable load-based settings
for the device.
1
2
3
13 of 24
Savant Lighting and Keypad Programming Guide
009-1810-00 | 190315
Copyright © 2019 Savant Systems, LLC
5.2 Define Keypad Settings
Refer to the image and table below for descriptions of the available fields and settings for Savant keypad programming. The settings detailed below
apply to the keypad as a whole, rather than a particular button.
BLE Gateway Check this option if the keypad (or lamp
controller) will be used as a gateway for
BLE devices (see Section 6).
Always On Check this option for components for
which the associated load should always
stay powered such as with BLE lighting.
This should be set at deployment and not
changed if possible, Altering this setting
too often can damage hardware.
Layout This field is available for Echo keypads
only - select the button layout for the
particular keypad from the drop-down
menu.
Not Wired Check this option for keypads not
connected to a load. Keypads without a
load operate as Control-only devices, and
can have any service request (including
AV or lighting) assigned via the Control
tab.
Load Address Set automatically when devices are added,
this is the logical address for associated
load. Not editable.
Min / Max Level Adjust sliders or text fields to set dimming
range for supported loads.
Force Forward
Phase
Check this option with Adaptive Phase keypads to force the use of forward phase.
Driver Jumpstart
Requires Force Forward Phase to be enabled. Check this option in cases where the minimum dimmer level does not provide sucient power to
engage the driver for the lighting load. This setting ensures that the minimum voltage needed to power the driver (as defined by driver firmware) is
sent for any dimmer setting above O.
UID Bound devices will display UID here, and button to right of field will show option to Unbind. For un-bound devices, enter UID manually and select
Bind, or refer Product-specific documentation for Binding information.
Name Keypad/component name, set in Section 4.1 above.
Type
Board Name
Device Name
Non-editable fields, information-only. Set based on configured keypad and Layout type.
Location Zone within the configuration that corresponds to the keypad’s physical location on site. Select a Zone from the drop-down menu.
Address Logical keypad address, shown for relevant devices, not editable.
Backlighting Set button backlighting options. By default, this field is greyed-out and not editable. The Ambient checkbox must be unchecked in order to edit
Backlight settings (see Ambient entry below).
HELPFUL INFORMATION: Hover over the title text of any field for tool tips on its usage,
14 of 24
Savant Lighting and Keypad Programming Guide
009-1810-00 | 190315
Copyright © 2019 Savant Systems, LLC
LED Color Displays LED color setting options for supported devices. For Echo keypads, the LED color on the button display preview will change with new
selection.
LED Intensity Set LED brightness level using slider
Ambient Checked by default. With setting enabled, keypad uses onboard ambient lighting sensor to adjust LED brightness.
NOTE - This setting must be unchecked in order to change Backlighting settings. Uncheck, set Backlighting, re-check if desired.
5.3 Configuring Button Actions
Once settings for the keypad have been configured, actions and settings can be assigned to buttons as desired. The following section describes the
relevant fields within the Lighting and Keypad Manager.
With all keypad settings defined (see previous section), click
to select a button from the graphical display as shown in the
example at right.
By default, the Lighting tab is selected and displayed within the
button properties frame.
Keypads wired to a load (for which the Not Wired option
described in the Keypad Settings section above has not been
checked) will have all buttons assigned to control the
corresponding lighting load scene by default (see Section 7 for
detailed information on lighting scenes, including load scenes).
Savant Scene Check this option to allow Savant Pro App Scenes to be assigned to the selected button. Scenes must be assigned using the mobile app, and
the keypad must be bound within the configuration before assignment can be completed. For steps on how to assign a Pro App Scene to a
configured button, refer to Adding a Scene to a Button - Application Note on the Savant Customer Community.
LED Color Select one of the options from the dropdown menu to set the LED color for the selected button. Option will appear only for supported
keypads.
Button Label Click the text field to input a label for the selected button. This will be used to identify the button within the Savant Pro App UI for configured
devices
Function Select an option from the dropdown list to define the way the selected button will function when pressed. Mouse over (hover on) any of the
options in the list for details on the setting.
IMPORTANT - This field must be set to None in order to configure control actions for the selected button.
LED Behavior Set to Any On (Not All O) by default (LED will be active as long as at least one light in the assigned Scene is On). Select an option from the
dropdown list to define the conditions under which the LED for the button will be on or o. This setting also aects the CurrentLEDStatus
and LEDIsOn states within Savant State Center, which may be used within State Triggers.
IMPORTANT NOTE - To configure any keypad button to send a control command of any type, the Function field within the Lighting tab for the button
must be set to None. Configured Lighting actions will always be prioritized over Control commands.
HELPFUL INFORMATION: Hover over title text of any field for tool tips on usage.
15 of 24
Savant Lighting and Keypad Programming Guide
009-1810-00 | 190315
Copyright © 2019 Savant Systems, LLC
Scene Set to the load scene associated with the selected keypad by default. Select an option from the dropdown to assign a lighting scene to the
selected button. Dierent from Savant Pro App Scenes, lighting scenes can be configured and edited under the Lighting Scenes tab within
the Lighting/Keypad Manager. See Section 7 for details.
Address Not editable. This field displays the logical button address for the selected button. Assigned automatically.
HELPFUL INFORMATION! The options displayed vary based on the type of Keypad and button selected.
The example image and table above show the Lighting tab for an Echo 4-Button and Rotary Dial keypad
with the top left button selected. The example image and table shown below display the available
options under the Control tab for the same button.
With the Lighting Function set to None, select the Control tab at the top of the Button Properties frame
to set control command actions for the button.
Savant Scene
Check to enable a Savant Pro App Scene to be
assigned to the button via the mobile app. Note that
assigning a Scene to a button will clear any other
button settings programmed.
Button Label
Enter a button label used to identify the button
within the Pro App UI for configured devices.
Button Type
Select an option from the dropdown list to define the
way the button will function:
Push - Sends the configured command when
pressed.
Toggle - Sends one of two configured commands,
depending on the current button state.
Zone
Defined by the Location set for the keypad by
default, with unbound keypads defaulting to N/A.
Select a Zone from the dropdown list to define the
location and service options for the button.
Service This field will update automatically when an action
is assigned to a Command field. A Service can be
selected manually from the dropdown list if desired.
Command Action that will be sent when the button is pressed. Any desired Service Request can be selected from the dropdown list, or dragged and dropped
into the field from the Service Requests States (SRS) window, which can be accessed by selecting the icon at the lower right corner of the
window. Refer to Section 4.4 below for a step by step example of how to configure a command via the SRS window.
Hold Command Action sent when the button state reads as Hold within Savant State Center. See Minimum Hold Time and Hold Interval definitions below for
information on when this button state will be set. Hold Commands are programmed in the same manner as standard Commands (described above).
Release
Command
Action sent when the button state reads as Release within Savant State Center. In general, for simple Push button types, either a Command or a
Release Command should be set and not both.
Toggle
Commands
(Not shown in example image) - With the Toggle option selected under Button Type, fields for Toggle Command, Toggle Hold Command, and Toggle
Release Command will be displayed. Toggle Commands will be sent when the button’s LED state is On.
Minimum Hold
Time
Enter a number (in seconds) to define the length of time a button must stay pressed for to change its state to Hold (and send any configured Hold
Command).
Hold Send
Interval
Enter a number (in seconds) to define the length of time after which the Hold Command will be repeated if the button state is still Hold.
16 of 24
Savant Lighting and Keypad Programming Guide
009-1810-00 | 190315
Copyright © 2019 Savant Systems, LLC
Send Release
After Hold
Enable this checkbox to send any configured Release Command when a held button is released.
5.4 Use Case Example - Assigning a Custom Workflow to a Keypad Button
This subsection provides a step by step example of the process for assigning a Custom Workflow to a keypad button. The steps below assume that the
keypad has been added and configured within Lighting and Keypad Manager, and that the custom workflow has already been configured under General
Programmable Service Requests. For information on configuring Custom Workflows using Automator, refer to the Custom Workflow Development -
RacePoint Blueprint Programming Guide on the Savant Customer Community.
1. Open the RacePoint Blueprint
configuration and navigate to the
Lighting and Keypad Manager by
selecting Tools > Savant Lighting
and Keypads from the main menu,
or selecting the Manage Lighting
icon from the quick access menu.
2. Select the target keypad from the
Configured Devices list.
3. Select the target button from the
keypad’s graphical display.
4. With the Lighting Tab highlighted under Keypad Properties, set the
Function field to None.
5. Select the Control tab of the Keypad Properties frame.
6. Open the SRS Window by selecting the
icon at the lower right of
the window.
7. Within the SRS Window, navigate to the Service where the target
workflow is configured. Refer to the Services Requests States
(SRS) Overview on the Savant Customer Community for details on
this window.
8. Drag and drop the custom workflow (or other service request)
into the target Command field. Zone and Service fields will be
populated automatically.
9. Sync the Lighting Data Table and upload configuration to Host to
test button.
6. Discovery and Smart Grouping for BLE, DMX, and 0-10V Lighting
The following section describes the general process of scanning and discovery for BLE (Smart Bulbs and LED Strips), as well as DMX and 0-10V lighting
loads and then organizing those loads into Smart Groups.
A Smart Group can contain one light or many lights, and will function for the end user as a group. For example, a Kitchen ceiling with 8 DMX
7
8
5
6
3
4
17 of 24
Savant Lighting and Keypad Programming Guide
009-1810-00 | 190315
Copyright © 2019 Savant Systems, LLC
controlled lights all grouped within the same Smart Group will be controlled in unison, turning on/o and dimming all together. A Smart Group will be
presented within the user interface as a single light with shared control.
The following subsections briefly describe the separate process of connecting to controllers, creating Smart Groups, discovering lights, and adding lights to
groups for BLE Smart Bulbs and Strips, followed by DMX and 0-10V lighting. As always, product-specific documentation should be reviewed and followed
where available.
6.1 Discovery and Smart Grouping for Bluetooth Low Energy (BLE) Bulbs and Strips
The process for connecting to a BLE gateway device and scanning for lights is described below. The steps in this section assume that the relevant BLE
Gateway device has been added and configured, and that BLE bulbs and strips have been installed and are powered on.
1. If Discovery has not yet
been run, select the
Discovery button at the
upper left corner of the
Keypads and Controllers
tab.
2. Stop Discovery, and select
the controller from the
Configured Devices list.
For BLE lighting, the BLE
Gateway checkbox must be
enabled. A Bluetooth icon
will display on the device
within the Configured
frame.
3. Select Connect to establish
communication between
Lighting Manager and the
gateway device.
4. Within the Smart Groups
frame which will appear
for all group-able lighting,
select the + icon to add and
name one or more Smart
Groups. Names entered
will be used to identify the group(s) within the Savant
Pro App and other user interfaces.
5. Select Start BLE Scan to begin discovery of lighting
devices (bulbs and strips).
6. As BLE Scan runs, number of lights in the Not
Assigned group will rise as they are located. When
scan is complete, select Stop BLE Scan before
continuing.
7. Expand disclosure triangle to view lights in groups. Locate and select the light with the highest BLE RSSI Value, (for example, -65 would be
preferable to -91). Choose the Blink option to flash the light red to confirm its physical location.
8. Select the Connect option for the selected light. This will be the BLE Proxy device, used to relay communication from the Gateway to any other
BLE lights in the group. Connecting may take up to 30 seconds.
1
2
3
4
5
18 of 24
Savant Lighting and Keypad Programming Guide
009-1810-00 | 190315
Copyright © 2019 Savant Systems, LLC
9. Once connected to the Proxy light, begin moving lights into the Smart Group(s) created in step 4 above by dragging and dropping. Select a light
and use the Blink option at the lower right of the frame to confirm its physical location if needed.
10. Once all desired lights are placed in Smart Groups, maintain the connection to the proxy light and select one of the other grouped lights and
choose Commission. Wait for the process to complete and repeat for all lights in the group, Commissioning the Proxy light last. The status
indicator icon will turn green for each light when successfully Commissioned.
11. Once the Proxy light is Commissioned (last), the Smart Group is complete. The changes must be synced with the Lighting Data Table and the
Blueprint configuration file uploaded to the Savant Host before Smart Group control is fully functional. See Section 8 below for more info.
7
8
NOTE: All lights must be added to a
Smart Group for functional control. It
is possible to create a Smart Group
containing only a single light if
desired.
19 of 24
Savant Lighting and Keypad Programming Guide
009-1810-00 | 190315
Copyright © 2019 Savant Systems, LLC
6.2 Smart Grouping for DMX and 0-10V Lighting
The process for creating Smart Groups and assigning DMX or 0-10V controlled lights is detailed in the DMX and 0-10V Lighting Deployment Guide,
available on the Savant Customer Community. This section will briefly outline the process. This section assumes that the controller has been added,
configured, Discovered, and Bound, and that the SDE/MacBook running Lighting and Keypad Manager is connected to the same local network.
1. Open the Lighting and Keypad Manager and Select the DMX or 0-10V controller from the Configured devices list.
2. Select the Connect option. Note that in the example image, the controller is already connected so button text shows Disconnect option.
3. Within the Savant Smart Groups frame, select the + icon to add and name one or more Smart Groups to which lights will be assigned for the
controller. The name entered will be used to identify the group within the Savant Pro App and other user interfaces.
4. Lighting loads associated with the selected controller will appear under the Not Assigned group by default. Expand the disclosure triangle to
view loads.
5. Drag and drop loads into the desired Smart Group(s). All loads should be added to a group. Any load left in Not Assigned will not be controllable
from the UI. It is possible to create a Smart Group containing only a single load if desired.
6. Select Apply to save Smart Grouping changes.
HELPFUL INFORMATION!
Hover over title text for any
setting to view any available
tool tips on usage.
Once lighting Smart Groups
have been configured,
it is necessary to sync
the Lighting Data Table,
then save and upload the
configuration file for control
functionality (see Section 8
below for more info).
1
3
4
5
2
6
20 of 24
Savant Lighting and Keypad Programming Guide
009-1810-00 | 190315
Copyright © 2019 Savant Systems, LLC
7. Configuring Lighting Scenes
Section 2.3 above gives an overview of the layout and functions of the Lighting Scenes tab within the RacePoint Blueprint Lighting and Keypad Manager.
This section outlines the process for adding and configuring lighting scenes in more detail. The steps below assume that all relevant lighting devices have
been added and configured. Refer back to Section 2.3 for setting definitions as needed.
1. With all Lighting components added and configured, and Smart Groups created where relevant, open the Lighting Scenes tab of the Lighting and
Keypad Manager.
2. Select a lighting scene to modify (by default, an All O scene will already be added), or select the + icon at the lower left corner of the window to add a
scene to the list and name it. In the example image, Room 1 Scene has been added.
3. With the newly added scene selected, click the + icon for the center frame to open the Load Chooser dialogue (see Section 7.1 below for details). Select
and add lighting components to include in the scene. As components (loads or Smart Groups) are added to the Scene, they will populate within this
frame under the category matching their type (Dimmer, Switch, or Fan).
4. Adjust the Scene Default settings for Hold Time and LED Behavior. These will aect all lighting entities added to the scene.
5. Adjust load type/category defaults for any categories with populated lights. In the example below, the Dimmer Scene Defaults have been altered to
add a 2 second Fade On time.
6. Adjust the settings for individual lighting entities within each category. In the example image, the following changes have been made:
Max dimmer level for the Room 1 Accent Lighting group has been reduced to 50%
Preset levels have been adjusted for Room 1 Accent Lighting (25%, or 50% of Max Dimmer Value), BLE Group (50%), and Master In-Ceiling (75%).
The Room 1 DMX group has had the 2 second Fade On time imposed by Dimmer Scene Defaults removed and set back to 0.
HELPFUL INFORMATION!
Hover over title text for any setting to view
tool tips on usage.
Once lighting scenes have been configured,
it is necessary to sync the Lighting
Data Table, then save and upload the
configuration file for control functionality
(see Section 8 below for more info).
When any lighting entity added to a scene
has settings dierent from the category
defaults, the options to Apply to All or reset
to Defaults become active and selectable.
Lighting Scenes can be assigned easily to a
keypad button for control of the full scene
from a single button (see Section 4 above
for details).
2 3
1
4
5
6
  • Page 1 1
  • Page 2 2
  • Page 3 3
  • Page 4 4
  • Page 5 5
  • Page 6 6
  • Page 7 7
  • Page 8 8
  • Page 9 9
  • Page 10 10
  • Page 11 11
  • Page 12 12
  • Page 13 13
  • Page 14 14
  • Page 15 15
  • Page 16 16
  • Page 17 17
  • Page 18 18
  • Page 19 19
  • Page 20 20
  • Page 21 21
  • Page 22 22
  • Page 23 23
  • Page 24 24

Savant WIB-LAS106-00 Reference guide

Type
Reference guide

Ask a question and I''ll find the answer in the document

Finding information in a document is now easier with AI