Page is loading ...

T1EN
rev.0104
Platea Uno
T-940 Uno
installation annex
Audio and Video
door entry system
digital installation

2
OPlatea Uno monitor and T-940 Uno telephone are described on this annex,
as well their programming procedures. System assembly and wiring is
detailed on the instructions manual that's enclosed with the door panel.
OPlatea Uno monitor and T-940 Uno telephones are fully compatible with
Platea Plus monitor and T-940 Plus handset. However,
a resistor must be installed between 'D' and '–' door panel terminals.
This resistor is supplied with the door panel.
OIf the distance from the door panel to the farest monitor or telephone is
longer than 200 meters, or the building has more than 200 apartment units,
a RD-Plus/Uno repeater must be installed.
1
IMPORTANT NOTICE
ag
h
b
f
lk m
ej
i
a.
b.
c.
d.
e.
f .
g.
h.
i .
j .
k.
l .
m.
c
Monitor
Modelo
CODIGO / CODE
MASTER
18Vdc ± 2V
Standby 15mA
Máximo 450mA
Sistemas de comunicación S.A.
Made in Spain
10ºC + 50ºC
SLAVE
INTER A1 PUERTAESCALERA
ATENCIÓN
Alta tensión. No abrir la tapa.
Manipular sólo por personal
del servicio técnico.
WARNING
High voltage. Don't open cover.
Handle only by technical service.
PISO
Floor DoorStair
0000000000
Nº serie
PLATEA Uno
Monitor
Modelo
CODIGO / CODE
MASTER
18Vdc ± 2V
Standby 15mA
Máximo 450mA
Sistemas de comunicación S.A.
Made in Spain
10ºC + 50ºC
SLAVE
INTER A1 PUERTAESCALERA
ATENCIÓN
Alta tensión. No abrir la tapa.
Manipular sólo por personal
del servicio técnico.
WARNING
High voltage. Don't open cover.
Handle only by technical service.
PISO
Floor DoorStair
PLATEA Uno
0000000000
Nº serie
d
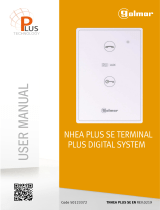
escription of the Platea Uno monitor.
D
Handset.
B/W screen.
Dummy push buttons.
On-Off light indicator.
Function push buttons.
Cord.
Attachment holes.
Identification label.
Connecting points.
CN2 connector.
Cable slot.
Contrast control.
Brightness control.
escription of the identification label.
D
For an easiest repair, replacement or increasement
of the existing monitors, fill the indentifying label
information.
MASTER: master monitor.
SLAVE: slave monitor.
INTER: not available.
A1: not available.
CODE: push button code (*).
STAIR: building code (*).
(*) Refer to the door panel instructions manual.
MONITOR DESCRIPTION

34
MONITOR DESCRIPTION MONITOR CONNECTOR DESCRIPTION
If the handset is on the craddle allows to see the picture from the master door panel.
If not, allows to establish audio and video communication with the door panel
that has been configurated with the autoswitch-on function. This function is
disabled if a communication is already established.
If the handset is on the craddle, press during 1 sec. to switch the monitor on or off.
After any monitor reset and during the next 45 seconds, all the monitor functions
will be disabled, with the exception of call reception.
With the handset lifted, allows to call to the master porter's exchange.
During call reception and communication progresses allows the lock release
activation, with no dependence on the handset position.
unction push buttons.
F
andling the end of line jumper.
H
The end of line jumper is placed on the CN2 connector, that can be
located on the monitor base.
In case of twisted pair cable installations, the end of line jumper
is placed in the EL561 module (see next paragraph).
Do not remove the jumper on monitors where the video cable finish.
Remove the jumper on monitors where the video cable continue.
L561 module for video installations
Ewith twisted pair cable.
Locate the CN2 connector, that's placed in the monitor base.
To plug the EL561 module, remove the existing jumper and
the double one (JP1) that's place on the right side.
NOTE: on this type of installations the EL560 module must be
plugged in the door panel microprocessed circuit.
Refer to the specific installation diagram.
a
a
b
b
f
e
d
c
+, –:
Vin / MP:
Malla:
Vo / VP :
A :
D :
HZ- :
V /MP
in
HZ-
MALLA
A
D
REF RCPL-UNO LOTE
CODE 11784082
Colocar la parte superior de la regleta a 1,60m. del suelo.
Place the top part of the monitor connector at 1,60m. from the floor.
50mm.
50mm.
Presionar para abrir.
Press to open.
V /VP
o
escription of the RCPL-Uno
Dmonitor connector.
a. Wall attachment hole (x4).
b. Monitor attachment hook (x2).
c. Vertical wiring input.
d. Attachment clip.
e. Wiring input hole.
f. Installation terminals: positive, ground.
video signal coaxial input.
twisted pair video signal input (MP).
coaxial shield.
video signal coaxial output.
twisted pair video signal input (VP).
audio communication.
digital communication.
door bell push button input.

MONITORS PROGRAMMING 56TELEPHONE DESCRIPTION
Set to ON the switch number 2 of the configuration dip switch, that's
accessible by opening the terminal connector protection cover
(see door panel instructions manual).
The door panel will reproduce a sound to advise that the system
has entered into programming mode.
In systems with more than one door panel, the programming process
shall be done on the master door panel only.
rogramming the monitors.
P
Switch off the monitor to be programmed, by pressing
the lock release push button during 1 second.
Once the monitor is off, press the autoswitch-on push button.
While pressing the autoswitch-on push button,
press the lock release push button.
To show that the system is ready for programming,
the door panel will reproduce a sound and the picture
will appears on the monitor. At this moment, the
push buttons can be released. Lift the monitor handset.
Press the door panel push button that will
call to this monitor. At this moment
the door panel and the monitor handset
will reproduce a sound.
To program the monitor as master,
replace the monitor handset.
To program it as slave, press the lock
release push button.
Each apartment must have one master unit only; in case of parallel units configure them
as slaves, both monitors or telephones.
Make a call to check that the monitor has been succesfully programmed.
Repeat these steps to program the rest of monitors.
Once the programming has been finished, set to OFF the programming
switch. If you don't, the door panel will reproduce a sound to advise
that the system is still into programming mode.
a.
b.
c.
d.
e.
f.
g.
a
d
c
e
b
e
f
g
unction push button.
F
During call reception and communication progresses allows the lock release activation,
with no dependence on the handset position.
During stand-by condition and with the handset lifted, allows to call to the master
porter's exchange.
HZ-
+ , :
A :
D :
HZ- :
–
A D
+_
escription of the T-940 Uno telephone.
D
Telephone handset.
Speaker grille.
Microphone hole.
Subjection hole.
Telephone cord connectors.
Function push button.
Hook switch.
erminal connector description.
Tpositive, ground.
audio communication.
digital communication.
door bell push button input.

7
TELEPHONES PROGRAMMING
Set to ON the switch number 2 of the configuration dip switch, that's
accessible by opening the terminal connector protection cover
(see door panel instructions manual).
The door panel will reproduce a sound to advise that the system
has entered into programming mode.
In systems with more than one door panel, the programming process
shall be done on the master door panel only.
rogramming the telephones.
P
Lift the handset while pressing the lock release push button.
To show that the system is ready for programming,
the door panel and handset will reproduce a sound,
being possible to stablish audio communication.
Release the lock release push button.
Press the door panel push button that will
call to this telephone. At this moment
the door panel and handset
will reproduce a sound.
To program the telephone as master,
replace the handset.
To program it as slave, press the lock
release push button.
Each apartment must have one master unit only; in case of parallel units configure them
as slaves, both monitors or telephones.
Make a call to check that the telephone has been succesfully programmed.
Repeat these steps to program the rest of telephones.
Once the programming has been finished, set to OFF the programming
switch. If you don't, the door panel will reproduce a sound to advise
that the system is still into programming mode.

Golmar se reserva el derecho a cualquier modificación sin previo aviso.
Golmar se réserve le droit de toute modification sans préavis.
Golmar reserves the right to make any modifications without prior notice.
golmar@golmar.es
www.golmar.es
/