Overland Storage NEO Series Remove & Replace / Add-On Instructions

Type
Remove & Replace / Add-On Instructions

Overland Storage NEO Series, a reliable and efficient library system, offers exceptional data storage and retrieval capabilities. With its advanced features, it streamlines operations, ensuring fast and secure access to your valuable data. Ideal for businesses and organizations seeking a robust storage solution, the NEO Series provides peace of mind and enhances productivity.

Overland Storage NEO Series, a reliable and efficient library system, offers exceptional data storage and retrieval capabilities. With its advanced features, it streamlines operations, ensuring fast and secure access to your valuable data. Ideal for businesses and organizations seeking a robust storage solution, the NEO Series provides peace of mind and enhances productivity.

Part Number 10400216-101 02/2009 ©2009 Overland Storage, Inc. Page 1 of 4
IMPORTANT: Overland Storage requires that all NEO
Series parts be removed and replaced by an Overland
Storage authorized service provider. Improper installation may
result in damage which voids existing warranties.
This document describes how to remove and replace the
Shuttle Track assembly in a NEO 4000E library from
Overland Storage.
WARNING: The GUI touch screen does not completely
shut off NEO SERIES system power. To reduce the risk
of electric shock or damage, unplug both power cords.
Unpacking the Spare
Carefully unpack and verify that you have all the parts:
NEO 4000
E Shuttle Track assembly
Eight (8) M3x20mm panhead Phillips screws
Eight (8) M3 cup washers
These instructions
Electrostatic Discharge Information
A discharge of static electricity can damage micro-circuitry
or static-sensitive devices. To help prevent Electrostatic
Discharge (ESD), observe standard ESD precautions.
1. If the library is operational:
a. Using the Graphical User Interface (GUI) or the
application software, remove any cartridges from
the drives to prevent damage.
b. Exit the application software and, if necessary,
stop the software services.
c. Use the GUI to remove all the magazines.
IMPORTANT: If the library is non-operational, the
doors can be manually opened by pushing a stiff
wire against the mechanical releases (Figure 1) directly
behind the front panel to remove the magazines.
Figure 1. Manual Door Release Locations
2. Power off the library as follows:
a. Use the GUI to power down the library.
b. Turn the power supply switches to OFF (O).
c. Remove the power cord.
3. Remove all external host cables.
4. Also, to reduce weight, we recommend removing the
drive assemblies at this time.
WARNING: It is recommended that a mechanical
lifter (or at least two people) be used to prevent
injury during rack installation or removal.
5. Using a mechanical lifter (or two people), remove the
unit from the rack and place on a secure ESD surface.
6. Remove and retain the two screws securing the front
top cover.
7. Lift and remove the front top cover, and set aside.
NEO
®
4000E
Spare Shuttle Track Assembly
Remove & Replace Instructions
Overview & Notes
N
E
O
-
0
1
6
9
Preparing the Library
N
E
O
-
0
1
5
5
Manual Release
Part Number 10400216-101 02/2009 ©2009 Overland Storage, Inc. Page 2 of 4
1. Remove the shuttle:
a. By hand, turn the motor/track coupler until the
track section is at a 45° or larger angle (Figure 2).
b. With one hand supporting the top of the shuttle,
grasp the shuttle base and carefully slide the
shuttle off the track.
Figure 2. Top View of Track Showing Movable Section
c. Without twisting the shuttle flex cable, set the
shuttle assembly (with the PCB up) on the top
edge of the unit (Figure 3).
Figure 3. Set the Shuttle Aside; PCB Up
2. Disconnect the track flex cable from the track plate
PCB (Figure 4):
Figure 4. Cable Connections on Flex Cable Card
3. Remove the eight M3x20mm screws and washers
(Figure 5) securing the two Z-Axis assemblies to the
track plate.
Figure 5. Remove the Z-Axis Screws
4. Raise the front Z-Axis about 1/2 inch by turning the
motor coupler clockwise (Figure 6).
Figure 6. Turn Front Z-Axis Motor Coupler
5. Raise the rear Z-Axis about one inch by turning the
pulley gear clockwise (Figure 7).
Figure 7. Turn Rear Z-Axis Pulley Gear
Removing the Old Assembly
N
E
O
-
0
1
5
0
Motor/Track Coupler
Shuttle
Assembly
Flex Cable PCB
Remove Screws
Remove Screws
Turn Coupler
Turn Gear
Part Number 10400216-101 02/2009 ©2009 Overland Storage, Inc. Page 3 of 4
6. Verify that the Z-Axis has cleared the track plate
alignment pins (Figure 8).
7. Carefully remove the old track and set it aside.
IMPORTANT: Check for loose hardware on the chassis
floor. Remove it before continuing.
Figure 8. Shuttle Track Z-Axis Alignment Pins
1. Position the new track assembly on the chassis floor.
2. Attach the rear Z-Axis:
a. Lower the rear Z-Axis bracket onto the alignment
pins on the track plate by turning the pulley gear
counterclockwise.
b. Align both sides of the rear Z-Axis base to the edges
of the track plate (Figure 9).
Figure 9. Align Rear Z-Axis Bracket & Tighten Screws in Order
c. Using four new M3x20mm screws and M3 cup
washers, secure the rear Z-Axis to the track plate
using around 6 lbs of torque.
Tighten the screws in the order shown in Figure 9.
Be sure the cup washer is positioned correctly
(Figure 10).
Figure 10. Screw and Cup Washer Assembly
3. Attach the front Z-Axis:
a. Lower the front Z-Axis bracket by turning the
motor coupler counterclockwise until it contacts the
track plate.
b. Align both sides of the front Z-Axis base to the edges
of the track plate (Figure 11).
Figure 11. Align Front Z-Axis Bracket & Tighten Screws in Order
c. Using four new M3x20mm screws and M3 cup
washers, secure the front Z-Axis to the track plate
using around 6 lbs of torque.
Tighten the screws in the order shown in Figure 11.
4. Reconnect the track flex cable to the track assembly
PCB (Figure 12).
Figure 12. Cable Connections on Flex Cable Card
Alignment Pins
Installing the New Assembly
Align Z-Axis Base
1
3
2
4
to Track Edges
Align Z-Axis Base
1
4
3
2
to Track Edges
Track Track
Flex Cable PCB
Part Number 10400216-101 02/2009 ©2009 Overland Storage, Inc. Page 4 of 4
5. Reinstall the shuttle:
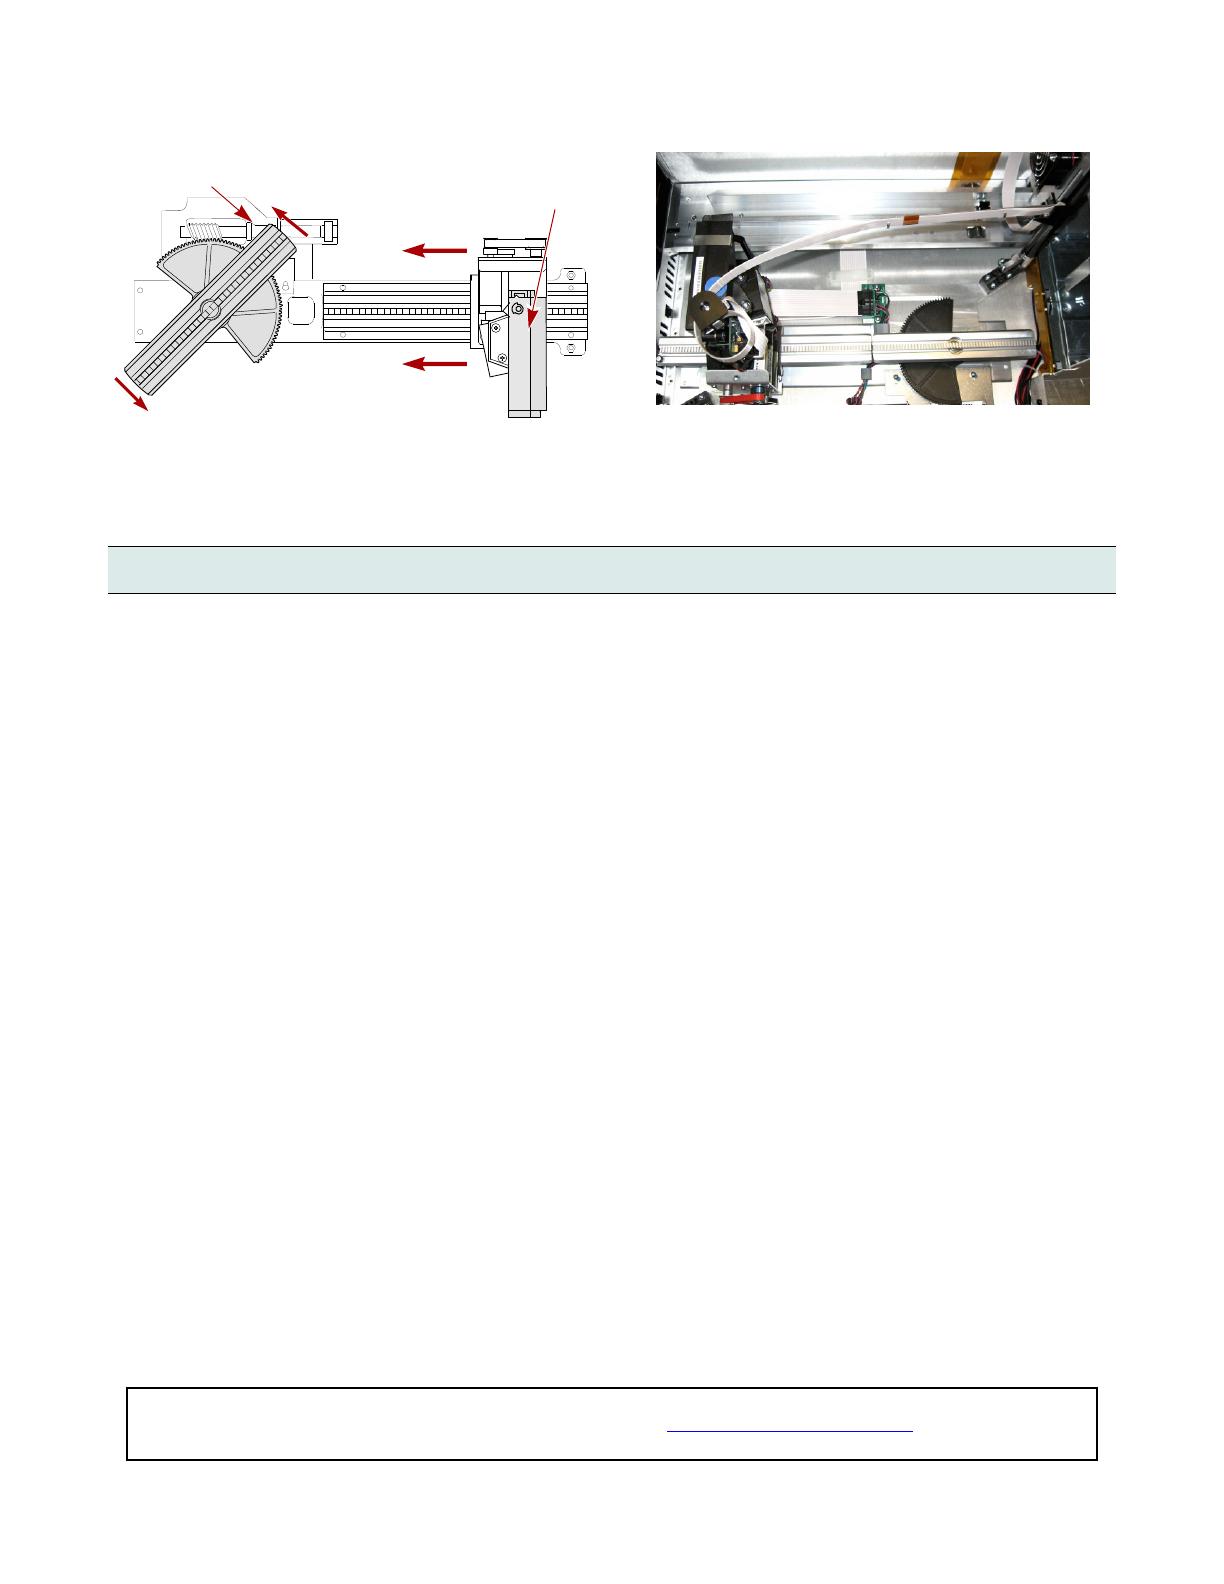
a. By hand, turn the track motor/track coupler until
it is at a 45° or greater angle (Figure 13).
Figure 13. Top View of Track Showing Movable Section
b. Carefully lift the shuttle and position it at the open
end of the track, checking that there are NO twists
in the flex cable (Figure 14).
Figure 14. Flex Cable Position Around Shuttle Spooler
NOTE:
The open side of the shuttle should be on the left.
c. Slide the shuttle onto the track making sure the
shuttle flex cable wraps around the spooler correctly.
Power On Library
Before returning the unit to the rack, verify that it works.
1. For SCSI systems, verify the terminators are still in
place.
2. Plug in the power cord.
3. Turn the power supply switch to ON (|).
4. Tap the GUI to power on the library.
5. Observe the POST process to verify the shuttle
assembly installation:
Watch the shuttle assembly and track movement.
Make sure that nothing interferes with the cable
assembly through its full range of motion.
NOTE: If problems occur, contact Overland Storage
Technical Support.
Run Diagnostics
Test the library’s operational mechanisms to make sure
they are running and operating properly.
NOTE: If you do receive errors, note them and contact
Overland Storage Technical Support.
1. From the touch-screen GUI, press Menu >
Diagnostics > Cartridge Cycle.
2. Run the Cartridge Cycle:
a. Press Start.
b. Allow the cycle to run at least 5 minutes.
c. Press Stop.
3. Using the Move Media function, load and unload a
cartridge from each drive.
4. Power off the library as follows:
a. Use the GUI to power down the library.
b. Turn the power supply switches to OFF (O).
c. Remove the power cord.
Reinstall the Library
1. Slide the front top cover tabs into their slots and
gently set the cover into place.
2. Reinstall the two retained cover screws.
1. Using a mechanical lifter (or two people), reinstall the
library into the rack.
2. Reinstall any removed drive assemblies.
3. Reattach all external host cables.
Return Old Track Plate
1. Place removed parts in the replacement part box.
2. Follow directions included in the box for returning
parts to Overland Storage.
N
E
O
-
0
1
5
0
Motor/Track Coupler
Shuttle
Assembly
Power On and Test the Library
Additional Help
You can get additional technical support on the Internet at http://support.overlandstorage.com, or call
1-877-654-3429 (toll-free U.S. & Canada), +44 (0) 118-9898050 (Europe), or +1 (858) 571-5555 Option 5 (International).
  • Page 1 1
  • Page 2 2
  • Page 3 3
  • Page 4 4

Overland Storage NEO Series Remove & Replace / Add-On Instructions

Type
Remove & Replace / Add-On Instructions

Overland Storage NEO Series, a reliable and efficient library system, offers exceptional data storage and retrieval capabilities. With its advanced features, it streamlines operations, ensuring fast and secure access to your valuable data. Ideal for businesses and organizations seeking a robust storage solution, the NEO Series provides peace of mind and enhances productivity.

Ask a question and I''ll find the answer in the document

Finding information in a document is now easier with AI