Page is loading ...

INSTALLATION GUIDE
271
Ground Fault Detection Module

271 Installation Guide | Digital Monitoring Products 1
GET STARTED
The 271 is a ground fault detection module that detects ground faults without harming the control panel. The module
connects to a zone and the earth ground to determine if there is a fault. Refer to the panel installation guide for more
information about zone programming.
What’s Included
▶One 271 Ground Fault Detection Module
▶3 Nylon Standos
▶2 Small Nylon Washers
▶2 1.25” Nylon Washers
▶2 Nylon Cup Washers
▶1 Ferrite Core
What You’ll Need
▶#2 Phillips screwdriver
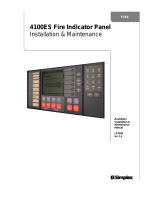
POWER GND FAULT
MODEL
271
+ 12V - OUT
LEV
LED Indicators
Earth
Ground
Output to
Zone*
To Panel
Terminal 7
To Panel
Terminal 10
*Connect to the positive terminal of
any available zone between 1 and 8
Figure 1: PCB Features

271 Installation Guide | Digital Monitoring Products 2
INSTALLATION
Preparing for Installation
1. Unscrew the panel from the enclosure and remove the panel PCB.
2. Place the included nylon cup washer between the enclosure
standos and the panel. Place the flat nylon washer on the screw
to secure the panel. This provides ground isolation from the
enclosure.
3. Screw the panel PCB back into place.
4. If a 381-2 antenna cable is used, install the two 1.25” nylon washers
to isolate the cable.
Note: The panel and entire system must be completely separated
from the earth ground before installing the 271 module. If there are
any earth ground connections on the system, such as the panel
mounting screws or the brass washers on the antenna, the module
will instantly indicate a ground fault. Any power supplies or zone
expander PCB’s installed in metal enclosures connected by conduit
must also be isolated from earth ground using nylon washers (not
included).
Metal Stando Washer
Panel
Cup Screw
Figure 2: Washer and Panel Installation
Mount the Module
The module can be mounted in a DMP enclosure using the standard 3-hole
mounting pattern. Refer to Figure 2 as needed during installation.
1. Hold the nylon standos against the inside of the enclosure side wall.
2. Insert the included Phillips head screws from outside of the
enclosure into the standos. Tighten the screws.
3. Carefully snap the module onto the standos.
1
2
Figure 3: Stando and Module Installation
Wire the Module
Caution: Disconnect all power from the panel before wiring the module. Failure to do so may result in
equipment damage or injury. Observe polarity when making power connections.
Use 18 to 22 gauge wire when wiring the module.
1. Use a wire to connect the module’s 12V negative to terminal 10 on the panel. Use another wire to connect
the module’s 12V positive to terminal 7 on the panel.
2. Connect the module to the earth ground using 14 gauge wire or larger. Additional options are a cold
water pipe, ground rod, or building ground. Gas pipes or sprinkler pipes should not be used. Do not
connect to an electrical ground, server rack or telephone company ground.
3. Connect the module’s OUT to the positive terminal of any available zone between 1 and 8. Do not attach
a resistor to the zone, there is a resistor built into the 271.
Note: The module monitors all busses on the panel through the on-board zone connection.
3

271 Installation Guide | Digital Monitoring Products 3
Program the Panel
Refer to the panel programming guide for full programming information.
After completing each of the following steps, press CMD to advance to the next prompt.
1. Reset the panel. At a keypad, enter 6653 (PROG) to access the PROGRAMMER menu.
2. In STATUS LIST, navigate to SUPERVISORY ZONES and select keypads to display the ground fault
trouble.
3. At ZONE INFORMATION, enter the zone number.
4. At *UNUSED*, name the zone GROUND FAULT.
5. At ZONE TYPE, select SUPERVISORY (SV).
6. Press CMD until STOP displays. Press a top row select key or area to save programming.
4Wire the Ferrite Core
Refer to Figure 4 as needed during installation.
1. Unplug the keypad harness from the panel keypad bus header.
2. Open the ferrite core.
3. Loop the keypad harness wires around the core and close.
4. Reconnect the keypad harness to the panel keypad bus header.
5
Figure 4: Ferrite Core Installation

18205
Designed, engineered, and
manufactured in Springfield, MO
using U.S. and global components.
LT-2660 1.01 24012
INTRUSION • FIRE • ACCESS • NETWORKS
2500 North Partnership Boulevard
Springfield, Missouri 65803-8877
800.641.4282 | DMP.com
© 2024
ADDITIONAL INFORMATION
Module Operation
When a ground fault is detected, the panel will enter into a trouble condition and annunciate at the keypad
programmed in the Status list. The trouble condition will continue until a valid user code is entered at the keypad. In
addition, ground fault conditions on the zone will light the corresponding GND FAULT red LED.
Compatibility
▶XR Series Panels
SPECIFICATIONS
Primary Power 12 VDC from panel
Current Draw
Idle 8.8 mA
Operating 12.8 mA
CERTIFICATIONS
Underwriters Laboratory (UL) Listed
ANSI/UL 864 Fire Protective Signaling
/