Page is loading ...

Cat. No. 54550-18
Dissolved Oxygen Meter
© Hach Company, 1999. All rights reserved. Printed in the U.S.A. ap/dk 9/99 1ed

2
TRADEMARKS OF HACH COMPANY
AccuGrow
AccuVac
AccuVer
®
®
®
®
®
®
®
®
®
®
®
®
®
®
®
®
®
®
2
2
®
®
®
®
®
®
®
®
®
®
®
®
®
®
®
®
®
®
®
®
®
®
®
®
®
®
®
®
®
®
®
®
ACS-Plus™
AgriTrak™
AluVer
AmVer™
APA 6000™
AquaCheck™
AquaTrend™
BariVer
BiVer
BODTrak™
BoroTrace™
BoroVer
C. Moore Green™
CalVer
ChromaVer
ColorQuik™
CoolTrak
CuVer
CyaniVer
Digesdahl
DithiVer
Dr.F. Fluent™
Dr.H.Tueau™
DR/Chek™
FerroMo
FerroVer
FerroZine
FilterTrak™660
Formula 2533™
Formula 2589™
Gelex
H O University™
H OU™
Hach Logo
Hach One
Hach Oval
Hach.com™
HachLink™
Hachology™
HexaVer
HgEx™
HydraVer
ICE-PIC™
IncuTrol
LeadTrak
m-ColiBlue 24
ManVer
MercuVer
MolyVer
Mug-O-Meter
NetSketcher™
NitraVer
NitriVer
NTrak
OASIS™
OptiQuant™
On Site Analysis.
ResultsYou Can Trust™
OriFlow™
OxyVer™
PathoScreen™
PbEx
PermaChem
Phillip D. Glass™
PhosVer
Pocket Colorimeter™
Pocket Pal™
Pocket Turbidimeter™
“Pond in Pillow”™
PourRite™
PrepTab™
ProNetic™
Pump Colorimeter™
QuanTab
Rapid Liquid™
RapidSilver™
Ratio™
RegeneVer™
RoVer
™
“Simply Accurate”™
SofCheck™
SoilSys™
Spec ™
StablCal
StannaVer
StillVer
SulfaVer
Surface Scatter
TanniVer
TenSette
Test ‘N Tube™
TitraStir
TitraVer
ToxTrak™
UniVer
VIScreen™
Voluette
WasteAway™
WaveCheck™
ZincoVer
Sens
ion
√

3
TABLE OF CONTENTS
SAFETY PRECAUTIONS ....................................................................................................... 7
SPECIFICATIONS.................................................................................................................... 9
OPERATION........................................................................................................................11
SECTION 1 INTRODUCTION...................................................................................... 13
1.1 Unpacking the Instrument................................................................................................. 14
1.1.1 Standard Accessories............................................................................................... 14
1.1.2 Optional Accessories............................................................................................... 14
1.2 Keypad Description........................................................................................................... 14
1.3 Display Fields and Icons................................................................................................... 16
1.4 Maintenance...................................................................................................................... 19
1.5 Audible Signals................................................................................................................. 19
SECTION 2 INSTRUMENT SETUP............................................................................ 21
2.1 Instrument Description...................................................................................................... 21
2.2 Power Connection............................................................................................................. 21
2.3 Printer and Computer Connections................................................................................... 22
2.4 Turning the Meter On........................................................................................................ 22
SECTION 3 INSTRUMENT OPERATION................................................................ 23
3.1 Setup Menu ....................................................................................................................... 23
3.1.1 Turning Display Lock Off and On........................................................................... 23
3.1.2 Selecting Metric or English Units............................................................................ 23
3.1.3 Selecting Measurement Resolution ......................................................................... 24
3.1.4 Adjusting for Sample Salinity.................................................................................. 24
3.1.5 Changing the Barometric Pressure. ......................................................................... 25
3.1.6 Adjusting the Altitude.............................................................................................. 26
3.1.7 Setting the Time....................................................................................................... 27
3.1.8 Setting the Date........................................................................................................ 28
3.1.9 Setting the Year........................................................................................................ 28
3.1.10 Automatic Data Transfer ....................................................................................... 29
3.2 Calibrating the Meter ........................................................................................................ 30
3.3 DO Probe........................................................................................................................... 31
3.3.1 Probe Assembly....................................................................................................... 31
3.3.2 Probe Polarization.................................................................................................... 32
3.3.3 Zeroing the Probe .................................................................................................... 33
3.3.4 Calibration in Water Saturated Air.......................................................................... 34
3.3.5 Calibration to a Known Dissolved Oxygen Concentration ..................................... 35

4
TABLE OF CONTENTS, continued
3.3.6 Calibrating a Sample to Read 100% Saturation...................................................... 37
3.3.7 Calibration Review.................................................................................................. 38
3.4 Measuring Dissolved Oxygen........................................................................................... 39
3.4.1 General Probe Operation......................................................................................... 39
3.4.2 Measurement........................................................................................................... 39
3.4.3 Probe Storage .......................................................................................................... 40
3.4.4 Maintenance............................................................................................................ 41
3.5 Using the BOD Accessory Kit.......................................................................................... 41
3.6 Making BOD Determinations........................................................................................... 42
3.7 Oxygen Utilization Rate (OUR) and Specific Oxygen Utilization Rate (SOUR) Tests... 42
SECTION 4 STORING AND RECALLING DATA.................................................. 45
4.1 Storing Measurements ...................................................................................................... 45
4.2 Recalling Stored Data....................................................................................................... 46
4.3 Erasing Data...................................................................................................................... 47
4.3.1 Erasing Single Data Points...................................................................................... 47
4.3.2 Erasing All Data Points........................................................................................... 47
SECTION 5 MAINTENANCE....................................................................................... 49
5.1 Cleaning the Probe............................................................................................................ 49
5.2 Meter Maintenance........................................................................................................... 49
SECTION 6 PRINTING AND DATA TRANSFER................................................... 51
6.1 Connecting to Printers/Computers.................................................................................... 51
6.1.1 Connection with the RS232 Cable.......................................................................... 51
6.1.2 Connecting to a Printer............................................................................................ 51
6.1.3 Connecting to a Personal Computer........................................................................ 53
6.2 Sending Data to Printers/Computers................................................................................. 55
6.2.1 Sending Currently Displayed Data.......................................................................... 55
6.2.2 Sending Recalled Data Points................................................................................. 55
6.2.3 Sending All Stored Data.......................................................................................... 55
6.2.4 Printed Data Format................................................................................................ 56
SECTION 7 DISSOLVED OXYGEN IN WATER..................................................... 57
SECTION 8 TROUBLESHOOTING............................................................................ 63
8.1 Error Codes....................................................................................................................... 63
8.2 Meter Service Request Questionnaire............................................................................... 63

5
TABLE OF CONTENTS, continued
SECTION 9 REFERENCE TABLES............................................................................ 65
9.1 Salinity Correction Factors................................................................................................ 65
9.2 Barometric Pressure and Elevation ................................................................................... 66
9.3 Solubility of Oxygen in Water .......................................................................................... 67
9.4 Pressure Conversions......................................................................................................... 73
GENERAL INFORMATION...........................................................................................75
REPLACEMENT PARTS....................................................................................................... 77
HOW TO ORDER................................................................................................................... 78
REPAIR SERVICE.................................................................................................................. 79
WARRANTY.......................................................................................................................... 80
CERTIFICATION ...................................................................................................................81

6


8

9
SPECIFICATIONS
Specifications subject to change without notice.
Oxygen Measurement:
Range 0-20 mg/L (ppm)
0-200% sat.
Accuracy ± 1% full scale
Temperature 0-50 °C
Resolution:
Oxygen Concentration 0.01 or 0.1 ppm (mg/L)
%Saturation 0.1%
Temperature 0.1 °C
Display: Custom LCD
Inputs: Outputs:
5-pin shielded RS232C
circular connector
Power Requirements: 6–12 Vdc; use either Hach-supplied 115 or 230V, 50/60 Hz external
power supply or a customer-provided supply with 50 mA output, 5.5-mm power plug with a
2.5 mm center post opening
Installation Category: II
Instrument drift: <1%/day
Environmental requirements: 5 to 50 °C at 85% relative humidity, non-condensing
Meter dimensions: 15x25.4x8.37cm(10.15x6x3.5inches)
Enclosure: Water resistant (IP32), chemical resistant
Probe Dimensions (Model 50180):
Probe Length 150 mm
Body Diameter 12 mm
Cap 15 mm dia. x 35 mm
Cable Length 1, 3, or 15 meters
Connector Fisher

10

11
DANGER
Handling chemical samples, standards, and reagents can be dangerous. Review the necessary
Material Safety Data Sheets and become familiar with all safety procedures before handling
any chemicals.
DANGER
La manipulation des échantillons chimiques, étalons et réactifs peut être dangereuse. Lire les Fiches
de Données de Sécurité des Produits (FDSP) et se familiariser avec toutes les procédures de sécurité
avant de manipuler tous les produits chimiques.
PELIGRO
La manipulación de muestras químicas, estándares y reactivos puede ser peligrosa. Revise las fichas
de seguridad de materiales y familiarícese con los procedimientos de seguridad antes de manipular
productos químicos.
GEFAHR
Das Arbeiten mit chemischen Proben, Standards und Reagenzien ist mit Gefahren verbunden.
Es wird dem Benutzer dieser Produkte empfohlen, sich vor der Arbeit mit sicheren Verfahrensweisen
und dem richtigen Gebrauch der Chemikalien vertraut zu machen und alle entsprechenden
Materialsicherheitsdatenblätter aufmerksam zu lesen.
PERIGO
A manipulação de amostras, padrões e reagentes químicos pode ser perigosa. Reveja a folha dos
dados de segurança do material e familiarize-se com todos os procedimentos de segurança antes
de manipular quaisquer produtos químicos.
OPERATION

12

13
SECTION 1 INTRODUCTION
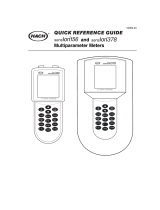
The versatile sension™8 Dissolved Oxygen Meter, shown in
Figure 1, easily measures dissolved oxygen in aqueous solutions.
Important features include measurement in % saturation;
autocalibration; a 99-point internal datalogging function; and
altitude, barometric pressure, and salinity correction. The meteris
microprocessor-controlled, has a sealed keypad, and can send
data to a printer or computer.
The DO probe can also be equipped with the available BOD
apparatus kit which allows it to be used in conjunction with an
electromagnetic stir stand for BOD measurements.
Figure 1
sens
ion
8
Dissolved Oxygen Meter

14
SECTION 1, continued
1.1 Unpacking the Instrument
Remove the instrument and accessories from the shipping
container and inspect each item for damage. Verify that all items
listed on the packing slip are included. If any items are missing or
damaged, contact Hach Customer Service, Loveland, Colorado.
Hach’s toll free phone number for customers within the United
States is 800-227-4224. Customers outside the United States
should contact their regional Hach office or distributor.
1.1.1 Standard Accessories
• Instrument Manual
• Dissolved Oxygen Probe
• Probe-related accessories (covered in the electrode manual)
• Power adapter
1.1.2 Optional Accessories
• BOD Accessory Kit (See Section 3.5 on page 41.)
• 1000 mg/L Cobalt Standard
• Sodium Sulfite
• Probe Holder and Stirring Stand
• Barometer/altimeter
1.2 Keypad Description
Figure 2 illustrates the meter’s keypad. Table 1 describes the
function of each key.

15
SECTION 1, continued
Figure 2
sens
ion
8
Dissolved Oxygen Meter Keypad
Table 1 Keys and Description
Key Description
EXIT/POWER
ON-OFF key
Turns the instrument on; turns it off from a Reading mode.
Acts as a No or Cancel key when the question mark icon is illuminated.
In Setup mode, backs up one step toward the Reading mode.
Performs the following and returns to the most recent Reading mode:
• Exits the Store, Erase, or Recall mode
• Aborts a calibration
• Exits a calibration review
UP and DOWN
ARROW keys
Scroll between options in Setup mode.
Scroll through data points in Store and Recall modes.
Scroll between the option to print or erase one data point and the option to print or
erase all data points.

16
SECTION 1, continued
1.3 Display Fields and Icons
The display has two screens. The upper screen displays
measurements or standard values, the operation mode in use,
sample temperature, units, error codes, and a stable reading
indicator. The lower screen displays the keys that are active.
Figure 3 shows the icons and fields displayed by the meter and
Table 2 describes each element. Some display icons are not used
in this model of meter but will be displayed if the power key is
held down for several seconds.
READ/ENTER
key
Accepts numerical input.
Acts as a “YES” answer when the question mark is flashing.
Allows user to edit the setup when the setup number is flashing.
Accepts the current Setup option when that option is flashing.
Initiates a measurement when the meter has stabilized in the Display Lock
Enabled mode.
RECALL key Recalls stored sample data (from Reading mode only).
STORE key Stores the current (displayed) measurement (from Reading mode only).
ERASE key Erases recalled data points.
CONC% key Toggles between dissolved oxygen concentrations displayed as % saturation and
mg/L in Reading and Calibration Review modes.
PRINT key Sendscurrent or recalled data to a printer or a computer via the RS232 port on the
docking station.
TIME key Allows user to view the current time and date setup directly without using the
Setup menu. In Recall Data and Calibration Review modes, the key toggles
between the time and date of the stored measurement.
CAL key Enters Calibration mode (from Reading mode only).
REVIEW key Enters Calibration Review mode (from Reading mode only).
SETUP/CE key Enters Setup mode (from Reading mode only).
Clears a numeric entry when the keypad icon is displayed.
Table 1 Keys and Description (Continued)
Key Description

17
SECTION 1, continued
Figure 3
sens
ion
8
Display Elements
Table 2 Main Display Elements
Item No. Description
1 Indicates meter is in Calibration mode. When the ? is flashing, a calibration is necessary.
2 Indicates meter is in Calibration Review mode.
3 Indicates data is being sent to a printer/computer.
4 Indicates currently displayed, recalled data is being erased.
5 Indicates meter is in Setup mode.
6 Indicates all data points are being printed or erased.
7Displays
Setup, Sample,andStandard plus the number of the individual item when those
words are displayed to the left of the number. For example, if
Sample and 1 are displayed,
the meter is displaying Sample 1.
8 Indicates calibration is necessary when display shows Flashing ? and CAL. Prompts to
press the ENTER or EXIT key.
9 Indicates the meter is displaying recalled data (sample number is displayed to the right).

18
SECTION 1, continued
10 NA
11 NA
12 Main measurement display field.
13 Indicates measurement units (% or mg/L).
14 NA
15 Indicates the temperature units in use (choice of °C or °F).
16 NA
17 Displays temperature or month/day portion of the date.
18 NA
19 Indicates an inactive key has been pressed and that function is not allowed.
20 Indicates ENTER keyisactive.
21 Indicates arrow keys are active.
22 Indicates the date is being set or displayed.
23 Indicates meter is displaying sample salinity. Indicates salinity correction is being applied to
dissolved oxygen measurement.
24 Indicates EXIT keyisactive.
25 NA
26 Indicates numeric key functions are active.
27 NA
28 Indicates the display is locked. Displayed with item 29.
29 Indicates Display Lock is
On or Off.
30 Indicates faulty probe connection or incorrect probe attached. Usually displayed with an
error code. Indicates the probe zeroing procedure cannot be completed.
31 NA
32 Indicates a meter function problem.
33 Indicates signal from sample is not yet stable when on or flashing.
34 Asks if the calibration that has been just completed or the displayed sample data should be
stored. Used with ? icon.
35 Indicates the time is being set or displayed. Used with large display.
36 Indicates meter is in recall mode and the displayed data is stored data.
Table 2 Main Display Elements (Continued)
Item No. Description

19
SECTION 1, continued
1.4 Maintenance
The meter is designed to be maintenance-free. If the meter gets
dirty, wipe the surface with a damp cloth. Use a cotton-tipped
applicator to clean or dry the connectors if they get wet.
1.5 Audible Signals
The meter will beep under certain conditions:
• When a non-functional key press is made (one beep)
• When measurement stability is reached during calibration
(three beeps)
• In reading mode, when the display lock is turned on and
stability is reached (three beeps).

20
/