Hach sensION+ pH1 User manual

Type
User manual
DOC022.97.80143
sensION
+ Portable Meter
02/2013, Edition 3
User Manual
Manuel d'utilisation
Manual del usuario
Manual do usuário
用户手册
取扱説明書
사용 설명서
คูมือผูใช
English...................................................................................................................................................................................................
3
Français..............................................................................................................................................................................................18
Español...............................................................................................................................................................................................34
Português..........................................................................................................................................................................................50
中文.......................................................................................................................................................................................................66
日本語..................................................................................................................................................................................................80
한글.......................................................................................................................................................................................................95
ไทย........................................................................................................................................................................................................110
2
Table of contents
Specifications on page 3
General information on page 4
Installation on page 5
User interface and navigation on page 6
Startup on page 10
Operation on page 10
Maintenance on page 13
Troubleshooting on page 13
Replacement parts and accessories on page 15
Standard solutions on page 15
Salinity values for dissolved oxygen meters on page 17
Specifications
Specifications are subject to change without notice.
Specification Details
Dimensions 18.6 x 7.3 x 3.8 cm (7.32 x 2.87 x 1.5 in.)
Weight 300 g (0.66 lb)
Meter enclosure IP67
Power requirements
(internal)
AA Alkaline or rechargeable Nickel Metal Hydride
(NiMH) batteries (3); battery life: over 500 hours
Input connectors MP-5 or MP-8 connector for sensION+ probes
Meter protection class Class III
Storage temperature –15 to +65 °C (5 to +149 °F)
Operating temperature 0 to 50 °C (32 to 122 °F)
Operating humidity 80% (non-condensing)
Specification Details
Instrument range pH: –2.00 to 19.99; ORP: ±1999 mV
Conductivity: 0.01 to 500 mS/cm; TDS: 0 to
500 g/L; Salinity: 0.0 to 1999 mg/L, 2.0 to 50.0 g/L
DO: 0.00 to 19.99 mg/L and 20.0 to 22.0 mg/L
(25°C), 0.0 to 199.9% and 200 to 250% (25°C)
Resolution pH: 0.01 pH; ORP: 1 mV (0.1 mV from –199.9 to
199.9 mV)
DO: 0.1% (1% if ≥ 200%); 0.01 mg/L (0.1 mg/L if ≥
20 mg/L)
Conductivity: changes with range (auto-ranging)
Temperature: 0.1 °C (0.1°F)
Measuring error (± 1 digit) pH: ≤ 0.01 pH; ORP: ≤ 1 mV
DO: ≤ 0.5% of the measured value
Conductivity: ≤ 0.5% (0.01 µS/cm to 19.99 mS/cm);
≤ 1% (≥ 20.0 mS). Salinity/TDS: ≤ 0.5%
Temperature: ≤ 0.2 °C (≤ 0.4 °F)
Reproducibility (± 1 digit) pH: ± 0.01 pH; ORP ± 1 mV
DO: ≤ 0.2 of the measured value
Conductivity/Salinity/TDS: ± 0.1%
Temperature ± 0.1 °C (± 0.1 °F)
Reference temperature
(RT)
Conductivity: 20 or 25 °C (68 or 77 °F) (factory
settings: 25 °C (77 °F))
Temperature coefficient
(TC)
Conductivity: 0.00 to 5.00%/°C (factory settings:
2%/ °C)
TDS conversion factor Conductivity: 0.00 to 4.44 (factory settings: 0.64)
Energy management Automatic power off after 5 minutes of inactivity
Certification CE
English 3
General information
Revised editions are found on the manufacturer’s website.
Safety information
N O T I C E
The manufacturer is not responsible for any damages due to misapplication or
misuse of this product including, without limitation, direct, incidental and
consequential damages, and disclaims such damages to the full extent permitted
under applicable law. The user is solely responsible to identify critical application
risks and install appropriate mechanisms to protect processes during a possible
equipment malfunction.
Please read this entire manual before unpacking, setting up or operating
this equipment. Pay attention to all danger and caution statements.
Failure to do so could result in serious injury to the operator or damage
to the equipment.
Make sure that the protection provided by this equipment is not impaired.
Do not use or install this equipment in any manner other than that
specified in this manual.
Use of hazard information
D A N G E R
Indicates a potentially or imminently hazardous situation which, if not avoided, will
result in death or serious injury.
W A R N I N G
Indicates a potentially or imminently hazardous situation which, if not avoided,
could result in death or serious injury.
C A U T I O N
Indicates a potentially hazardous situation that may result in minor or moderate
injury.
N O T I C E
Indicates a situation which, if not avoided, may cause damage to the instrument.
Information that requires special emphasis.
Precautionary labels
Read all labels and tags attached to the instrument. Personal injury or
damage to the instrument could occur if not observed. A symbol on the
instrument is referenced in the manual with a precautionary statement.
This symbol, if noted on the instrument, references the instruction
manual for operation and/or safety information.
Electrical equipment marked with this symbol may not be disposed of
in European public disposal systems after 12 August of 2005. In
conformity with European local and national regulations (EU Directive
2002/96/EC), European electrical equipment users must now return
old or end-of-life equipment to the Producer for disposal at no charge
to the user.
Note: For return for recycling, please contact the equipment producer or supplier
for instructions on how to return end-of-life equipment, producer-supplied
electrical accessories, and all auxiliary items for proper disposal.
Product overview
The sensION
+ series meters are used with sensION+ probes to
measure various parameters in water. Primarily for field use, the portable
meter operates on three AA batteries.
The sensION
+ series meters are available in 6 models:
sensION
+ EC5—conductivity, TDS, salinity and temperature meter
sensION
+ MM150—pH, ORP (Redox), conductivity, TDS and
temperature meter
sensION
+ MM110—pH, ORP (Redox) and temperature meter
sensION
+ MM156—pH, conductivity, salinity, dissolved oxygen and
temperature meter
sensION
+ pH1—pH meter
sensION
+ DO6—dissolved oxygen (concentration and % saturation)
and temperature meter
Certification
Canadian Radio Interference-Causing Equipment Regulation,
IECS-003, Class A:
4 English
Supporting test records reside with the manufacturer.
This Class A digital apparatus meets all requirements of the Canadian
Interference-Causing Equipment Regulations.
Cet appareil numérique de classe A répond à toutes les exigences de la
réglementation canadienne sur les équipements provoquant des
interférences.
FCC Part 15, Class "A" Limits
Supporting test records reside with the manufacturer. The device
complies with Part 15 of the FCC Rules. Operation is subject to the
following conditions:
1. The equipment may not cause harmful interference.
2. The equipment must accept any interference received, including
interference that may cause undesired operation.
Changes or modifications to this equipment not expressly approved by
the party responsible for compliance could void the user's authority to
operate the equipment. This equipment has been tested and found to
comply with the limits for a Class A digital device, pursuant to Part 15 of
the FCC rules. These limits are designed to provide reasonable
protection against harmful interference when the equipment is operated
in a commercial environment. This equipment generates, uses and can
radiate radio frequency energy and, if not installed and used in
accordance with the instruction manual, may cause harmful interference
to radio communications. Operation of this equipment in a residential
area is likely to cause harmful interference, in which case the user will be
required to correct the interference at their expense. The following
techniques can be used to reduce interference problems:
1. Disconnect the equipment from its power source to verify that it is or
is not the source of the interference.
2. If the equipment is connected to the same outlet as the device
experiencing interference, connect the equipment to a different
outlet.
3. Move the equipment away from the device receiving the interference.
4. Reposition the receiving antenna for the device receiving the
interference.
5. Try combinations of the above.
Installation
C A U T I O N
Multiple hazards. Only qualified personnel must conduct the tasks
described in this section of the document.
Install the batteries
W A R N I N G
Explosion hazard. Incorrect battery installation can cause the release of explosive
gases. Be sure that the batteries are of the same approved chemical type and
are inserted in the correct orientation. Do not mix new and used batteries.
N O T I C E
The battery compartment is not waterproof. If the battery compartment becomes
wet, remove and dry the batteries and dry the interior of the compartment. Check
the battery contacts for corrosion and clean them if necessary.
N O T I C E
When using nickel metal hydride (NiMH) batteries, the battery icon will not
indicate a full charge after freshly charged batteries have been inserted (NiMH
batteries are 1.2 V versus 1.5 V for alkaline batteries). Even though the icon does
not indicate complete charge, 2300 mAH NiMH batteries will achieve 90% of
instrument operation lifetime (before recharge) versus new alkaline batteries.
N O T I C E
To avoid potential damage to the meter from battery leakage, remove the meter
batteries prior to extended periods of non-use.
The meter can be powered with AA alkaline or rechargeable NiMH
batteries. To conserve battery life, the meter will power off after
5 minutes of inactivity. This time can be changed in the Display Options
menu.
English 5
For battery installation, refer to Figure 1.
Note: A tool such as a flat screwdriver may be necessary the first time the cover is
removed.
Make sure that the cover is tightly closed to maintain the IP67 enclosure
rating.
Figure 1 Battery installation
Connect a probe
1. Plug the probe into the meter (Figure 2).
2. Push the connector so that the alignment pin goes into the groove on
the female connector.
Note: Do not turn the connector.
Figure 2 Probe connection
User interface and navigation
User interface
Figure 3 Keypad description
1 CALIBRATION key 4 DOWN key: scroll to other options,
change a value
2 UP key: scroll to other options,
change a value
5 ON/OFF: turn on or turn off the
meter, DISPLAY LIGHT: turn on
and off the display light
3 MEASUREMENT key
6 English
Display description
The display shows 3 types of screens:
Measure—the most recent parameter measurement is shown with the
temperature and stabilization time.
Calibration—the calibration standard values and temperature are
shown during a calibration.
Standby—the screen is empty except for the measurement timer at
the bottom.
Figure 4 pH1 screen display
1 Main measurement value (pH or
ORP)
4 Measurement time (hh:mm:ss)
2 Main measurement units 5 Temperature
3 Battery indicator
Figure 5 DO6 screen display
1 Main measurement value (DO) 4 Measurement time (hh:mm:ss)
2 Main measurement units 5 Temperature
3 Battery indicator
English 7
Figure 6 MM110 screen display
1 Main measurement value (pH) 4 Main measurement time
(hh:mm:ss)
2 Measurement units 5 Temperature
3 Battery indicator 6 Main measurement value (ORP)
Figure 7 MM150 screen display
1 Main measurement value
(conductivity)
5 Measurement time (hh:mm:ss)
2 Main measurement value (pH) 6 Temperature
3 Main measurement units 7 Main measurement value (TDS,
ORP)
4 Battery indicator 8 Reference temperature
8 English
Figure 8 MM156 screen display
1 Main measurement value
(conductivity)
5 Measurement time (hh:mm:ss)
2 Main measurement value (pH) 6 Temperature
3 Main measurement units 7 Main measurement value (DO,
salinity)
4 Battery indicator 8 Reference temperature
Figure 9 EC5 screen display
1 Reference temperature 4 Battery indicator
2 Main measurement units 5 Measurement time (hh:mm:ss)
3 Temperature 6 Main measurement value
(conductivity, salinity, TDS)
Navigation
Use the calibrate key to calibrate the probe. Use the measure key
to take a sample measurement. Use the arrow keys to scroll to
other options or to change a value.
Some options require that a key be pushed and held or that multiple
keys be pushed at the same time. Be sure to look at the display during
tasks as the screens change quickly. Refer to each task for specific
instructions.
English 9
Startup
Turn the meter on and off
N O T I C E
Make sure that the probe is connected to the meter before the meter is turned on.
Push and hold to turn on or turn off the meter. If the meter does not
turn on, make sure that the batteries are properly installed.
Note: The meter is set to automatically power off after 5 minutes of inactivity to
maximize the battery life.
Operation
W A R N I N G
Chemical exposure hazard. Obey laboratory safety procedures and wear all of
the personal protective equipment appropriate to the chemicals that are handled.
Refer to the current material safety data sheets (MSDS) for safety protocols.
Setup for pH
The meter is ready for pH or ORP calibration without additional setup.
Setup for dissolved oxygen
Before calibration or measurement for dissolved oxygen, the probe must
be polarized and the settings for atmospheric pressure and salinity must
be entered.
Polarize the electrode
If the probe or batteries are disconnected, connect the probe or install
the batteries and wait for polarization:
Disconnect time Polarization time
< 5 minutes 10 minutes
5 to 15 minutes 45 minutes
> 15 minutes 6 hours
Change the settings
The settings for dissolved oxygen measurements can be changed when
a dissolved oxygen probe is used. Push to view the current settings.
1. Push . The first setting is shown.
2. Quickly use the arrow keys to change the value. Wait for the next
setting to be shown and change any additional values:
Option Description
Atmospheric pressure in mbar (default: 1013 mbar)
SAL Salinity in g/L NaCl (default: 0 g/L)
Aut: automatic (only in model MM156)
SEn Select the DO sensor model: 5120 or 5130
Note: The salinity value can be found from a conductivity measurement. Refer
to Table 3 on page
17.
Setup for conductivity
The settings for conductivity measurements can be changed when a
conductivity probe is used. Push
to view the current settings.
1. Push . The first setting is shown.
2. Quickly use the arrow keys to change the value. Wait for the next
setting to be shown and change any additional values:
Option Description
CEL Electrode type: platinum (default) or titanium.
Note: This option is not available on all meters.
CAL The number of standards for conductivity calibration. Select one
standard (default). Select the standard nearest to the expected
measurement range.
tC Temperature compensation: 0 to 9.99%/°C (default: 2%/°C)
tr Reference temperature: 20 or 25 °C (default: 25 °C)
F TDS calculation factor: 0.01 to 4.44 (default: 0.64)
10 English
The new settings are automatically stored in the meter.
Calibration
W A R N I N G
Chemical exposure hazard. Obey laboratory safety procedures and wear all of
the personal protective equipment appropriate to the chemicals that are handled.
Refer to the current material safety data sheets (MSDS) for safety protocols.
Calibration procedure
This procedure is for general use with liquid calibration solutions. Refer
to the documents that are included with each probe for additional
information.
1. Pour the buffers or calibration solution into the labeled calibration
tubes.
2. Rinse the probe with deionized water and put the probe into the
appropriate calibration tube. Make sure that there are no air bubbles
under the probe tip.
3. Push . The parameter flashes.
4. Use the arrow keys to change the parameter, if applicable.
5. Push to select the parameter.
6. Push the arrow keys to select the appropriate standard solution. For
pH, the buffers are automatically recognized.
7. Push to measure the calibration solution.
Note: For pH, the next calibration solution is shown. For conductivity, use one
calibration point. Select the standard nearest to the expected measurement
range.
8. Rinse the probe with deionized water and put the probe into the
second calibration tube, if applicable. Make sure that there are no air
bubbles under the probe tip.
9. Push to measure the second calibration solution, if applicable.
The next calibration solution is shown.
10. Rinse the probe with deionized water and put the probe into the third
calibration tube. Make sure that there are no air bubbles under the
probe tip.
11. Push to measure the third calibration solution, if applicable.
When the calibration is good, the display briefly shows OK and then
goes to the standby mode.
Note: To calibrate with only 1 or 2 standards when additional standards are
supplied, push after the first or second standard is measured.
View the calibration data
Data from the most recent calibration can be shown for pH, ORP and
conductivity.
1. Push .
2. Use the arrow keys to change the parameter, if necessary, and push
.
3. Push and at the same time. The calibration data is shown:
pH—the slope and offset values are shown alternating with the
deviation (in %) and calibration temperature.
ORP—the measured mV value and calibration temperature are
shown.
Conductivity—the cell constant and calibration temperature for
each standard are shown.
Restore the factory calibration
The user calibration can be erased and the factory calibration restored
for pH, ORP and conductivity.
1. Push
. The parameter flashes.
2. Use the arrow keys to change the parameter, if necessary.
3. Push and hold until OFF
is shown.
The factory calibration for the selected parameter is restored.
Adjust the calibration
The instrument can be adjusted to read a specified solution value for pH,
ORP and conductivity.
1. Rinse the probe. Put the probe in the solution.
2. Push
to read the value of the solution.
3. Push . The parameter flashes.
English 11
4. Use the arrow keys to select the parameter, if necessary.
5. Push and hold and then push .
The measured value flashes.
6. Use the arrow keys to change the value.
7. Push . The display shows OK.
Adjust the temperature
The temperature measurement can be adjusted at 25 °C (77 °F) and/or
85 °C (185 °F) to increase accuracy for pH, ORP and conductivity.
Note: Refer to the probe documentation to find the temperature limits for the probe
that is used.
1. Put the probe and a reference thermometer in a container of water at
approximately 25 °C and allow the temperature to stabilize.
2. Compare the temperature read by the meter with that of the
reference thermometer. The difference is the adjustment value for
the meter.
Example: reference thermometer: 24.5 °C; meter: 24.3 °C.
Adjustment value: 0.2 °C.
3. Enter the adjustment value for the 25 °C reading:
a. Push . The parameter flashes.
b. Use the arrow keys to select tEn.
c. Push . 25 °C is shown.
d. Push and then use the arrow keys to enter the adjustment
value for 25 °C. Push . 85 °C is shown.
4. Put the probe and a reference thermometer in a container of water at
approximately 85 °C and allow the temperature to stabilize.
5. Compare the temperature from the meter with that of the reference
thermometer. The difference is the adjustment value for the meter.
6. Push and then use the arrow keys to enter the adjustment value
for the 85 °C reading. Push .
About sample measurements
Each probe has specific preparation steps and procedures for taking
sample measurements. For step-by-step instructions, refer to the
documents that are included with the probe.
Push to take a sample measurement. During measurements, the
parameter flashes and the timer shows the stabilization time. To change
the measurement parameter (if applicable), push and hold
.
To measure the sample continuously, push 2 times. The parameter
flashes to indicate the continuous measurement mode.
Change the temperature units
The temperature units can be changed when the measurement screen is
shown.
1. Make sure that a stable measurement reading is shown.
2. Push and at the same time. The temperature units change to °C
or °F.
Disable the auto-shutoff option
The meter is set to automatically power off after 5 minutes of inactivity to
maximize the battery life. This option can be temporarily disabled.
1. Make sure that the meter is powered off.
2. Push and hold until the display shows OFF and no. The power
remains on indefinitely.
3. To power off the meter, push and hold until the display shows
OFF.
Note: The auto-shutoff option is enabled again when the meter is powered on
normally.
Set the backlight time
The display is illuminated when is pushed. The user can set the
length of time that the backlight stays on.
12 English
Note: The battery life is decreased when the backlight time is increased.
1. Make sure that the instrument is powered on.
2. Push and immediately push 2 times. The backlight time
flashes.
3. Push or to change the backlight time (range: 3 seconds to
2 minutes).
Maintenance
W A R N I N G
Multiple hazards. Do not disassemble the instrument for maintenance or service.
If the internal components must be cleaned or repaired, contact the
manufacturer.
C A U T I O N
Personal injury hazard. Only qualified personnel should conduct the tasks
described in this section of the manual.
Clean the instrument
N O T I C E
Never use cleaning agents such as turpentine, acetone or similar products to
clean the instrument including the display and accessories.
Clean the exterior of the instrument with a moist cloth and a mild soap
solution.
Store the meter
N O T I C E
To avoid potential damage to the meter from battery leakage, remove the meter
batteries prior to extended periods of non-use.
Replace the batteries
W A R N I N G
Explosion hazard. Incorrect battery installation can cause the release of explosive
gases. Be sure that the batteries are of the same approved chemical type and
are inserted in the correct orientation. Do not mix new and used batteries.
For battery replacement, refer to Figure 10.
Figure 10 Battery replacement
Troubleshooting
Refer to the following table for common problem messages or
symptoms, possible causes and corrective actions.
English 13
Error/Warning Description Solution
Measurement out
of range.
Insert the probe into the appropriate
standard and read again.
Clean the probe and the membrane.
Make sure that there are no air
bubbles in the membrane.
Disconnect the probe and then
connect the probe again.
Connect a different probe to verify if
problem is with probe or meter.
Battery is low. Insert new batteries.
E1 Unstable reading
during a stability
measurement or
during calibration.
Make sure that the probe is properly
immersed in the sample.
E2 Probe current:
exceeded upper
limit during
measurement ≥
250 nA.
Clean the probe and the membrane.
Make sure that there are no air
bubbles in the membrane.
Disconnect the probe and then
connect the probe again.
Connect a different probe to verify if
problem is with probe or meter.
E2 pH probes
sensitivity out of
range (accepted
values 70–105%).
Make sure that the correct probe is
connected to the meter.
Connect a new probe.
Error/Warning Description Solution
E2 During calibration,
the difference
between the
constants gets >
30%.
Insert the probe into the appropriate
standard and read again.
Clean the probe and the membrane.
Make sure that there are no air
bubbles in the membrane.
Disconnect the probe and then
connect the probe again.
Connect a different probe to verify if
problem is with probe or meter.
Connect a new probe.
E3 During calibration,
the cell constant
gets < 0.05 cm
-1
.
Insert the probe into the appropriate
standard and read again.
Clean the probe and the membrane.
Make sure that there are no air
bubbles in the membrane.
Disconnect the probe and then
connect the probe again.
Connect a different probe to verify if
problem is with probe or meter.
E3 Slope out of range
(accepted values ±
58 mV).
Connect a new probe.
E4 Buffer solution not
recognized.
Clean the probe and the membrane.
Make sure that there are no air
bubbles in the membrane.
Disconnect the probe and then
connect the probe again.
Connect a different probe to verify if
problem is with probe or meter.
Make sure that the buffer used
matches the buffer specified in
configuration.
Replace the buffer solution.
Make sure of the temperature
specification in configuration.
14 English
Error/Warning Description Solution
E4 Salinity cannot be
calculated TC=0
Modify TC
E5 Same buffer
solutions.
Clean the probe and the membrane.
Make sure that there are no air
bubbles in the membrane.
Disconnect the probe and then
connect the probe again.
Connect a different probe to verify if
problem is with probe or meter.
Make sure that the buffer used
matches the buffer specified in
configuration.
Replace the buffer solution.
Make sure of the temperature
specification in configuration.
E6 The calibration
solutions have
different
temperatures.
Make sure that the calibration solutions
have the same temperature.
ErA (only
MM156)
Salinity is set to
automatic and
measured value >
50 g/L.
Modify TC
Replacement parts and accessories
Note: Product and Article numbers may vary for some selling regions. Contact the
appropriate distributor or refer to the company website for contact information.
Replacement parts
Description Item no.
Batteries, Alkaline AA 1938004
Carrying case LZW9990.99
Accessories
Description Item no.
Electrolyte for DO probe 51 20, 25 mL LZW9811.99
Electrolyte for DO probe 51 30, 50 ml 2759126
Tube for DO probe calibration LZW5123.99
Service kit for 51 30 DO probe (contains 2 membrane
modules and DO filling solution)
5196800
Replacement DO membrane for DO probe 51 20 LZW5125.99
147 μS/cm standard solution (at 25 °C, 77 °F), 125 mL
bottle
LZW9701.99
1413 μS/cm standard solution (at 25 °C, 77 °F), 125 mL
bottle
LZW9711.99
12.88 mS/cm standard solution (at 25 °C, 77 °F), 125 mL
bottle
LZW9721.99
Set of calibration tubes, 147 μS/cm, 1413 μS/cm and
12.88 mS/cm
LZW9138.99
220 mV standard solution, 125 mL LZW9402.99
Buffer solution pH 4.01, 125 mL LZW9460.99
Buffer solution pH 7.00, 125 mL LZW9461.97
Buffer solution pH 10.01, 125 mL LZW9470.99
Electrolyte solution, KCI 3M, 50 mL LZW9509.99
Calibration tubes pH 4.01, pH 7.00 and pH 10.01 LZW9137.97
Tube for ORP standard calibration 220 mV LZW9136.99
Work protector for electrodes 50 51 T and 50 52 T LZW9162.99
Standard solutions
Technical buffer solutions (DIN 19267)
Refer to Table 1 pH and ORP (mV) values of specific buffer sets at
varying temperatures.
English 15
Table 1 pH, ORP (mV) and temperature values
Temperature pH mV
°C °F
0 32 2.01 4.01 7.12 9.52 10.30
10 50 2.01 4.00 7.06 9.38 10.17 245
20 68 2.00 4.00 7.02 9.26 10.06 228
25 77 2.00 4.01 7.00 9.21 10.01 220
30 86 2.00 4.01 6.99 9.16 9.96 212
40 104 2.00 4.03 6.97 9.06 9.88 195
50 122 2.00 4.06 6.97 8.99 9.82 178
60 140 2.00 4.10 6.98 8.93 9.76 160
70 158 2.01 4.16 7.00 8.88
80 176 2.01 4.22 7.04 8.83
90 194 2.01 4.30 7.09 8.79
Conductivity standard solutions
Refer to Table 2 for conductivity values of standard solutions at varying
temperatures.
Table 2 Conductivity and temperature values
Temperature Conductivity (EC)
°C °F µS/cm µS/cm mS/cm mS/cm
15.0 59 119 1147 10.48 92.5
16.0 60.8 122 1173 10.72 94.4
17.0 62.6 125 1199 10.95 96.3
18.0 64.4 127 1225 11.19 98.2
19.0 66.2 130 1251 11.43 100.1
Table 2 Conductivity and temperature values (continued)
Temperature Conductivity (EC)
°C °F µS/cm µS/cm mS/cm mS/cm
20.0 68 133 1278 11.67 102.1
21.0 69.8 136 1305 11.91 104.0
22.0 71.6 139 1332 12.15 105.4
23.0 73.4 142 1359 12.39 107.9
24.0 75.2 145 1386 12.64 109.8
25.0 77 147 1413 12.88 111.8
26.0 78.8 150 1440 13.13 113.8
27.0 80.6 153 1467 13.37 115.7
28.0 82.4 156 1494 13.62
29.0 84.2 159 1522 13.87
30.0 86 162 1549 14.12
31.0 87.8 165 1581 14.37
32.0 89.6 168 1609 14.62
33.0 91.4 171 1638 14.88
34.0 93.2 174 1667 15.13
35.0 95 177 1696 15.39
16 English
Salinity values for dissolved oxygen meters
Table 3 can be used to convert conductivity values to salinity for
dissolved oxygen meters.
Table 3 Conversion from conductivity to salinity
Conductivity (mS/cm) Salinity (g/L NaCl)
1.9 1.0
3.7 2.0
7.3 4.0
10.9 6.0
17.8 10.1
25.8 15.1
33.6 20.2
41.2 25.4
48.9 30.6
56.3 35.8
62.2 40.0
69.4 45.3
75.7 50.0
English 17
Table des matières
Caractéristiques à la page 18
Généralités à la page 19
Installation à la page 20
Interface utilisateur et navigation à la page 22
Mise en marche à la page 25
Fonctionnement à la page 25
Maintenance à la page 29
Dépannage à la page 29
Pièces de rechange et accessoires à la page 31
Solutions étalons à la page 32
Valeurs de salinité pour sondes à oxygène dissous à la page 33
Caractéristiques
Les caractéristiques techniques peuvent être modifiées sans préavis.
Caractéristique Détails
Dimensions 18,6 x 7,3 x 3,8 cm (7,32 x 2,87 x 1,5 pouces)
Poids 300 g (0,66 lb)
Boîtier de l'appareil IP67
Alimentation (interne) (3) piles alcalines AA ou rechargeables Nickel
Métal hybride (NiMH) ; durée de vie des piles :
plus de 500 heures
Connecteurs d'entrée Connecteur MP-5 ou MP-8 pour les sondes
sensION+
Classe de protection de
l'instrument
Classe III
Température de stockage –15 à +65 °C (5 à +149 °F)
Température de
fonctionnement
0 à 50 °C
Humidité de fonctionnement max. 80% (sans condensation)
Caractéristique Détails
Plage de l'appareil de
mesure
pH : –2,00 à 19,99 ; Eh : ±1 999 mV
Conductivité : 0,01 à 500 mS/cm ; TDS : 0 à
500 g/l ; salinité : 0,0 à 1 999 mg/l, 2,0 à 50,0 g/l
DO : 0,00 à 19,99 mg/l et 20,0 à 22,0 mg/l
(25 °C), 0,0 à 199,9 % et 200 à 250 % (25 °C)
Résolution pH : 0,01 pH ; Eh : 1 mV (0,1 mV de –199,9 à
199,9 mV)
DO : 0,1 % (1 % si ≥ 200 %) ; 0,01 mg/l (0,1 mg/l
si ≥ 20 mg/l)
Conductivité : varie avec la plage (plage auto)
Température : 0,1 °C (0,1 °F)
Erreur de mesure
(± 1 chiffre)
pH : ≤ 0,01 pH ; Eh : ≤ 1 mV
DO : ≤ 0,5 de la valeur mesurée
Conductivité : ≤ 0.5% (de 0,01 µS/cm à
19,99 mS/cm) ; ≤ 1 % (≥ 20 mS). /TDS (Facteur
TDS) :
Température : ≤ 0,2 °C (≤ 0,4 °F)
Reproductibilité (± 1 chiffre) pH : ± 0,01 pH ; Eh : ± 1 mV
DO : ≤ 0,2 de la valeur mesurée
Conductivité/Salinité/TDS : ± 0,1 %
Température : ± 0,1 °C (± 0,1 °F)
Température de référence
(RT)
Conductivité : 20 ou 25 °C (68 ou 77 °F)
(réglages d'usine : 25 °C (77 °F))
Coefficient de température
(TC)
Conductivité : 0,00 à 5,00 %/°C (réglages
d'usine : 2 %/°C)
Facteur de conversion TDS Conductivité : 0,00 à 4,44 (réglages d'usine :
0,64)
18 Français
Caractéristique Détails
Gestion de l'énergie Arrêt automatique au bout de 5 minutes
d'inactivité
Certification CE
Généralités
Les éditions révisées se trouvent sur le site Internet du fabricant.
Consignes de sécurité
A V I S
Le fabricant décline toute responsabilité quant aux dégâts liés à une application
ou un usage inappropriés de ce produit, y compris, sans toutefois s'y limiter, des
dommages directs ou indirects, ainsi que des dommages consécutifs, et rejette
toute responsabilité quant à ces dommages dans la mesure où la loi applicable le
permet. L'utilisateur est seul responsable de la vérification des risques
d'application critiques et de la mise en place de mécanismes de protection des
processus en cas de défaillance de l'équipement.
Veuillez lire l'ensemble du manuel avant le déballage, la configuration ou
la mise en fonctionnement de cet appareil. Respectez toutes les
déclarations de prudence et d'attention. Le non-respect de cette
procédure peut conduire à des blessures graves de l'opérateur ou à des
dégâts sur le matériel.
Assurez-vous que la protection fournie avec cet appareil n'est pas
défaillante. N'utilisez ni n'installez cet appareil d'une façon différente de
celle décrite dans ce manuel.
Interprétation des indications de risques
D A N G E R
Indique une situation de danger potentiel ou imminent qui, si elle n'est pas évitée,
entraîne des blessures graves, voire mortelles.
A V E R T I S S E M E N T
Indique une situation de danger potentiel ou imminent qui, si elle n'est pas évitée,
peut entraîner des blessures graves, voire mortelles.
A T T E N T I O N
Indique une situation de danger potentiel qui peut entraîner des blessures
mineures ou légères.
A V I S
Indique une situation qui, si elle n'est pas évitée, peut occasionner
l'endommagement du matériel. Informations nécessitant une attention
particulière.
Etiquettes de mise en garde
Lisez toutes les étiquettes et tous les repères apposés sur l'instrument.
Des personnes peuvent se blesser et le matériel peut être endommagé
si ces instructions ne sont pas respectées. Un symbole sur l'appareil est
désigné dans le manuel avec une instruction de mise en garde.
Si l'appareil comporte ce symbole, reportez-vous au manuel
d'utilisation pour consulter les informations de fonctionnement et de
sécurité.
En Europe, depuis le 12 août 2005, les appareils électriques
comportant ce symbole ne doivent pas être jetés avec les autres
déchets. Conformément à la réglementation nationale et européenne
(Directive 2002/96/CE), les appareils électriques doivent désormais
être, à la fin de leur service, renvoyés par les utilisateurs au fabricant,
qui se chargera de les éliminer à ses frais.
Remarque : Pour le retour à des fins de recyclage, veuillez contacter le fabricant
ou le fournisseur d'équipement pour obtenir les instructions sur la façon de
renvoyer l'équipement usagé, les accessoires électriques fournis par le fabricant,
et tous les articles auxiliaires pour une mise au rebut appropriée.
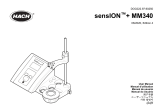
Présentation du produit
Les appareils de mesure portables de la série sensION
+ s'utilisent
avec des sondes numériques sensION
+ pour mesurer différents
paramètres dans l'eau. Essentiellement destinés à l'utilisation sur le
terrain, ces appareils de mesure portables fonctionnent avec trois piles
AA.
Les appareils de mesure de la série sensION
+ sont disponibles en
6 modèles :
Français 19
sensION
+ EC5- appareil de mesure de conductivité, TDS, salinité et
température
sensION
+ MM150- appareil de mesure de pH, Eh (Redox),
conductivité, TDS et température
sensION
+ MM110- appareil de mesure de pH, Eh (Redox) et
température
sensION
+ MM156—instrument de mesure du pH, de la conductivité,
de la salinité, de l'oxygène dissous et de la température
sensION
+ pH1-appareil de mesure de pH
sensION
+ DO6- appareil de mesure d'oxygène dissous
(concentration et % saturation) et de température
Certification
Règlement canadien sur les équipements causant des
interférences radio, IECS-003, Classe A:
Les données d'essai correspondantes sont conservées chez le
constructeur.
Cet appareil numérique de classe A respecte toutes les exigences du
Règlement sur le matériel brouilleur du Canada.
Cet appareil numérique de classe A répond à toutes les exigences de la
réglementation canadienne sur les équipements provoquant des
interférences.
FCC part 15, limites de classe A :
Les données d'essai correspondantes sont conservées chez le
constructeur. L'appareil est conforme à la partie 15 de la règlementation
FCC. Le fonctionnement est soumis aux conditions suivantes :
1. Cet équipement ne peut pas causer d'interférence nuisible.
2. Cet équipement doit accepter toutes les interférences reçues, y
compris celles qui pourraient entraîner un fonctionnement inattendu.
Les modifications de cet équipement qui n’ont pas été expressément
approuvées par le responsable de la conformité aux limites pourraient
annuler l’autorité dont l’utilisateur dispose pour utiliser cet équipement.
Cet équipement a été testé et déclaré conforme aux limites définies pour
les appareils numériques de classe A, conformément à la section 15 de
la réglementation FCC. Ces limites ont pour but de fournir une protection
raisonnable contre les interférences néfastes lorsque l’équipement
fonctionne dans un environnement commercial. Cet équipement génère,
utilise et peut irradier l'énergie des fréquences radio et, s'il n'est pas
installé ou utilisé conformément au mode d'emploi, il peut entraîner des
interférences dangereuses pour les communications radio. Le
fonctionnement de cet équipement dans une zone résidentielle risque de
causer des interférences nuisibles, dans ce cas l'utilisateur doit corriger
les interférences à ses frais Les techniques ci-dessous peuvent
permettre de réduire les problèmes d'interférences :
1. Débrancher l'équipement de la prise de courant pour vérifier s'il est
ou non la source des perturbations
2. Si l'équipement est branché sur le même circuit de prises que
l'appareil qui subit des interférences, branchez l'équipement sur un
circuit différent.
3. Éloigner l'équipement du dispositif qui reçoit l'interférence.
4. Repositionner l’antenne de réception du périphérique qui reçoit les
interférences.
5. Essayer plusieurs des techniques ci-dessus à la fois.
Installation
A T T E N T I O N
Dangers multiples. Seul le personnel qualifié doit effectuer les tâches
détaillées dans cette section du document.
20 Français
  • Page 1 1
  • Page 2 2
  • Page 3 3
  • Page 4 4
  • Page 5 5
  • Page 6 6
  • Page 7 7
  • Page 8 8
  • Page 9 9
  • Page 10 10
  • Page 11 11
  • Page 12 12
  • Page 13 13
  • Page 14 14
  • Page 15 15
  • Page 16 16
  • Page 17 17
  • Page 18 18
  • Page 19 19
  • Page 20 20
  • Page 21 21
  • Page 22 22
  • Page 23 23
  • Page 24 24
  • Page 25 25
  • Page 26 26
  • Page 27 27
  • Page 28 28
  • Page 29 29
  • Page 30 30
  • Page 31 31
  • Page 32 32
  • Page 33 33
  • Page 34 34
  • Page 35 35
  • Page 36 36
  • Page 37 37
  • Page 38 38
  • Page 39 39
  • Page 40 40
  • Page 41 41
  • Page 42 42
  • Page 43 43
  • Page 44 44
  • Page 45 45
  • Page 46 46
  • Page 47 47
  • Page 48 48
  • Page 49 49
  • Page 50 50
  • Page 51 51
  • Page 52 52
  • Page 53 53
  • Page 54 54
  • Page 55 55
  • Page 56 56
  • Page 57 57
  • Page 58 58
  • Page 59 59
  • Page 60 60
  • Page 61 61
  • Page 62 62
  • Page 63 63
  • Page 64 64
  • Page 65 65
  • Page 66 66
  • Page 67 67
  • Page 68 68
  • Page 69 69
  • Page 70 70
  • Page 71 71
  • Page 72 72
  • Page 73 73
  • Page 74 74
  • Page 75 75
  • Page 76 76
  • Page 77 77
  • Page 78 78
  • Page 79 79
  • Page 80 80
  • Page 81 81
  • Page 82 82
  • Page 83 83
  • Page 84 84
  • Page 85 85
  • Page 86 86
  • Page 87 87
  • Page 88 88
  • Page 89 89
  • Page 90 90
  • Page 91 91
  • Page 92 92
  • Page 93 93
  • Page 94 94
  • Page 95 95
  • Page 96 96
  • Page 97 97
  • Page 98 98
  • Page 99 99
  • Page 100 100
  • Page 101 101
  • Page 102 102
  • Page 103 103
  • Page 104 104
  • Page 105 105
  • Page 106 106
  • Page 107 107
  • Page 108 108
  • Page 109 109
  • Page 110 110
  • Page 111 111
  • Page 112 112
  • Page 113 113
  • Page 114 114
  • Page 115 115
  • Page 116 116
  • Page 117 117
  • Page 118 118
  • Page 119 119
  • Page 120 120
  • Page 121 121
  • Page 122 122
  • Page 123 123
  • Page 124 124
  • Page 125 125
  • Page 126 126

Hach sensION+ pH1 User manual

Type
User manual

Ask a question and I''ll find the answer in the document

Finding information in a document is now easier with AI