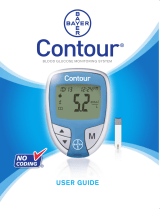
®
USER GUIDE
BLOOD GLUCOSE MONITORING SYSTEM
DATE:
CLIENT:
DESCRIPTION:
SCHAWK JOB#:
SKU#:
DIMENSIONS:
PRINTER SPEC:
RELEASE: V-2
LANGUAGE(S): ENGLISH
INTERNAL: R-X
18211 NE 68th Street, E120
Redmond, WA 98052
T: 425-881-5454
BAN#:84500489 Rev. 06/12
Contour TS UG Southeast Asia
Alt#1 - 06/29/12 Copy Changes
Alt#2 - 07/05/12 Copy Changes
July 05, 2012
Bayer HealthCare
Contour TS UG - English
909006
1807B Parent BAN#84500411
6" (H) x 4.5" (W)
PUSG0494 REV. G
FONTS:
Helvetica, Berthold Akzidenz Grotesk, Frutiger, Zapf Dingbats
COLORS:
Cyan Magenta Yellow Black
NOTE: THIS COLOR PROOF INDICATES COLOR BREAK ONLY AND MAY NOT ACCURATELY REFLECT ACTUAL PRODUCTION COLOR.
Regional Master Template No: MST_UG_020_R001
Clinical Trial / Global Master Template No: XXXX
FC: 22mm BC: 8.5mm
Footer: N/A
7mm min.
84500489_CntrTS_UG_EN_FpBp_v2.indd ofc184500489_CntrTS_UG_EN_FpBp_v2.indd ofc1 7/5/12 10:27 AM7/5/12 10:27 AM
July 12, 2012

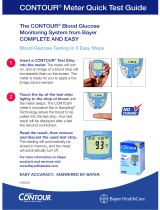
Welcome to Accuracy
and Convenience
Your CONTOUR
®
TS system 2
CONTOUR
®
TS meter display 3
Meter Features 4
System Information 5
Symptoms of High or Low Blood Sugar 7
Important Things to Know 8
Before You Begin 9
Error Codes and Symbols 24
Setting the Date, Time and Sound 20
Replacing the Battery 28
Caring for the System 29
Transferring Results to a Computer 30
Specifi cations 31
Symbols Used 32
Service Information 33
Warranty 34
Supplies 36
Table of Contents
Important
Testing
Setup
Solving
Problems
Care and
Extras
Preparing the Lancing Device 10
Inserting the Test Strip 11
Getting the Blood Drop 12
Testing Your Blood 13
Alternative Site Testing 15
Viewing Stored Test Results 16
Testing with a Control Solution 17
The CONTOUR
®
TS meter balances science and simplicity for ease and
accuracy you can depend on. We’re proud to be your partner in helping
you manage your diabetes.
Unlike many meters, the CONTOUR TS meter does not require you to enter
a numeric code or put in a coding chip; therefore it eliminates coding
steps and inaccurate results due to miscoding.
84500489_CntrTS_UG_EN_FpBp_v1.indd ifc2-184500489_CntrTS_UG_EN_FpBp_v1.indd ifc2-1 6/29/12 1:23 PM6/29/12 1:23 PM

2
Important
3
Important
CONTOUR
®
TS meter display:
A full display, as shown below, indicates that all characters in the
display are working properly. You will briefl y see this display each
time you turn the meter on. You can see the complete display when
the meter is off by pressing and holding the
button. Compare your
meter to the display shown below.
While all characters are displayed, it is most important to
verify that
is fully displayed. If there is a difference,
see Error Codes and Symbols (page 27). This may affect the
way you see your results.
or
Displays the
date format.
or will
appear if the meter
is in 12 hour setup.
Your CONTOUR TS system
CONTOUR TS meter display
Your CONTOUR
®
TS meter:
Grey Electrode End:
This end (with the
grey end facing up) is in-
serted into the orange test
strip port on the meter.
Sample Tip: The
end of the test strip
where the blood is
drawn in.
Orange Test
Strip Port
Button
(Scroll)
Display
Your CONTOUR
®
TS
test strip:
14 day
average.
Control result
marker.
Indicates
the meter is
ready to test.
Indicates the
battery is low
and needs to be
changed.
Results are
displayed as
either mmol/L
or mg/dL.
Beeper on/off
indicator.
Indicates it is too cold or
too hot for your meter
to test accurately.
Center area on the display
that shows either your test
result or any error codes.
Bottom area on
the display show-
ing date and time.
NOTE: Your CONTOUR TS meter only works with
CONTOUR TS test strips!
Button
(On/Off,
Memory
Recall, Enter)
84500489_CntrTS_UG_EN_FpBp_v1.indd 2-384500489_CntrTS_UG_EN_FpBp_v1.indd 2-3 6/29/12 1:23 PM6/29/12 1:23 PM

4
For Customer Service Support:
Hong Kong (852) 8100 6386; South East Asia Contact: (65) 6496 1974
Email: diabetescare@bayer.com
Important
5
www.bayerdiabetes.com
Important
Meter Features
Meter Features:
Your New CONTOUR
®
TS monitoring system is the
Perfect Balance of Science and Simplicity
The CONTOUR TS blood glucose monitoring system from
Bayer Diabetes Care is designed to make testing your blood
glucose levels easier.
Essential Features for Testing
The CONTOUR TS system uses No Coding™
technology for ease and reliability. This means
that the CONTOUR
®
TS test strips automatically
code the meter, so you don’t have to. It
provides accurate results in just 8 seconds, while only requir-
ing 0.6 µL of blood. The alternate site testing capability allows
for more options — test on your fi ngertip, palm or forearm.
Designed for Simplicity
The CONTOUR TS meter is easy to learn and use. The two
large buttons enable simple navigation, while the large
LCD display is easy to read. The orange test strip port
makes for easy test strip insertion.
Overall Convenience
With its optimal size, the CONTOUR TS meter fi ts well in the
palm of your hand. It is compact and portable. It provides
the accuracy you need with the ease of use you want.
System Information:
Intended Use
The CONTOUR
®
TS system (meter, test strips, controls) is
intended for self-testing by people with diabetes and by health
care professionals to monitor glucose concentrations in whole
blood. Capillary samples may be drawn from alternate site
testing locations. In clinical settings, the
CONTOUR TS system
may also be used with fresh venous and arterial whole blood.
CAUTION
• For
in vitro diagnostic use only. External use, do not
swallow test strips.
• Potential Biohazard: Health care professionals using
this system on multiple patients should be aware that
all products or objects that come in contact with human
blood, even after cleaning, should be handled as if
capable of transmitting viral diseases.
1
• The MICROLET ™2 lancing device included in the kit is
not suitable for use by health care professionals. It must
not be used on more than one person due to the risk of
infection.
Principles of the Procedure
The CONTOUR
®
TS blood glucose test is based on measurement
of electrical current caused by the reaction of glucose with
the reagents on the electrode of the strip. The blood sample
is drawn into the tip of the test strip through capillary action.
Glucose in the sample reacts with FAD glucose dehydrogenase
(FAD-GDH) and potassium ferricyanide. Electrons are gener-
ated, producing a current that is proportional to the glucose in
the sample. After the reaction time, the glucose concentration
in the sample is displayed. No calculation is required.
System Information
84500489_CntrTS_UG_EN_FpBp_v1.indd 4-584500489_CntrTS_UG_EN_FpBp_v1.indd 4-5 6/29/12 1:23 PM6/29/12 1:23 PM

6
Important
7
www.bayerdiabetes.com
Important
Symptoms of High or Low Blood Sugar:
You can better understand your test results by being aware of
the symptoms of high or low blood sugar; this will also help you
decide what to do if your results seem unusual.
Some of the most common symptoms are:
3
High blood sugar
(Hyperglycemia):
• frequent urination
• excessive thirst
• blurred vision
• increased fatigue
• extreme hunger
• irritability
Ketones (Ketoacidosis) from
untreated Hyperglycemia:
• shortness of breath
• nausea and vomiting
• very dry mouth
If you are experiencing any of these symptoms,
test your blood glucose. If your result is displayed
as LO or HI, contact your doctor immediately.
For additional information and symptoms, contact a health care
professional or refer to the website for the American Diabetes
Association: www.diabetes.org
Symptoms of High or Low Blood Sugar
Low blood sugar
(Hypoglycemia):
• shakiness
• sweating
• fast heartbeat
• blurred vision
• strange behavior
• confusion
• passing out
• seizure
Limitations
1. Preservatives: Blood may be collected by health care professionals
into test tubes containing heparin. Do not use other anticoagulants
or preservatives.
2. Altitude: Up to 3048 meters does not signifi cantly affect results.
3. Lipemic Specimen: Cholesterol concentrations >13.0 mmol/L or
triglyceride concentrations >33.9 mmol/L may produce elevated
readings.
4. Peritoneal dialysis solutions: Icodextrin does not interfere with
CONTOUR
®
TS test strips.
5. Xylose: Do not use during or soon after xylose absorption testing.
Xylose in the blood will cause an interference.
6. Contraindications: Capillary blood glucose testing may not be
clinically appropriate for persons with reduced peripheral blood fl ow.
Shock, severe hypotension, hyperosmolar hyperglycemia and severe
dehydration are examples of clinical conditions that may adversely
affect the measurement of glucose in peripheral blood.
2
7. Interference: Reducing substances occurring in the blood naturally
(uric acid, bilirubin) or from therapeutic treatments (ascorbic acid,
acetaminophen) will not signifi cantly affect results. The limiting
concentrations of these compounds are listed in your test strip insert.
The C
ONTOUR TS system may be used by Health care professionals to
monitor hypoglycemia in neonates diagnosed with laboratory glucose
levels. The CONTOUR TS system should not be used with high risk or
pre-term infants or for screening for neonatal hypoglycemia. Diagnosis
of neonatal hypoglycemia should be performed using a laboratory blood
glucose method. Monitoring with this product should be done only
with neonates that are more than one day old. For neonates exhibiting
hypoglycemic symptoms, provide appropriate medical care to treat
symptoms and monitor patient. If symptoms are inconsistent with meter
results, obtain a laboratory blood glucose test.
Performance Data Summary
The international standard, ISO 15197, requires that at least 95% of the
results from blood glucose meters should be within 20% of laboratory
results when equal to or above 4.2 mmol/L and within 0.8 mmol/L
when below 4.2 mmol/L. The CONTOUR TS system exceeded this goal.
A study was conducted on 105 untrained users with diabetes, testing
fi ngertip blood, to see how well the CONTOUR TS system compared to
laboratory results. The study demonstrated that 97.9% of the CONTOUR
TS system results were within the accuracy standard.
System Information
84500489_CntrTS_UG_EN_FpBp_v1.indd 6-784500489_CntrTS_UG_EN_FpBp_v1.indd 6-7 6/29/12 1:23 PM6/29/12 1:23 PM

8
For Customer Service Support:
Hong Kong (852) 8100 6386; South East Asia Contact: (65) 6496 1974
Email: diabetescare@bayer.com
Important
9
www.bayerdiabetes.com
Important
Important Things to Know:
Your CONTOUR
®
TS blood glucose meter is specifi c for
glucose and has been referenced to plasma/serum values.
Methods calibrated to plasma/serum can be 9 to 15% high-
er than the results of whole blood glucose assay methods.
• Always keep the test strips in the original bottle. Firmly
snap the lid closed immediately after removing a test
strip. The bottle is especially designed to provide a dry
environment for the test strips. Extended exposure to
room humidity from leaving the bottle open or not
storing the test strips in the original bottle will
damage your test strips.
• Completely dry your hands before handling strips or
opening the bottle.
• Avoid excessive “milking” of your fi nger when forming a drop
of blood and test immediately after forming the blood drop.
• DO NOT drop blood directly on the fl at surface of the
test strip. Your test strip is designed to easily draw the blood
in through the sample tip.
• DO NOT press the test strip against your fi nger. This may
block the sample tip.
• DO NOT use a test strip that appears damaged or has
been used. Test strips are for single use only.
IMPORTANT NOTE: Your meter has been preset to display
results in mmol/L (millimoles of glucose per liter). Results in
mmol/L will always have a decimal point (e.g.,
);
results in mg/dL will never have a decimal point (e.g.,
) .
Check your display to ensure that results are being displayed
in the expected units; if they are not, contact your authorized
Bayer Diabetes Care representative.
Before You Begin:
1. Have all the materials you will need ready before you begin
testing. This includes your CONTOUR
®
TS meter, the CONTOUR
®
TS
test strips, and the MICROLET
™
2 lancing device with
MICROLET™
lancets. You may also need
CONTOUR
®
TS control
solution to run a quality control check.
2.
Read your user guide and all instructional materials
provided in your meter kit before testing.
3. Let the meter and test strips adjust to the temperature of the
location where you are testing. Whenever the meter is moved
from one location to another, allow 20 minutes for the meter
to adjust to the temperature of that new location before
performing a blood glucose test. The products have been
designed to give accurate results at temperatures between 5°C
and 45°C.
4. It is important not to use the test strips or control solution
if the expiration date printed on the bottle label and carton
has passed. The CONTOUR TS control solution should also not
be used if it has been six months since the bottle was fi rst
opened. It is helpful to write the discard date on the label in
the area provided when you fi rst open the control solution.
5. WASH YOUR HANDS THOROUGHLY WITH WARM SOAPY
WATER AND DRY THEM WELL BEFORE TESTING.
Potential Biohazard
Health care professionals or persons using this system on
multiple patients should follow the infection control proce-
dure approved by their facility. All products or objects which
come in contact with human blood, even after cleaning,
should be handled as if capable of transmitting viral diseases.
1
Important Things to Know
Before You Begin
84500489_CntrTS_UG_EN_FpBp_v1.indd 8-984500489_CntrTS_UG_EN_FpBp_v1.indd 8-9 6/29/12 1:23 PM6/29/12 1:23 PM

10
Testing
For Customer Service Support:
Hong Kong (852) 8100 6386; South East Asia Contact: (65) 6496 1974
Email: diabetescare@bayer.com
11
Testing
www.bayerdiabetes.com
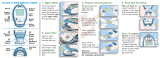
Preparing the Lancing Device:
Read the MICROLET ™2 lancing device insert for complete
instructions. If your lancing device does not look like the one
pictured, follow the instructions that came with your device.
Inserting the Test Strip:
Remove test strip from the bottle.
Tightly close the bottle lid immediately after you have
removed the test strip. Excess moisture could damage the
test strip.
NOTE: Check the expiration date. Make sure the test strip
does not appear torn or damaged.
Hold the test strip with the grey
end facing up.
Insert the grey end into the
orange test strip port on the
meter. No coding required!
Preparing the Lancing Device
Inserting the Test Strip
The following steps (pages 10–14) are shown in the proper
order for performing a blood glucose test.
Remove the endcap from the
M
ICROLET2 lancing device.
Rotate (do not remove) the
lancet protective cap ¼ turn.
Insert the lancet fi rmly until it
comes to a full stop. This will
“re-set” the device.
Twist off the lancet
protective cap and replace
the device endcap.
The meter will turn on. A test
strip with a fl ashing blood drop
will appear letting you know the
meter is ready to test. Do not
apply blood to the test strip until
the blood drop symbol fl ashes.
WARNING: The MICROLET2 lancing device is intended
for self testing by a single patient. It must not be used on
more than one person due to the risk of infection.
Use a new MICROLET ™ lancet each time you test because
it is no longer sterile after use.
Wash and dry your hands thoroughly before testing.
84500489_CntrTS_UG_EN_FpBp_v1.indd 10-1184500489_CntrTS_UG_EN_FpBp_v1.indd 10-11 6/29/12 1:23 PM6/29/12 1:23 PM

12
Testing
For Customer Service Support:
Hong Kong (852) 8100 6386; South East Asia Contact: (65) 6496 1974
Email: diabetescare@bayer.com
13
Testing
www.bayerdiabetes.com
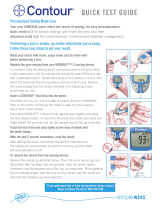
Testing Your Blood:
Hold the meter with the
orange test strip port point-
ing down or toward you. This
will ensure your meter is oriented
correctly for reading your test
result.
Immediately touch the tip of the
test strip to the drop of blood.
The blood is drawn into the
test strip through the tip.
Do not press the tip
against the skin or
place the blood on top
of the test strip.
Hold the tip of the test strip in the blood drop until the meter beeps.
Getting the Blood Drop:
With the grey endcap on your MICROLET ™2 lancing device, select
the puncture depth by rotating the dial on the endcap to a smaller
drop for shallower puncture or larger drop for deeper puncture.
Adjusting the amount of pressure applied to the puncture site will
also affect puncture depth.
Suggested Actual Drop Size
Getting the Blood Drop
Testing Your Blood
Fingertip Testing
Press the endcap fi rmly against
the puncture site (the side of the
fi ngertip is often preferred) and
press the blue release button.
Test immediately after you have
formed a blood drop. (See page
13.) Only 0.6 µL is needed for
a test.
For Alternative Site Testing read page 15, and see your
lancing device instructions.
After the beep, you will see the
meter count down eight seconds
until the test is complete and your
result is displayed. Make sure the
orange test strip port is pointing
down or toward you when you
read the test result.
Your test result
will automatically
be stored in the meter memory
with the date and time you tested.
Wait a few seconds. Stroke your
hand and fi nger towards the
puncture site to form a drop of
blood. Do not squeeze around
the puncture site or ”milk” your
fi nger excessively.
84500489_CntrTS_UG_EN_FpBp_v1.indd 12-1384500489_CntrTS_UG_EN_FpBp_v1.indd 12-13 6/29/12 1:23 PM6/29/12 1:23 PM

14
Testing
For Customer Service Support:
Hong Kong (852) 8100 6386; South East Asia Contact: (65) 6496 1974
Email: diabetescare@bayer.com
15
Testing
www.bayerdiabetes.com
Blood samples for glucose
testing may be taken from sites
other than your fi ngertips. Read
the instructions with your lanc-
ing device.
Alternative site testing using
blood from the forearm or palm
may give glucose results that
signifi cantly differ from fi ngertip
blood. Differences occur when
blood glucose levels are chang-
ing rapidly, such as after a meal,
after insulin, during or after
exercise.
We recommend the following:
1. Consult your health care professional to determine if alterna-
tive site testing is right for you.
2. Use a fi ngertip sample for testing blood glucose whenever you
will be participating in risky activities, such as before driving
a car or operating machinery. Fingertip testing should also be
used during illness, times of stress or when test results do not
agree with the way you feel.
3. Alternative site testing is not recommended if you have hypo-
glycemic unawareness (you do not recognize the symptoms of
or cannot tell when you have low blood glucose). Please con-
sult with your health care professional if you have low blood
glucose levels.
4. Select a soft, fl eshy area of skin that is free from hair, moles and
visible veins for alternative site testing. Wash the site with soap
and warm water, then rinse and dry thoroughly.
5. Use alternative site testing for blood glucose tests only when it
is more than 2 hours after:
• a meal • taking medication • exercise
Expected Values: Blood glucose values will vary depending
on food intake, medication dosages, health, stress or exercise.
Consult your health care professional for the target value that
is appropriate for you. Standard medical practice goals for a
typical non-pregnant individual with diabetes are:
4
• Glucose before a meal: 5.0 to 7.2 mmol/L
• Glucose 2 hours after a meal: less than 10.0 mmol/L
CAUTION
• If you see “HI” displayed, your blood glucose level may
be above 33.3 mmol/L. If you see “LO” displayed, your
blood glucose level may be below 0.6 mmol/L. Repeat
test. If you receive a similar result, call your physician or
health care professional immediately.
• Do not change your medication based on CONTOUR
®
TS
blood glucose results without the advice of your physi-
cian or health care professional.
Testing Your Blood
Alternative Site Testing
To turn your meter off, simply
remove the test strip.
Potential Biohazard:
Carefully dispose of the used
test strip.
Your meter will also turn off after
three minutes of inactivity.
Dispose of the used lancet according to instructions for your
M
ICROLET ™2 lancing device.
Alternative Site Testing
Forearm
Palm
84500489_CntrTS_UG_EN_FpBp_v1.indd 14-1584500489_CntrTS_UG_EN_FpBp_v1.indd 14-15 6/29/12 1:23 PM6/29/12 1:23 PM

16
Testing
For Customer Service Support:
Hong Kong (852) 8100 6386; South East Asia Contact: (65) 6496 1974
Email: diabetescare@bayer.com
17
Testing
www.bayerdiabetes.com
Viewing Stored Test Results:
Viewing Stored Test Results
Testing with a Control Solution
Testing with a Control Solution:
With the meter off, press and
release on the meter to view
stored test results.
The 14 day average will appear
on the display with the average
of test results taken over the last
14 days.
Press to review previous
test results.
Previous test results: Test re-
sults will be shown starting with
the most recent. Each result will
show the date and time the test
was taken.
You can press to scroll
through the results. You can
press and release the button to
view stored results one at a time
or you can hold it to move through results continuously.
When appears on the dis-
play, you have viewed all of the
results in the memory.
The meter will hold 250 test
results in the memory. When the
memory is full, the oldest test
result will be removed as a new
test is completed and saved to
the memory.
Press to turn the meter off, or it will automatically turn off after
three minutes.
You should perform a control test:
• When using your meter for the fi rst time
• To check if you are testing correctly
• When you open a new vial of strips
• If you leave the test strip vial open for an
extended period of time
• If you think your meter may not be working
properly
• If your test results do not match how you feel
Low, Normal and High Control Solutions are available.
Always use C
ONTOUR
®
TS control solutions, as other brands
could present incorrect results.
Remove a test strip from the bottle.
Tightly close the bottle lid immediately after you have
removed the test strip. Excess moisture could damage the
test strip.
NOTE: Check the expiration
date and discard date of the
control solution and test strips.
Make sure the test strip does
not appear torn or damaged.
Hold the test strip with the grey
end facing up.
Insert the grey end into the orange
test strip port on the meter.
The meter will turn on. A test
strip with a fl ashing blood drop
will appear letting you know the
meter is ready to test. Do not
apply control solution to the test
strip until the blood drop symbol
fl ashes.
84500489_CntrTS_UG_EN_FpBp_v1.indd 16-1784500489_CntrTS_UG_EN_FpBp_v1.indd 16-17 6/29/12 1:23 PM6/29/12 1:23 PM

18
Testing
For Customer Service Support:
Hong Kong (852) 8100 6386; South East Asia Contact: (65) 6496 1974
Email: diabetescare@bayer.com
19
Testing
www.bayerdiabetes.com
If your control test results are out of range, stop. Do not do
any blood glucose tests until you resolve the issue. Turn to
page 27 and follow the steps in the Error Codes and Symbols
chart for troubleshooting.
Gently rock the control bottle
before opening to ensure it is
mixed well.
Squeeze a small drop of control
solution on a clean non-
absorbent surface, such as a
piece of wax paper.
Do not apply control solution
to the test strip directly from
the bottle.
Replace the cap on the control
solution bottle.
Testing with a Control Solution
Testing with a Control Solution
The meter will automatically rec-
ognize and mark ( ) the control
result for you.
NOTE: The does not indi-
cate the control test result is
within the specifi ed range.
Compare your control test result
with the Normal Control Range
printed on the test strip bottle
label or on the bottom of the
test strip box.
The Low and High control range
values can be found on the bot-
tom of the test strip box.
Immediately touch the tip of the
test strip to the drop of control
solution. The solution is pulled
into the test strip through the tip.
Hold it in the drop until the
meter beeps.
After the beep, you will see the
meter count down eight seconds
until the test is complete and
your control test result is
displayed.
To turn your meter off, simply
remove the test strip. The result
will automatically be marked
and stored in the meter memory.
Control results will not be
included
in your 14 day blood
glucose average.
84500489_CntrTS_UG_EN_FpBp_v1.indd 18-1984500489_CntrTS_UG_EN_FpBp_v1.indd 18-19 6/29/12 1:23 PM6/29/12 1:23 PM

20
Setup
For Customer Service Support:
Hong Kong (852) 8100 6386; South East Asia Contact: (65) 6496 1974
Email: diabetescare@bayer.com
21
Setup
www.bayerdiabetes.com
You can set your meter to dis-
play different options.
To get into setup mode, press
and hold for three sec-
onds. The complete display
will briefl y appear, then go to a
display with the time.
NOTE: You may turn the
meter off at any time during
setup by pressing and hold-
ing until the meter turns off.
Setting the Date, Time and Sound:
Setting the Date,
Time and Sound
Setting the Date,
Time and Sound
Setting the Time:
The number in the hour position
will be fl ashing. Press until you
reach the correct hour.
Press to set.
The number in the minute
posi-
tion will now fl ash. Press until
you reach the correct minutes.
Press to set.
The year will be fl ashing. Press
to reach the current year.
Press to set.
The month will now fl ash. Press
to reach the current month.
Press to set.
The day will now fl ash. Press
to set the day.
Press to set.
Setting the Date:
The date will now appear on the display.
The PM will now fl ash.
Press to choose AM
or PM.
Press to set.
84500489_CntrTS_UG_EN_FpBp_v1.indd 20-2184500489_CntrTS_UG_EN_FpBp_v1.indd 20-21 6/29/12 1:23 PM6/29/12 1:23 PM

22
Setup
For Customer Service Support:
Hong Kong (852) 8100 6386; South East Asia Contact: (65) 6496 1974
Email: diabetescare@bayer.com
23
Setup
www.bayerdiabetes.com
Press to choose how you want
the date to appear, as month/
day (m/d) or day.month (d.m).
Press to set.
Setting the Month and Day Format:
d.m will now fl ash on the display.
Setting the Date,
Time and Sound
Setting the Date,
Time and Sound
The fl ashing bell symbol will
now appear on the display.
This option controls whether you
want to hear the “beeps” during
testing.
Press to choose whether to
turn the beeper on or off .
Press to set.
Setting the Sound:
Setting the 12 or 24 Hour Clock:
24H will now fl ash on the dis-
play. Press to choose the 12H
or 24H setting.
This option lets you set the me-
ter to display time as a 12 hour
setting with AM and PM or as a
24 hour display (military time).
Press to set.
When you have reached the end
of setup, your meter will show
you all of the current settings
and turn off automatically.
OR
OR
84500489_CntrTS_UG_EN_FpBp_v1.indd 22-2384500489_CntrTS_UG_EN_FpBp_v1.indd 22-23 6/29/12 1:23 PM6/29/12 1:23 PM

24
Solving
Problems
For Customer Service Support:
Hong Kong (852) 8100 6386; South East Asia Contact: (65) 6496 1974
Email: diabetescare@bayer.com
25
Solving
Problems
www.bayerdiabetes.com
Error Codes and Symbols
Error Codes and Symbols
Error Codes and Symbols:
WHAT YOU SEE WHAT IT MEANS WHAT YOU SHOULD DO
Low Battery. Replace the battery as soon as
possible (see page 28).
Temperature
out-of-range.
Move to an area that is within
the operating range for the
meter: 5°C–45°C. Let the meter
and test strips adjust to this
temperature for twenty minutes
before testing.
The test strip has not
fi lled enough to give
an accurate result.
• You may have
applied blood more
than once on the
same strip.
• Blocked sample tip.
• Blood drop too
small.
Remove the test strip and repeat
the test using a new test strip.
• Do not attempt to apply blood
more than once per strip.
• Do not push strip into skin
while fi lling strip.
• See suggested drop size on
page 12.
The meter is sensing
a used test strip.
Remove the test strip and retest
using a new test strip. Wait until
you see the fl ashing blood drop
in the display before adding the
blood sample.
WHAT YOU SEE WHAT IT MEANS WHAT YOU SHOULD DO
Test strip not inserted
correctly.
Remove the test strip and insert
it properly (see page 11).
E5 E10
E6 E12
E8 E13
E9
Potential software or
hardware issue.
Remove the test strip and retest
using a new test strip. If you
continue to have problems,
contact Customer Service.
Wrong test strip. Remove the test strip and retest
using only a C
ONTOUR
®
TS test
strip.
• Strip disturbed dur-
ing countdown.
• Strip degraded due
to long exposure
out of bottle.
• Used test strip
inserted.
Remove the test strip and retest
using a new test strip. Carefully
follow testing instructions in
your user guide.
If you continue to have prob-
lems, contact Customer Service.
84500489_CntrTS_UG_EN_FpBp_v1.indd 24-2584500489_CntrTS_UG_EN_FpBp_v1.indd 24-25 6/29/12 1:23 PM6/29/12 1:23 PM

26
Solving
Problems
For Customer Service Support:
Hong Kong (852) 8100 6386; South East Asia Contact: (65) 6496 1974
Email: diabetescare@bayer.com
27
Solving
Problems
www.bayerdiabetes.com
WHAT YOU SEE WHAT IT MEANS WHAT YOU SHOULD DO
Some display seg-
ments do not appear
when the meter
initially turns on.
Possible meter
electronics failure.
Press and hold
while the
meter is off. Compare meter dis-
play with the picture on page 3.
If the display is still not correct,
call Customer Service.
Control test result
is out-of-range (too
high or too low).
• Test strip is deterio-
rated due to expo-
sure to humidity or
heat.
• Control solution
is past expiration
date or is past the
open use date.
• Test strip is past
expiration date or
is past the open
use date.
• Incorrect control
solution was used.
• Control solution
is not at room
temperature.
• Control solution is
not mixed well.
• Run another control test with
a new test strip.
• Check all expiration dates.
Do not use expired testing
materials.
• Make sure you are using
C
ONTOUR
®
TS control solution.
• Wait 20 minutes until control
solution is at room tempera-
ture. Try again.
• Gently rock the control bottle
to ensure the control solution
is mixed well.
• If result is still out-of-range,
retest with a new test strip
and control solution.
• If result is still out-of-range,
call Customer Service.
If you do not resolve the problem, contact your local Bayer Diabetes Care Customer Service.
Error Codes and Symbols
Error Codes and Symbols
WHAT YOU SEE WHAT IT MEANS WHAT YOU SHOULD DO
Test result is above
33.3 mmol/L.
• Wash your hands and the test
site. Repeat the test using a
new test strip.
• If your result is still “HI,”
contact your physician or
health care professional
immediately.
CAUTION: Glucose levels above 13.9 mmol/L may
indicate a potentially serious medical condition.
Test result is
below 0.6 mmol/L.
• Repeat the test using a new
test strip.
• If your result is still “LO,”
contact your physician or
health care professional
immediately.
CAUTION: Glucose levels below 2.8 mmol/L may
indicate a potentially serious medical condition.
The display goes
blank after the
meter is turned on.
• Meter will turn off
after 3 minutes
of inactivity. This
feature prolongs
your battery life.
• The battery
may need to be
replaced.
• Try turning the meter on again
by pressing
. If display
goes blank before 3 minutes,
replace battery.
See page 28.
Results are not dis-
played in expected
units of measure
(mmol/L or mg/dL).
This may affect
the way you see
your results.
Contact Customer Service.
84500489_CntrTS_UG_EN_FpBp_v1.indd 26-2784500489_CntrTS_UG_EN_FpBp_v1.indd 26-27 6/29/12 1:23 PM6/29/12 1:23 PM

Care and
Extras
28
For Customer Service Support:
Hong Kong (852) 8100 6386; South East Asia Contact: (65) 6496 1974
Email: diabetescare@bayer.com
Care and
Extras
29
www.bayerdiabetes.com
CAUTION: Do not allow any solution to run down
or in around the buttons. Doing so may cause a
malfunction.
The battery should be replaced
when the meter continually
displays
or does not turn on.
Your CONTOUR
®
TS meter uses
one 3-volt lithium battery
(DL2032 or CR2032).
Replacing the Battery:
Replacing the Battery
Caring for the System
Caring for the System:
• Store meter in the carrying case provided whenever
possible.
• Wash hands and dry them thoroughly before handling
to keep the meter and test strips free of oils and other
contaminants.
• Handle the meter carefully to avoid damaging the electronics
or causing other malfunctions.
• Avoid exposing meter and test strip to excessive humidity,
heat, cold, dust, or dirt.
•
The exterior of the meter can be cleaned using a moist (not
wet)
lint-free tissue with a mild detergent or disinfectant solution,
such as 1 part bleach mixed with 9 parts water. Wipe dry with
lint-free tissue after cleaning.
Press fi rmly on the battery cover
and slide in the direction of the
arrow.
NOTE: After replacing the
battery you will need to reset
the time (see page 20). The
date and other formatting
choices do not need to be
reset. Test results stored in the
memory are not erased when the battery is changed.
To remove the old battery, place
your fi nger under the top of the
battery and pull upward. Grasp
the battery and remove.
Place the new battery into the
battery compartment with the
“+” side up (facing you).
Slide the battery cover back into
place, lining up with the open
slots, and close fi rmly.
WARNING
• Keep batteries away from children.
• Lithium batteries are poisonous. If swallowed,
immediately contact your physician or poison
control center. Discard batteries according to
your local environmental regulations.
84500489_CntrTS_UG_EN_FpBp_v1.indd 28-2984500489_CntrTS_UG_EN_FpBp_v1.indd 28-29 6/29/12 1:23 PM6/29/12 1:23 PM

Care and
Extras
30
For Customer Service Support:
Hong Kong (852) 8100 6386; South East Asia Contact: (65) 6496 1974
Email: diabetescare@bayer.com
Care and
Extras
31
www.bayerdiabetes.com
Test Sample : Whole blood
Test Result : Referenced to plasma/serum glucose
Sample Volume: 0.6 µL
Measuring Range: 0.6–33.3 mmol/L
Measuring Time: 8 seconds
Memory Feature: Stores most recent 250 test results
Battery Type: One 3-volt (DL2032 or CR2032)
lithium battery
Battery Life: Approximately 1000 Tests (1 yr. average use)
Operating Temperature Range:
Humidity: 10 –93% RH
Dimensions: 71 mm (H) x 60 mm (W) x 19 mm (T)
Weight: 56.7 grams
Alarm: “Beeps” whenever a test strip is inserted into the meter,
when the test strip is fi lled with blood or control solu-
tion, and when a test result appears in the display. Two
beeps will sound for an error. To turn off the ”beeps,”
see Setting the Sound on page 22.
Specifi cations:
Transferring Results to a Computer
Specifi cations
CAUTION: The CONTOUR TS meter has not been tested
or certifi ed by Bayer Diabetes Care for use with any soft-
ware other than the Bayer Diabetes Care diabetes manage-
ment software. Bayer Diabetes Care is not responsible for
any erroneous results from the use of other software.
Transferring Results to a Computer:
You can transfer test results
from the CONTOUR
®
TS meter
to a computer, where they can
be summarized in a report with
graphs and tables. To make use
of this feature, you need Bayer
Diabetes Care diabetes manage-
ment software and a Bayer Data
Cable.
For more information, call your local Customer Service Depart-
ment, or visit our Website at www.bayerdiabetes.com.
84500489_CntrTS_UG_EN_FpBp_v1.indd 30-3184500489_CntrTS_UG_EN_FpBp_v1.indd 30-31 6/29/12 1:23 PM6/29/12 1:23 PM

Care and
Extras
32
For Customer Service Support:
Hong Kong (852) 8100 6386; South East Asia Contact: (65) 6496 1974
Email: diabetescare@bayer.com
Care and
Extras
33
www.bayerdiabetes.com
Service Information:
If you have a problem and none of the problem solving steps in
the user guide help, call your local Bayer Diabetes Care Customer
Service. We have trained specialists to help you.
Important:
■
Speak to a Bayer Diabetes Care Representative before returning
your meter for any reason. He/she will give you the information
needed to get your problem handled correctly and effi ciently.
■
Have your CONTOUR
®
TS blood glucose meter and CONTOUR
®
TS
test strips available when you phone. It would also be helpful to
have a bottle of CONTOUR
®
TS normal control solution nearby.
■
Fill out the following check list before calling!
Check List
1. The Meter serial number (A) and model number (B) (found on
the back of the meter) are:
_______________________
_
2. The date and time the problem
occurred was:
_______________________
_
3. I have read the user guide and
followed the testing steps:
_______________________
4. I am using CONTOUR TS control
solution and CONTOUR TS test strips that have not expired or
passed their open use life dates: _________________
_____________
5. I do not need to replace the battery: _________________
_
B
A
The following symbols are used throughout the product labeling
for the C
ONTOUR
®
TS blood glucose monitoring system (meter
packaging and labeling, test strip packaging and labeling and
control solution packaging and labeling).
Use by date (last day of month)
Batch code
Temperature limitations
Consult instructions for use
In vitro diagnostic device
Manufacturer
Caution, consult accompanying documents
Product code number
Control Range Low
Control Range Normal
Control Range High
Do not re-use
Batteries must be disposed of in accordance with
laws in your country. Contact your competent local
administration for information on the relevant laws
regarding disposal and recycling in your area.
The meter should be treated as contaminated and
disposed of according to local safety rules. It should
not be disposed of with waste electronic equipment.
Symbols Used:
Symbols Used
Service Information
84500489_CntrTS_UG_EN_FpBp_v1.indd 32-3384500489_CntrTS_UG_EN_FpBp_v1.indd 32-33 6/29/12 1:23 PM6/29/12 1:23 PM

Care and
Extras
34
For Customer Service Support:
Hong Kong (852) 8100 6386; South East Asia Contact: (65) 6496 1974
Email: diabetescare@bayer.com
Care and
Extras
35
www.bayerdiabetes.com
BAYER DIABETES CARE MAKES NO OTHER EXPRESS WARRANTY
FOR THIS PRODUCT. THE OPTION OF REPLACEMENT, DESCRIBED
ABOVE, IS BAYER DIABETES CARE’S ONLY OBLIGATION UNDER
THIS WARRANTY.
IN NO EVENT SHALL BAYER DIABETES CARE BE LIABLE FOR
INDIRECT, SPECIAL OR CONSEQUENTIAL DAMAGES, EVEN IF
BAYER DIABETES CARE HAS BEEN ADVISED OF THE POSSIBILITY
OF SUCH DAMAGES.
Some states do not allow the exclusion or limitation of incidental
or consequential damages, so the above limitation or exclusion
may not apply to you. This warranty gives you specifi c legal rights
and you may also have other rights which vary from state to state.
For warranty service: Purchaser must contact the
Customer Service Department of Bayer Diabetes Care for
assistance and/or instructions for obtaining service of this
instrument. Please for customer service contact information in
your country see the last page of this User Guide.
REFERENCES
1
Protection of Laboratory Workers from Occupationally
Acquired Infections; Approved Guideline — Third Edition. Clini-
cal and Laboratory Standards Institute (CLSI), document M29-
A3, (ISBN 1-56238-567-4). CLSI, 940 West Valley Road, Suite
1400, Wayne, Pennsylvania 19087-1898, USA 2005.
2
Atkin S., Jaker M.A., Chorost M.I., Reddy S.: Fingerstick Glucose
Determination in Shock. Annals of Internal Medicine, 1991,
114: 1020–24.
3
American Diabetes Association, www.diabetes.org
4
American Diabetes Association: Standards of Medical Care in
Diabetes (Position Statement). Diabetes Care 29 (Suppl. 1):S10,
2006.
Warranty
Warranty:
Manufacturer’s Warranty: Bayer Diabetes Care warrants
to the original purchaser that this instrument will be free from
defects in materials and workmanship for 5 years from the date
of original purchase (except as noted below). During the stated
5-year period, Bayer Diabetes Care shall, at no charge, replace a
unit found to be defective with an equivalent or current version of
the owner’s model.
Limitations of Warranty: This warranty is subject to the
following exceptions and limitations:
1. A 90-day warranty only will be extended for consumable parts
and/or accessories.
2. This warranty is limited to replacement due to defects in parts
or workmanship. Bayer Diabetes Care shall not be required to
replace any units which malfunction or are damaged due to
abuse, accidents, alteration, misuse, neglect, maintenance by
someone other than Bayer Diabetes Care, or failure to operate
the instrument in accordance with instructions. Further, Bayer
Diabetes Care assumes no liability for malfunction or damage
to Bayer Diabetes Care instruments caused by the use of
reagents other than reagents (i.e., CONTOUR
®
TS test strips)
manufactured or recommended by Bayer Diabetes Care.
3. Bayer Diabetes Care reserves the right to make changes in
design of this instrument without obligation to incorporate such
changes into previously manufactured instruments.
4. Bayer Diabetes Care has no knowledge of the performance of
the CONTOUR
®
TS blood glucose meter when used with any test
strips other than CONTOUR TS test strips, and therefore makes
no warranty of the performance of the CONTOUR TS meter
when used with any test strips other than CONTOUR TS test
strips or when the CONTOUR TS test strip is altered or modifi ed
in any manner.
Warranty
84500489_CntrTS_UG_EN_FpBp_v1.indd 34-3584500489_CntrTS_UG_EN_FpBp_v1.indd 34-35 6/29/12 1:23 PM6/29/12 1:23 PM

Care and
Extras
36
For Customer Service Support:
Hong Kong (852) 8100 6386; South East Asia Contact: (65) 6496 1974
Email: diabetescare@bayer.com
Supplies:
When calling or writing for supplies be sure to include the number
with the name of the replacement part or accessory item.
REPLACEMENT PARTS
Part Number* Item
02521456 One 3-volt (DL2032 or CR2032)
Lithium Battery
84500489 CONTOUR
®
TS user guide
*Part numbers are subject to change without notice.
Supplies
84500489_CntrTS_UG_EN_FpBp_v1.indd 36-3784500489_CntrTS_UG_EN_FpBp_v1.indd 36-37 6/29/12 1:23 PM6/29/12 1:23 PM
Page is loading ...
/