Page is loading ...

i
Blood Glucose Monitoring System
Self monitoring of blood glucose (SMBG) is an important part of diabetes care, but
the high cost of testing can make it difficult. At ACON, our goal is to provide high
quality glucose monitoring systems at a price that allows you to test as often as
necessary. Together, we can better manage your diabetes and help you live a
longer and healthier life.
Welcome, and thank you for choosing the On Call
®
Express Blood Glucose
Monitoring System. The On Call
®
Express Blood Glucose Monitoring System will
give you accurate blood glucose results in just a few simple steps.
The On Call
®
Express Blood Glucose Monitoring System uses an electrochemical
enzymatic assay. It is for the quantitative detection of glucose in fresh capillary
whole blood. It allows people with diabetes to take blood samples from the fingertip,
forearm or palm. It is used at home as a way to monitor the effectiveness of
diabetes control programs. Alternative testing sites (forearm and palm) should be
used only during steady-state times (when blood glucose level is not changing
rapidly). The On Call
®
Express Blood Glucose Monitoring System is intended to be
used by a single patient and should not be shared. Alternative Site Testing (AST)
should not be used to calibrate continuous glucose monitors (CGMs) nor for use in
insulin dose calculations. On Call
®
Express Blood Glucose Monitoring System is
for single patient use only. Do not share with others.
To ensure accurate results from your On Call
®
Express Blood Glucose Monitoring
System, please follow these guidelines:
• Read instructions before use.
• Use only On Call
®
Express Blood Glucose Test Strips with the On Call
®
Express
Blood Glucose Meter.
• For in vitro diagnostic use only. Your blood glucose monitoring system is to be
used only outside the body. It’s for monitoring the effectiveness of diabetes
control. It should not be used for the diagnosis of diabetes.

ii
• For self testing use only.
• Test only whole blood samples with the On Call
®
Express Blood Glucose Test
Strips and On Call
®
Express Meter.
• For self-testers, consult your physician or doctor before making any
adjustments to your medication, diet or activity routines.
• Keep out of reach of children.
• Keep this User’s Manual in a safe place, do not discard it.
• Not for use on critically ill patients, patients in shock, severely dehydrated
patients or hyperosmolar patients (with or without ketosis).
Following the instructions outlined in this User's Manual, you will be able to use
your On Call
®
Express Blood Glucose Monitoring System to monitor your blood
glucose and better manage your diabetes.

iii
Table of Contents
Getting Started .................................................................................................... 1
Component Descriptions ............................................................................ 2
On Call
®
Express Blood Glucose Meter ..................................................... 4
Meter Display ............................................................................................. 6
On Call
®
Express Blood Glucose Test Strips .............................................. 8
On Call
®
Express Glucose Control Solution .............................................. 11
Installing the Battery .........................................................................................13
Meter Setup before Testing ...............................................................................14
Testing Your Blood ............................................................................................19
Step 1 – Getting a Drop of Blood ..............................................................19
Step 2 – Testing Blood Glucose ................................................................25
“HI” and “LO” Messages ............................................................................28
“Hypo” and “Hyper” Messages ..................................................................28
“Ketone?” Message ...................................................................................29
Using the Meter Memory ...................................................................................31
Viewing Stored Records ............................................................................31
Clearing the Memory .................................................................................33
Transferring Records.................................................................................33
Performing a Quality Control Test ....................................................................35
Maintenance .......................................................................................................39
Replacing the Battery ................................................................................39
Caring for Your On Call
®
Express Blood Glucose Monitoring System ........40
Suggested Testing Times and Target Goals....................................................43
Comparing Meter and Laboratory Results .......................................................44
Troubleshooting Guide .....................................................................................45
Specifications ....................................................................................................47
Warranty .............................................................................................................48
Index ...................................................................................................................49

Before t
your O
n
On Call
®
separat
e
Please
c
are incl
u
esting, read the i
n
Call
®
Express
®
Express produc
t
e
ly (please conta
c
c
heck the list of c
o
u
ded with your pu
r
On Call
®
Ex
p
Blood Glucos
e
Lancing De
v
Sterile Lan
c
1
Getting
S
nstructions caref
u
Blood Glucose
M
t
you purchased,
y
c
t Customer Sup
p
o
ntents on the ou
t
r
chase.
Carrying
C
p
ress
e
Mete
r
v
ice
c
et
S
tarted
u
lly. Learn about
M
onitoring Syste
m
y
ou may need to
b
p
ort at 1-800-838
-
t
er box for details
C
ase
On Call
®
E
Blood Glucos
e
On Call
®
E
Glucose Con
t
Clear
all the compone
n
m
. Depending o
n
b
uy some access
o
-
9502 for purcha
s
on which compo
n
E
xpress
e
Test Strips
E
xpress
t
rol Solution
Cap
n
ts of
n
the
o
ries
s
ing).
n
ents

2
Component Descriptions
1. On Call
®
Express Blood Glucose Meter: Reads the test strips and displays the
blood glucose level.
2. On Call
®
Express Blood Glucose Test Strips: Equipped with a chemical
reagent system. They measure glucose concentration in blood when inserted
into the meter.
3. Lancing Device: Used with sterile lancets to prick the fingertip, palm (at the
base of the thumb) or forearm for blood sample collection. The packaged
lancing device has multiple depth settings. It allows users to adjust the depth
of the puncture to minimize discomfort. It can also eject the used lancets.
4. Lancing Device Clear Cap: Used with the lancing device and sterile lancet to
draw a blood sample from the forearm or palm.
5. Sterile Lancets: Used with the lancing device to draw a blood sample. Sterile
lancets are inserted into the lancing device prior to each blood sampling.
Discard after use.
6. On Call
®
Express Glucose Control Solution: Confirms that the blood glucose
monitoring system is properly working. Use this solution in place of a blood
sample to check the test strips and meter for a pre-calibrated reading. Three
levels of control solution are included in the On Call
®
Express Glucose Control
Solution kit (sold separately). Control Solution 1 is all you will need most of the
time. Additional testing may be performed with Control Solution 0 and Control
Solution 2 if you think your meter and test strips are not working properly.
Please contact Customer Support at 1-800-838-9502 to order the
On Call
®
Express Glucose Control Solution kit.
7. Carrying Case: Makes this blood glucose testing system easy to carry anywhere.
8. On Call
®
Express User's Manual: Provides detailed instructions on using the
blood glucose monitoring system.
9. On Call
®
Express Quick Reference Guide: Provides a brief overview of the
blood glucose monitoring system and testing procedures. This small guide can
be kept in your carrying case.
10. On Call
®
Express Quick Start Guide: Provides a brief overview of the
On Call
®
Express blood glucose meter setup. This small guide can be kept in
the carrying case.
11. Logbook: Allows users to record their blood glucose data. Used to identify any
trends.
12. Warranty Card: Should be completed and returned to the Warranty Center.
Qualifies your meter for the 5-year warranty.

3
Note: Important Safety Instructions
1. The meter and lancing device are for single patient use. Do not share them
with anyone!
2. All parts of the kit are considered bio-hazardous. They can potentially transmit
infectious diseases, even after you have performed cleaning and disinfection.
Please follow proper precautions when handling your meter and lancing
device.
3. Cross-use of meter and lancing device may cause Bloodborne Pathogens
Transmission. For more information, please refer to the FDA Public Health
Notification: “Use of Fingerstick Devices on More than One Person Poses Risk
for Transmitting Bloodborne Pathogens: Initial Communication” (2010) at
http://www.fda.gov/MedicalDevices/Safety/AlertsandNotices/ucm224025.htm.
You may also refer to the CDC Clinical Reminder: “Use of Fingerstick Devices
on More than One Person Poses Risk for Transmitting Bloodborne Pathogens”
(2010) at http://www.cdc.gov/injectionsafety/Fingerstick-DevicesBGM.html.

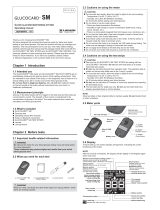
4
On Call
®
Express Blood Glucose Meter
The meter reads the test strips and displays the blood glucose concentration. Use
these diagrams to become familiar with all the parts of your meter.
Battery Cover
Strip Port
Liquid Crystal
Display (LCD)
Strip Ejector
Right (►) ButtonLeft (◄) Button
Data Port

5
Liquid Crystal Display (LCD): Shows your test results. Helps you through the
testing process.
Left (◄) Button: Recalls previous test results from the meter memory and
performs other menu selection functions.
Right (►) Button: Selects meter settings and performs other menu selection
functions.
Strip Port: Test strips are inserted into this area to perform a test.
Strip Ejector: Slide the ejector forward to discard the used test strip.
Note: Dispose of blood samples and materials with care. Treat all blood samples
as if they are infectious materials. Follow your doctor’s recommendations for
disposal.
Battery Cover: Remove the battery cover to install one CR 2032 coin cell battery.
Data Port: Sends information to a computer via an optional data transfer cable.
Allows you to view, analyze and print stored data in the meter. The data transfer
cable is available for order as an optional add-on.

6
Meter Display
Test Result Area: Indicates test result.
Blood Drop / Strip Symbol: Wait for the Blood Drop / Strip Symbol to appear
before applying the sample. These two symbols appear at the same time.
Control Solution Symbol: Indicates a control test result. A pound sign (#) will also
be displayed when control solution symbol appears.
MEM: Shows a test result stored in memory.
Ketone?: Appears when the blood glucose concentration is above 300 mg/dl. This
simply suggests that a ketone test is recommended. Consult your doctor about
testing for ketones.
Note: This symbol does not mean that the system has detected ketones. It
recommends that a ketone test should be taken.
Hypo Symbol: Appears when the blood glucose concentration is below the
“Hypoglycemia” (low blood sugar) target level that you have set.
Hyper Symbol: Appears when the blood glucose concentration is above the
“Hyperglycemia” (high blood sugar) target level that you have set.
Measurement Unit: Only mg/dl will be displayed on your meter. It cannot be
adjusted.
Battery Symbol: Warns when you should replace the battery.
After Meal Symbol: Appears when after-meal test results are displayed.
Before Meal Symbol: Appears when before-meal test results are displayed.
Test Reminder Symbol: Appears when reminding you to test blood glucose.
Pound Sign (#): Appears with the control solution test result or when you mark an
invalid result to prevent it from being included in the average.
Month Day Hour Minutes
Pound Sign (#)
Test Remind Symbol
Before Meal Symbol
After Meal Symbol
Battery Symbol
Measurement Unit
Hyper Symbol
Blood Drop
/
Strip Symbol
Memory Ketone Hypo Symbol
Test Resul
t
Area
Control Solution
Symbol

7
Meter Use and Precautions
• Wait for the Blood Drop / Strip Symbol to appear before applying the sample.
• The meter is preset blood glucose concentration in mg/dl when sold in the
United States. If your meter is not set to mg/dl when you first begin using it,
please contact Customer Support at 1-800-838-9502.
• Meter will shut off by itself after 2 minutes of inactivity.
• Do not get water or other liquids inside the meter.
• Keep the strip port area clean.
• Keep your meter dry. Avoid exposing it to extremes temperature or humidity.
Do not leave it in your car.
• Do not drop the meter or get it wet. If you do, check the meter by running a
quality control test. Refer to Quality Control Test on page 35 for instructions.
• Do not take the meter apart. This will void the warranty.
• Refer to the Caring for Your Meter section on page 40 for details on cleaning
the meter.
• Keep the meter and all associated parts out of the reach of children.
Note: Follow your doctor’s recommendations when disposing of the meter and
used batteries.
All Glucose Systems Preventive Warnings with Regard to EMC:
1. This instrument is tested for immunity to electrostatic discharge as specified in
IEC 61000-4-2.
2. This instrument complies with the emission and immunity requirements
described in EN61326-1 and EN61326-2-6.

8
On Call
®
Express Blood Glucose Test Strips
The On Call
®
Express Blood Glucose Test Strips are thin strips. The strips have a
chemical reagent system. They work with the On Call
®
Express Blood Glucose
Meter to measure the glucose concentration in whole blood. After the strip is
inserted into the meter, blood is applied to the sample tip of the test strip. The blood
is then automatically absorbed into the reaction cell where the reaction takes place.
A transient electrical current is formed during the reaction. The blood glucose
concentration is calculated based on the electrical current detected by the meter.
The result is shown on the meter display. The meter is set to display plasma
equivalent results.
IMPORTANT: Apply the sample only to the sample tip of the test strip. Do not
apply blood or control solution to the top of the test strip. This may result in an
inaccurate reading.
Hold the blood drop to the sample tip of the test strip until the check window is
completely full. The meter will then begin to count down. If you applied blood but do
not see the count down start, you may reapply a second drop of blood within 3
seconds. If the check window does not fill and the meter starts to count down, then
do not add more blood to the test strip. If you do then you may get an E-5 message
or an inaccurate test result. In this case if the meter begins to count down and the
check window does not fill, discard the strip and begin the test again with a new
test strip.
Sample Tip
Apply blood or control solution here.
Check Window
Check to confirm that a sufficient
sample has been applied.
Contact Bars
Insert this end of the test strip
into the meter until it stops.
Correct
Incorrect

9
Storage and Handling
Please review the following storage and handling instructions:
• Store in a cool, dry place between 41-86 °F (5-30 °C) and 10-90 % relative
humidity and keep out of direct sunlight.
• Do not freeze or refrigerate.
• Do not store or use test strips in a humid place such as a bathroom.
• Do not store the meter, the test strips or control solution near bleach or
cleaners that contain bleach.
• The test strip should be used immediately after removing it from the container.
• Repeated insertion and removal of a test strip into the meter strip port may
result in reading errors.
Special Instructions for Test strip in the Vial
• Do not use test strips after the unopened expiration date printed on the vial.
Note: All expiration dates are printed in Year/Month format. 2015/01 indicates
January, 2015.
• A new vial of test strips may be used for 6 months after being first opened.
After 6 months they will expire. Write the opened expiration date on the vial
label after opening.
• Test strips must be stored in the original vial with the cap tightly closed. This
keeps them in good working condition.
• Do not transfer test strips to a new vial or any other container.
• Close the cap on the test strip vial immediately after removing a test strip.
Special Instructions for Test Strip in the Foil Pouch
• Do not use test strips after the unopened expiration date printed on the pouch.
Note: All expiration dates are printed in Year/Month format. 2015/01 indicates
January, 2015.
Correct
Incorrect

10
• Tear the pouch carefully starting from the tear gap. Avoid damaging or bending
the test strip.
• Use test strip immediately after removing it from the pouch.
Test Strip Precautions
• For in vitro diagnostic use. Test strips are to be used only outside the body for
testing purposes.
• Do not use test strips that are torn, bent, or damaged in any way. Do not reuse
test strips.
• Keep the test strip vial or the foil pouch away from children and animals.
• Consult your doctor before making any changes in your treatment plan based
on your blood glucose test results.
• Not intended for the diagnosis of, or screening of, diabetes mellitus.
• Not for use on critically ill patients, patients in shock, severely dehydrated
patients or hyperosmolar patients (with or without ketosis).
• Not for use on neonates.
Consider alternate site testing when
• You are in a fasting state.
• You are testing before a meal.
• Two hours have passed since your last meal.
• Two hours have passed since your last insulin dosing.
• Two hours have passed since your last physical activity.
Use fingertip testing when
• It is less than two hours since your last meal.
• It is less than two hours since your last insulin dosing.
• It is less than two hours since your last physical activity.
• You have a history of hypoglycemia, are experiencing signs of low blood sugar,
or suffer from hypoglycemic unawareness.
• You are ill or feeling stressed.
• Your AST result is not consistent with how you feel.
See the test strip insert for more details.

11
On Call
®
Express Glucose Control Solution
The On Call
®
Express Glucose Control Solutions contain known concentrations of
glucose. They are used to confirm that your On Call
®
Express Blood Glucose
Meter and test strips are working properly together. They also confirm that you are
performing the test correctly. It is important to run a quality control test regularly to
make sure you are getting correct results. Control Solution 1 is all you will need
most of the time. Additional testing may be performed with Control Solution 0 and
Control Solution 2 if you think your meter and test strips are not working properly.
Please contact Customer Support at 1-800-838-9502 to order the On Call
®
Express
Glucose Control Solution kit.
You should run a quality control test:
• Before you first use your meter, to familiarize yourself with its operation.
• Before using a new box of test strips.
• When you suspect that the meter or test strips are not working
properly.
• When you suspect that your test results are inaccurate, or if they
are inconsistent with how you feel.
• When you suspect your meter is damaged.
• After cleaning your meter.
• At least once a week.
Refer to Quality Control Test on page 35 for instructions on running a quality
control test.
Storage and Handling
Please review the following storage and handling instructions:
• Store in a cool, dry place between 41-86 °F (5-30 °C) and 10-90% relative
humidity and keep out of direct sunlight.
• Do not freeze or refrigerate.
• If the control solution is cold, do not use until it has warmed to room temperature.
• Do not use control solution after the unopened expiration date printed on the bottle.
Note: All expiration dates are printed in Year/Month format. 2015/01 indicates
January, 2015.
• Use control solution only for 6 months after you first open the bottle. After 6
months it will expire. Write the opened expiration date on the bottle label after
opening.

12
Control Solution Precautions
• For in vitro diagnostic use. The control solution is for testing only outside the
body. Do not swallow or inject.
• Shake well before using.
• Control solution tests are designed to be accurate only when tested between
50 and 104 °F (10-40 °C).
• The control ranges shown on the test strip vial (or on the foil pouch) are not
recommended ranges for your blood glucose level. Your personal blood
glucose target ranges should be determined by your doctor.
• Do not touch the test strip with the tip of the control solution bottle.
• Use only the same brand of control solution that was provided with your kit.
Please contact Customer Support at 1-800-838-9502 to obtain more control
solution materials. See the control solution package insert for more details.

13
Installing the Battery
If the battery has been preinstalled in the meter, a plastic tab will be protruding
from the battery carrier. Simply pull on the tab to remove the plastic strip.
The battery may not be preinstalled in the meter. The meter requires one CR 2032
3.0V coin cell battery. Please find the battery in your carrying case and install it
according to the following steps:
1. Turn over the meter. Slide the battery cover in the direction of the arrow to
open it.
2. Insert a fresh CR 2032 3.0V coin cell battery with the plus (+) side facing up.
3. Close the battery cover until it snaps shut.

14
Meter Setup before Testing
Before using your meter for the first time, you will need to adjust the settings that
are listed in detail below.
1. Meter Setup Mode: When meter is off, in memory mode or in average mode,
press and hold the right (►) button for two seconds to enter meter setup mode.
The meter will automatically enter the setup mode when turned on for the first
time by any method.
2. Clock: Set the clock to 12 or 24 hour mode. Press the left (◄) button to switch
between the two settings. Then press the right (►) button to save your choice.
Now you can start to set the year, month and date.
Note: The clock needs to be reset after replacing the battery.
3. Date: The year will appear at the top of the display. Press the left (◄) button to
increase the year. Once you have selected the correct year, press the right (►)
button to save your choice and start setting the month. Press the left (◄)
button to increase the month. Then press the right (►) button to save your
choice and start setting the date. Press the left (◄) button to increase the date.
Then press the right (►) button to save your choice and start setting the time.
4. Time: The hour will appear at the top of the display. Adjust the hour with the
left (◄) button until the correct hour is displayed. Press the right (►) button to
save your choice and set the minutes. Press the left (◄) button to change to
the correct minute. Press the right (►) button to save your choice and move to
set the meal marker feature.
OR
Y
ear Month Date

15
5. Meal Marker: The meter comes with the meal marker feature disabled. The
meter allows the user to enable or disable this option. The words “On” or “Off”
will be displayed on the large center segments of the display. The before meal
symbol together with the after meal symbol will be displayed as shown below.
Press the left (◄) button to switch between turning the meal marker “On” and
“Off”. Press the right (►) button to confirm your selection.
6. Audio Feature: The meter comes with the audio feature enabled. There will be
a short beep when it is turned on, after sample detection and when the result is
ready. The meter will sound three short beeps to sound a warning when an
error has occurred. Please check the error number on the display to determine
what kind of error has occurred.
OR
Hou
r
Hou
r
OR
Minute Minute

16
Press the left (◄) button to turn the meter beep “On” and “Off”. Press the right
(►) button to confirm your selection.
7. Ketone Indicator: The meter comes with the Ketone indicator feature disabled.
Press the left (◄) button to switch between turning the Ketone indicator “On”
and “Off”. Press the right (►) button to confirm your selection. When the
Ketone indicator is enabled, if the test result is higher than 300 mg/dl, the
symbol of "Ketone?" will appear on the display.
8. Hyper Indicator: The meter comes with the Hyper indicator feature disabled.
Press the left (◄) button to turn the Hyper indicator “On” or “Off”. Press the
right (►) button to confirm your selection. When the Hyper indicator is “Off”,
pressing the right (►) button will go to the next Hypo indicator set up. When
the Hyper indicator is “On”, pressing the right (►) button will go to the Hyper
indicator level set up. At the Hyper level set up, press the left (◄) button to
adjust the Hyper level. Press the right (►) button to go to the Hypo indicator set up.
Note: The meter allows the hyperglycemia level to be as low as 120 mg/dl or
higher. The hyperglycemia level should be above the hypoglycemia level.
Consult your doctor before determining what your hyper blood glucose level is.

17
9. Hypo Indicator: The meter comes with the Hypo indicator feature disabled.
Press the left (◄) button to turn the Hypo indicator “On” or “Off”. Press the right
(►) button to confirm your selection. When the Hypo indicator is “Off,” pressing
the right (►) button will go to the Test Reminder set up. When the Hypo
indicator is “On”, pressing the right (►) button will go to the Hypo indicator level
set up. At the Hypo level set up, press the left (◄) button to adjust the Hypo
level. Then press the right (►) button to go to the Test Reminder set up.
Note: The meter allows the hypoglycemia level to be as high as 100 mg/dl. The
hypoglycemia level should be below the hyperglycemia level. Consult your
doctor before determining what your hypo blood glucose level is.
10. Test Reminder: Test reminders are a useful way to remind you when to test.
You can set 1 to 5 reminders per day. Your meter is preset with the test
reminder disabled. You must turn it on to use this feature.
• Press the left (◄) button to turn the first Test Reminder “On” and “Off”.
Press the right (►) button to confirm your selection. When the Test
Reminder is “Off”, pressing the right (►) button will go to the set up of the
second Test Reminder. When the Test Reminder is “On”, pressing the right
(►) button will go to the set up of the time for the first Test Reminder. Press
the left (◄) button to adjust the first Test Reminder time. Press the right (►)
button to confirm the first Test Reminder time and then go to the second
Test Reminder set up.
• When the Test Reminder is “Off” during the second Test Reminder set up,
pressing the right (►) button will go to the set up of the third Test Reminder.
When the Test Reminder is “On”, pressing the right (►) button will go to the
set up of the time for the second Test Reminder. Press the left (◄) button to
adjust the second Test Reminder time. Press the right (►) button to confirm
the second Test Reminder time and then go to the third Test Reminder set up.
• Repeat the same set up procedure for Test Reminder 3, 4 and 5.
• After finishing the fifth Test Reminder set up, it will then end the setup mode
and power off the meter.
/

![LivongoBlood Glucose Monitoring System [PL00497]](http://vs1.manuzoid.com/store/data/001794217_2-3e764f07ad29ea86e9aa74e34fbfeb35-160x210.png)