Page is loading ...

Gebruiksaanwijzing
Mode d’emploi
Bedienungsanleitung
Operator manual
Instrucciones de servicio
Cafi tesse 60
January 2007
Article no. 700.403.422-B
Cafitesse_C60_EN.indd ACafitesse_C60_EN.indd A 18-12-2007 16:53:2018-12-2007 16:53:20

Cafitesse_C60_EN.indd BCafitesse_C60_EN.indd B 18-12-2007 16:53:2118-12-2007 16:53:21

Serial number: — — — — — — — — — — — — — — — — — — — — —
Registration number: — — — — — — — — — — — — — — — — — — —
Phone number service: — — — — — — — — — — — — — — — — — —
Supplier: — — — — — — — — — — — — — — — — — — — — — — —
Cafitesse_C60_EN.indd CCafitesse_C60_EN.indd C 18-12-2007 16:53:2118-12-2007 16:53:21

Table of contents
Introduction . . . . . . . . . . . . . . . . . . . . . . . . . . . . . . . . . . . . . . . . . . . . . . . . . . . . . . . . . . . . . . . . . . . . . . . . . . . . . . . . . . . . . . . . . . . . . . . . . . . . . . . . 1
Safety instructions . . . . . . . . . . . . . . . . . . . . . . . . . . . . . . . . . . . . . . . . . . . . . . . . . . . . . . . . . . . . . . . . . . . . . . . . . . . . . . . . . . . . . . . . . . . . . . . . . . 2
Description of the dispenser “CAFITESSE 60” . . . . . . . . . . . . . . . . . . . . . . . . . . . . . . . . . . . . . . . . . . . . . . . . . . . . . . . . . . . . . . . . . . . . . . . . . . . 4
Display pictograms . . . . . . . . . . . . . . . . . . . . . . . . . . . . . . . . . . . . . . . . . . . . . . . . . . . . . . . . . . . . . . . . . . . . . . . . . . . . . . . . . . . . . . . . . . . . . . . . . 5
Operating panel (tapping beverages) . . . . . . . . . . . . . . . . . . . . . . . . . . . . . . . . . . . . . . . . . . . . . . . . . . . . . . . . . . . . . . . . . . . . . . . . . . . . . . . . . . . 6
Programming buttons. . . . . . . . . . . . . . . . . . . . . . . . . . . . . . . . . . . . . . . . . . . . . . . . . . . . . . . . . . . . . . . . . . . . . . . . . . . . . . . . . . . . . . . . . . . . . . . . 6
Operation of the dispenser. . . . . . . . . . . . . . . . . . . . . . . . . . . . . . . . . . . . . . . . . . . . . . . . . . . . . . . . . . . . . . . . . . . . . . . . . . . . . . . . . . . . . . . . . . . . 7
Switching on the dispenser . . . . . . . . . . . . . . . . . . . . . . . . . . . . . . . . . . . . . . . . . . . . . . . . . . . . . . . . . . . . . . . . . . . . . . . . . . . . . . . . . . . . . . . . . . 7
Switching off the dispenser . . . . . . . . . . . . . . . . . . . . . . . . . . . . . . . . . . . . . . . . . . . . . . . . . . . . . . . . . . . . . . . . . . . . . . . . . . . . . . . . . . . . . . . . . . 7
Filling the water tank . . . . . . . . . . . . . . . . . . . . . . . . . . . . . . . . . . . . . . . . . . . . . . . . . . . . . . . . . . . . . . . . . . . . . . . . . . . . . . . . . . . . . . . . . . . . . . . 8
Placing/replace ingredient pack . . . . . . . . . . . . . . . . . . . . . . . . . . . . . . . . . . . . . . . . . . . . . . . . . . . . . . . . . . . . . . . . . . . . . . . . . . . . . . . . . . . . . . . 9
Dispensing a cup of drink . . . . . . . . . . . . . . . . . . . . . . . . . . . . . . . . . . . . . . . . . . . . . . . . . . . . . . . . . . . . . . . . . . . . . . . . . . . . . . . . . . . . . . . . . . . . 10
Dispensing a pot of drink . . . . . . . . . . . . . . . . . . . . . . . . . . . . . . . . . . . . . . . . . . . . . . . . . . . . . . . . . . . . . . . . . . . . . . . . . . . . . . . . . . . . . . . . . . . . 11
Dispensing hot water . . . . . . . . . . . . . . . . . . . . . . . . . . . . . . . . . . . . . . . . . . . . . . . . . . . . . . . . . . . . . . . . . . . . . . . . . . . . . . . . . . . . . . . . . . . . . . . 12
Moving the dispenser with water tank . . . . . . . . . . . . . . . . . . . . . . . . . . . . . . . . . . . . . . . . . . . . . . . . . . . . . . . . . . . . . . . . . . . . . . . . . . . . . . . . . . . 13
Preparation . . . . . . . . . . . . . . . . . . . . . . . . . . . . . . . . . . . . . . . . . . . . . . . . . . . . . . . . . . . . . . . . . . . . . . . . . . . . . . . . . . . . . . . . . . . . . . . . . . . . . . . 13
Moving the dispenser . . . . . . . . . . . . . . . . . . . . . . . . . . . . . . . . . . . . . . . . . . . . . . . . . . . . . . . . . . . . . . . . . . . . . . . . . . . . . . . . . . . . . . . . . . . . . . . 14
Access to the operator menu. . . . . . . . . . . . . . . . . . . . . . . . . . . . . . . . . . . . . . . . . . . . . . . . . . . . . . . . . . . . . . . . . . . . . . . . . . . . . . . . . . . . . . . . . . 15
Counter readings consumptions . . . . . . . . . . . . . . . . . . . . . . . . . . . . . . . . . . . . . . . . . . . . . . . . . . . . . . . . . . . . . . . . . . . . . . . . . . . . . . . . . . . . . . . 16
CLEANING - Manual, daily cleaning procedure . . . . . . . . . . . . . . . . . . . . . . . . . . . . . . . . . . . . . . . . . . . . . . . . . . . . . . . . . . . . . . . . . . . . . . . . . . . 18
CLEANING - Automatic, periodic cleaning procedure. . . . . . . . . . . . . . . . . . . . . . . . . . . . . . . . . . . . . . . . . . . . . . . . . . . . . . . . . . . . . . . . . . . . . . 20
Cleaning program . . . . . . . . . . . . . . . . . . . . . . . . . . . . . . . . . . . . . . . . . . . . . . . . . . . . . . . . . . . . . . . . . . . . . . . . . . . . . . . . . . . . . . . . . . . . . . . . . . 20
Start the cleaning program . . . . . . . . . . . . . . . . . . . . . . . . . . . . . . . . . . . . . . . . . . . . . . . . . . . . . . . . . . . . . . . . . . . . . . . . . . . . . . . . . . . . . . . . . . . 21
Changing the settings. . . . . . . . . . . . . . . . . . . . . . . . . . . . . . . . . . . . . . . . . . . . . . . . . . . . . . . . . . . . . . . . . . . . . . . . . . . . . . . . . . . . . . . . . . . . . . . . 24
Clock setting: set date and time . . . . . . . . . . . . . . . . . . . . . . . . . . . . . . . . . . . . . . . . . . . . . . . . . . . . . . . . . . . . . . . . . . . . . . . . . . . . . . . . . . . . . . . 24
Language setting . . . . . . . . . . . . . . . . . . . . . . . . . . . . . . . . . . . . . . . . . . . . . . . . . . . . . . . . . . . . . . . . . . . . . . . . . . . . . . . . . . . . . . . . . . . . . . . . . . 26
Switching text on or off . . . . . . . . . . . . . . . . . . . . . . . . . . . . . . . . . . . . . . . . . . . . . . . . . . . . . . . . . . . . . . . . . . . . . . . . . . . . . . . . . . . . . . . . . . . . . . 27
“Almost empty” Warning . . . . . . . . . . . . . . . . . . . . . . . . . . . . . . . . . . . . . . . . . . . . . . . . . . . . . . . . . . . . . . . . . . . . . . . . . . . . . . . . . . . . . . . . . . . . . 28
Volume setting . . . . . . . . . . . . . . . . . . . . . . . . . . . . . . . . . . . . . . . . . . . . . . . . . . . . . . . . . . . . . . . . . . . . . . . . . . . . . . . . . . . . . . . . . . . . . . . . . . . . 29
Strength setting . . . . . . . . . . . . . . . . . . . . . . . . . . . . . . . . . . . . . . . . . . . . . . . . . . . . . . . . . . . . . . . . . . . . . . . . . . . . . . . . . . . . . . . . . . . . . . . . . . . 30
Descaling the dispenser . . . . . . . . . . . . . . . . . . . . . . . . . . . . . . . . . . . . . . . . . . . . . . . . . . . . . . . . . . . . . . . . . . . . . . . . . . . . . . . . . . . . . . . . . . . . . . 31
Start descaling program (Optional) . . . . . . . . . . . . . . . . . . . . . . . . . . . . . . . . . . . . . . . . . . . . . . . . . . . . . . . . . . . . . . . . . . . . . . . . . . . . . . . . . . . . 32
Putting the dispenser into service after storage / Storing the dispenser . . . . . . . . . . . . . . . . . . . . . . . . . . . . . . . . . . . . . . . . . . . . . . . . . . . . . . 35
Display messages and troubleshooting . . . . . . . . . . . . . . . . . . . . . . . . . . . . . . . . . . . . . . . . . . . . . . . . . . . . . . . . . . . . . . . . . . . . . . . . . . . . . . . . . 36
Display messages and troubleshooting when using model with removable watertank . . . . . . . . . . . . . . . . . . . . . . . . . . . . . . . . . . . . . . . . . . . . . 39
Quick reference . . . . . . . . . . . . . . . . . . . . . . . . . . . . . . . . . . . . . . . . . . . . . . . . . . . . . . . . . . . . . . . . . . . . . . . . . . . . . . . . . . . . . . . . . . . . . . . . . . . . . 40
Serve a drink and hot water . . . . . . . . . . . . . . . . . . . . . . . . . . . . . . . . . . . . . . . . . . . . . . . . . . . . . . . . . . . . . . . . . . . . . . . . . . . . . . . . . . . . . . . . . . 40
Daily cleaning . . . . . . . . . . . . . . . . . . . . . . . . . . . . . . . . . . . . . . . . . . . . . . . . . . . . . . . . . . . . . . . . . . . . . . . . . . . . . . . . . . . . . . . . . . . . . . . . . . . . . 41
Periodic cleaning . . . . . . . . . . . . . . . . . . . . . . . . . . . . . . . . . . . . . . . . . . . . . . . . . . . . . . . . . . . . . . . . . . . . . . . . . . . . . . . . . . . . . . . . . . . . . . . . . . 42
Specifi cations . . . . . . . . . . . . . . . . . . . . . . . . . . . . . . . . . . . . . . . . . . . . . . . . . . . . . . . . . . . . . . . . . . . . . . . . . . . . . . . . . . . . . . . . . . . . . . . . . . . . . . 43
Subject index . . . . . . . . . . . . . . . . . . . . . . . . . . . . . . . . . . . . . . . . . . . . . . . . . . . . . . . . . . . . . . . . . . . . . . . . . . . . . . . . . . . . . . . . . . . . . . . . . . . . . . . 44
Cafitesse_C60_EN.indd DCafitesse_C60_EN.indd D 18-12-2007 16:53:2118-12-2007 16:53:21

1
Introduction
This manual contains the instructions and explanation of the operation
and maintenance of the ”CAFITESSE 60” dispenser.
The dispenser is a machine for preparing warm drinks and hot water by
the cup or pot.
There are 2 models:
● one model with a fi xed water connection (C61)*/**,
● one model with a removable water tank (C60)*.
The dispenser cooling compartment has room for two ingredient packs.
The right-hand ingredient pack always contains coffee.
Depending on the ingredients that you put there, the dispenser can
dispense coffee, decaffeinated coffee, or coffee with milk drinks such as
cappuccino.
The dispenser is easy to operate. All aspects of the design are oriented
towards ease of use. Cleaning the dispenser is simple and requires very
little time.
Follow the instructions for operation and maintenance in this manual so
that the dispenser works well.
*) Optional: a cold water system can be connected to the machine.
**) Optional: an extra tap water system can be mounted in the machine.
Caution!
- Read the safety instructions carefully.
- Do you have any questions? Ask your Cafi tesse system
supplier.
- The manufacturer and DECS International are not
liable for any damage and/or injury if the dispenser is
not operated and maintained in accordance with these
instructions.
© Decs Int. - 2006
We reserve the right to change the design and specifi cations.
Cafitesse_C60_EN.indd 1Cafitesse_C60_EN.indd 1 18-12-2007 16:53:2118-12-2007 16:53:21

2
Safety instructions
Operation
Installation, programming and setting up should be done by a service
technician or other authorized person. For safety reasons, never remove
the housing.
Do not use the ”CAFITESSE 60” dispenser for any other purpose than the
purpose for which it was intended. The dispenser is intended for indoor
use only, at an ambient temperature of between min. +1 °C (33.8 °F) and
max. +32 °C (89.6 °F).
Do not position the dispenser too close to a drain (damp) or cooking
equipment (heat). Ensure that the dispenser is not stored in places
where the surrounding temperature is lower than +1 °C (33.8 °F). If the
dispenser is nevertheless frozen, disconnect the power and the water
supply and call the service technician.
Warning The liquids that are dispensed by the dispenser are hot.
To prevent burns to the hands and other parts of the body,
they should be kept away from the beverage outlet after
pressing a selection button.
Do not leave children unattended near the dispenser.
The capacity of the drip tray is limited to approx. 1000 ml (1 decanter).
You must empty the drip tray regularly. Also empty the drip tray if coffee, a
drink or water has been dispensed without there being a cup or decanter
in position.
Turn the dispenser off at the power switch when it will not be used for an
extended period (for example, at night or at the weekend). Unplug the
power cord only if there is a malfunction. When the power cord is not
plugged in to a power outlet, the cooling system does not operate and the
ingredients will not be cooled. In this case, place the ingredient packs in
the refrigerator.
For hygienic and functional reasons, clean the dispenser daily in
accordance with the manual cleaning procedure and use the automatic
cleaning procedure for periodic cleaning; see the description in this
manual.
Always observe basic hygiene. Use only food-grade cleaning agents for
the coffee dispenser. Clean the dispenser parts with a clean, damp cloth.
Do not spray or splash the equipment with water and never submerge it
in water.
Make sure that there is suffi cient space around the dispenser for
ventilation and keep the front and back accessible for repair purposes.
The dispenser may tilt a maximum of 5°.
Read the instructions in the appropriate chapter fi rst (see the table of
contents) before moving the dispenser.
Cafitesse_C60_EN.indd 2Cafitesse_C60_EN.indd 2 18-12-2007 16:53:2118-12-2007 16:53:21

3
For dispensers with a fixed water connection:
Connect the equipment to a manually operated tap. Use the connecting
hose supplied.
Warning: Never connect the dispenser to a source that supplies
polluted or biologically contaminated water. If a water fi lter
is included, it is exclusively intended for the elimination
of undesired fl avours and aromatic substances (such as
chlorine).
For dispensers without a fixed connection:
Warning: Use only fresh, clean drinking water to (re)fi ll the water tank.
For the best water quality, you should fi ll the cold water tank
with fresh tap water each morning.
Storing the ingredient packs
Ensure that the dispenser cooling compartment is properly closed at all
times. If it is not, the quality of the coffee or drink can degrade.
Store defrosted coffee and ingredient pack in the refrigerator only at a
temperature of 6 °C (42.8 °F).
Always check the expiration date on the coffee or ingredient pack (“use
by”) and use the coffee or ingredient pack that has been in storage the
longest. Write the placement date on the pack before you place the pack
in the dispenser.
Do not refreeze the coffee or ingredient packs again after they have
thawed out. This will have a detrimental effect on the quality and the taste.
Electricity
Warning: Ensure that the power cord and the dispenser are never
submerged in water or any other liquid.
Warning: Never insert the power cord plug into the power outlet (or
remove it) if either the plug or the power outlet is wet or has
been touched with wet hands.
Warning: Never switch on a dispenser if the power cord or power plug
is damaged. The power cord may only be replaced by a
service technician or other authorized personnel.
Warning: Never connect the dispenser to a power outlet with
characteristics other than those indicated on the label.
Warning: Because of the risk of fi re and electric shock only replace
the power cord with an original power cord as provided by
the equipment manufacturer. As the part number of the
power cord may differ per country, contact your Cafi tesse
system supplier for the correct part or part number.
Connect the dispenser to a grounded circuit only. The dispenser must be
connected to an electrical circuit with an extra protection or preferably a
circuit with a ground leak switch.
When the dispenser is moved, ensure that the capacity of the electrical
installation is not exceeded when the plug is inserted in the power outlet
at the new location.
Cafitesse_C60_EN.indd 3Cafitesse_C60_EN.indd 3 18-12-2007 16:53:2118-12-2007 16:53:21

o
k
l
m
n
j i
h
gfedba c
4
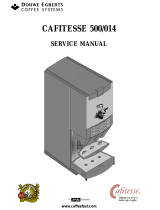
Description of the dispenser “CAFITESSE 60”
Fig. 1 Important parts
a. Removable water tank*
b. Cover, water tank*
c. Descaling opening
d. Door
e Cooling compartment
f. Ingredient packs
g. Cleaning sticker
h. Trough
i. Drip grid
j. Drip tray
k. Operating panel
l. Beverage outlet
m. Hot water outlet**
n. Display
o. Power switch (touch control)
*) Only on model with removable water
tank.
**) Optional for the Cafi tesse 61
Also cold water outlet if connected to
a cold or extra tap water system.
Cafitesse_C60_EN.indd 4Cafitesse_C60_EN.indd 4 18-12-2007 16:53:2118-12-2007 16:53:21

a
g
f
e
d
bc
j
i
h
o
k
l
m
n
p
q
r
s
tu
5
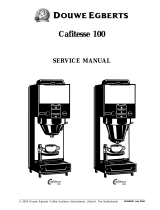
Display pictograms
a. Caution, hot drink is dosed
b. Cleaning
c. Trough
d. Operator mode
e. Service mode
f. Ingredient packs, left and right
g. No water
h. Steaming cup, select drink
i. Crossed out cup, you can’t select a drink
j. Thermometer, boiler temperature
k. Eco (energy saving mode)
l. Descaling pictogram, descaling program
m. Text
n. Scroll button (navigation/selection)
o. Info
p. Numeric specifi cation
q. Degrees Fahrenheit/percentage
r. Degrees Celsius
s. Scroll button (navigate/selection)
t. Enter button (back/confi rm)
u. Back button (back/cancel)
Cafitesse_C60_EN.indd 5Cafitesse_C60_EN.indd 5 18-12-2007 16:53:2118-12-2007 16:53:21

c
d
a
b
STOP
d1
b
a
c
d
STOP
6
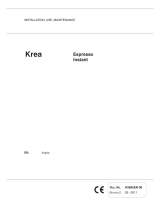
Operating panel (tapping beverages) Programming buttons
hot water
SELECT DRINK
390F
Fig. 2 Operating panel (tapping beverages)
a. Selection buttons*
b. Display
c. Stop button
d. Hot water button*
d1. Cold water button**
*) The stop button and the upper selection button pressed
together give access to operator menu.
**) Optional:
If the machine is connected to a cold water or tap water system.
Fig. 3 Programming buttons
a. Scroll button (navigation/selection)
b. Scroll button (navigation/selection)
c. Back button (back/cancel)
d. Enter button (back/confi rm)
hot water
COUNTER READ
cold water
Cafitesse_C60_EN.indd 6Cafitesse_C60_EN.indd 6 18-12-2007 16:53:2118-12-2007 16:53:21

STOP STOP
7
Caution!
- Never remove the plug from the
power outlet to turn the dispenser off!
- The cooling system can not operate
without power, allowing the quality of
the ingredients to degrade.
Switching on the dispenser
1. Insert the plug into the power outlet.
2. Press the power switch (fi g. 4).
● The water in the boiler is heated.
● A fl ashing thermometer shows in the
display and the message “PLEASE
WAIT”.
● When the water has reached the set
temperature, a coffee cup shows in the
display with the message “SELECT
DRINK” (fi g. 5).
The dispenser is now ready for use.
Switching off the dispenser
1. Press the power switch (fi g. 4).
● The boiler is now switched off.
● The cooling system remains in operation.
● The display shows the message:
“SWITCHED OFF” (fi g. 6).
The cooling system is only switched off when
the plug is removed from the power outlet.
Fig. 4 Plug + switch Fig. 5 Dispenser ready for use Fig. 6 Dispenser switched off
Operation of the dispenser
select drink
390F
SWITCHed OFF
1000
Cafitesse_C60_EN.indd 7Cafitesse_C60_EN.indd 7 18-12-2007 16:53:2218-12-2007 16:53:22

a
ab
c
8
Filling the water tank
The model without a fi xed water connection is
equipped with a removable water tank.
When the “NO WATER” symbol (fi g. 7) shows
in the display, the water tank (fi g. 8 a) must be
fi lled:
1. Remove the lid (fi g. 8 b).
2. Lift the water tank by the mounting from the
dispenser (fi g. 8 c).
3. Empty the water tank, rinse it and fi ll it with
clean, fresh drinking water to the “max.”
mark.
● You should fi ll the water tank with fresh
water each day to maintain the best
water quality.
4. Replace the water tank and lid.
The dispenser is now ready for use.
Fig. 7 Filling the water tank Fig. 8 Water tank model
no water
Cafitesse_C60_EN.indd 8Cafitesse_C60_EN.indd 8 18-12-2007 16:53:2218-12-2007 16:53:22

ab
de
c
f
9
Placing/replace ingredient pack
The dispenser shows a symbol in the display
when an ingredient pack is empty. Place/
replace the pack when the “pack empty” symbol
(fi g. 9 b, c or d) shows in the display. (See also
§ “Display messages and troubleshooting” for
more information).
Optional:
The dispenser shows a symbol (fi g. 9 e or f) in
the display when an ingredient pack is almost
empty and the “ALMOST EMPTY” warning
is set, see fi g. 66. Place a new pack in the
refrigerator to defrost, when the “ALMOST
EMPTY” symbol shows. So the pack will be
ready for exchange, when it is completely
empty.
If the AED is active the dispenser askes, during
placing the ingredient packs, if it is a new pack,
and (optional) if it is a small one.
1. Open the cooling compartment door.
2. Lift the empty pack out of the dispenser
(fi g. 10)
● Be careful of splashes, drops can come
out of the dispensing spout.
3. Throw away the empty pack.
4. Clean the interior of the cooling
compartment with a clean, damp cloth.
5. Always check the use-by date on the new
pack.
● Never use a pack whose use-by date
has expired.
● Always use the pack that has been in
storage the longest.
6. Follow the instructions on the pack.
a. Shake the pack at least 10 times.
b. Check whether the pack is fully
defrosted.
c. Fold open the dispensing spout.
7. Place the new ingredient pack in the cooling
compartment. Ensure that the dispensing
spout is properly positioned through the
hole in the cooling compartment!
● When the “ALMOST EMPTY” warning is
set the display shows: “NEW PACK”?
8. Do nothing if the former pack is replaced,
e.g. during cleaning.
9. Press the enter button to confi rm if a new
pack is placed.
● When also the option “small pack” is set,
the display shows: “SMALL PACK”?
10. Do nothing if a large pack is placed.
11. Press the enter button to confi rm if a small
pack is placed.
12. Close the cooling compartment door.
Fig. 9 Indication in the display Fig. 10 Replace ingredient packs Fig. 11 Pay attention to the use-by date!
(= optional) (= optional)
Caution!
Check the use-by date.
Check the pack is fully
defrosted.
SELECT DRINK
390F
SELECT DRINK
390F
SELECT DRINK
390F
SELECT DRINK
390FSELECT DRINK
390F
SELECT DRINK
390F
Cafitesse_C60_EN.indd 9Cafitesse_C60_EN.indd 9 18-12-2007 16:53:2218-12-2007 16:53:22

b
STOP STOP
10
Dispensing a cup of drink
1. Place a cup on the drip grid under the right-
hand outlet (fi g.12).
Caution!
- Liquids from the dispenser are hot.
Avoid burns!
- Use the dispenser only when the
trough has been installed correctly.
When the dispenser is used without
the trough, the hot water can splash
around.
2. Press one of the right-hand selection
buttons (fi g. 13). (Not on the pot button, if
present).
● Now the dispenser dispenses the drink
from the right-hand outlet (fi g. 13 b) and
stops automatically after one cup has
been dispensed.
3. Press the stop button (fi g. 14) to stop
dispensing earlier, for example if you want
the cup to be less full.
● The stop button can be pressed at any
time to stop dispensing (fi g. 14).
If the selection button has been programmed
for continuous dispensing:
(Please note, this option doesn’t function with
mixed drinks, e.g. cappuccino.)
4. Keep the selection button pressed until you
have obtained the desired quantity of drink.
5. Release the button when you have obtained
the desired quantity.
The supplier can change this setting on request.
Fig. 12 Place a cup under the outlet Fig. 13 Select the desired drink Fig. 14 Stop button
SELECT DRINK
390F SELECT DRINK
390F
Cafitesse_C60_EN.indd 10Cafitesse_C60_EN.indd 10 18-12-2007 16:53:2218-12-2007 16:53:22

b
STOP STOP
11
Dispensing a pot of drink
1. Place a pot under the right-hand outlet
(fi g. 15).
● Use only the accompanying 0.9 liter
coffee pot (1 pot is supplied with the
dispenser).
Caution!
- Liquids from the dispenser are hot.
Avoid burns!
2. Press the selection button for a pot of drink
(fi g. 16).
● Now the dispenser dispenses the drink
from the right-hand outlet (fi g. 16 b) and
stops automatically after one pot has
been dispensed.
3. Press the stop button to stop dispensing
earlier, for example if you want the pot to be
less full (fi g. 17).
● The stop button can be pressed at any
time to stop dispensing (fi g. 17).
The supplier can change the standard pot
setting on request.
Fig. 15 Place a pot under the outlet Fig. 16 Select the pot button Fig. 17 Stop button
SELECT DRINK
390F SELECT DRINK
390F
Cafitesse_C60_EN.indd 11Cafitesse_C60_EN.indd 11 18-12-2007 16:53:2218-12-2007 16:53:22

e
STOP STOP
12
Dispensing hot water*
1. Place a cup on the drip grid under the left-
hand (hot water) outlet (fi g. 18).
Caution!
- Liquids from the dispenser are hot.
Avoid burns!
*) Optional:
If the machine is connected to a cold water
or extra tap water system, cold water can be
dispensed likewise by pushing the cold water
button.
2. Press the selection button for hot water
(fi g. 19).
● Now the dispenser dispenses hot water
from the left-hand outlet (fi g. 19 e) and
stops automatically after one cup has
been dispensed.
3. Press the stop button (fi g. 20) to stop
dispensing earlier, for example if you want
the cup to be less full.
● The stop button can be pressed at any
time to stop dispensing (fi g. 20).
If the selection button has been programmed
for continuous dispensing:**
4. Keep the selection button pressed until
the desired quantity of hot water has been
dispensed (fi g. 19).
5. Release the button when you have obtained
the desired quantity.
The supplier can change this setting on request.
**) Continuous dispensing is not possible with
the cold water option, it is only possible with
tap water.
Fig. 18 Hot water outlet Fig. 19 Hot water button/Cold water button* Fig. 20 Stop button
SELECT DRINK
390F SELECT DRINK
390F
CW
HW
Cafitesse_C60_EN.indd 12Cafitesse_C60_EN.indd 12 18-12-2007 16:53:2218-12-2007 16:53:22

a
90 ˚C /194 ˚F
a
b
13
Caution!
- You may only move the dispenser
when you have disconnected the
power cord from the power supply.
- The boiler contains hot water, that
can come out of the dispenser when
you tilt it, lift it up or move it.
- The drained water can be hot.
Wear protective gloves.
- Contact the service provider for
moving the model with a fi xed water
connection!
Preparation
1. Switch the dispenser off.
2. Remove the plug from the power outlet.
3. Remove the ingredient packs from
the dispenser and place them in the
refrigerator.
4. Remove and empty the water tank
(fi g. 21 a).
5. Using the drain hose, drain all the water
from the dispenser (fi g. 22 a):
a. Remove the drip tray with grid.
b. Pull the drain hose approx. 12 in. (30
cm) out of the rear wall (fi g. 22 a).
c. Slide the unit to the edge of the surface
on which it is positioned.
d. Place a container with a capacity of
at least 2.5 liter under the drain hose
(fi g. 23).
e. Remove the cap (fi g. 22 b) from the
drain hose and allow the water to fl ow
into the container (fi g. 23).
f. Replace the cap on the drain hose and
push the hose all the way back.
6. Clean the dispenser with a clean, damp
cloth; especially around the left and right-
hand outlets.
The dispenser can now be moved.
Fig. 21 Water tank Fig. 22 Drain hose Fig. 23 Draining
Moving the dispenser with water tank
approx. 2.5l
Cafitesse_C60_EN.indd 13Cafitesse_C60_EN.indd 13 18-12-2007 16:53:2218-12-2007 16:53:22

14
Caution!
- You may only move the dispenser
when you have disconnected the
power cord from the power supply.
- Always use a serving trolley or
something similar to move the
dispenser (26.5 kg).
- Move the trolley carefully to avoid
sudden movements, bumps or
shocks that might risk the dispenser
to tilt or fall from the trolley.
- Never use the dispenser on a server
trolley as a mobile station to dispense
hot drinks.
- When installing the dispenser on the
new location, ensure the placement
complies with the safety instructions
on page 2.
Make sure that there is suffi cient
space around the dispenser for
ventilation.
- Ensure that the dispenser does
not overload the local electrical
installation.
Moving the dispenser
1. Lift the dispenser carefully onto a serving
trolley or something similar to move the
dispenser.
2. Keep the dispenser upright and do not
shake it while moving it.
3. Position the dispenser on a smooth,
horizontal and stable surface that can
support the weight of the dispenser
(26.5 kg).
4. Position the drip tray and grid in front of the
unit.
5. Insert the plug into the power outlet
(fi g. 25).
6. Switch the dispenser on at the power switch
(fi g. 25).
7. Place the ingredient packs (fi g. 26).
8. Fill the water tank with clean, fresh drinking
water.
The dispenser is now ready for use.
Fig. 24 Moving on a serving trolley Fig. 25 Plug + switch Fig. 26 Place ingredient packs
Cafitesse_C60_EN.indd 14Cafitesse_C60_EN.indd 14 18-12-2007 16:53:2218-12-2007 16:53:22

STOP
c
STOP
d
a
b
15
The dispenser has an operator menu in which
you can perform a number of special tasks:
● Counter readings
● Cleaning (automatic, periodic cleaning
procedure)
● Changing the settings such as:
- clock setting (date and time)
- language (in display)
- text (on or off)
- almost empty (AED on/AED off)
- adjust volume (volume per cup)
(optional)
- adjust strength (optional)
● Descaling (optional)
● Service mode (optional, only for service)
The operator menu leads you through the
programming step by step. The display shows
a message and/or instruction to tell you what
actions must/can be performed.
To activate the operator menu:
1. Keep the stop button pressed;
2. Now press the topmost selection button too
(fi g. 27);
3. Keep both buttons pressed until
“OPERATOR MODE” appears at the top
right-hand of the display;
4. Release the buttons.
In the operator menu, the selection buttons
become programming buttons (fi g. 28).
● Enter button (fi g. 28 d), to confi rm your
selections.
● Scroll buttons (fi g. 28 a and b) (navigation/
selection), to page through the menu and
select options.
● Stop button (back) (fi g. 28 c), to cancel your
changes and go back one level in the menu
and to exit the operator mode.
Fig. 27 Access to the operator menu Fig. 28 Program buttons
Access to the operator menu
counter read
SELECT DRINK
390F
Cafitesse_C60_EN.indd 15Cafitesse_C60_EN.indd 15 18-12-2007 16:53:2318-12-2007 16:53:23

STOP
d
STOP STOP
a
b
c
16
Counter readings consumptions*
In the operator menu, from the
“COUNTER READ” selection menu, you can
read out various counters. Some of those
counters can also be reset.
ONLY READING OUT:
- “TOTAL RTD” (Ready To Drink):
Total volume in liters of all consumptions
(coffee and hot water);
- “TOTAL CON L”:
Total amount of liters ingredient from the left
ingredient pack;
- “TOTAL CON R”:
Total amount of liters ingredient from the
right ingredient pack.
*) Optional
If the machine is connected to a cold water
or extra tap water system, cold water
consumptions can be read out/resetted too.
READING OUT AND RESETTING:
- “TOTAL FILTER”:
Total amount of liters water passed through
the water fi lter (option);
- “BUTTON 1 (2, 3 or 4) POR”:
Amount of consumptions (portions)
measured by selection button 1, 2, 3 or 4.
- “BUTTON 1 (2, 3 or 4) RTD”:
Total volume in liters of all consumptions
measured by selection button 1, 2, 3 or 4.
- “HOTWATER POR”:
Amount of consumptions measured by the
hot water button;
- “HOTWATER RTD”:
Total volume in liters of consumptions
measured by the hot water button;
- “C.WATER POR”:*
Amount of consumptions measured by the
cold water button;
- “C.WATER RTD”:*
Total volume in liters of consumptions
measured by the cold water button.
READING OUT AND RESETTING THE
COUNTERS:
1. Activate the operator menu (fi g. 29), see
also § “Access to the operator menu”
(fi g. 27).
● The display shows: operator mode
“COUNTER READ”, scroll arrows ,
enter and back (fi g. 28).
2. Press the enter button (fi g. 30 d). The
display shows the total counter
“TOTAL RTD” (fi g. 31).
Fig. 29 Access to the operator menu Fig. 30 “COUNTER READ” selection menu Fig. 31 Total counter
counter read
SELECT DRINK
390F total rtd
390F
Cafitesse_C60_EN.indd 16Cafitesse_C60_EN.indd 16 18-12-2007 16:53:2318-12-2007 16:53:23
/