Page is loading ...

OPERATING INSTRUCTIONS
CAFITESSE 300
B-2224
PressPress


01.00 1
Contents
CONTENTS
Introduction ..........................................................................................................................3
Safety Instructions...............................................................................................................4
Technical Data......................................................................................................................5
Dispenser Components.......................................................................................................6
Operation ..............................................................................................................................8
Discription of Operating Elements .........................................................................................8
Putting into Operation ............................................................................................................8
Cup Carrier ..........................................................................................................................10
Delivery per Cup/Pot............................................................................................................10
Delivery of Beverages..........................................................................................................11
Hot Water Delivery ...............................................................................................................12
Switching off the Dispenser .................................................................................................13
Counter ................................................................................................................................13
Concentrate Treatment......................................................................................................14
Concentrate Treatment ........................................................................................................14
Replacing the Concentrate Pack .........................................................................................14
Cleaning and Maintenance................................................................................................16
General Instructions .............................................................................................................16
Maintenance Time Schedule ...............................................................................................16
Daily Cleaning - Cleaning the Outside of the Dispenser......................................................17
Daily Cleaning - Cleaning the Drip Grid and the Drip Tray ..................................................17
Weekly Cleaning - Cleaning the Cup Carrier (if installed)....................................................18
Weekly Cleaning - Cleaning the Trough Junction................................................................18
Weekly Cleaning - Cleaning the Outlet Trough....................................................................19
Weekly Cleaning - Cleaning the Trough Support.................................................................19
Weekly Cleaning - Cleaning the Cooling Compartment.......................................................20
Trouble Shooting ...............................................................................................................21

201.00

01.00 3
Introduction
INTRODUCTION
The dispenser has to be installed on a ta-
ble or a similar piece of furniture. It is to
be used only to deliver coffee, decaf, tea
or hot water.
To operate the dispenser you need liquid
beverage concentrates stored in non-re-
turnable packs.
If the dispenser is used for any other pur-
pose than indicated in these instructions,
the manufacturer will not pay for any da-
mages.
Several functions can be programmed by
our service technicians to suit your indivi-
dual requirements.
Before putting the dispenser into
operation, it is necessary to read
the chap. "Safety Instructions".
The following options are available for the
dispenser:
portion selector buttons
additional outlet
operation with coins
delivery counter
operating unit for waiters
(These options will not be described in the
operating instructions. Contact our service
technicians for further information.)

401.00
Safety Instructions
SAFETY INSTRUCTIONS
●Before putting the dispenser into ope-
ration, the operating instructions must
be read and understood.
●If the user
- cannot read, he must ask somebody
to read it out to him.
- does not know this language, he
must ask somebody to translate it
for him.
The liquids delivered by the dis-
penser are very hot! In order to
prevent scalds, take your hands
and other parts of the body out of
the beverage delivery area before
pressing any delivery button. Stay
away from that area.
Keep children off the dispenser!
If the delivered beverages have a
lower temperature, e. g. when too
many deliveries have been carried
out in short intervals, observe the
national regulations. (Sterilization
cannot take place. There is danger
of bacteria.)
●Regular cleaning of the dispenser is
necessary for functional and hygienic
reasons.
When cleaning, be aware of sharp
edges. There is danger of injuries!
Switch the power switch to "0" before
pulling out the power supply plug.
Before cleaning the dispenser pull out
the power supply plug.
●Clean the dispenser inside and outside
with a wet, neat cloth; do not spray it
off. Use only cleaning agents approved
by the food industry for cleaning the
dispenser.
●The dispenser must be connected to
the drinking water system and to the
electric system following local regula-
tions.
Check whether the power supply corre-
sponds with the values given on the
rating plate. The dispenser must be
connected to an electric circuit which is
secured by an extra fuse (for fuse data
see the rating plate). The connection
must be made using a safety plug
socket earthed according to the regula-
tions.
Follow local regulations!
●If the dispenser will not be used for a
longer period of time (e. g. at night or
during the weekend), close the water
cock. Switch the power switch to "0".
Do not pull out the power supply plug
because otherwise the cooling system
will not function any more.
●The dispenser must not be used when
the water supply is interrupted because
otherwise the boiler will not be refilled.
●Do not switch off the dispenser bet-
ween beverage deliveries in order
to keep the optimum water temperature
in the boiler.
●Use only original spare parts.
●Programming and repairing the dispen-
ser must be performed by trained ser-
vice technicians only.

01.00 5
TECHNICAL DATA
The technical data of each dispenser type are given on the rating plate.
Dimensions: Height: 740 mm / 29 inch (without foot extension)
Width: 430 mm / 17 inch
Depth: 520 mm / 20 inch
housing made of stainless steel
Weight: 47 kg / 104 lb (empty)
Water connection: Drinking water line with stop valve. Connection to hot water supply via
copper pipes only.
Supply system requirements:
Temperature: max. 95°C / max. 203°F
Dynamic pressure: min. 0.8 bar/ min. 11 psi
Static pressure: max. 10 bar/ max. 140 psi
Water filling capac.: 9 l / 304 Floz, open boiler
Cooling: Compressor cooling with thermostat control
Power consumption: 100VA
Beverage capacity: 10 l/338 Floz per hour and KW heating capacity
Concentrate capac.: Concentrate pack 2 x 2 l/67.6 Floz
Electric connection: Only via power supply plug, otherwise a contact breaking device con-
trolling all poles must be installed in the power supply system.
You must earth the dispenser!
In addition, we recommend to install a fault current safety switch.
Length of power
supply cable: approx. 1.80 m / 6 feet
Further requirements Height: up to 2.000 m / 6.562 feet
for installation: Ambient temperature: 10°C/50°F, max. 32°C/max. 90°F
The dispenser is drip-proof.
Accessories: Cleaning brush, foot extensions, foot insets, cup carrier, connecting
piece for water inlet
Subject to changes!
Technical Data

601.00
PressPress
Dispenser Components
1
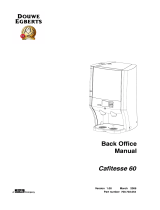
DISPENSER COMPONENTS (FIG. 1)
1 Display "ready for operation"
2 Concentrate pack - empty indicators
left-hand side = left concentrate pack
right-hand side = right concentrate pack
3 Delivery button/hot water
4 Delivery buttons for product delivery on left/right-hand side
5 Drip tray
6 Drip grid
7 Door lock
8 Operating panel
9 Dispenser door
9
8
7
6
5
1
2
3
4

01.00 7
13
12
11
Dispenser Components
2
DISPENSER COMPONENTS
(FIG. 2)
10 Cooling compartment door
11 Counter
12 Reset button
(functions only if a mechanic counter is
installed)
13 Power switch (open the door to get ac-
cess)
10

801.00
Operation
DESCRIPTION OF OPERATING ELEMENTS
3
1
PUTTING INTO OPERATION
●Open the water cock.
●Open the dispenser door and switch
the power switch (1) to position "I".
(Fig. 3)
3 Delivery button/hot water: (Fig. 1)
Delivery of hot water by pressing the
push button.
4 Delivery buttons for product delivery
on left/right-hand side: (Fig. 1) Delivery
of hot products by pressing the push
buttons.
Note:
Only one beverage can be delivered at
the same time.
Either the left product, the right product
or hot water.
13 Power switch (Fig. 2)
I= all functions ON
0= all functions OFF (except cooling)
1 Display "ready for operation" (Fig. 1)
Lights as soon as the dispenser is
ready for operation. Connected to the
power supply (power switch switched
to "I" and dispenser door closed).
2 Concentrate pack - empty indicators:
(Fig. 1)
Light off = ready for operation
Lights red = Concentrate pack of
the unit empty.
Delivery stopped.
Replace the pack.
Both flash = Indicates a malfunction.
Delivery stopped.
Call the service.

01.00 9
Press Press
PressPress
Operation
4
21
5
●Close the dispenser door. The display
"ready for operation" will light (1).
(Fig. 4)
●When the empty indicator (2) lights
red, the corresponding concentrate
pack is empty and has to be replaced.
(Fig. 4)
●If the dispenser has been out of opera-
tion for a longer period of time (e. g.
during the weekend), actuate the push
button/hot water (1) and drain approx.
2 l of water. (Fig. 5)
1

10 01.00
Operation
6
CUP CARRIER
●Insert the cup carrier rod (1) in the po-
sition of the drip grid you wish. (Fig. 6)
●Plug the cup carrier (2) onto the cup
carrier rod (1). (Fig. 6)
●Tighten the knurled-head screw (3) at
the height of the cup carrier you wish.
(Fig. 6)
2
1
3
DELIVERY PER CUP/POT
●Prior to the delivery of coffee, adjust
the height of the cup carrier.
●Prior to the delivery of coffee, swing
up the cup carrier (1), and place the
pot on the drip grid. (Fig. 7)
7
1

01.00 11
Operation
DELIVERY OF BEVERAGES
The liquids delivered by the dispenser
are very hot.
In order to prevent scalds, take your
hands and other parts of the body out
of the beverage delivery area before
pressing the delivery buttons or the
delivery button/hot water.
8
12
●Depending on how the dispenser has
been programmed by our service tech-
nicians, it can be used as follows:
- as a 1-product dispenser
the same product on both sides
(a mechanical trough junction is re-
quired)
The product on the left-hand side is
consumed first. If this concentrate
pack is empty, the dispenser will
automatically switch over to the
pack on the right-hand side.
- as a 2-product dispenser (Fig. 8)
different products on the left (1) and
right-hand side (2)
●Depending on how the dispenser has
been programmed by our service tech-
nicians, the beverage will be delivered
in the following modes when actuating
one of the delivery buttons (1, 2) (Fig.
8):
- Exactly one portion is delivered
when the push button is pressed.
- The delivery is constantly repeated,
with an interruption of 0.3 sec. as
long as the corresponding push but-
ton (1 or 2) is pressed.
- The delivery is continuous and unin-
terrupted.
PressPress

12 01.00
9
Operation
HOT WATER DELIVERY
The liquids delivered by the dispenser
are very hot.
In order to prevent scalds, take
your hands and other parts of the
body out of the beverage delivery
area before pressing the delivery
buttons or the delivery button/hot
water.
●For the delivery of hot water, actuate
the delivery button/hot water (3).
(Fig. 9)
●As long as the delivery button/hot wa-
ter is pressed, the delivery is conti-
nuous and uninterrupted.
●When the delivery button/hot water is
released, the delivery will be interrup-
ted.
PressPress
3

01.00 13
Operation
10
2
1
SWITCHING OFF THE DISPENSER
●Switch the power switch (1) to position
"0" (Fig. 10).
●If the dispenser will not be used for a
longer period of time (e. g. during the
weekend), close the water cock.
Do not pull out the power plug be-
cause otherwise the cooling system
will not function any more.
COUNTER
●The counter (2) counts the number of
deliveries for the three delivery buttons
separately. (Fig. 10)
●For this, the counter must have been
activated by our service technicians.
●Reading the counter:
- Open the dispenser door.
- Switch the power switch (1) to
position "I". (Fig. 10)
- Press the delivery button you
wish.
The counter will show the number of
deliveries carried out by means of this
push button.
Note:
If no push button is actuated, the
counter will show automatically the
number of deliveries of the left product.

14 01.00
CONCENTRATE TREATMENT
(FIG. 11)
●Store the concentrate pack in a deep
freezer at -18°C/0°F or colder.
●Let it thaw in a refrigerator at
+2°C/36°F to +6°C/43°F
(approx. 3 - 5 days).
When filled into the dispenser, the con-
centrate should be consumed within
3 weeks.
●Do not thaw the concentrate in hot wa-
ter or in a microwave oven.
Concentrate Treatment
min. 5 days
11
REPLACING THE CONCENTRATE
PACK
●A red light (1) indicates that one con-
centrate pack is empty. It will extin-
guish when the pack has been repla-
ced. (Fig. 12)
1
12
max. 1 year max. 3 weeks
●Always consume the oldest concentra-
te pack first.
●Use only appropriate concentrates.
●Storage temperatures
Refrigerator: +6°C/43°F
Deep freezer: -18°C/0°F or colder
PressPress

01.00 15
Concentrate Treatment
14 15
●Open the dispenser door.
●Open the cooling compartment door.
●Remove the empty concentrate pack.
●Take a thawed concentrate pack out of
the refrigerator. Shake it very well.
(Fig. 13).
●Remove the cellophane cover and pull off
the flap along the perforated line. Then
pull out the dosing tube. (Fig. 14).
●Slide the dosing tube into the slotted
opening of the pack so that the pack
fits well into the red groove of the do-
sing tube.
●Slide the dosing tube backwards until
it rests against the edge of the pack
opening. (Fig. 15).
13

16 01.00
CLEANING AND MAINTENANCE
GENERAL INSTRUCTIONS
●Switch off the power switch before
starting to clean the dispenser.
Observe the cleaning instructions at
the dispenser.
●Carry out all instructions given in the
maintenance time schedule. Observe
the indicated intervals. Otherwise any
warrenty claims will not be fulfilled.
●Use only cleaning agents approved by
the food industry. Do not use any
scouring agents to clean the outlet
troughs and the housing.
Make sure that all parts are instal-
led properly after having cleaned
the dispenser.
Cleaning and Maintenance
●To guarantee proper execution of all
procedures, read the corresponding
sections in these operating instructions
before starting to carry them out.
When cleaning the dispenser, be
aware of sharp edges. There is
danger of injuries!
Never clean the dispenser under
running water. It suffices to clean it
with a wet cloth.
MAINTENANCE TIME SCHEDULE
Interval Kind of work
Daily cleaning Cleaning the outside of the dispenser
Cleaning the drip grid and the drip tray
Weekly cleaning Cleaning the cup carrier (if installed)
Cleaning the trough junction
Cleaning the outlet trough
Cleaning the trough support
Cleaning the cooling compartment

01.00 17
Cleaning and Maintenance
16
CLEANING THE DRIP GRID AND
THE DRIP TRAY
●Remove the drip grid (1) and the drip
tray (2) and clean them in hot water to
which a small amount of detergent has
been added. (Fig. 16)
●Rinse the drip grid (1) and the drip tray
(2) with clean water, dry and then reinsert
them. (Fig. 16)
After cleaning, mount the drip tray
with the drip grid in the correct po-
sition on the dispenser. Otherwise
water can drop on the floor (dan-
ger of injuries).
12
DAILY CLEANING
CLEANING THE OUTSIDE OF
THE DISPENSER
●Clean the outside of the dispenser daily
with a wet, neat cloth.

18 01.00
Cleaning and Maintenance
19
18
CLEANING THE TROUGH
JUNCTION
●Open the dispenser door.
●Compress the claws (1) of the trough
junction (2) simultaneously with your
thumb and index finger and take it out.
(Fig. 18)
●Clean the trough junction in hot water
to which a small amount of detergent
has been added. (Fig. 19)
●Rinse the trough junction with clean water,
dry and then reinsert it. (Fig. 19)
1
2
17
1
WEEKLY CLEANING
CLEANING THE CUP CARRIER
(IF INSTALLED)
●Remove the cup carrier (1) and clean
it in hot water to which a small
amount of detergent has been added.
(Fig. 17)
●Rinse the cup carrier (1) with clean water,
dry and then reinsert it. (Fig. 17)
/