Page is loading ...

Cafitesse Excellence Compact
USER MANUAL ENGLISH (US)

1
Cafitesse Excellence Compact
Operator Manual
Safety 2
Part overview description 4
Technical data 6
Machine start up & storage 7
Hygiene and pack handling 8
Daily operations 10
Brewing a cup of coffee / hot water / pot of coffee 10
Ingredient pack replacement 12
Filling ingredient canister 13
Filling water tank 14
Cleaning 15
User programming 27
Troubleshooting 32

2
Safety
Symbols that can be found in this manual
The following symbols are used throughout this manual in combination with a statement to
emphasize important and critical information. Observe the statements to ensure safety and
prevent injury and product damage.
Note:
Gives additional information which may be helpful during the dispenser operation.
Caution:
Alerts against unsafe practices. Observe to ensure food safety, to prevent minor personal
injury, or damage to the dispenser.
Warning:
Indicates a potentially hazardous situation which, if not avoided, could result in serious injury
and even death.
Danger:
INDICATES A IMMINENTLY HAZARDOUS SITUATION WHICH, IF NOT AVOIDED, WILL RESULT
IN SERIOUS INJURY AND EVEN DEATH.
Operation, filling and cleaning of the dispenser must be restricted to authorized and trained
persons. Take care that new staff reads the operator manual before they operate the
dispenser and understand the safety and hygiene aspects. For quick reference a printed
cleaning instruction label or quick reference guide is included.
You may only use the dispenser according to the instructions in this operator manual for the
delivery of drinks. The manufacturer is not liable for any damage or injury resulting from
improper use of the dispenser or from non-compliance with the procedures described in this
operator manual.
This dispenser can be used by children aged from 8 years and above and persons with reduced
physical, sensory or mental capabilities or lack of experience and knowledge if they have been
given supervision or instruction concerning use of the appliance in a safe way and understand
the hazards involved.
Children should be supervised to ensure they do not play with the dispenser.
Cleaning and user maintenance shall not be made by children.
Installation, relocation (fixed water version), service and programming of the dispenser is
restricted to authorized service technicians. The service area is restricted to persons having
knowledge and practical experience of the appliance, in particular as far as safety and hygiene
are concerned.
This dispenser is not suitable for installation where a pressure washer may be used.
This dispenser must not be cleaned by a pressure washer.
The dispenser is not suitable for outdoor use.
Protect the dispenser against running water, splashes, spray or steam, heat and heavy dust.

3
The liquids delivered by the dispenser are hot!
Avoid scalding!
Keep hands and other body parts away from the dispenser while drinks are being dispensed
and during the rinsing program.
Do not place cups, pots, or containers filled with hot liquids on top of the dispenser.
There is the risk of being scalded, in case the cups/pots/containers fall down.
Keep sufficient space around the dispenser to get away easily in case of hot liquid splashes.
Never touch the power supply or power supply plug when your hands or the power cord or
plug are wet.
If the power cord of the dispenser is damaged, switch off the dispenser and contact your
system supplier for replacement.
Shield the dispenser from running water, splashes, spray or steam, heat or heavy dust.
The dispenser is designed for indoor installation on a stable flat surface such as a table or a
counter. Shield the dispenser from direct sunlight, frost and rain.
Make sure that there is sufficient space around the dispenser for ventilation, and front/back
sides are accessible for service.
Only use water hoses and connections in compliance with EN61770.
Connect the dispenser to the drinking water line in compliance with local regulations. In case
of cold drink options, test the quality of the water supply to ensure delivery of safe cold
drinks according to local regulations.
If the mains cable of the dispenser is damaged, switch the dispenser off and contact your
Cafitesse system supplier to have the mains cable replaced.
When connected to a wall outlet power supply, use a grounded safety plug socket in
compliance with local regulations. Ensure that the electric circuit is secured by means of a
fault current safety switch and that the power supply plug remains accessible after
installation.
Transport and storage
Always store and transport the dispenser in the original packaging. Before storing or
transporting the dispenser:
• Place the product packs in the refrigerator. Remove them from refrigerator if you plan to
storage the machine.
• Clean the dispenser.
• Contact your Cafitesse system supplier so that an authorized and trained service technician
can drain the water from the boiler and protect the dispenser against frost damage.
The dispenser may not be subject to frost during operation, storage or transport.

4
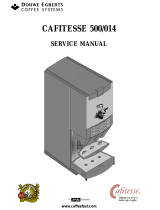
Part Overview Description
1. Drink buttons
2. Drink outlets
3. Hot water outlet
4. Cup tray
5. Drip tray
6. Dispenser door
7. Cooling compartment
8. WJM top tray
9. Fluid treatment panel
10. Stand by/lock dispenser button
11. Ingredient canister *
12. mixing bowl *
13. Internal water tank **
14. Air ventilation
15. Removable ventilation cover
16. Main socket
17. Water connection
* Only for machine with instant option.
** Only for machine with internal
water tank

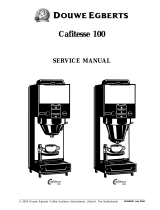
5
18. Display
19. Pre-selection buttons
20. STOP button
21. Port for USB key
22. Operator Mode: (up)
23. Operator Mode: (down)
24. Operator Mode: (enter)
25. Operator/service mode
26. The energy saving mode is active
27. Product pack left is empty
28. Product pack right is empty
29. Logo
30. Current day
31. Low temperature, boiler is heating up
32. LOCK
the dispenser is locked and cannot dispense drinks
33. DELIVERY BLOCKED
the dispenser cannot deliver the selected drink
34. FILTER, replace water filter
35. The internal water tank is empty, refill the tank
36. Descaling od the dispenser is needed
37. MESSAGE-linemessages are displayed to
guide you through the cleaning, programming
steps, or in case of errors
38. Strenght, mild, normal or strong drinks
39. The pre selection buttons can be lit in
different combinations and have different
functions depending on machine configuration.
If A+B is lit, volume, small, normal or large drink
If B+C is lit, add extra sugar (3 steps)
If only B is lit, add extra milk (3 steps)
40. INFO-field display of cooling compartment
temperature, time, error codes, etc.
41. Payment is enabled
42. CLEANING, the dispenser needs to be cleaned

6
Technical data
Dimensions
(H) 560mm x (W) 380mm x (D) 406mm
(H) 22 inch x (W) 15 inch x (D) 16 inch
Weight empty
empty
22 kg / 48.5 lbs
operational
24 kg / 52.9 lbs **27 kg / 59.2 lbs (with water tank option)
Cup
volume
Factory setting = 125 ml / 4.2 fl oz adjustable ±10%
dispensing time
10 - 20 seconds (125 ml / 4.2 fl oz)
Pot
volume
factory setting = 900 ml / 30.4 fl oz adjustable ±10%
dispensing time
110 seconds ±10%
max height
160 mm / 6.3 inch
Interval between pots
160 seconds (120 V)
Power supply
120 V 60 Hz
Power consumption
1.5 kW – 15A – 120 V
Capacity
120 V
180 cups per hour (± 22.5 liter / 25.94 gal)
Environment
temperature
1 °C – 32 °C / 34 ºF – 90ºF for both operation and storage
humidity
Up to 80% RH
Cooling compartment
capacity
Capacity 2x 1.25 liter / 2x 42.2 fl oz
temperature
2 °C – 5 °C / 35.6 ºF – 41 ºF
Canister capacity*
Chocolate
1.2 kg / 42.3 oz (~55 cups)
Topping
1.1 kg / 38.8 oz (~80 cups)
Tea
1.2 kg / 43.3 oz (~1700 cups)
Sugar
0.8 kg / 28.2 oz (~230 cups)
Instant coffee
0.7 kg / 24.7 oz (~350 cups)
Boiler
Volume
1.2 liter / 40.5 fl oz
Temperature
Adjustable between 83 ºC – 97 ºC / 181.4 – 206.6 ºF
Standard water
connection
1/2" or 3/8" supply line with 3/4" BSP connecting piece,
drinking water line with stop valve.
**Removable cold water tank, capacity 3 liter / 101.4 fl oz
Dynamic water
pressure
Min. 0.08 MPa at 10 l/min - 11 psi at 2.6 gal/min
Static water
Pressure
Max. 1.0 MPa - 140 psi
Highest noise emission
< 49 dB(A)
* Only for machine fitted with instant option.
** Only for machine fitted with internal water tank option.

7
Dispenser start up
Dispenser start up
1. Place the machine on a flat horizontal surface that
will support the weight of the machine.
2. Connect the water inlet hose A to A. And then open
the water tap
3. Connect the power cord B to B, and insert the
power plug C in the wall socket, the machine will
start automaticlly and fill up and heat the boiler
and cooling down the cooling compartment. Drink
delivery will be blocked until the water in the boiler
has reached the correct temperature.
Note:
The cooling of the product compartment can take
24 hours or more.
Dispenser storage
Please take the following preparations when the machine
is not to be used for a long period, e.g. holidays:
1. Remove the product packs and check the expiry date.
2. Store the product packs in a refrigerator until you
switch the dispenser back on again. When the expiry date
has passed, throw the product packs away.
3. Clean and flush the dispenser.
4. Pull the power plug out of the socket.
5. Close the water tap.
Note:
If the dispenser has been shut down
for longer periods, the date and time
must be set so the programmed cleaning
cycles and eco settings are reactivated.

8
Hygiene and pack handling
Always observe basic and personal hygiene.
Use only food-grade cleaning agents for the coffee dispenser. Clean the dispenser exterior parts
with a clean, damp cloth.
If your coffee machine features a water tank: refresh the water inside the tank if the machine is
not often used with fresh drinking water.
Ingredient pack handling <coffee pack placement>
The ingredient pack handling instructions are printed on the carton.
Observe hygiene: Wash hands before starting
Shake the pack at least 10 times and remove the plastic foil
Write date op opening and expiry dat on the carton.
Pull the perforated strip from the pack
Take the dosing tube out of the carton

9
Slide the dosing tube over the blue ring on the carton. The red
ring must cover the circle printed on the carton.
Ensure that the dosing tube is correctly placed, i.e. over the
carton box
Turn the pack upside down and place inside the machine.

10
Daily operations
Brewing a cup of coffee / hot water / pot of coffee
Cup of coffee or hot water
1. Place a cup on the drip grid under the middle outlet
for coffee (A) or left outlet for hot water (B).
2. Press a drink button
Warning:
The liquids dispensed by the dispenser are hot! Avoid
scalding!
Keep hands and other body parts away from the
dispenser while drinks are being delivered.
Never leave children unsupervised near the
dispenser.
The machine will dispense coffee or hot water from
the outlets depending on selection and stops after one
cup has been delivered (portioned flow).
If the dispenser is programmed for continuous flow:
Press the coffee or hot water button to start and keep
the button pressed until you have obtained the desired
amount of coffee or hot water.
The STOP button can be pressed at any moment to
cancel delivery.
Pot of Coffee
1. Place a pot under the middle (coffee) outlet and
press the pot button.
Warning:
The liquids dispensed by the dispenser are hot! Avoid
scalding!
Keep hands and other body parts away from the
dispenser while drinks are being delivered.
Never leave children unsupervised near the dispenser.
The machine will dispense coffee from the outlet and stop
after 0,9 litre / 30.4 oz of coffee has been delivered.
The STOP button can be pressed at any moment to cancel
delivery. You can also press the STOP button if you want to
obtain any amount of coffee less than 0,9 litre / 30.4 oz.
Your supplier can change the standard pot volume setting
on request.

11
Drink delivery with preselections
Your dispenser supports preselection options. The
service technician may activate preselection options
during installation. When the preselection button is
pressed, the following pre-selections can be activated
Strenght (mild, normal or strong drinks)
Volume (small, normal or large drinks)
Add extra sugar (3 steps)
Add extra milk (3 steps)
Note:
only one of volume, extra sugar and milk can be active
at one time.
If you press a preselection button, but do not press the
delivery button, the dispenser will return to the default
state after a few seconds.
Strenght preselection
1. Place your cup.
2. A bean icon (mild - normal - strong) is displayed.
3. Press a drink button. The drink will be delivered with the
selected strength.
Note:
If the icon A+B is lit the preselection button
is set for "volume".
If B+C is lit the preselection button
is set for "extra sugar".
If only B is lit the preselection button
is set for "extra milk".
Volume preselection example
1. Place your cup.
2. Press the preselection button VOLUME to activate this
preselection.
A cup icon (small - medium - large) is displayed.
3. Press the preselection button until the desired
portion size is marked.
4. Press a drink button. The drink is delivered with
the selected portion size.

12
Ingredient pack replacement
The display shows an icon when a pack is empty (or almost empty) at the left / right side or at
both sides (in this case the right pack is empty)
Please follow the instruction to replace a pack
information about pack handling here
Caution:
Never use a frozen or damaged product pack. Do not use a product pack if the "Best before"
date has expired.
Open the machine door to access the cooling
compartment and ingredient packs.
Take out the the empty ingredient pack and replace
with a new one.

13
Filling ingredient canister
Only for machines fitted with instant option.
1. Open the door, rotate and keep the outlet of canister is upward.
2.Take out the canister from the dispenser.
3. Fill the canister with desired ingredient.
4. Put the canister back into the dispenser, rotate the canister outlet back so it
points towards the mixer bowl, close the door and the machien is ready to use.

14
Filling water tank
Only for machines fitted with water tank option.
The display shows an icon when the internal water tank is empty (A). In
this state the machine will also be blocked from dispensing drinks (B), it
will be unlocked once the tank is refilled.
Please follow the instruction to refill the water tank.
1. Grab the tank in the handle at the front. push slightly up while pulling
the tank straight out.
2.Fill up the tank to the MAX indication (3L) with fresh and cold tap
water.
3. Put the water tank back into the dispenser. Push the tank all the way
in until it hooks in place at the front.

15
Cleaning
Navigation buttons
In operator and cleaning mode, 4 UI buttons are used to
enter cleaning mode and navigate the menus.
A STOP = back
B Drink button top right = UP
C Drink button middle right = DOWN
D Drink button bottom right = ENTER
Cleaning procedures
There are two different cleaning programs:
• “Flushing” the drink outlets
• “Cleaning” the cooling compartment and the drink
outlets.
You can select the weekdays for “Flushing” and
“Cleaning” programs in the operator menu CLEANING
DAYS.
Caution:
It is recommended to carry out the procedure “Clean &
Flush” once a week.
When to clean the dispenser
Run the cleaning program when the cleaning icon
appears in the display (See fig.1).
If the dispenser is not cleaned and/or flushed within 24
hours, the drink delivery will be blocked and the delivery
blocked icon appears in the display (See fig.2).
Start and finalize the cleaning program to resume
delivery.
Exterior cleaning
Note:
It is advised to clean the exterior of the dispenser
daily.To prevent accidental dispensing of drinks if you
wish to clean the areas around the buttons. You may
lock the drink dispensing by opening the door an press
the “Standby” button.
1. Remove the drip tray and empty it if needed, clean
the drip tray with a cloth or brush under running water.
2. Clean the exterior of the dispenser with a damp, clean
cloth.

16
Flush
Note:
You can flush the dispenser at any time by using the
procedure described below.
1. Press STOP and then ENTER button, hold them
pressed simultaneously for 2-3 seconds to enter the
cleaning mode.
2. The display will show FLUSHING, press ENTER button
to continue.
Follow the instruction on the display:
PLACE BIN MIN 1L PRESS ENTER TO CONFIRM
3. Place the container under the drink outlets and press
ENTER.
Follow the instruction on the display:
PRESS ENTER TO CONFIRM
4. Press ENTER to start flushing all the drink outlets.
CAUTION HOT LIQUIDS is shown in the display.
When done, the dispenser is ready for use.
Warning:
The liquids dispensed by the dispenser are hot! Avoid
scalding! Keep hands and other body parts away from
the dispenser during the cleaning process.

17
Cleaning
1. Press STOP and then ENTER button, hold them
pressed simultaneously for 2-3 seconds to enter the
cleaning mode.
2. The display will show FLUSHING,
press UP or DOWN button until display
shows CLEANING, press ENTER to continue.
Follow the instruction on the display:
REMOVE PRODUCT PACKS
3. Open the dispenser door.
4. Remove the product packs.
5. When all packs have been removed the display will
automatically continue and show:
CLEAN COOLING BOX PRESS ENTER TO CONFIRM
6. Clean the doser opening with a brush and the interior
of the cooling compartment with a clean, damp cloth.
Dry with a clean paper cloth.
Remove and clean Mixing tray
7. Press ENTER and display will show:
REMOVE AND CLEAN MIXING TRAY
8. Follow the steps below:
a. Open the water treatment panel (fig.1.1)
b. Pull the mixing tray straight out (fig.1.2)
Note:
It is recommended to use the included exchange kit,
which consists of clean mixing tray, to save time.

18
9. Separate the top lid from the base by simply lifting it
straight up.
10. Place both parts of the mixing tray in a bin with
food grade cleaning agent and hot water and let it soak
for approximately 15 minutes.
Note:
Comply with the safety instructions and cleaning
instructions on the cleaning agent packaging.
The mixing tray can be dished in a dishwasher.
11. Reassemble the top and base of the mixing tray.
Display will show: REINSTALL MIXING TRAY
Slide the mixing tray back into the machine.Once the
mixing tray is in position it will continue to next step.
If the machine is fitted with instant option the display
will show:
CLEAN MIXER BOWL PRESS ENTER TO CONFIRM
Note:
if the machine don’t have instant option it will continue
on step 13.
12. To remove and clean the mixer bowl, follow the
steps below:
a. Pull out the outlet tube from the mixer bowl.

19
b. turn the mounting plate level anticlockwise into the
correct position.
c. Remove the mixer bowl by pulling it straight out.
d. Use the included tool to remove the whipper. Place
the tool behind the whipper (1). Gently press in the
handle towards the machine until the whipper is loose
(2). Pull the whipper straight out (3).
1. 2.
e. Rotate the mounting plate anticlockwise even further
until it completly stops (1). Pull the plate straight out
(2).
/