Page is loading ...

U S B I n s t a n t V i d e o C D
User’s Guide
Product Part#: USBAV-190
Product UPC: 7-57887-19000-2
www.adstech.com
USB
USB
USB
USB
USB
USB
USB
USB
USB
USB
USB
USB
USB
USB
USB
USB
USB


© 2002 ADS Technologies. All Rights Reserved
First Edition: Revision 1.0 August, 2002
Microsoft, MS-DOS, Windows, Windows 95, Windows 98SE,
Windows 2000, Windows ME and Windows XP are registered
trademarks of Microsoft Corporation.
IBM is a registered trademark of the International Business
Machines, Inc.
ADS is a registered trademark of ADS Technologies Inc.
ADS Technologies (ADS) makes no warranty of any kind with
regard to this material, including but not limited to, the implied war-
ranties of merchantability and fitness for a particular purpose. The
information furnished within this written document is for information
purposes only and is subject to change without notice. ADS
Technologies assumes no responsibility or liability for any errors or
inaccuracies that may appear herein. ADS makes no commitment
to update or to keep current information contained within this
document.
(rtt)

Introduction. . . . . . . . . . . . . . . . . . . . 5
Package Contents . . . . . . . . . . . . . . . . . . . 5
System Requirements . . . . . . . . . . . . . . . . 5
Quick Installation Guide . . . . . . . . . . . . . . . 7
Installation Instructions. . . . . . . . . . . . . . . . . 8
Step 1. Driver Installation. . . . . . . . . . . . . . . . 8
Step 2. Plugging In. . . . . . . . . . . . . . . . . . 10
Step 3. Checking It. . . . . . . . . . . . . . . . . . 12
VideoStudio 6. . . . . . . . . . . . . . . . . . 13
Step 1. Installing Software Applications. . . . . . 14
Step 2. Getting Started With VideoStudio. . . . .14
Help Resources. . . . . . . . . . . . . 20
Service and Warranty . . . . . . . . . . . . . . . 21
FCC Information . . . . . . . . . . . . . . . . . . 22
4
Table of Contents

5
I n t r o d u c t i o n
Package Contents:
1. USB Instant VideoCD device w/ 6 ft. USB cable attached
2. Audio/Video connection cable
3. USB Instant VideoCD CD
4. User’s Guide
System Requirements:
• A computer system equipped with a Celeron, Pentium III or 4,
AMD Athlon or Duron
• USB host on mother board or USB Port adapter card in the computer
• Operating system: Windows 98SE, WinME, Windows 2000, Win XP
• Minimum 128 MB of RAM
• Minimum 100 MB of free hard disk space for software installation
• CD-ROM drive for installation of the bundled software
• CD-R/RW drive and software required for creating Video CD’s
• Sound card
• A modem and Internet connection is required for the application of
videoconference, live web cam and Internet video publishing software
Applications:
• Creating VCD’s
• Archiving old VHS tapes
• Still and video image capture
• Video Editing
• Video conferencing
• Live Web Cam
• Video mail

6
I N S T A L L A T I O N
G U I D E
NOTE: INSERT the CD and install the Drivers before
plugging the USB Instant VideoCD Device in your
computer!

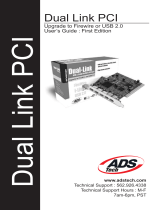
Quick Installation Guide
USB Instant VideoCD
7
Video Source
VCR, Camcorder,
DVD player, etc...
USB
Port
This Quick Installation Guide should be used as a reference
guide only. It is highly recommended that you read the complete
USB Instant VideoCD Manual before using this product to help ensure
you get the most out of your USB Instant VideoCD!
Back of your computer
Follow these instructions when
using USB Instant VideoCD for
the first time.
1) Insert the USB Instant
VideoCD CD
2) Install Drivers First
3) Connect the USB
Instant VideoCD unit to
your computer
4) Follow the on-screen
instructions to install the
new hardware
5) Install the software after
the hardware has been
successfully installed
R W Y

8
Installation Instructions:
Windows 98SE, ME, 2000 and XP
(NOTE: Actual screens may differ depending on which OS is used)
Step 1. Driver Installation:
Do not connect the device to the USB port at this time. INSTALL
Device Drivers FIRST!
Installing Drivers for the USB Instant VideoCD
A. Insert the USB Instant VideoCD CD.
B. From the Auto-Run Install screen Click “INSTALL DRIVERS”
first. (See Fig. A)
Note: WinXP is shown. Other
Windows OS prompts will
look slightly different for all
the pictures depicted here
2) Allow Windows to search for the
best drivers. Click “Next”.
Fig. A
1) Click “Next”.

9
2a) (Does Not Apply to Windows ME/2000/XP)
Check the box next to “CD-ROM”
and make sure the rest of the boxes
are unchecked. Then click “Next”.
3) USB Instant Video will start to install
the drivers into your system.
Note:
This alert might appear 3-4 times
depending on your OS. Click
“Continue Anyway” to proceed.
4) Click “Finish”.

10
Step 2. Plugging In:
Connect Your USB Instant VideoCD Device To Your Computer
A. Plug the USB cable on the device into the USB port on your
computer.
Note: Some computers may be equipped with USB ports on
the front of the computer tower.
B. Follow the on-screen instructions.
1) Make sure that “Install the software
automatically (Recommended)” is
selected. Click “Next”.
2) Wait while Windows searches for
your device, then when found, the
“Hardware Installation” pop-up
window will appear.
Note:
This alert might appear 3-4 times
depending on your OS. Click
“Continue Anyway” to proceed.

11
3) Your device, USB Instant VCD, is
now detected. Click “Finish”.
C. The Wizard will once again appear due to the
USB Instant VCD Audio device which is built-in into the unit.
1) Make sure that “Install the software
automatically (Recommended)” is
selected. Click “Next”.
2) Wait while Windows searches for
your device, then when found, the
“Hardware Installation” pop-up
window will appear.
Note:
This alert might appear 3-4 times
depending on your OS. Click
“Continue Anyway” to proceed.

1) Right-click “My Computer”.
2) Click on “Properties”.
3) Click on the “Hardware” tab.
4) Click on “Device Manager”.
5) When the Device Manager
appears click on the "+" sign
next to “Imaging devices”.
USB Instant VCD should
appear. (1)
6) Now click on the "+" sign next
to “Sound, video, and game
controllers”. USB Instant VCD
Audio” should appear. (2)
12
3) Your device, USB Instant VCD Audio,
is now detected. Click “Finish”.
Step 3. Checking It
Verifying Proper Installation of Devices
A. Making sure that the Instant VideoCD devices are properly
installed.
1
2

13
First English edition for Ulead VideoStudio version 6.0, November 2001.
© 1992-2002 Ulead Systems, Inc.
All rights reserved. No part of this publication may be reproduced or transmitted in any form or by any means, electronic
or mechanical, including photocopying, recording or storing in a retrieval system, or translated into any language in any
form without the express written permission of Ulead Systems,
Inc.
Software license
The software described in this document is furnished under a License Agreement, which is included with the product.
This Agreement specifies the permitted and prohibited uses of the product.
Licenses and trademarks
ICI Library © 1991–1992 C-Cube Microsystems.
Ulead Systems, Inc., Ulead, the Ulead logo, and Ulead VideoStudio are trademarks of Ulead Systems, Inc. All other
product names and any registered and unregistered trademarks mentioned in this
manual are used for identification purposes only and remain the exclusive property of their respective owners.
Sample files
Files provided as samples on the program CD can be used for personal demonstrations, productions and presentations.
No rights are granted for commercial reproduction or redistribution of any sample files.
North & South America: International:
Ulead Systems Inc. Ulead Systems, Inc.
http://www.ulead.com http://www.ulead.com
E-mail: [email protected] http://www.asiapac.ulead.com
http://www.ulead.com.tw
E-mail: [email protected]
Europe: Japan:
Ulead Systems GmbH Ulead Systems, Inc.
http://www.ulead.de http://www.ulead.co.jp

14
Software Application Installation:
STEP 1. Installing Software applications
A. Insert the USB Instant VideoCD CD.
B. From the Auto-Run Install screen Click “VideoStudio 6”
and follow the on-screen instructions. (See Fig. B)
STEP 2. Getting Started with VideoStudio
Here are a few quick tips on getting started in VideoStudio.
Fig. B
I - Creating a New Project
1) Click on “New Project”.

15
2) The New Project
window will appear.
Click on “NTSC
VCD” (1) in the
Select a template
menu. Then click
on “OK” (2).
1
2
I I- Setting Capture Options
1) Click on “Options” (1)
2) It will bring up the
Options pane. Click
on “Capture
Properties” (2).
1
2
3) The Capture
Properties window
appears. Make sure
“Video Capture Filter”
is selected. Click on
“Properties”.

16
4) The Properties
Window will appear.
Click on the “Video
Setting” tab.
5) Now click on the
arrow under “Video
Input” (1) which will
bring down the menu.
Select “Composite 1”
(2). Then click “OK”
(3).
*Note: You can adjust
the picture brightness
under the “Video
Proc. Amp” (*)
1
2
3
*
III- Setting Capture Properties
( A u d i o )
1) Click on “Options”
then “Capture
Properties” which will
bring up the Capture
Properties window.
Click on the arrow (1)
under “Property Type”
and select “Audio
Source”(2).
1
2

17
2) Click on “Properties”.
3) The Audio Source
Window appears.
Make sure that “USB
Instant VCD Audio” is
selected.
Click “OK”.
I V- Using the DVDWi z a r d
1) Click on “Export” (1),
which brings down the
Export pane. Next,
click on “Ulead DVD
Wizard” (2).
1
2

18
2) This brings up the
DVD Plug-In Wizard.
Here, select “Create
scene selection
menu” (1) then click
“Next” (2).
3) Select scenes to use in the scene selection
menu and use the Preview window to
browse for scenes and click “Add” (1) to
place them in the Scenes list. You can select
up to 99 scenes. Select “Locate scene
frames” (2) to search for I-frames only.
Click “Next” (3).
**Option: Select “Add introduction video file” (*) to insert
a video clip that will be played automatically when the
disc is inserted into the player. Browse and select the
DVD / VCD / SVCD compliant file you want to use for
your introduction video in the “Add Introduction Video”
window then click “Next”.
4) Select a preset template layout under
“Project Template” (1) in the Select Menu
Template window. You can also customize
the background and enter text captions.
Click “Next” (2).
1
2
1
2 3
*
1
2

19
5) Use the remote control to observe the
behavior of your DVD/VCD/SVCD project in the
Playback Simulation dialog box. Click “Next”.
6) Select the folder location where to output
files in the “Determine Output Options Settings”
window. Determine also the settings of your CD
burner. Click “Next”.
7) Determine the output options you want for
the video file in the Finish window then click
Create DVD/VCD/SVCD to start the burning
process (as shown in Fig. C).
Fig. C

HELP RESOURCES:
Video Studio Help – Press "F1" on your keyboard at any time.
Video Studio User Manual – on CD
Video Studio Guide – Turn this on by clicking on "G" (global properties)
and selecting preferences.
ADS Web Site: www.adstech.com
Support Online:
We are constantly adding more information to the On-Line Help section
of our web site. Click the "Support" button on the home page and
select your product. Here you find support F.A.Q.’s with questions and
answers to common issues, downloads, patches, manuals, and other
resource material to help you get the most out of your product.
For Specific Video Studio software questions:
Check the Ulead web site: www.ulead.com
E-mail Ulead for help: http://www.ulead.com.tw/ulead/suppform.cfm
Call Ulead for help: 1-310-896-6391
For Instant Video Hardware questions:
Check the ADS web site: www.adstech.com
E-mail ADS for help: www.adstech.com - click e-mail link on support page
Call ADS for help: 1-562-926-4338
Support Hours: M-F 8:00 AM – 5:00 PM PST
20
/