Page is loading ...

User Guide
Ulead Systems, Inc.
March 2005
[Control Number]

English edition for Ulead® VideoStudio™ 9, March 2005.
© 1992-2005 Ulead Systems, Inc.
All rights reserved. No part of this publication may be reproduced or transmitted in any form or by
any means, electronic or mechanical, including photocopying, recording or storing in a retrieval
system, or translated into any language in any form without the express written permission of Ulead
Systems, Inc.
Software license
The software described in this document is furnished under a License Agreement, which is included
with the product. This Agreement specifies the permitted and prohibited uses of the product.
Licenses and trademarks
ICI Library © 1991–1992 C-Cube Microsystems.
All rights reserved. Ulead and the Ulead Systems logo are registered trademarks and Ulead
VideoStudio is a trademark of Ulead Systems, Inc. Intel, Pentium and MMX are registered
trademarks and/or trademarks of Intel Corporation. Microsoft, Windows, DirectX and/or other
Microsoft products referenced herein are either trademarks or registered trademarks of Microsoft
Corporation. Adobe, the Adobe logo, and Acrobat are trademarks of Adobe Systems Incorporated.
QuickTime and the QuickTime logo are trademarks used under license. QuickTime is registered in
the U.S. and other countries. All other product names and any registered and unregistered
trademarks mentioned in this manual are used for identification purposes only and remain the
exclusive property of their respective owners.
Sample files
Files provided as samples on the program CD can be used for personal demonstrations,
productions and presentations. No rights are granted for commercial reproduction or redistribution
of any sample files.
North & South America
Ulead Systems Inc.
http://www.ulead.com
Support: http://www.ulead.com/tech
International
Ulead Systems, Inc.
http://www.ulead.com
http://www.asiapac.ulead.com
http://www.ulead.com.tw
Support:
http://www.ulead.com/tech
http://www.asiapac.ulead.com/tech
http://www.ulead.com.tw/tech
Japan
Ulead Systems Inc.
http://www.ulead.co.jp
Support: http://www.ulead.co.jp/tech
Germany
Ulead Systems GmbH
http://www.ulead.de
Support: http://www.ulead.de/tech
China
Ulead Systems, Inc.
http://www.ulead.com.cn
Support: http://www.ulead.com.cn/tech
France
http://www.ulead.fr
Support: http://www.ulead.fr/tech
United Kingdom
http://www.ulead.co.uk
Support: http://www.ulead.co.uk/tech

ULEAD VIDEOSTUDIO USER GUIDE
3
Welcome to Ulead VideoStudio .................................... 7
How VideoStudio works .................................................. 7
Installing and running VideoStudio ................................... 8
Setting up your computer ............................................ 9
Installing a capture card ................................................. 9
Connecting a video camera to the computer ...................... 9
DV or Digital 8 camcorder ......................................... 9
Analog video sources .............................................. 13
USB camera .......................................................... 18
Preparation for video capturing and editing ...................... 20
Getting started ........................................................... 21
DV-to-DVD Wizard ....................................................... 21
Step 1: Scan for scenes .......................................... 21
Step 2: Apply a theme template and burn to DVD ...... 23
Movie Wizard ............................................................... 23
Step 1: Add video and images ................................. 24
Step 2: Select a template ....................................... 27
Step 3: Finish ........................................................ 31
VideoStudio Editor ....................................................... 31
The user interface .................................................. 31
The Step Panel ...................................................... 32
The Menu Bar ........................................................ 33
The Options Panel .................................................. 34
The Navigation Panel .............................................. 34
The project timeline ............................................... 35
The Library ........................................................... 39
Starting a new movie project ......................................... 43
Setting your preferences ......................................... 44
Setting project properties ....................................... 44
Adding clips .......................................................... 45
Previewing ............................................................ 45
Undoing and redoing actions ................................... 47
Showing and hiding grid lines .................................. 47
Saving your project ............................................... 48
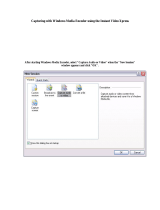
Capture ...................................................................... 50
Seamless DV and MPEG capture ..................................... 50
The Capture Step Options Panel ..................................... 51
Capturing video ........................................................... 51
Digital Video (DV) .................................................. 53
Analog video ......................................................... 55
Importing from DVD/DVD-VR .................................. 58

ULEAD VIDEOSTUDIO USER GUIDE
4
DV Quick Scan .......................................................59
Direct video capturing to MPEG format ......................59
Direct video capturing to Windows Media Video ..........61
Capturing still images ....................................................64
Edit .............................................................................65
Adding clips to the Video Track .......................................65
Video clips .............................................................65
Images .................................................................66
Color clips .............................................................66
The Edit Step Options Panel ...........................................67
Split by Scene ..............................................................69
Trimming a clip ............................................................70
Multi-trim Video ...........................................................72
Saving trimmed clips .....................................................74
Ripple Editing ...............................................................75
Adjusting color and brightness ........................................77
Reversing video playback ...............................................77
Playback Speed ............................................................77
Resizing and distorting clips ...........................................78
Capturing still images in the Edit Step .............................79
Pan & Zoom .................................................................80
Applying video filters .....................................................82
Key frame settings .................................................83
Effect ..........................................................................86
Adding transitions .........................................................86
The Effect Step Options Panel .........................................87
The Album transition .....................................................88
The Flashback transition ................................................91
The Mask transitions .....................................................92
Overlay .......................................................................94
Adding clips to the Overlay Track ....................................94
The Overlay Step Options Panel ......................................99
Adding Objects or Frames ............................................101
Adding Flash animations ..............................................101
Title ..........................................................................103
Adding text ................................................................ 103
Modifying text attributes ..............................................105
The Title Step Options Panel ........................................106
Applying animation .....................................................107
Animation effects ................................................. 108

ULEAD VIDEOSTUDIO USER GUIDE
5
Audio ........................................................................ 112
The Audio Step Options Panel .......................................112
Adding voiceover narration ...........................................114
Adding background music ............................................115
Adding and importing music from an audio CD ..........115
Adding audio files .......................................................117
Trimming and cutting audio clips ...................................117
Stretching audio duration .............................................118
Fading-in/out ............................................................119
Mixing audio tracks .....................................................120
Using the Clip Volume Control ................................120
Using the Audio Mixing Panel ..................................120
Duplicating an audio channel ..................................121
Volume rubber banding .........................................121
Applying audio filters ...................................................122
Share ........................................................................ 124
The Share Step Options Panel .......................................124
Creating movie templates ............................................125
Creating and saving a video file ....................................126
Burning a DVD, VCD or SVCD .......................................128
Assembling files ....................................................129
Adding/Editing chapters .........................................131
Creating selection menus .......................................132
Previewing ..........................................................134
Burning your project onto a disc .............................135
Project Playback .........................................................136
Exporting your movie ..................................................138
Exporting videos to Ulead DVD DiskRecorder ............139
Posting your video on a Web page ...........................141
Sending a movie by e-mail .....................................142
Electronic greeting cards ........................................143
Setting your video as your desktop screen saver .......144
Creating an audio file ..................................................145
Recording back to a DV camcorder ..........................145
Appendix A: Menus and dialog boxes ...................... 148
Menus .......................................................................148
File menu ............................................................148
Edit menu ............................................................149
Clip menu ............................................................150
Tools menu ..........................................................151
Help menu ...........................................................152
Dialog boxes ..............................................................153

ULEAD VIDEOSTUDIO USER GUIDE
6
Advanced Options ................................................153
Advanced Settings (DV-to-DVD Wizard) ..................154
Audio Save Options ...............................................155
Batch Convert ......................................................156
Border/Shadow/Transparency ................................157
Capture Options ...................................................158
Change Capture Plug-in ......................................... 159
Output Options .....................................................160
Preferences: File menu ..........................................161
Preferences (Create Disc) .....................................167
Preview Playback Options ...................................... 168
Project Properties .................................................169
Project Options ....................................................170
Project Settings (Create Disc) ................................ 170
Preview Files Manager ........................................... 171
Select Device Control ............................................172
Video and Audio Capture Property Settings .............. 173
Video Color Manager .............................................175
Video Save Options ...............................................176
Appendix B: Shortcuts .............................................182
Menu command shortcuts ...........................................182
Step Panel shortcuts ................................................... 182
Navigation Panel shortcuts ...........................................183
Timeline shortcuts ......................................................184
Multi-trim Video shortcuts ............................................184
Others ...................................................................... 185
Appendix C: Technology Overview ...........................186
Analog vs. Digital ....................................................... 186
SmartRender Technology ............................................. 187
DV SmartPlay ............................................................ 187
DVD, VCD, and SVCD ..................................................188
Appendix D: System tweaks ....................................189
Enabling DMA for IDE disks ..........................................189
Disabling Write-Behind Caching ....................................192
Setting the Paging File size ..........................................195
Appendix E. Tips and techniques .............................198
Glossary ...................................................................201
Index ........................................................................211

ULEAD VIDEOSTUDIO USER GUIDE
7
Welcome to Ulead VideoStudio
Thank you for purchasing VideoStudio, the video editing software
that allows even beginners to produce professional-looking movies.
VideoStudio provides you with a complete set of tools to capture
videos, edit them, and share your final production on tape, DVD,
CD, or the Web.
How VideoStudio works
VideoStudio follows a step-by-step paradigm that lets you easily
capture, edit, and share your video. VideoStudio also offers more
than a hundred transition effects, professional titling capabilities
and simple soundtrack creation tools. Learn in seconds, create in
minutes.
To make a movie production, first capture footage from a
camcorder or another video source. You can then trim the captured
videos, arrange their order, apply transitions, and add overlays,
animated titles, voiceover narration, and background music. These
elements are organized in separate tracks. Changes to one track do
not affect other tracks.
A movie production is in the form of a VideoStudio project file
(*.VSP), which contains information on the path location of the
clips and how the movie has been put together. After you have
finished your movie production, you can burn it to a DVD, VCD or
SVCD or record the movie back to your camcorder. You can also
output your movie as a video file for playback on the computer.
Components of a project as displayed in Timeline View

ULEAD VIDEOSTUDIO USER GUIDE
8
VideoStudio uses the information in the video project file to
combine all the elements in your movie into a video file. This
process is called rendering.
Installing and running VideoStudio
To install VideoStudio:
1. Insert the VideoStudio CD into your CD-ROM drive.
2. When the Setup screen appears, follow the instructions to install
VideoStudio onto your computer.
3. In addition to VideoStudio, these programs and drivers will be
automatically installed:
To run VideoStudio:
• Double-click the VideoStudio icon on your Windows desktop.
OR,
• Select the VideoStudio icon from the VideoStudio program
group on the Windows Start menu.
The VideoStudio CD has an auto-
run feature that automatically
starts up the installation.
Back up your projects and media
files first before installing the new
version of VideoStudio.
Note: If the Setup screen does not appear after loading the CD, then
you can manually start it by double-clicking the My Computer icon on
your desktop, then double-clicking the icon for the CD-ROM drive.
When the CD-ROM window opens, double-click the Setup icon.
•QuickTime
• SmartSound
• Windows Media Format
•DirectX
• Sony MicroMV
•Indeo

ULEAD VIDEOSTUDIO USER GUIDE
9
Setting up your computer
Before you can start making movie projects using your own video
footage, you first need to capture video from your video camera
into your computer. Your computer needs to be equipped with the
proper capture card or interface port for connecting your video
camera and for capturing video to your computer. Since capturing
and video editing require a lot of computer resources, your
computer must also be properly set up to ensure successful
capturing and smooth editing of your videos.
Installing a capture card
If your capture card is a PCI-based card, install the card on your
computer by inserting it in an available PCI slot on the computer’s
motherboard.
Connecting a video camera to the computer
The type of capture card or interface port that you will need to
connect your video camera to your computer depends on the type
of video camera you have.
DV or Digital 8 camcorder
If you are using a DV (Digital Video) or Digital 8 camcorder, you will
need an IEEE-1394 interface on your computer. Some newer
computers already have built-in IEEE-1394 ports. If you do not
have them on your computer, install an IEEE-1394 card.

ULEAD VIDEOSTUDIO USER GUIDE
10
Connecting the camcorder to the IEEE-1394 interface
Use an IEEE-1394 cable to connect your digital camcorder to the
IEEE-1394 port. Before purchasing one, check first the pin
connectors used on your camcorder and your computer. Most DV
and Digital 8 camcorders have a 4-pin connector, whereas desktop
computers that come with IEEE-1394 ports or installed with IEEE-
1394 cards usually have 6-pin connectors. The IEEE-1394 cable
that is required for desktop computers is a 4-pin to 6-pin cable.
Most notebook computers have 4-pin connectors which require a 4-
pin to 4-pin cable.
6-pin IEEE-1394 ports on a desktop
computer
4-pin IEEE-1394 ports on a
notebook computer
Connecting the IEEE-1394 cable to the DV camcorder

ULEAD VIDEOSTUDIO USER GUIDE
11
Checking the hardware setup
After connecting your digital camcorder to the computer, check if
the device is detected by your Windows system. If you installed an
IEEE-1394 card on your computer, check also if the card is
detected.
To check if the IEEE-1394 card and digital camcorder are
detected:
1. Insert your video tape into the
camcorder and switch it on.
Make sure it is in playback
mode (usually named VTR or
VCR). Check your camcorder's
manual for specific instructions.
2. Open the Control Panel, then open System: Hardware -
Device Manager.
3. Make sure the following device names are listed in the Device
Manager.
Under Windows XP or Windows Me:
Connecting a 4-pin to 6-pin IEEE-1394 cable to a desktop computer
Connecting a 4-pin to 4-pin IEEE-1394 cable to a notebook computer

ULEAD VIDEOSTUDIO USER GUIDE
12
• 1394 Bus Controller
• <Brand name> DV Camcorder (The brand name depends on
the DV camcorder connected to the IEEE-1394 interface.)
Under Windows 2000 or Windows 98SE:
• 1394 Bus Controller
• Image Device: Microsoft DV Camera and VCR (For Microsoft
DV driver only.)
• Sound, video and game controllers: 1394 camcorder (For
Texas Instruments DV driver only.)
Note: In addition to commonly used Texas Instruments and
Microsoft DV drivers, there are other drivers available. Consult your
camcorder's manual for suitable drivers.
Windows XP: Device Manager Windows 2000: Device Manager

ULEAD VIDEOSTUDIO USER GUIDE
13
Analog video sources
VHS, S-VHS, Video-8, and Hi8 camcorders and VCRs are examples
of analog video sources. To capture video from analog sources, you
will need to install an analog capture card in your computer. (See
“Installing a capture card” on page 9).
Conventional broadcast television is also an analog source. To
capture TV footage, you need to have a TV tuner card installed in
your computer.
4. If your digital camcorder has been
detected properly, it will be listed as
a source device in VideoStudio's
Options Panel. In VideoStudio,
select the Capture Step and check
if your camcorder is displayed under
the Source list in the Options
Panel.
Note: TV capture cards provide S-Video/Composite inputs and a TV
tuner, which can be used to capture both video and TV footage.

ULEAD VIDEOSTUDIO USER GUIDE
14
Connecting the video device to the analog capture card
To connect your video device to the analog capture card, use either
an S-Video or RCA Composite cable depending on your device's
video output. If your video device has both types of output, use the
S-Video connection for higher video quality captures.
If you want to use the Composite output of your video device,
connect the yellow plugs of the Composite cable to the video output
of your video device and the video input port of the analog capture
card.
Most higher-end analog capture cards do not have the Composite/
S-Video input ports crowded on the side of the cards. Instead,
these cards come with an external breakout box that provide all the
video input ports at the front of the box. Video devices can be
Connecting the S-Video source to
the capture card
S-Video cable
Composite cable
Connecting the Composite video
source to the capture card

ULEAD VIDEOSTUDIO USER GUIDE
15
connected to the capture card more easily through the breakout
box.
Connecting a TV antenna to the tuner card
A tuner card has a TV antenna input just like the regular television
monitor. Plug your TV antenna to the TV connector of the tuner
card.
Note: When purchasing a tuner card, make sure you acquire one
that provides the correct TV system (NTSC or PAL) for your region.
Breakout box
TV antenna cable
Connecting TV antenna to the
tuner card

ULEAD VIDEOSTUDIO USER GUIDE
16
Connecting the capture or tuner card to the sound card
Most capture and tuner cards only allow video capture. To preview
the audio from your video device or TV and to capture the audio
into your computer, you need to connect the audio output of the
capture or tuner card to the sound card's Line In port. The required
cables for connecting to the sound card are different for each type
of video source:
Line-in and audio cables for S-Video
S-Video connection
Line-in and audio cables for Composite
video
Composite video connection

ULEAD VIDEOSTUDIO USER GUIDE
17
Checking the hardware setup
After connecting your analog source to the capture or tuner card,
check if the card is detected by your Windows system.
To check if the capture or tuner card is detected:
1. If you are using a video device such as a camcorder as your
source, insert your videotape into the video device and switch it
on. Make sure it is in the playback mode (usually named VTR or
VCR). See your machine's manual for specific instructions.
Line-in cable for TV tuner
card
TV tuner connection
Line-in cable for high-end
TV capture card
High-end TV capture card connection

ULEAD VIDEOSTUDIO USER GUIDE
18
USB camera
To capture live video and still images from a USB camera, connect
the camera to an available USB port on your computer.
2. Open the Control Panel, then
open System: Hardware -
Device Manager.
3. In the Device Manager,
double-click Sound, video and
game controllers. Check if
your capture or tuner card is
listed in this folder.
4. If your capture or tuner card
has been detected properly, it
will be listed as a source device
in VideoStudio's Options
Panel. In VideoStudio, select
the Capture Step and check if
your capture or tuner card is
displayed under the Source list
in the Options Panel.
Note: If your capture device supports multiple video sources, the
Video and Audio Capture Property Settings dialog box allows
you to select your desired video source such as Composite, Tuner, or
S-Video. Likewise, if you have multiple audio sources, this dialog box
allows you to select your desired audio source. (See “Video and
Audio Capture Property Settings” on page 173).

ULEAD VIDEOSTUDIO USER GUIDE
19
USB cameras may require installation of a device driver, depending
on the Windows version you are using. For information on how to
install your USB camera, refer to its accompanying manual.
After properly installing your USB camera, check if it is detected by
your Windows system.
To check if the USB camera is detected:
1. Open the Control Panel, then
open System: Hardware -
Device Manager.
2. In the Device Manager,
double-click Imaging devices.
Check if your USB camera is
listed in this folder.
3. If your USB camera has been
detected properly, it will be
listed as a source device in
VideoStudio's Options Panel.
In VideoStudio, select the
Capture Step and check if your
USB camera is displayed under
the Source list in the Options
Panel.
USB ports
Connecting a USB camera

ULEAD VIDEOSTUDIO USER GUIDE
20
Preparation for video capturing and editing
Capturing and video editing are tasks that require a lot of computer
resources. Your computer must be properly set up to ensure
successful capturing and smooth video editing. Below are some tips
on how to prepare your digital camcorder and optimize your
computer for capturing and editing.
• For better workability of DV Quick Scan and camcorder
device control, correct timecode on the DV tape is a must. To
do this, before shooting your video, use the standard
playback (SP) mode and shoot a blank video (for example,
leaving the lens cover on while recording) without interruption
from start to end of a tape.
• It is recommended that you close all other applications when
working with VideoStudio. You should also turn off any
automatically-launched software like screen savers to avoid
possible interruptions while capturing.
• If you have two hard drives in your system, it is
recommended that you install VideoStudio to your system
drive (usually C:) and store captured videos in your other
drive (usually D:).
The choice of what hard disk to use is also crucial. Using a
dedicated video hard drive, preferably with Ultra-DMA/66
7200 rpm and 30GB free space, is recommended.
•Make sure DMA is enabled for your hard disk. (See “Enabling
DMA for IDE disks” on page 189).
• Disable Write-Behind Caching on the hard drive used for video
capture. (See “Disabling Write-Behind Caching” on page 192).
• Increase the Paging File (Swap File) size to twice your amount
of RAM. (See “Setting the Paging File size” on page 195).
/