Page is loading ...

Instant VideoMPX: English
Archive & Share Your Home Movies On CD
User’s Guide: First Edition
USB Instant VideoMPX
ADS Tech
Technical Support - 562.926.4338
North America Support Hours:
Mon-Fri: 8am - 5pm, PST
Support: www.adstech.com/support/support.asp
www.adstech.com
European Technical Support: +353.61.702042
Tech
If you have any problems or questions on this product, please call :

Introduction. . . . . . . . . . . . . . . . . . . . 4
Installation Guide . . . . . . . . . . . . . . . 8
Step 1. Driver Installation. . . . . . . . . . . . . . . . 10
Step 2. Plugging In the Hardware. . . . . . . . . 12
Software Installation . . . . . . . . . . . . . . . . . 14
Ulead VideoStudio 8 . . . . . . . . . . . . . . . . . 15
Help Resources. . . . . . . . . . . . . 32
Service and Warranty . . . . . . . . . . . . . . . 33
FCC Information . . . . . . . . . . . . . . . . . . 34
3
Table of Contents
© 2004 ADS Technologies. All Rights Reserved
First Edition: July 2004
Microsoft, MS-DOS, Windows, Windows 95, Windows 98SE, Windows 2000, Windows ME
and Windows XP are registered trademarks of Microsoft Corporation.
IBM is a registered trademark of the International Business Machines, Inc.
ADS is a registered trademark of ADS Technologies Inc.
ADS Technologies (ADS) makes no warranty of any kind with regard to this material,
including but not limited to, the implied warranties of merchantability and fitness for a
particular purpose. The information furnished within this written document is for
information purposes only and is subject to change without notice. ADS Technologies
assumes no responsibility or liability for any errors or inaccuracies that may appear herein.
ADS makes no commitment to update or to keep current information contained within this
document. (rtt)

4
Introduction
Package Contents:
1. USB Instant VideoMPX device
2. Audio/Video connection cable
3. USB Instant VideoMPX Installation CD
4. User’s Guide
System Requirements:
• A computer system equipped with a Pentium 4 2.4GHz or greater.
• USB 2.0 host controller on motherboard or USB port adapter card
• Operating system: Windows XP Home or Professional Editions with
SP1 only (minimum)
• Minimum of 256MB of RAM or greater
• Minimum of 100MB of hard disk space for software installation
• CD-ROM drive for installation of the bundled software
• CD-R/RW or DVD+-R/+-RW drive required for creating your DivX,
WMV or VCD Video on CD’s
• Sound Card
Applications:
• Ulead Video Studio 8SE VCD

5
Instant VideoMPX allows you to easily capture video in multiple video
compression formats. This product is targeted at compressing video into
low bit rate formats that generate compact video files which are easily
transferred to portable devices or allow for lots of video to fit on a normal
CD-R disc.
The Instant VideoMPX acts as a video digitizer and video pipeline
enabling raw uncompressed video to flow into the PC via the USB 2.0
port on Windows XP machines. Once in the PC any number of software
video compression engines can be used to compress the video into the
chosen format.
Your Instant VideoMPX includes the Ulead VideoStudio 8 video capture
and editing application which supports direct capture and real time
compression into popularly used video formats such as MPEG-1, VCD,
Windows Media Video 9
®
and Divx
®
Video.
What is video compression?
When video is digitized the file size is very large. The video is more
manageable when it is compressed to smaller size. At its most basic
level, compression is performed when an input video stream is analyzed
and information that is not noticeable to the viewer is discarded. There
are different video compression schemes and each one analyzes the
video stream in a different way. Each video compression method has
the general goal of reducing the overall size of the finished video file
while retaining video quality but each video compression method may
have a different application goal, such as producing video for satellite
TV transmission, video e-mail, DVD video or getting as much video on
a standard CD. The result is that there are different video compression
formats for different purposes and applications.
What compression formats can I capture in with Instant
VideoMPX?
Because Instant VideoMPX brings raw, uncompressed video into your
PC via the USB 2.0 port on your Windows XP machine it can be used
to compress video in to virtually any video compression/decompression
(video codec) installed on your computer that is Microsoft Direct Show
compliant. This is called software compression. This means that the
software video codec installed on your computer makes use of the
computers powerful CPU to complete both video compression and
decompression. Keep in mind that video compression can be very CPU
intensive. New video codecs like DivX and WVM9 work to compress to
very low bit rates while retaining very good video quality. This process is
very CPU intensive. Divx Video, for example, is a compression

6
6
technology that can reduce the file size of video more than 5 times
smaller than DVD while offering similar quality. This takes intense
processing power. This is why the minimum CPU requirement Instant
VideoMPX is set at 2.4 GHz.
The software included with your Instant VideoMPX installs the Divx
Video codec, Microsoft Windows Media Video 9 codec and MPEG-1
codec allowing you to easily capture into any of these video formats.
What can I do with these video compression formats?
DivX Video
DivX™, much like MP3 is a format for digital music. DivX™ is the brand
name of a very popular patent-pending video compression technology
created by DivXNetworks, Inc. The DivX™ codec is based on the
MPEG-4 compression standard. This codec is so advanced that it can
reduce an MPEG-2 video (the same format used for DVD or Pay-Per-
View) to ten percent of its original size.
• Divx video files can be copied to a CD-R disc and then be played
back in DivX Certified DVD players. You can generally get a 2 hour
movie on a single CD-R disc.
• Many portable video players support DivX playback.
• Most Pocket PC and PALM PDA’s can support DivX video playback
when a compatible software player has been installed.
• DivX Video is compatible with the ADS Tech Media-Link
Entertainment receiver. Capture video in the DivX video format and
then distribute the video over your wired or wireless Ethernet
network. The Media-Link Receiver decodes the video and displays
it on your Big Screen TV.
MPEG-1
MPEG-1 video can be played back on any Windows PC with the
Microsoft Media Player. No extra software required. This makes MPEG-1
a very easy video format to share with friends or business colleagues.
MPEG-1 is generally targeted at a low bit rate of 1.5Mb (Megabit) per
second. This is about the speed of a double speed CD-ROM. The video
resolution is also rather low, commonly set to 352 x 240 (NTSC) or 352
x 288 (PAL), commonly referred to as SIF resolution.
Applications:
• Insert MPEG-1 Video into PowerPoint presentations
• Archive video clips to hard drive or CD in small files sizes for
viewing on the PC
• Create a VideoCD

6 7
Video CD (VCD)
VCD is probably the most common application for MPEG-1 video and
has been a popular format in Europe and Asia for many years for
movies. Before DVD players existed, VCD players were very popular
virtually everywhere except North America. VCD is the same video
bit rate and resolution as MPEG-1 but copied to a CD-R in a format
that will play in VCD players. The advantage of VCD is that you can
record approximately 70 minutes of audio and video on a CD-R. The
disadvantage is that the quality will be much lower than a DVD movie.
• Create Video CD’s - they play back in most late model DVD players.
Microsoft Windows Media Video 9
This is Microsoft’s proprietary video compression standard that is similar
to MPEG-4. Windows Media video 9 can be captured in a variety of
resolutions and video bit rates depending upon the target application.
With Instant VideoMPX we have included two ways to create Windows
Media Video 9 (WMV 9) content:
• VideoStudio 8 - you can easily select the Windows Media Capture
plug-in to capture video directly into a WMV 9 file.
• Windows Media Encoder - install the Windows Media Encoder to
capture WMV 9 files on your PC or broadcast video across your
home, office network or serve over the Internet.

8
I N S TA L L AT I O N
G U I D E
NOTE: INSERT the CD and install the Drivers before
plugging the USB Instant VideoMPX Device in your
computer!

9
Quick Installation Guide
This Quick Installation Guide should be used as a reference guide
only! It is highly recommended that you read the complete USB
Instant Video MPX Manual before using this product to help ensure
you get the most out of your USB Instant Video MPX.
1) Insert Installation CD
2) Click on “Install Drivers” when the installation menu appears
3) Connect the USB Instant Video MPX into the back of
your computer
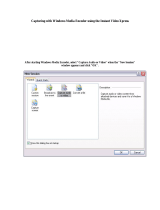
4) Windows will automatically detect the USB Instant Video MPX
and a “Found New Hardware” wizard will appear
5) Follow the directions on-screen
6) Install
Installation Instructions:
Optional precaution:
Please disable/close/turn off any applications that may be running in the
background (i.e. anti-virus software, popup blockers, screensavers, etc.).
In addition, remove all other USB devices that are not currently in use.
Insert the Installation CD into the CD-ROM. The installation menu
will appear.
Click on “Install Video Studio 8”. Follow the directions for each window
that appears. When the software installation is complete, click on “Exit”
at the lower right hand corner of the screen.
With the Installation CD still inside the CD-ROM, plug in the USB
cable directly into the back of your PC (it is not recommended that you
connect the USB cable into the front of your PC).

10 11
10
Step 1. Driver Installation:
2) Click on the “Next” button to continue installation.
3) Wait while Windows installs the drivers for your device.
1) Click on the “Install Drivers” button to start the driver installation.

10 11
11
Note: This alert will appear 3 times during the installation process. Click on “Continue
Anyway” to proceed.
This update addresses the “Availability of the Windows XP SP1 USB
1.1 and 2.0 Update” issue in Windows XP and is discussed in Microsoft
Knowledge Base (KB) Article 822603. Download now to install the
Windows XP SP1 USB 1.1 and 2.0 update. After you install this item,
you may have to restart your computer.
Note: This may NOT appear on some systems if they already have the Windows
update installed.

12
2) Wait while Windows searches for the proper drivers, then when found,
the “Hardware Installation” pop-up window will appear.
3) Click on “Continue Anyway” when prompt to do so.
Note: Cicking on “Continue Anyway” will not harm your computer in any way and will
allow you to finish the install of your new hardware.
Step 2. Plugging In:
Connect Your USB Instant VideoMPX Device to your Computer:
A. Plug the USB end directly into the USB port on the back of
your computer.
B. Once plugged in a “Found New Hardware Wizard” will appear on
your screen.
1) With the “Install the software automatically (Recommended)” selected,
click on “Next”.

13
4) Your device, USB Instant VideoMPX, is now installed, Click on
“Finish” when the installation is complete.
After the installation is complete, determine if the drivers have
successfully installed by going into the “Device Manager” (Right-click on
“My Computer” and select “Properties”. A window will appear, select the
“Hardware” TAB and click on the “Device Manager” button.) The USB
Instant VideoMPX should appear in 3 locations.
• Click on the “+” sign next to “Imaging Devices” and you should see: “Instant VideoMPX”.
• Click on the “+” sign next to “Sound, video and game controllers” and you should see:
“USB Audio Device”.
• Click on the “+” sign next to “Universal Serial Bus controllers” and you should see: “USB
Composite Device”.
Once you have confirmed the 3 locations, close the “Device Manager”
window. Congratulations, you have installed the Instant VideoMPX
properly.

1514
Software Application Installation
To start the installation of VideoStudio 8, click on the
“VideoStudio 8” button.
Getting Started with Video Studio 8 SE VCD:
1) Click on “VideoStudio Editor” to capture, edit, and burn your
home movies.
To install VideoStudio 8, click on the “Install Ulead VideoStudio 8” button.

15
How VideoStudio works
VideoStudio follows a step-by-step paradigm so that editing tasks
remain uncomplicated from start to nish. VideoStudio also offers
more than a hundred transition effects, professional titling
capabilities and simple soundtrack creation tools. Learn in seconds,
create in minutes.
To make a movie production, rst capture footage from a camcorder or
another video source. You can then trim the captured videos, arrange
their order, apply transitions, and add overlays, animated titles, voiceover
narration, and background music. These elements are organized in
separate tracks. Changes to one track do not affect other tracks.
A movie production is in the form of a VideoStudio project le (*.VSP), which
contains information on the path location of the clips and how the movie has
been put together. After you have nished your movie production, you can burn
it to a VCD. You can also output your movie as a video le for playback on the
computer.
VideoStudio Editor
VideoStudio Editor provides a step-by-step workow that makes
creating movies simple and easy.
This section introduces you to the VideoStudio Editor interface and briey
explains the steps involved in creating a movie. Refer to the succeeding
chapters for more in-depth information on each step.
Compnents of a project as displayed in Timeline View
2) Click on the “Capture” tab and ensure that your Source is set to
Instant VideoMPX.

16 17
The User Interface
1 Step Panel
Contains buttons that correspond to the different steps in video editing.
2 Menu Bar
Contains menus that provide different set of commands.
3 Options Panel
Contains controls, buttons, and other information that you can use to customize the
settings of the selected clip. The contents of this panel change depending on the step you
are in.
4 Preview Window
Shows the current clip, video lter, effect, or title.
5 Navigation Panel
Provides buttons for playback and for precision trimming of clips. In the Capture Step,
this also acts as the device control for the DV camcorder.
6 Library
Stores and organizes all of your media clips.
7 Timeline
Displays all the clips, titles, and effects included in your project.

16 17
The Step Panel
VideoStudio simplies the process of creating movies into seven simple
steps. Click the buttons in the Step Panel to switch between steps.
Once a project is opened in VideoStudio, video can be recorded directtly
to your computer’s hard disk in the Capture Setup. Footage from a video
tape can be captured as a single le or automatically divided into multiple
les. This step allows you to capture video and still images.
The Edit Step and the Timeline are the heart of VideoStudio. This is
where you arrange, edit, and trim your video clips. Video lters can also
be applied to your video clips in this step.
The Effect Step lets you add transitions between video clips in your
project. Choose from the variety of transitions effects in the Library.
The Overlay Step allows you to superimpose one clip over another to
create a picture-in-picture effect.
No movie would be complete without opening titles, captions and closing
credits. In the Title Step, you can create animated text titles or choose
from various presets in the Library.
Background music sets the mood of the movie. The Audio Step lets
you select and record music les from one or several CD-ROM drives
attached to your computer. You can also dub over your video in this step.
When your movie is complete, you can create a video le for sharing on
the Web or output the movie on tape, DVD, or CD in the Share Step.
Note: These steps do not necessarily need to be followed in the order that they
are presented.
The Menu Bar
The Menu Bar provides various commands for customizing VideoStudio,
opening and saving movie projects, working with individual clips,
and more.

1918
1) On the “Format” pull down menu make sure that you select “DivX”.
Capturing in DivX Format:
Planning your DivX Video Project:
You can change the video resolution and video bit rate settings
to adjust for quality and also the file size of your video capture
project. You may have the goal of fitting up to 2 hours of
DivX video on CD-R disc. Here are some guidelines showing
resolutions, video settings and approximate file sizes:
Resolution Video Bit Rate File Size
640 x 480 500 kb/sec. @ 300 MB/Hr.
352 x 240 100 kb/sec. @ 110 MB/Hr.

19
1) Click on the “Options” button and then “Video and Audio Capture
Property Settings…”
Step 1. Setting Video and Audio Capture Properties:
2) Verify that the “Input Source:” is correct if you are connecting your
analog source with RCA cables then please select Video Composite
and if connected with S-Video then Video S-video.

2120
1) Click on the “Capture” tab and then click on “Configure”.
Step 2. Adjusting the DivX bitrate:
2) Then choose the desired Variable Bitrate Mode by clicking the
pull-down arrow.

21
1-Pass Encoding: (RECOMMENDED)
1-pass encoding is the quickest way to encode your video in the DivX format, at the
expense of some quality - it allows you to set a fixed average bit-rate to use for the
entire encoding.
1) Make sure that you select “Ulead Mpeg-1 Layer2” for your Audio
Encode Codec and then click “OK” to finish and save your settings.
Step 3. Selecting the Audio Bitrate:
/