Page is loading ...

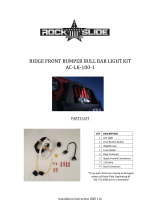
JK A-Pillar 50” Light Bar Brackets
AC-WS-100-JK
Parts List
QTY
DESCRIPTION
2
Metal Brackets
10
Flange Head Bolts
10
Nylon washers
*If any parts listed are missing or damaged please call Rock-Slide Engineering @
435-752-4580 prior to installation
Installation Instruction RSEI 126

Installation Instruction RSEI 126
Bracket Installation
1. Decide the location where you want to run your wires for your light
a. Recommend running the wires down the length of the bracket and into the
hood seam to the engine compartment
b. Other possibility is through the rubber seal in the front door
2. Run your wiring harness for your light as you attach your brackets
3. Remove the factory bolts from the A-Pillar on both drivers and passenger sides
4. Nylon washers are provided to keep the bracket off of the paint. The washers can be
used
one on each bolt, or if you need more space to run your light wires, you can stack more
washers on one bracket to create space for your wiring.
5. Run the flange head bolt through the bracket and attach a nylon washer. Do this for
each
bolt in the bracket
6. Set the bracket against the A-Pillar with the bolts held into place with the washers. Make
sure if you have wiring, it is located where you want

Installation Instruction RSEI 126
7. Start the tightening sequence with the outside 3 bolts. Tighten them loosely
then
move to the inside 2 bolts. The inside bolt holes have a slot to allow for the
bracket to move as to tighten the bracket
8. Alternate tighten from the outside holes to the inside holes until the bracket
is tight
against the A-Pillar
9. Repeat steps 5-8 for the second bracket
10. Ensure all bolts are fully tightened before installing the light bar
11. Install the light bar onto the brackets. The mounting holes allow for different sizes of
mounting bolts. Use appropriate washers and spacers to ensure the light bar is secured safely
to the brackets. The brackets can be tightened to pull them close together for a snug fit with
the light bar. If necessary, the A-Pillar bolts can be
loosened before tightening the light bar to
create more space. After the light bar is tightened snugly to the top of the brackets, re-
tighten the A-Pillar bolts.
Inside Bolts
Outside bolts

Installation Instruction RSEI 126
12. Attach wiring to switch and power source
13. Enjoy!
Thank you for choosing Rock-Slide Engineering products. We value your business and welcome your
feedback/suggestions.
If you have any concerns please contact us directly @ 435-752-4580. We are here to help you!
Ensure light bar is securely attached
with appropriate washers, spacers, etc
/