Page is loading ...

DATSUN
MODEL
610
SERIES
CHASSIS
AND
BODY
1
I
NISSANI
1973
l
NISSAN
MOTOR
CO
LTD
TOKYO
I
N

REAR
WINDOW
ELECTRIC
DAFROSTER
RELAY
m
R
IJ
OPTIONAL
ylH
LW
BR
i
w
GB
GR
Y
m
GL
m
ANTENNA
OPTIONAL
SEAT
BELT
WARNING
LAMP
t
LBB
I@GW
B
RADIO
UNIT
OPTIONAL
WJ
HEATER
3
L
SW
2
i
I
LB
OFF
L
LR
o
8
GW
ILLUMINATION
TO
COMB
METER
IRG
LW
EJi
BY
m
R
LR
RY
L
IR
YG
YW
LB
m
G
R
YR
ILB
z
LYR
w
YB
w
LY
g
LW
L
L
LW
G
i
GL
i
HOMETER
OPTIONAL
4
BG
YW
i
I
I
I
i
J
BR
wi
B
B
B
B3W
Ifr
BW
B
s
RADIO
SPEAKER
OPTlONALl
G
t
G
r
m
b
fi
REAR
WINDOW
L
ELECTRIC
DEFROSTER
StIJ
B
PTlONALl
REAR
WINDOW
ELECTRIC
DEO
FROSTER
PILOT
LAMP
PTtONAL
HEATER CONTROL
MP
CIG
LIGHTER
b
ASH
TRAY
MP
o
B
Il
w
HAZARD
WARNING
SW
RYj
GL
I
2
L1GHT
B
Y
2
LY
L
WIPER
e
WASHER
SW
LR
5
I
12
S
9
7
6
4
3
10
COMB
METER
R
H
DOOR
SN
LiI
a
Bl
B
o
REAR WINDOW
ELECTRIC
DEFROSTER
OPTIONAL
JB
o
I
B
itWHllTE
B
RB
GB
B
GR
SIDE
MARKER
n
LAMP
m
ROOM
LAMP
@fI
g
NK
UNIT
RY
S
B
tiJa
L
iJ
@P
B
BW
tI
RL
flL
H
DOOR
SW
A
C
B
0
hR
9A
J
LW
fI
B
T
B
Ji
TRUNK
ROOM
sw
AGON
BR
iI
L
H
SEAT
SELT
SW
COLOR
CODE
B
W
R
Y
Black
White
Red
Yellow
f
lw
II
II
II
II
t
n
N
OR
t
1
HEATER
lFU
E
UNIT
120A
B
TO
AIR
CONDITIONG
L
l
t
Q
KICK
DOWN
SW
LB
I
LW
m
u
I
EY
a
SEAT
8ELT
I
8
WARNING
BUZZER
r
t
2
STOP
LAMP
SW
r
YG
LW
f01
PARKiNG BRAKE
SW
t
b
t
HAZARD
FLASHER
UNIT
I
g
T S
FLASHER
UNIT
I
GNITION
SW
BR
a
Rt
STEERING
I
B
m
m
LOCK
sw
gEVER
t
bI
DIMMER
86
I
SW
I
m
TURN
G
R
SIGNAL
SW
r
G
THERMO
SW
I
HORN
UTTON
L
RY
L
Iw
La
RW
GRS
m
YR
Iz
LY
w
LW
w
WR
L
LW
1
GR
r
OL
GJ
LW
G
L
B
Lg
Green
Blue
Brown
Light
green
m
U
SIDE
MARKER
LAMP
BB
RB
GY
NTURN
TAIL
STOP
BACK
UP
R
H
REAR
COMa
LAMP
J
r
LICENSE
LAMP
Bi
B
I
L
H
REAR
COMB
LAMP
OW
GR
BACK
UP
RB
TAIL
STOP
GY
TURN

WIRING
DIAGRAM
TO
MAGNETIC
CLUTCH
LY
0
1
u
l
m
lIlgttl
L
R
rtt
t
l
j
Ly
lW
L
RELAY
i
t
I
AUTO
CHOKE
LIGHTING
I
l
ii
I
I
m
f
T
J11Iffil
ria
l
J
I
T
1
11
r
BY
VOLTAGE
I
111
REGULATOR
i
Cl
Iii
I
1l
1J
I
i
l
ull
h
W
H
l
l
J
B
I
BY
I
I
I
I
B B
III
I
J
GREEN
I
I
i
I
t
rm
B
I
i I
a
m
JJ
y
J
1Il1IlctIl
60
WB
I
I I
rtlli
K
j
J
@
KIC
l
ii
DOWN
ALTER
3tllJ
J
R
F
00
SOLENOID
NATDR
00
OR
@@
INH
B
TOR
r
UIL
PREss
sw
FOURTH
BACK
UP
NEUTRAL
SPARK
I
LAMP
SW
LAMP
SW
SW
PLUGS
DISTRIBUTOR
I
I
I
I
r
I
1
I
I
I
I
I
I
I
I
i
I
I i
I
B
B
Br
i
YI
B
SlOE
MARKER
LAMP
W
B
RH
FRONT
COMB
LAMP
I
SA
TTER
r
e
I
I
I
m
t
j
o
FOSIBLE
LINK
rn
lr
4
B
UJ
B
R
C
7Gy
BG
G8
I
r
RB
r
mo
W
I
I
RH
HEAD
LAMP
G
HO
I
G
FOG
LAMP
OPTIONAL
BLACK
RB
B
R v
Ro
R
GL
B
GS
BL
BLACK
BBBB
B
r
I
I
I
WHITE
r
mm
I
I
I
i
Ii
I
SEAT
BELT
6
STARTER
RELAY
BW
I
RBG
FOG
LAMP
OPTIONAL
G
HORN
I
RL
ttllIICDCDalg
CDCDCDCDCDCD
CD CD
WHITE
J
fu
Ci
J
I
THERMAL
ANSMITTER
VI
RL
Manual
Autom
nJ
L
m
J
LH
FRONT
r
GL
COMB
LAMP
B
e
I
I
m
L
CI
L
a
BRAKE
BG
SYSTEM
SW
f
BW
Dc
I
BG
REGISTANCE
L
lo
BYm
11
L H
HEAD
LAMP
@
I
WASHER
TANK
a
MOTOR
IGNITION COIL
RELAY
SIDE
MARKER
LAMP

I
BG
r
LR
YW
IWR
YB
i
ii
BY
RB
BW
r
w
I
I
G
1
I
L
I
I
GL
j I
I
y
BGGL
11
I
I
GB
1
I
I
I
1
IB
i
III
i
Rill
i
i
1
1
i
it
i
ii
i
E
I
I
I
R
I
j
I
R
I I
i
I
i
I
j
I
I
L
I
I
I
IT
T
I
i
1
i
TO
WIPER
MOTOR
sion
VACUUM
CONTROL
SOLENOID
AUTO
CHOKE
HEATER
ANTI
OIESElING
SOLENOIO
THROTTLE
Sw
tJ
I
i
i
I
i
i
i
I
I
i
I
i
I
i
i
i
I
i
Ir
1C
b
JI
L
1
I
I
I
I
I
L
I
I
I
I
I
I
I
I
I
I
I
I
t
LY
FUSE
BLOCK
I
i5G
m
W
1
5 g
l
i
REAR
WINDOW
ELECTRIC
DAFROSTER
RELAY
rd
RtB
m
R
tB
OF
f
ON
Ll
FUSEl5A
ml
BR
tIJ
i
GB
GR
Y
m
GL
flJ
r
B
0
0
rj
GW
o
I
I
I
rt
ffih
n
I
RI
HEATER
I
Cw
UNIT
I
lruSE
IZOA
B
TO
AIR
COl
tD1TIONG
Il
l
lBe
tI
PKICK
DOWN
SW
LB
m
l
EY
Ii
SEAT
BELT
H
LW
WARNING
BUZZER
B
g
a
STOP LAMP
SW
YG
a
i
@
1l
PARKING
BRAKE
sw
t
HAZARO
FLASHER
UNIT
t
TIS
FLASHER
UNIT
RwLRlFI
m
IGNlTION
SW
l
STEERtNG
iJ
W
LOCK
SW
f
T
i1
G
1
THERMO
SW
U
D
RGI
LW
GL
RY
L
I
YG
G8
R
YR
LBI
y
LW
BI
BG
I
INDICATOR
LAMP
OIMM
SW
TURN
SIGNAL
sw
HORN
BUTTON

SEAT
BELT
WARNING
LAMP
t
C
B
RADIO
UNIT
OPTIONAL
iWB
HEATER
3
W
SW
r
mL
OFF
LeB
LW
o
8
LR
o
GW
ILLUMINATION
ANTENNA
OPTIONAL
TO
COMB
METER
IRG
LW
G
GW
BY
R
LR
RY
L
IR
YG
3
YW
LB
RW
G
R
VR
ILB
Z
LYR
w
YB
LY
LW
L
L
LW
I
I
GR
GL
GJ
BR
wi
B
i
B
B
B
B
m
S
Ifr
BW
R
H
DOOR
SII
II
61
REAR WINDOW
DEFROsf
CTRIC
OPTIONAL
SIDE
MARKER
n
LAMP
i
tEl
TURN
TAIL
STOP
BACK
UP
R
H
REAR
COMa
LAMP
JB
o
B
B
tWHltTE
B
GY
B
GW
B
RB
B
GB
GR
B
o
ROOM
LAMP
SEAT
SW
B
i1j
IlJ
RL
flL
1
DOOR
SW
C
RH
SEA
BW
tI
C
T
9A
MP
L H
SEAT
BELT
SW
RUNK
ROOM
SW
WAGON
@GW
B
8j
RtDIO
SPEAKER
PTIONAll
G
f
HEATER CONTROL
LW
GWlO1
ILL
LAMP
LW
B
T
G
w
Em
c
CIG
LIGHTER
GW
I
GW
W
LY
REAR
WINCO
L
ELECTRIC
W
ASH
TRA
DEFROSTER
B
ILL
Y
B
PTIONALl
SII
GW
MP
REAR
WINCO
DEFROSTER
ELECTRIC
OPTIONAL
ILOT
LAMP
r
LICENSE
lAMP
Bi
I
TACHOM
C
ETER
OPTIONAL
i
YW
I
I
i
i
GI
GB
GL
GR
HAZAR
L
D
WARNING
SW
RYI
GL
R
I
GW
r
LIGHTSW
Y
LV
I 2
LW
L
WIPER
a
WASHER
SW
B
I
J
GBWI
GR
RB
GY
5
I
12
B
9
7
6
4
3
10
COLOR
COOE
Black
White
Red
Yellow
Green
Blue
Brown
Ught
green
G
L
e
Lg
e
w
R
y
A
SIDE
MARKER
lAMP
LH
REAR
COMB
LAMP
BACK
UP
TAil
STOP
TURN
B
COMB
METER

j
s
r
c
r
f
J
1
IE
C
c
1
1
f
f
t
t
j
1
t
u
U
800
Jlnn
f
l
1MJ
iA1IRH
D
MOIDEl
6
O
SEIR
IES
1
1HI
@
IDW
t
I I
INm
S
INJ
M@ij
Q Q
O
jj
O
TOIC
YO
JAPAI
Il
No
l
t7
qo
ii
a
z
i
ol
4
QUllCK
REFERENCE
INDEX
t
l
r
I
GBN
R
t
FNf
nRM
qWQ
GI
J
j
ojo
r
ii
M
E
G
I
NJ
r
MrogA
L
lR
IN
S
IA
IJAfdON
i
nkutcH
CL
C
J
RAN
SMiISSION
TM
i
B
R
SW
Fjr
8tlniflRE
E
HlfiliAiL1C
AiR
RI
EiRL
PD
C
O
M
A
XUE
7
2
m
t
FiR
n
N1Tlm
N
toIN
FA
p
Y
i
8
RX
R
U
N
tl
l
O N
RA
r
i
fj
4
l
J
c
r
s
BR
1
fr
r
4
I
w
1
iN
p
l
i
i
WT
1i
i
i
e
l
r
O
ij
N
G
ST
T
Il
liN1fr
E
QP
N
T
ROr
f
Ult
FE
c
j
J
HA
USJ
SYSjTlE
M
iB
O
D
Y
u
B
F
l
u
f
B
o
Y
E
t
RR1C
BE
r
y
t
7
f
r
h
SERV
IC
E
E
OU
J
E1NJ
SE
fI
oJ
r
T
t

r
I
FOREWORD
This
service
manual
has
been
prepared
for
the
purpose
of
assisling
service
personnels
of
our
distributors
and
dealers in
providing
effective
service
and
mainlenance
of
Ihe
model
610
series
Since
proper
maintenance
and
service
are
absolutely
essential
to
satisfy
our
customers
this
manual should
be
read
carefully
The
following
matters
should
be
noted
for
effective
utilization
of
this
manual
1
Explanations
in
this manual
are
mainly
concerning
the
model
P610UWT
right
hand
drivel
but will
easily
be
referred
to
also
for
the
left
hand
drive
models
2
Please
refer
to
the
following
SERVICE
MANUALS
in
addition
to this
manual for
complete
details
of
the
car
because
this
manual
describes
information
concerning
the
chassis
and
body
only
SERVICE
MANUAL
Model
LIB
Series
Engine
SERVICE
MANUAL
Nissan
Automatic
Transmission
Model3N71B
3
All
part
names
in
this
manual
conform
to
the
PARTS
CATALOG
Model
610
and
only
the
genuine
service
parts
listed
in
this
PARTS
CATALOG
must
be
used
for
replacements
4
AIl
information
illustrations
and
specifications
contained
in
this manual
are
based
on
the
latest
product
information
available
at
the
time
of
publication
approval
5
It
should
be
emphasized
that
those
who
use
this
manual
are
responsible
for
revising
the
contents
according
to
the
TECHNICAL
BULLETIN
or
DATSUN
SERVICE
JOURNAL
which
carrys
the
latest
factory
approved
service
methods
6
Rights
for
alternation
of
specifications
and
methods
at
any
time
are
reserved
NISSAN
MOTOR
CO
LTD
TOKYO
JAPAN
10
@
1972
NISSAN
MOTOR
CO
LTD
Printed
in
Japan

c
r
r
t
S
ERV
I
GE
f
L
o
l
A
ot
i
J
I
r
1
M
B
I
i
j
I
J
IlM
fI
U
M
Ii
f
0f
i
0
DATSUN
1800
MODEL
610
SERIES
CHASSIS
BODY
I
NI
AN
I
NISSAN
MOTOR
CO LTD
TOKYO
JAPAN
SECTION
GI
GENERAL
INFORMATION
MODEl
VARIATIONHHHHHHHHHHHHH
GI
2
IDENTIFICATION
NUMBERS
GI 3
APPROXIMATE
REFILL
CAPAC
IlY
FINAL
TRANSMISSION AND
SPEEDOMETER
USAGE
CHART
RECOMMENDED
LUBR
ICANTS
GI
6
JACK
UpHH
HH
HHHHHHHHHHH
HH
H
H
GI
8
GI 5
GH

r
GENERAL
INFORMATION
MODEL
VARIATION
Transmission
Differential
carrier
Model
Engine
Transmission
control
Model
Gear
ra
tio
Hardtop
KPL6lOUAWf
3N71B
3
900
KPL6lOUWf
F4W63
Floor
3
700
PL6IOUAWf
R160
3N71B
3
900
Sedan
PL610UA
Ll8
Column
PL6IOUWf
F4W73
Floor
3
700
WPL6lOUAWf
3N71B
Station
Wagon
WPL6
I
OUA
Column
HI65
3
889
WPL610UWT
F4W73
Floor
The
meaning
of
prefix
and
suffix
K
P
L
610
U
W
A
T
ROOf
shift
vehicle
Column
shift
vehicle
A
Au
tomatic
transmission
Manual
transmission
W
Reclining
separate
seat
Bench
seat
L6IOU
Destined
for
U
S
A
and
Canada
p
Equipped
wilh
Ll8
engine
K
Hardtop
W
Station
Wagon
o
Sedan
SuffIX
PrefIX
Note
0
means
no
indication
GI
2

GENERAL
INFORMATION
IDENTIFICATION
NUMBERS
The
unit
and
car
numbers
are
stamped
and
registered
at
the
factory
The
engine
and
vehicle
idenlifica
tion
numbers
are
llsed
on
legal
docu
ments
These
numbers
are
used
for
factory
communication
such
as
Tech
nical
Report
Warranty
Claim
Service
Journal
and
other
information
Car
identification
plate
The
car
identification
plate
is
lo
cated
at
the
center
of
the
cowl
top
The
plate
contains
the
vehicle
type
engine
capacity
max
horse
power
wheelbase
and
engine
and
car
serial
numbers
IIII
Fig
GI
Car
jd
ntification
plate
location
Caution
labels
Car
serial
number
JeJ
The
car
serial
number
is
stamped
on
the
left
side
of
the
cowl
top
and
broken
down
as
shown
in
the
follow
ing
figure
Fig
GI
2
The
car
number
consists
of
the
vehicle
model
and
the
seriai
number
PL61O
xxxxxx
S0
c
I
Fig
GI
3
Engine
serial
number
location
PI
O
OOOO
O
SP026
Fig
GI
2
Car
serial
number
location
Engine
serial
number
The
engine
serial
number
is
stamp
ed
on
the
right
hand
side
of
the
cylinder
block
The
number
is
broken
down
as
shown
in
the
following
figure
Fig
GI
3
Many
labels
are
sluck
on
the
vehicle
as
shown
in
the
following
table
Label
name
Location
Sample
Car
identification
plate
Cenler
of
cowl
top
See
Figure
GI
I
Identification
number
Left
upper
side
of
inslrument
panel
plate
10
I
PL61
0
000040
I
01
GI 3

GENERAL
INFORMATION
Label
name
Sample
Color
code
number
label
Tire
inflation
pressure
label
Cooling
system
caution
label
M
v
s
S
cerlificale
label
Location
Right
upper
side
of
radialor
core
support
RadiatOI
core
support
01079
Inside
of
glove
box
lid
Gl097
Upper
side
of
radiator
support
panel
Gll00
GI1D1
Lock
pillar
Sedan
Station
wagon
GI
4
PAINT
COLOR
NUMBER
COLOR
NO
PAINT
AMINO
ALK
l
D
ENAMEL
GI096
fEIICl
w
Ilia
150
S
1111
fUll
U
II
Cpmn
IOJ
HlIllum
II
ClJMII
NDED
COlD
TIRE
IIlfLATlDI
PRESSURE
flllUlIa
111
150
IIllEnCEll
U
iOO j
llRt
lm
M
n
l
i
lIie
2
1I
4S1
L
1
2Mu
3UP
L
FROKl
lH
R
fRONT
tA
I
I
II
fU
llillPEU
28
PSI
32
24
PSI
28
PSI
lOin
III
m
m
28
PSI
32
PSI
n
3 2
PSI
nil
10
U5SR13
28
PSI
28
PSI
28
PS
28
PSI
Gl098
NISSAN
MOTOR
COMPANY
S
NEW
COOLANT
ANTIFREEZE
IS
INSTALLED
IN
THIS
CAR
NISSAN
lONG
LIFE
COOLANT ETHYL
ENE
GL
VeDl
BASEl
the
new
combinetion
wmmef
coolant
winter
ntifreeze Freeze
protectjo
35
ClI
Cooling
system
should
be
drained
every
24
mont
s
or
4O
oookm
24
OIXlmilesj
nder
nOl
mal
conditions
nd
refilled
with
NISSAN
LONG
LIFE
COOLANT
equivalent
r
NISSAN
MOTOR
CO
LTO
Gt099
o
MANlFACTURED
ff1
0
HISSAN
MOTOR
CO
LTD
72
THS
VEHUE
COOFORMS
TO
ALL
llI
I
OCAEI
E
fE
MOTCJlVEHlQ
E
S
lfETY
STAIII
Wl
5
N
EFfECT
ON
1HE
0Al
E
If
MtWJ
lC
l
JlE
SHONN
AOOIf
GVWR
LB5
GIlWR
fR
LB5
RR
LBS
PL
610
o
PASSENGER
CAR
0
GI102

GENERAL
INFORMATION
Exhausl
emission
label
Right
side
of
rear
windshield
glass
California
only
Emission
control
system
label
APPROXIMATE
REFILL
CAPACITY
u
s
measure
Imper
measure
Liter
Fuel tank
Sedan
14
Ii
gal
12
U
gal
55
Station
Wagon
13
gal
II
Ii
gal
52
Engine
cooling
system
1
I
gal
I
gal
65
Engine
crankcase
2 4
Ii
qt
3
qt
4
3
Manual
transmission
41
pt
3
Ii
pt
2
0
Automatic
transmission
3
5
i
qt
4
i
qt
5 5
Differential
carrier
Sedan
1
pt
1
pt
0 8
Stalion
Wagon
2
pi
2
I
pt
13
Steering
gear
box
pt
Ii
pt
0
27
1
Include
Ii
U
S
qt
Ii
Imper
qt
05
liler
for
heater
2
Include
Ii
U
S
qt
Ii
Imper
qt
05
liter
for
oil
filter
3
Include
4
I
U
S
qt
3
Ii
Imper
qt
4
0
lilers
for
torque
converter
GI
5

GENERAL
INFORMATION
FINAL
TRANSMISSION
AND
SPEEDOMETER
USAGE
CHART
Sedan
Station
Wagon
M
T
A
T
M
T
A
T
Type
F4W63
3N71B
F4W63
3N71B
Shift
lever
position
Floor
Floor
Floor
Floor
Column
Column
1st
3
382
2
458
3
382
2
458
Transmission
2nd
2
013
1
458
2
013
1
458
Gear
ratio
3rd
1
312
1
000
1
312
1
000
41h
1
000
1
000
Rev
3
365
2
182
3
365
2
182
Final
gear
Type
RI60
RI60 HI65
HI65
Gear
ratio
3
700
3
900
3
889
3
889
Speedometer
gear
ratio
17
5
20
6
17
5
20
6
MIT
Manual
Transmission
A
T
Aulomatic
Transmission
RECOMMENDED
LUBRICANTS
RECOMMENDED
SAE
VISCOSITY
NUMBER
Engine
Oil
Multi
viscosity
SW
30
lOW
3O
1OW
40
2OW
40
Single
viscosity
10W
20W
20
30
40
30 20 10
0
10
20
30 40
Oc
22
4
14
32
50
6S
86
104
OF
Temperature
Range
Anticipated
GI
6

h
I
PRODUCING
CHEVRON
ESSO
MOBIL
SHELL
SUNOCO
TEXACO
0
Multigrade
Supreme
Motor
Oil
Unifio
Me
hUon
Super
SUpeI
Motor
Oil
Special
Motor
Oil
Havoline
super
SD
5W
30
IOW
30
5W
30
IOW
40
SW
30
5W
40
IOW
40
20W
5O
5W
30
IOW
40
Premium
MIL
L
2104B
10W
40
20W
4O
Extra
Motor
Oil
IOW
40
lOW
50
Dynalube
Moto
Oil
5W
30
IOW
40
Z
l
5W
20
10W
30
20W
50
10W
30
20W
50
0
is
20W
40
Mobiloil
special
Z
Gasoline
5W
20
10W
30
0
i3
ffi
20W
40
20W
50
r
c
Monograde
special
Motor
Oil
McbUail
Sun
lube
Motor
Oil
Havoline
Motor
Oil
SD
lOW
20W
20
30
40
lOW
20W
20
30
40
lOW
20W
20
30
40
lOW
20W
20
30
40
MIL
L
2104B
50
50
50
50
Transmission
API
GL
4
MultiserVice
Gear
GearOilGP
Mobilube
EP
or
GX
Spirax
75EP
Multipurpose
Gear
Un
ersal
Gear
Lub
and
MIL
L
2105
Lub
80
90
140
80
90
90
140
80EP
90EP
140EP
Lub
GL
4
EP
steering
75
80
90
140
80
90
140
80
90
140
l
is
API
GL
4
Multiservice
Gear
Gear
Oil
GP
Mcbilube
EP
or
GX
Spiral
75EP
Multipurpose
Gear
Universal
Gear
Lub
Rigid
MIL
L
2105
Lub
80
90
140
8Q
90
90
140
80EP
90EP
140EP
Lub
GL
4
EP
OJ
75
80
90
140
80
90
140
80
90
140
l
l
i5
I
R
S
or
APIGLS
Universal
Gear
Lub
Gear
Oil
GX
Mobilu
oe
HD
Sflirax
HeaVY
Duty
Multipurpose
Gear
34S0
Gear
Oil
90
limited
MIL
L
210SB
75
80
90
140
80
90
140
80
80
90
90
140
80
90
140
Lub
GL
5
Multigear
Lub
EP
slip
75
80
90
140
80
90
140
Automatic
Type
DEXRON
A
T
P
A
T
P
A
t
P
220
A
t
P
DEXRON
Transrnatic
Fluid
Texamatic
Fluid
transmissioo
3N71B
AfT
DEXRON
Type
UEXRON
Multipurpose
grease
Lithium
soap
Automotive
Multipurpose
MobilgreaSe
Mp
RetinaX
1
Pre
tige
n
Marfak
NLGI2
Grease
Medium
Grease
WB
500
Multipurpose
2
Brake
and
DOT
3
It
mu
be
cnnform
to
the
Motor
Vebicle
Safety
Standard
No
116
du
tch
fluid
Atlas
Perma
Guard
Long
Life
Coolant
Perma
lone
Shell1
one
Permanent
Type
Antifreeze
Coolant
Antifreeze
coolant
L
L
C
Antifreeze
Atlas
Long
Life
Startex
Antifreeze
Coolant
RAD
Coolant
G
D
0
0
0
r
c
D
C
m
Z
Z
D
I
J
r
Z
0
D
0
Z
In
case
the
above
brand
oils
are
nol
available
it
is
permissible
to
use
oils
marked

GENERAL
INFORMATION
PANTOGRAPH
JACK
Apply
the
pantograph
jack
fur
nished
with
the
vehicle
to
the
position
indicated
below
in
a
safe
manner
Noles
a
Never
gel
under
lhe
vehicle
while
il
is
supported
only
by
Ihe
jack
Always
use
safely
stands
to
supporl
frame
when
you
have
10
gel
under
Ihe
vehicle
b
Block
Ihe
wheels
diagonally
by
wheel
chocks
Ii
Detail
WH056
Fig
GI
4
Jack
up
point
Fig
GJ
5
Wheel
chocks
and
jack
Sedan
WH090
Fig
GI
6
Jack
Station
Wogon
JACK
UP
WH097
Fig
GI
7
Lowering
spare
tire
Station
Wogon
GARAGE
JACK
Note
When
carrying
out
operations
wilh
Ihe
garage
jack
be
sure
10
support
Ihe
car
wilh
safely
stands
FRONT
SIDE
I
When
jacking
up
the
front
of
the
vehicle
place
the
chocks behind
the
rear
wheels
to
hold
them
2
Apply
the
garage
jack
under
the
front
suspension
member
Be
sure
not
10
lift
up
the
engine
oil
pan
located
just
behind
the
suspension
member
3
Jack
up
the
vehicle
gently
jusl
high
enough
to
place
the
safely
slands
under
both
the
side
members
Place
the
stands
at
the
posilion
indicaled
in
Figure
GI
8
4
Release
the
jack
slowly
Fig
GI
8
Front
jack
up
point
GI
B
Fig
GI
9
Front
supportable
points
REAR
SIDE
I
When
jacking
up
the
rear
of
Ihe
vehicle
place
the
chocks
at
the
front
side
of
the
fronl
wheels
10
hold
them
2
Apply
the
garage
jack
under
the
differential
carrier
aII
models
the
suspension
arm
A
Sedan
or
suspen
sion
member
B
Sedan
3
Jack
up
the
vehicle
gently
just
high
enough
10
place
the
safety
slands
under
the
rear
suspension
member
or
body
Sedan
or
under
the
rear
axle
case
Slalion
Wagon
Place
the
stands
al
the
positions
indica
led
below
4
Release
the
jack
slowly
11
u
GI070
Fig
0
0
Rear
jack
up
points
Sedan
Fig
GI
l1
Rear
supportable
points
Sedan

GENERAL
INFORMATION
Gl072
Fig
GI
12
Rear
6upportable
point
Station
Wagon
TOWING
Manual
transmission
model
When
the
car
is
towed
forward
connect
the
rope
securely
10
Ihe
hook
attached
on
Ihe
right
side
tension
rod
bracket
Do
not
tow
Ihe
hook
at
tached
on
the
left
side
tension
rod
bracket
This
bracket
on
the
eft
is
inslalIed
for
the
tie
down
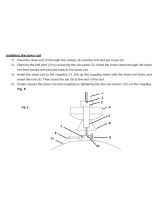
use
only
To
tow
another
car
connect
a
rope
to
the
rear
bumper
stay
by
using
a
waste
10
the
bumper
edge
Sedan
In
case
of
the
Station
Wagon
the
rope
should
be
connected
to
the
rear
leaf
spring
shackle
A
lowing
rope
should
not
be
con
nected
to
any
other
positions
than
those
described
above
Note
Do
nol
attempl
to
apply
load
10
a
rope
suddenly
10
prevenl
damage
GI073
Fig
01
13
Towing
front
11
11
J
li
III
1
II
I
f
6GI07
Fig
GI
14
Towing
rear
Sedan
GI075
Fig
GI
15
Towing
rear
Station
Wagon
Automatic
transmission
model
The
car
may
be
towed
safely
on
its
rear
wheels
on
the
ground
wilh
Ihe
selecl
lever
in
N
Neutral
posilion
of
at
speeds
of
less
than
30
km
h
18
7
MPH
However
the
propeller
shaft
must
be
disconnected
or
the
car
must
be
towed
on
ils
front
wheels
on
the
ground
under
Ihe
following
condi
tions
I
Tow
speed
of
more
Ihan
30
km
h
18
7
MPH
2
Car
must
be
lowed
for
a
long
distance
over
10
km
6
miles
3
Transmission
is
not
operating
properly
If
car
is
lowed
on
its
front
wheels
on
the
ground
the
steering
wheel
should
be
secured
to
maintain
a
straighl
ahead
position
GI
9
TIE
DOWN
The
front
tie
down
hook
is
located
on
both
the
tension
rod
brackets
The
right
side
bracket
is
also
available
as
a
lowing
hook
The
rear
tie
down
hook
is
localed
on
both
the
rear
floor
members
secur
ing
with
the
bumper
slay
0
Fig
01
16
Tie
down
hook
front
Fig
O
l7
Tie
down
hook
rear

7
1J
r
t
S
E
d
ir
I
i6
E
0Ro
J
II
1M
fI
lil
N
oM
B41J1
tI
aL
U
J1I
c
J
1
DATSUN
1800
MODEL
610
SERIES
CHASSIS
BODY
INI
NI
NISSAN
MOTOR
CO
LTD
TOKYO JAPAN
SECTION
ER
ENGINE
REMOVAL
INSTAllATION
ENGINE
REMOVAL
AND
INSTALLATION
IR
2

I
I
ENGINE
REMOVAL
INSTALLATION
ENGINE
REMOVAL
AND
INSTAllATION
REMOVAL
INSTALLATION
ENGINE
MOUNTING
INSULATOR
REMOVAL
It
is
much
easier
to
remove
engine
wi
th
transmission
as
a
single
unit
than
to
remove
only
engine
from
engine
compartment
The
engine
can
then
be
separated
from
transmission
assembly
Notes
a
Be
sure
10
hoisl
engine
and
10
jack
up
transmission
in
a
safe
manner
b
Fender
cover
should
be
used
10
prevenl
damaging
vehicle
body
Disconnecl
battery ground
cable
CONTENTS
ER
2
ER
4
ERA
Front
insulator
Rear
insulator
TIGHTENING
TORQUE
ER
4
ERA
ER
5
2
Scribe hood
mounting
location
of
hood
hinge
and
remove
hood
3
Remove
air
cleaner
after
discon
necting
blow
by
hose
from
rocker
cover
4
Drain
radiator
coolant
and
engine
oil
5
Remove
radialor
grille
Note
On
automatic
transmission
e
quipped
vehicles
a
Remove
Wider
cover
b
DiscoDDecl
oil
cooler
hose
al
oil
cooler
which
is
inslalled
10
radial
or
lower
end
c
Then
disconnect
vacuum
hose
lJ
6
Disconnect
upper
and
lower
hoses
from
radiator
EA066
Fig
ER
1
Disconnecting
oil
cooler
hose
7
Remove
four
bolts
securing
radiator
and
detach
radiator
ER
2
Fig
ER
2
Remouing
radiator
8
Disconnecl
engine
ground
cable
al
battery
Iray
Fig
ER
3
Disconnecting
engine
ground
cable
9
Disconnect
wires
at
I
Starter
2
AJlernalor
3
High
lension
cable
at
ignition
coil
4
Oil
pressure
switch
and
thermal
transmitter
10
Disconnect
I
Fuel
line
al
fuel
pump
2
Healer
line
at
engine
side
3
Choke
wire
at
carburelor
4
Acceleralor
linkage
Nole
The
following
is
Ihe
removal
sequence
a
Remove
relum
spring
and
joint
b
Delach torsion
shaft

ENGINE
REMOVAL
INSTALLATION
Return
spring
Joint
3
Torsion
shaft
Fig
ER
4
Disconnecting
accelerator
linkage
5
Disconnecl
parking
wire
at
rear
cable
adjuster
11
Remove
transmission
control
linkage
I
For
vehicles
equipped
with
3
speed
transmission
Disconnect
transmission
cross
shaft
from
control
linkage
and
rod
shaft
2nd
top
from
2nd
top
lever
ER070
Fig
ER
S
Disconnecting
cross
and
rod
shafts
2
For
vehicles
equipped
with
floor
shift control
Detach
rubber
boot
Remove
nul
from
shift
iever
and
detach
shift
lever
Fig
ER
6
Removing
shift
lever
3
For
vehicles
equipped
with
automatic
transmission
Disconnect
joint
between
control
lever
and
lower
selector
rod
EA072
Fig
ER
7
Disconnecting
range
selector
lever
12
Remove
Iwo
bolts
shown
by
arrows
securing
clulch
operating
cyl
inder
Then
detach
operating
cylinder
and
flexible
lube
as
an
assembly
EA073
Fig
ER
8
Removing
clutch
operating
cylinder
13
Disconnect
speedometer
cable
and
reverse
lamp
wiring
I
6
I
11
II
Note
On
automatic
transmission
equipped
vehicles
also
disconnect
wires
at
a
Kickdown
swilch
b
Inhibilor
swilch
c
14
Disconnect
exhaust
front
tube
from
exhaust
manifold
Then
loosen
connector
between
center
and
rear
tubes
Detach
front
and
center
tubes
as
an
assembly
74
Fig
ER
9
Disconnecting
exhaust
front
and
center
tube
assembly
15
Disconnect
propeller
shaft
at
companion
flange
of
gear
carrier
Plug
up
rear
end
of
rear
extension
housing
of
transmission
to
prevent
oil
leakage
16
Attach
a
suitable
wire
to
lift
engine
Remove
engine
front
mount
ing
bolts
shown
by
arrows
at
front
suspension
member
17
Place
a
jack
under
transmission
and
jack
it
up
18
Loosen
two
CD
in
Figure
ER
II
engine
rear
mounting
bolls
19
Remove
four
@
in
Figure
ER
II
bolts
securing
engine
mounting
rear
support
and
delach
il
ER
3
EA075
Fig
ER
10
Removing
front
mounting
bolts
Engine
rear
1
2
Engine
mounting
mounting
boltl
rear
support
II
securing
bol
t
I
I
Fig
ER
11
Removing
engine
mounting
rear
support

ENGINE
REMOVAL
INSTALLATION
20
Raise
engine
with
transmission
by
means of
a
hoist
and
cable
See
Figure
ER
I2
Then
support
them
on
engine
stand
Note
In
this
operation
care
should
be
always
taken
not
to
aUow
the
unit
hitting
against
any
adjacent
parts
EA077
Fig
ER
12
Lifting
engine
and
transmission
INSTALLATION
b
On
automatic
transmission
equip
ped
engine
be
sure
to
secure
oil
cooler
pipes
at
oil
cooler
To
install
reverse
the
order
of
removal Do
not
connect
any
parts
to
the
engine
until
engine
mounting
insulators
are
placed
and
power
unit
weight
is
supported
by
them
ENGINE
MOUNTING
INSULATOR
Noles
a
As
the
sequence
of
installation
fIrst
secure
engine
mo
uoting
rear
support
10
body
Three
insulators
are
used
to
mount
the
engine
two
at
left
and
right
front
ends
of
the
cylinder
block
and
one
at
transmission
rear
extension
housing
Front
mounting
t
c
W
@
Rear
mounting
EA078
Fig
ER
13
Structural
view
of
engine
mounting
ER
4
Notes
a
Replace
front
or
rear
insulator
assembly
when rubber
of
engine
mounting
insulator
is
cracked
abnormally
worn
or
deteriorated
b
Keep
insulator
free
from oil
or
grease
Front
insulator
Distinguish
between
left
and
right
mounting
insulators
by
notch
marks
on
insulator
rubber
one
notch
is
at
front
and
two
notches
at
rear
Front
ER079
Fig
ER
14
Front
mounting
insulator
Rear
insulator
In
assembling
engine
always
locate
F
mark
on
the
rubber
of
rear
mounting
insulator
facing
toward
the
front
C
J
fj
F
If
EROBO
Fig
ER
15
Rear
mounting
insulator
/