Page is loading ...

INSTALLATION INSTRUCTIONS
800.533.3948 • www.barronltg.com
1
BVTPLED
20070109 REV 1 - 08/17
IMPORTANT SAFEGUARDS
READ AND FOLLOW ALL SAFETY INSTRUCTIONS.
When using electrical equipment, basic safety precautions should always be followed including the following:
• DISCONNECT AC POWER SUPPLY BEFORE SERVICING.
• Installation and servicing of this equipment should be performed by qualified service personnel only.
• Ensure the electricity connections conform to the National Electrical Code and local regulations if applicable.
• Do not mount near gas or electrical heaters.
• Equipment should be mounted in locations and at heights where it will not readily be subjected to tampering by
unauthorized personnel.
• The use of accessory equipment not recommended by the manufacturer may cause an unsafe condition. Any
modification or use of non-original components will void the warranty and product liability.
• Do not use this equipment for other than intended use.
SAVE THESE INSTRUCTIONS!
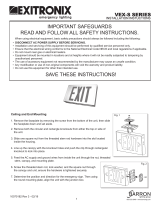
1. Locate and drill holes for the mounting brackets. Use hardware found in hardware kit. Mount bracket to surface.
2. Release the lens attachment clips and remove the lens. Squeeze the LED module retaining clips (Fig. A) and remove
the LED module from the luminaire housing.
3. Attach the luminaire housing to mounting brackets.
4. Make sure the plastic safety cable is securely attached to both luminaire housing and the LED module.
Note:
• Connect the flexible cord (SJTW 18AWG)
to the outlet box, and cover the outlet box
with UL listed canopy. Use a strain relief
rated for wet locations to prevent damage
to the power wires. A

800.533.3948 • www.barronltg.com
2
20070109 REV 1 - 08/17
INSTALLATION INSTRUCTIONS
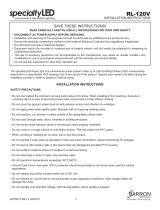
After installing the luminaire, make wiring
connections as shown in the wiring diagram.
• Connect the black luminaire input power wire to
the supply line (hot) wire.
• Connect the white luminaire input power wire to
the supply neutral wire.
• Connect the green luminaire input power wire to
a ground wire or surface.
If a dimming control is used, connect the purple
(DIM+) dimming wire to the purple wire from the
0-10v dimming control, and connect the grey (DIM-)
dimming wire to the grey wire from the 0-10v
dimming control. If a dimming control is not used,
cap the driver dimming leads with UL approved wire
nuts.
Notes:
• Green ground screw is provided in the proper location. Do not relocate the screw.
• Use minimum 90° C supply conductors
• Specifications and dimension subject to change without notice.
• Suitable for dry or damp locations.
Black (Line)
White (Neutral)
Green (Ground)
INPUT
OUTPUT
LED DRIVER
Purple (Dim+)
Grey (Dim-)
Blue (-)
Red (+)
TO LEDs
Dimming wires
to 0-10V control
General Wiring Diagram
120-277V
BVTPLED
/