Wiley 978-0-470-62204-9 Datasheet
- Category
- Software manuals
- Type
- Datasheet

2
Introducing the iPhone
and iPod touch
I
t is an exciting time to be a Flash developer. Adobe
has taken big steps in making the Flash Platform
available on as many devices as possible. The Open
Screen Project is an Adobe-led initiative whose goal is to
bring rich Internet experiences seamlessly across as many
devices as possible. Flash Player 10.1 will be available for
multiple mobile platforms, such as Google Android, RIM’s
BlackBerry, Palm Pre, and Nokia, as well as numerous
other devices such as TVs, set top boxes, tablets, and
netbooks. Adobe is working with these and over 50 other
partners to optimize Flash Player 10.1 in order to work
better with the different devices.
However, one manufacturer that is not part of this
initiative is Apple. To allow Flash developers to create
iPhone applications, Adobe has created a cross-compiler
for the iPhone called the iPhone Packager. The iPhone
Packager, which comes with Flash CS5, takes your .swf
file and converts it to a native iPhone application.
The workflow is similar to what you are familiar with
when building your Flash applications for the Web. You
write ActionScript 3 code and compile it to an .swf file.
An .swf file contains an abc block, which stands for
ActionScript byte code. This is what all of your
ActionScript 3 code gets compiled to when publishing
your file. The iPhone Packager goes through your .swf
file, finds all of the abc blocks, strips them out the file,
and converts them into native ARM assembly code using
the LLVM (low level virtual machine) compiler
infrastructure. Your application is then signed using the
Apple signing process. After it is signed, it is ready to be
deployed on a device running iOS (iPhone OS).
There are three devices that run iOS — the iPhone, the
iPod touch, and the iPad. Each device has different
features and different hardware. It is important to
understand the difference between each device. It is a
great idea to have as many of the different versions of
the devices on hand so that you can test your application
on each of them.
iPhone and iPhone 3G
The hardware for the first generation iPhone and the iPhone
3G are very similar. They both have a 620MHz underclocked
to 412MHz Samsung 32-bit RISC ARM processor, PowerVR
MBX Lite 3D GPU, 128MB DRAM, WiFi, Bluetooth 2.0, and a
2.0 megapixel camera. The biggest difference between the two
is their design. The first generation came with an aluminum
back, which was later switched to a glossy plastic back for the
3G version. Also, the iPhone 3G has assisted GPS and can
communicate over the 3G cell network.
03_622049-ch01.indd 203_622049-ch01.indd 2 11/6/10 12:08 AM11/6/10 12:08 AM
COPYRIGHTED MATERIAL

3
Chapter 1: Getting Started with iPhone Development
iPhone 3GS
The third generation of the iPhone is known as the 3GS.
Released a year after the iPhone 3G, the 3GS saw many
improvements and is the fastest of the three generations.
With an 833MHz underlocked to 600MHz processor,
PowerVR SGX GPU, and 256MB DRAM, you will notice a
significant difference in performance compared to the
earlier version. Applications will be more responsive, and
animations will be a lot smoother. Along with the
hardware upgrade, the 3GS also introduced voice control,
a digital compass, Nike+, and a 3.0 megapixel camera,
which also shoots video in VGA at 30 frames per second.
iPod
The first and second generation iPod touches have very
similar hardware to the iPhone and iPhone 3G. The
second generation processor ran at 532MHz, up from
the earlier 412MHz. Theses iPod touches were made in
8GB, 16GB, and 32GB models, all of which have been
discontinued except for the second generation 8GB. In
late 2009, Apple released new 32GB and 64GB versions
with improved hardware. These versions put the
processor, graphics, and memory on par with that of the
iPhone 3GS. They also came with earphones with a
remote and microphone integrated in. This enables you
to interact with the device through the microphone, just
like you can with any of the iPhone versions.
iPad
The iPad is Apple’s fastest mobile device to date and is
almost twice as fast as the latest iPhone and iPod
models. With the new 1GHz Apple A4 processor and
512MB DRAM, you can be assured that your
applications will feel faster than ever. The biggest change
is the 1024 x 768 resolution screen. This is quite a big
difference from the 320 x 480 resolution that the iPhone
and iPod touch have. Apps created for the iPod and
iPhone will still work on the iPad; however, to really take
advantage of the platform, you will want to carefully plan
your applications to support both.
Test for Multiple Devices
As you can see, there are many differences between all
the different models, and the iPad is a game changer. If
you want to get a few different devices for testing, you
can probably get away with two different devices. If you
already have an iPhone, try and get your hands on the
iPod with the opposite specs. For example, if you have
an iPhone 3GS, pick up one of the second generation
8GB iPod touches before they are discontinued. There
are lots of tips and things to think about in this book
when developing your applications to support multiple
platforms. It is a good exercise to try and take all of
these into consideration early on in development. Some
things to ask yourself are, “What does my application
look like on multiple resolutions?,” and “How does a
user interact with my application on a nontouch-enabled
device?.” Even if you ever only plan to support one
device today, allowing for multiple platforms in the
future will prove to be worthwhile.
03_622049-ch01.indd 303_622049-ch01.indd 3 11/6/10 12:08 AM11/6/10 12:08 AM

4
I
f you have developed Flash applications before, you
will already be familiar with some of the tools that
will be explored throughout this book. However,
there are a number of new applications that are specific to
iPhone development that you may not be so familiar with.
Some of these are completely optional when developing
iPhone applications, and some are only available on
Mac OS X.
Introducing the
Development Tools
Flash CS5 Professional
Flash CS5 is the main integrated development environment
(IDE) for developing Flash applications for the Web,
desktop, and Flash Lite–enabled mobile devices. In this
11th version of Flash, Flash CS5 introduces us to the
ability to publish Flash applications to native iPhone
applications. This is a pretty big accomplishment as it
brings iPhone development to not only the many Flash
developers in the world, but also the Windows operating
system. Flash will be the primary application used
throughout the book as you explore creating iPhone
applications.
Flash Builder
Flash Builder, formerly know as Flex Builder, is an Eclipse-
based IDE for creating Flex and AS3 projects. Flash Builder
is Adobe’s main ActionScript coding application. Flash CS5
does have the ability to write separate ActionScript code
and classes; however, Flash Builder provides a much more
feature-rich development environment. With the newest
version of Flash Builder, Adobe has also integrated better
workflow between it and Flash CS5. You are now able to
publish .fla files directly from Flash Builder without having
to switch between applications. One of the benefits of Flash
Builder is that it is built on top of Eclipse, a popular open
source IDE. This enables you to take advantage of the
many plug-ins built for Eclipse, which provide additional
functionality that you do not get in Flash CS5. There are
many plug-ins for managing source control, build
integration, and support for other programming languages.
Xcode
Xcode is part of Apple’s developer tools, which can be
downloaded with the iPhone SDK from the iPhone
Developer Program Portal, http://developer.apple.com/
iphone/. Xcode is a Mac OS X–only full-featured
development environment for creating applications with the
iPhone SDK. It is the primary development tool if you are
building Cocoa-based applications. Xcode’s Organizer
window has some great features to help manage data on
your device. You can install and uninstall applications and
provisioning files, as well retrieve application data and
crash reports from your device. This book will also explore
creating application settings bundles with Xcode, which
allow you to create application settings views that will
appear in the Settings application on your device.
Instruments
Instruments, also part of Apple’s developer tools, is an
OS X–only application that allows you to profile many
different parts of your application. It enables you to collect a
wide variety of data at the same time, allowing you to easily
compare the data and spot any abnormalities. Instruments
uses different instruments to collect data. There is an
instrument to profile almost every part of your application.
You can profile file access, memory usage, object allocation,
and OpenGL. Instruments can give you lots of insight into
what is actually going on behind the scenes when your
application is running. Instruments also allows you to
compare data between different runs of your application. For
example, if on your first run of your application you were
able to track down inefficiencies in your code, you could fix
them and run it again and compare the optimized data to the
first. This allows you to see the difference over time as you
optimize your application.
03_622049-ch01.indd 403_622049-ch01.indd 4 11/6/10 12:08 AM11/6/10 12:08 AM

5
Chapter 1: Getting Started with iPhone Development
iPhone Configuration Utility
The iPhone Configuration Utility is an application
available for both Windows and OS X and can be
downloaded for free from the Apple Web site. It is a
great application to manage profiles and configurations
of your device. When your device is connected, you can
add and remove provisioning profiles, install and
uninstall applications, and view console messages. The
iPhone Configuration Utility is great for configuring
multiple devices with the same settings. Because it is
designed to help enterprise users, you are able to create
configuration profiles that contain WiFi settings, VPN
configurations, email account settings, a calendar, and
certificates that allow your device to communicate with
enterprise systems. To download the iPhone
Configuration Utility, go to http://support.apple.com/kb/
DL926 for Windows or http://support.apple.com/kb/
DL851 for Mac OS X.
iTunes
iTunes is the most widely used digital music application.
This book discusses two features of the iTunes application.
The first has to do with managing your device. You can
use iTunes just like many of the other applications
mentioned earlier for adding and removing applications
and provisioning profiles. The other feature covered here is
the iTunes App Store. This is where your applications will
be available for download and purchase by other users.
Later in the book you will find out about everything that is
necessary to successfully submit your application.
iPhone Dev Center
The iPhone Developer Program Portal is the main online area for your iPhone development account. From here you can
download the latest iPhone SDK, developer tools, and any beta versions of iOS. There is also an enormous amount of
sample code that can be downloaded. Unfortunately, they are all in Objective-C, but some of the samples can be applied and
converted to ActionScript 3. There are also a lot of user guides that talk about the different tools and about how different
features of the device work. I encourage you to go through as much of the documentation as you can to get a better
understanding of the anatomy of an iPhone application.
iPhone Developer Program Portal
You can access the iPhone Developer Program Portal
when you log into your iPhone developer account. The
Developer Program Portal takes you through the
necessary steps to get your applications onto your
device so that you can test and distribute them. The
Program Portal allows you to add and invite new team
members and create certificates and provisioning files.
You can also add devices to your account so that you
can install your applications on them.
iTunes Connect
iTunes Connect, which can be accessed from the
Developer Program Portal, provides you with a set of
tools to manage your applications in the App Store.
When your application is completed, you can submit it to
Apple through iTunes Connect. Furthermore, you can set
up any needed banking and tax information if you plan
on selling your applications. After your application has
been approved by Apple and is ready for sale, iTunes
Connect provides you with a suite of Sales and Trend
reports that will show you where and how often your
application is being downloaded.
03_622049-ch01.indd 503_622049-ch01.indd 5 11/6/10 12:08 AM11/6/10 12:08 AM

6
W
ith the ability to publish iPhone applications
from Flash CS5 comes a set of new APIs that
enable you to take advantage of some of the
features the iPhone has to offer. However, Adobe’s
strategy is not to support only the iPhone platform but as
many platforms as possible. This is the reason you may
not see as many iPhone-specific features as you might
like or think. Adobe is being very pragmatic about what
new features it introduces and how its APIs will look on
future platforms, mobile or otherwise. Adobe’s goal is to
provide one consistent API for all platforms. For example,
the ActionScript code should be the same for accessing a
camera whether you are developing applications for the
Web, desktop, iPhone, or any other future supported
platform such as Android.
Introducing the
Available APIs
Accelerometer
The new Accelerometer class, which can be found in
the
flash.sensors package, gives you the ability to
interact with the accelerometer that is built into the device.
The iPhone accelerometer is a three-axis accelerometer
capable of measuring both acceleration and gravity. iOS
uses the accelerometer to detect its rotation as well as any
movements such as shakes.
GeoLocation
The flash.sensors.Geolocation class enables you
to interact with the device’s location sensor. Using this
class allows you to retrieve the location of your device
anywhere in the world. Coordinates are reported to you in
the form of latitude and longitude. There are differences in
the ways each device figures out your location. The iPhone
3G and 3GS have actual GPS chips onboard, which provide
the most accurate readings. However, the iPod touch does
not have a GPS onboard but uses WiFi positioning services
in order to figure out your location. It is important to
understand that every device that has iOS installed does
not necessarily have the same location sensor and that
accuracy will differ greatly between devices.
Stage Orientation
There are a few new classes and methods to help handle
stage orientation changes and updates. The
flash.
display.StageOrientation
class defines a set of
valid orientations in which the stage can be set. The
flash.display.Stage.setOrienation method,
which is new in AIR 2.0, allows you to set the orientation
of the stage based on one of the static properties in the
StageOrientation class. And finally there is a
flash.events.StageOrienationEvent class,
which allows you to listen for when the stage orientation is
changing and has changed.
Camera Roll
The flash.media.CameraRoll class enables you to
save a
BitmapData instance to the iPhone’s camera roll.
This feature is currently only supported on the iPhone, and
at the time of writing this, there is no fully supported way
to load any of the images into your application.
03_622049-ch01.indd 603_622049-ch01.indd 6 11/6/10 12:08 AM11/6/10 12:08 AM

7
Chapter 1: Getting Started with iPhone Development
Touch Event
The flash.events.TouchEvent class is used to
detect when a user touches the screen with his or her
finger. The
TouchEvent class is very much the
alternative to the
MouseEvent class but for touches. As
well as being available on the iPhone, the
TouchEvent
class is also available on AIR applications in Windows 7
with a touch-enabled screen.
Gesture Transform Event
The flash.events.GestureTransformEvent
class is used to detect specific user interactions with
multiple fingers. Touch-enabled interfaces are still very
much in their infancy; however, there is already a
standard set of gestures that a user understands and
expects when interacting with your applications. The
GestureTransformEvent class can detect four
different types of gestures: swipe, rotate, pinch and
zoom, and pan. Swipe detects a single finger swiping
across the screen in the left, right, up, or down direction.
The rotate gesture allows you to place two fingers on an
object and rotate one finger around the other to rotate the
object. The pinch and zoom gesture enables you to zoom
in and out of objects by moving your fingers closer or
farther apart from each other. Finally, the pan gesture lets
you pan an object in any direction with two fingers. Some
of these gestures are supported in Windows 7, OS X
10.5.3, and Windows Mobile 6.5, as well as on the
iPhone. If you plan on supporting more than one
platform, you should double check which gestures are
fully supported on each before starting development.
FLV
FLV is Adobe’s Flash Video format. There are two
methods of playing an FLV video on the iPhone. The first
is to import the video onto the Timeline in an FLA file.
This will create a
MovieClip with your video in it, and
you will be able to control it just as you would a normal
MovieClip. The second method is to bundle the file
with the application and load it at runtime. Both of these
methods are covered in Chapter 8, “Working with
Video,” later in the book.
SharedObjects
SharedObjects are Flash’s version of a browser
cookie. They allow your Flash application to save user
data on the device. This allows your application to load
the save data when you come back to the application.
NetConnection
Adobe has added NetConnection support for iPhone
applications. The
NetConnection class gives you the
ability to connect to a Flash Media Server to create peer-
to-peer applications, as well as view streaming video on
your device. It will also allow you to communicate with
Flash Remoting and the AMF protocol.
SQLite Database
The SQLite database is the most widely deployed SQL database in the world. When Adobe released AIR 1.0, it included
the ability to communicate with SQLite databases from your applications. This gives you the ability to save large and
complex data locally on the device. The iPhone also has SQLite libraries to develop with. A lot of the data on your phone
is stored in SQLite databases, such as your Contacts and Call History. Adobe has given us the ability to create, save, and
load data from a SQLite database.
03_622049-ch01.indd 703_622049-ch01.indd 7 11/6/10 12:08 AM11/6/10 12:08 AM

8
A
pple has placed certain restrictions on what
developers can and cannot do when creating
their applications. This allows Apple to have
control over the quality and stability of applications that
are available in the App Store. Some of these restrictions
have forced Adobe to restrict access to certain
ActionScript 3.0 APIs when developers are creating
iPhone applications.
Check What APIs
Are Not Available
Pixel Bender and HTML Loader
In the App Store terms of use, it states that applications
cannot run interpreted code. This is the reason that Adobe
had to compile a Flash project to native ARM assembly
instead of having your SWFs running on an iPhone version
of the Flash Player. This is the same reason that Pixel
Bender and
HTMLLoader are not available. Currently, the
only way to get Pixel Bender kernels to work on the iPhone
is to include the code from the Flash Player, which
interprets the kernel.
HTMLLoader is the same concept.
You may be thinking that iPhone applications can already
display HTML pages. This is true; however, Adobe has yet
to implement the functionality for providing developers
access to it. If Adobe were able to bundle its existing code
used to display HTML pages, it probably would have, but
Apple’s terms of use makes everything a little trickier.
New AIR 2.0 Networking Classes
With the most recent release of AIR 2.0, Adobe has
introduced some new networking classes. The
ServerSocket class enables you to create your own
socket server and have other AIR clients connect to it via
the
Socket class. This feature allows you to pass data to
and from applications. The
ServerSocket class is
currently not available, but you can create a
Socket in
your iPhone application and connect to one running on
your computer.
The
DatagramSocket class enables you to send and
receive UDP data. This can be used to create peer-to-peer
applications or gaming. It is more unreliable than a TCP
socket because you cannot guarantee the order of the data
you will receive and lost packets are not retransmitted or
even detected.
Adobe has also introduced a set of classes that can be
used in conjunction with the new socket and server
classes. For example, the
NetworkInfo class provides
you with a list of all available network interfaces available
on the current machine. From those you are able to find
out what type of interface they are as well as the IP for the
address. This comes in handy when you are creating peer-
to-peer applications where you might not know the IP
address of the other peer.
There is technically no reason why these classes are
not part of the Flash-to-iPhone offering, and they have
been a highly requested feature. Adobe does plan on
implementing these sometime in the future — when,
however, is very hard to say.
Camera
One of the main features of the iPhone is its onboard
camera. You can take pictures — and video on the 3GS —
and save them to your camera roll. Currently, there is not
access to the camera in order to take pictures. However,
there is the ability to take a snapshot of the screen and
save it to the camera roll. The final piece of functionality
currently not fully supported is being able to select an
image from the camera roll. This is by far the highest
requested feature by developers, and Adobe will be
revisiting this feature in the future.
03_622049-ch01.indd 803_622049-ch01.indd 8 11/6/10 12:08 AM11/6/10 12:08 AM

9
Chapter 1: Getting Started with iPhone Development
Microphone
Support for the microphone is also missing in the
iPhone Packager. AIR 2.0 introduced the ability to
receive the sample data from the microphone, which
would enable you to encode the data and save it out.
This would allow developers to create voice-recording
applications or allow you to use voice as an additional
way to interact with your device.
AS1 and AS2
This may come as a surprise to some developers, but
there are still many developers who have not adopted
AS3 and are still using AS2 or AS1. If you are one of
these developers or have some older projects that you
are looking to convert, you will need to start learning
AS3 and start converting your projects. Currently, the
iPhone Packager works only with AS3, and there will not
be support for any earlier version of ActionScript. All the
tasks and code in this book are in ActionScript 3, so if
you are not familiar with it, I suggest you read up on
ActionScript in order to get up to speed first; I recommend
the book ActionScript: Your visual blueprint for creating
interactive projects in Flash CS4 Professional, available
from Wiley Publishing.
In App Purchase
One thing that has really helped developers sell
applications is the availability of a free version of your
application. These are sometimes referred to as Lite
versions. However, you were not able to really tell if any
of the customers who played the Lite version actually
bought the full version of the application. To help with
this, Apple introduced In App Purchase. This allows you
to set up a mini App Store inside your game. Now you
can provide a Lite version of your application and have
the customer purchase new levels or items from within
the game. The same App Store rules apply and Apple
takes 30% of any transaction. However, this allows you
to keep your users engaged in your application and offers
you control over what and how they upgrade. Currently,
In App Purchases are not available for Flash CS5 iPhone
applications. Adobe understands that this is a key feature
that will allow users to monetize their applications. Adobe
is currently looking at ways that it can provide this
feature in the iPhone Packager in future updates.
iPhone Standard Controls
One of the great things about iPhone applications, and
even OS X desktop applications, is the design and user
experience. Apple spends a lot of time creating controls
and components for developers to use so that
applications have a consistent look and feel, no matter
the developer. Currently, there is not an iPhone-specific
component set, nor do you have the ability to use the
ones in the iPhone SDK. However, there are some PSD
templates online that people have provided that have
most of the controls. This is not an ideal solution
because you will have to still develop the controls, but
the more you can make your app look like an application
built with the iPhone SDK, the better.
Push Notifications
Push notifications enable you as a developer to send
notifications to users who have downloaded or purchased
your applications. The great thing about this is that you
can receive notifications even when you are not running
the application. For example, an instant messaging
application could notify you when someone from your
contact list has come online. Push notifications are
currently unavailable for all Flash CS5 iPhone
applications. This does remain one of the most requested
features, and Adobe is looking at providing it in an update
to the iPhone Packager after the Flash CS5 launch.
03_622049-ch01.indd 903_622049-ch01.indd 9 11/6/10 12:08 AM11/6/10 12:08 AM

10
2
1
3
8
9
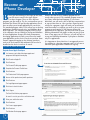
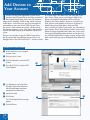
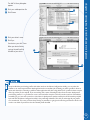
Register As an Apple Developer
1 In a browser, go to http://developer.apple.com/
programs/start/register/create.php.
2 Click Create an Apple ID.
3 Click Continue.
The Personal Profile page appears.
4 Complete the Personal Profile form.
5 Click Continue.
The Professional Profile page appears.
6 Answer all the professional profile questions.
7 Click Continue.
The Legal Agreement page appears.
8 Click here to check the box.
9 Click I Agree.
The Email Verification page appears.
An email is sent to you with a verification code.
0 Enter your verification code.
! Click Continue.
The Success page appears.
@ Click Continue.
The Member Center page appears.
Become an iPhone Developer
B
efore you start with any of the topics in this book,
you will want to enroll in the Apple iPhone
Developer Program. There are three different
programs you can enroll in. The free version allows you to
download the iPhone SDK and develop applications, but it
does not allow you to install applications to your device.
The standard program, which is $99, allows you to develop
applications, install them on devices, and distribute them
in the App Store. The enterprise program, which is $299,
is for companies who are looking to develop and distribute
in-house applications. Because this book demonstrates
developing applications in Flash, you will need to install
your applications on the device in order to test them. Some
features support debugging on the desktop, but others
such as the accelerometer and multitouch will need to be
installed on the device in order to be tested.
Chances are that the $99 standard program will be
exactly what you need. The standard program comes in
two forms, Individual and Company. If you choose
Individual, you will not be able to add any team members
to your account later on. After you have signed up and
enrolled in a program, Apple will send you an activation
email that outlines everything you need to do to get your
account up and running. If you plan on selling your
application in the App Store, you will need to set up your
banking information with Apple so that you can get your
share of any apps you sell. However, you will not have to
set up your banking information if you plan to distribute
only free applications.
It is important to know that there is an approval process
for enrolling in a developer program, and it is best not to
wait until your application is finished to sign up.
Become an
iPhone Developer
03_622049-ch01.indd 1003_622049-ch01.indd 10 11/6/10 12:08 AM11/6/10 12:08 AM

11
Chapter 1: Getting Started with iPhone Development
$
#
)
q
After you have signed up as an iPhone developer, you will want to install the iPhone SDK. Unfortunately, this is only
available for Intel-based OS X machines, with Leopard or later installed. Installing the SDK is not a requirement for
creating applications with Flash CS5 and is completely optional. However, it does provide you with some great
debugging tools that are covered later in this book. There is also a great deal of information about the iPhone
platform in the Developer Program Portal. There are many articles that explain how the iPhone works with lots of
details about the hardware itself. There are also several code examples that can be ported to Flash if the feature is
available. Even if you never intend to write your applications with the iPhone SDK provided by Apple, I strongly
recommend reading through all the “Getting Started” articles in the Developer Program Portal. They will give you a
better understanding of what makes a great iPhone application and the types of things Apple is looking for when it
reviews your application.
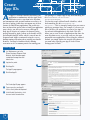
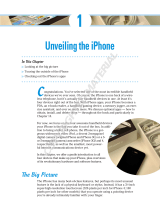
* Enter your billing information.
( Click Continue.
The Select Your Program page appears.
) Click iPhone Developer Program.
q Click Continue.
The Review & Submit page appears.
w Review your information.
e Click Continue.
The Program License page appears.
r Accept the terms.
t Click I Agree.
The Purchase Page appears.
y Click Add to Cart.
An activation email will be sent to you.
Enroll in the iPhone Program
# Go to http://developer.apple.com/programs/start/
standard/create.php.
$ Click I’m Registered As a Developer with Apple.
% Scroll down and click Continue.
The Enrollment Selection page appears.
^ Click your enrollment type, such as Individual.
Note: You may be asked to log into your account.
& Complete any account profile questions.
The Billing Information page appears.
03_622049-ch01.indd 1103_622049-ch01.indd 11 11/6/10 12:08 AM11/6/10 12:08 AM

12
7
2
2
3
4
5
8
9
6
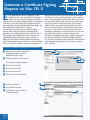
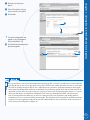
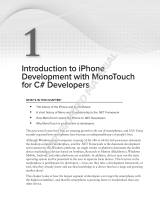
7 Click Keychain Access.
8 Click Certificate Assistant.
9 Click Request a Certificate From a
Certificate Authority.
1 Open the Keychain Access application
by double-clicking its icon in the
/Applications/Utilities folder.
2 Click Keychain Access ➔ Preferences.
The Preferences dialog box appears.
3 Click the Certificates tab.
4 Click here and select Off.
5 Click here and select Off.
6 Click here to close the dialog box.
Generate a Certificate Signing Request on Mac OS X
E
very application needs to be signed by a valid
certificate before it can be installed on an iPhone
or iPod. You can request development certificates
from the iPhone Developer Program Portal. A development
certificate is used only during the development process
and is valid only for a specified period of time. Apple can
also revoke the certificate before it expires.
You will first need to generate a certificate signing
request (CSR) using the Certificate Assistant in the
Keychain Access application that comes with Mac OS X.
The Keychain Access application can be found in the
/Applications/Utilities directory on your hard drive.
Make sure that Online Certificate Status Protocol and
Certificate Revocation List are both set to Off in Keychain
Access’s Preferences window, under the Certificates tab.
When you create your request, the Certificate Assistant
will ask you to enter your email address and a common
name. When entering this information, make sure to use
the same email address and name that you used to sign
up for your iPhone developer account. The CA Email
Address field is not required and should be left blank.
If the Let Me Specify Key Pair Information check box is
present, be sure to check it so that you can select the
appropriate information. If for some reason it is not there,
you should still be able to continue without issue.
This process simultaneously creates a public and private
key that will establish your iPhone developer identity.
The Certificate Assistant creates a CSR file, which you will
upload through the Program Portal in order to request
your certificate.
Generate a Certificate Signing
Request on Mac OS X
03_622049-ch01.indd 1203_622049-ch01.indd 12 11/6/10 12:08 AM11/6/10 12:08 AM

13
Chapter 1: Getting Started with iPhone Development
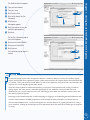
@
0
!
&
*
$
(
#
A certificate signing request is like an application form for a certificate. When you create your certificate signing
request, the Keychain Access application creates a public and private key. The request contains the information that
you entered, such as your name and email address, as well as your public key. Your private key is not included in the
request but is used to digitally sign the entire request.
If you have done any Web site administration before, you may have some experience with creating a certificate
signing request. The same process is used when applying for an SSL certificate so that your Web server can
communicate over a secure socket layer (SSL). SSL technology protects Web sites and allows visitors to trust that
their data is properly encrypted.
Processing credit card information for an online shopping site, logging in, and submitting personal information such
as drivers’ license numbers or banking information are all examples of when you would use or interact with SSL.
In most modern Web browsers, a lock icon will appear in or near the address bar, signaling that the site is using a
secure certificate. Clicking this lock will give you more information about the certificate and what type of encryption
it is using.
The Key Pair Information page of
the assistant appears.
& Click here and select 2048 Bits.
* Click here and select RSA.
( Click Continue.
Your certificate signing request is
created.
The Certificate Assistant appears.
0 Type your email address.
! Type your name.
@ Click Saved to Disk.
# Click Let Me Specify Key Pair
Information.
$ Click Continue.
A dialog box appears.
% Select the location to save your
certificate signing request.
^ Click Save.
03_622049-ch01.indd 1303_622049-ch01.indd 13 11/6/10 12:08 AM11/6/10 12:08 AM

14
2
1
3
4
5
6
7
The Administrator window appears.
4 Navigate to the bin directory of your
OpenSSL install, such as cd C:/
OpenSSL/bin.
5 Type openssl genrsa –out.
6 Type the name for your key, such as
mykey.key.
7 Type 2048.
8 Press the Enter key.
Your private key is created.
1 In an Explorer window, navigate to
your Windows System32 directory.
2 Right-click the cmd.exe file.
3 Click Run As Administrator.
Generate a Certificate Signing Request in Windows
E
very application needs to be signed by a valid
certificate before it can be installed on an iPhone
or iPod. You can request development certificates
from the iPhone Developer Program Portal. A development
certificate is used only during the development process
and is valid only for a specified period of time. Apple can
also revoke the certificate before it expires.
You will first need to generate a certificate signing
request (CSR) file using OpenSSL. You can download the
application from the OpenSSL Web site, www.openssl.
org/related/binaries.html. After you have installed the
application, you will use the command line to create your
private key and CSR file. Be sure not to ignore any error
messages as they may still produce files that are
unusable. If you see any error messages, check your
syntax and try the command again.
One common error that you may see is “Unable to write
‘random state.’” This error suggests that there were not
enough privileges to write a file to a certain directory.
This is usually caused by the command prompt
application not being run by the administrator.
After your private key has been created, you can create
your .csr file. When you creating your request, you will
be asked to enter your email address and a common
name. When entering this information, make sure to use
the same email address and name that you used to sign
up for your iPhone developer account.
After your certificate signing request file has been created
without any errors, you can upload it to the iPhone
Developer Program Portal.
Generate a Certificate
Signing Request in Windows
03_622049-ch01.indd 1403_622049-ch01.indd 14 11/6/10 12:08 AM11/6/10 12:08 AM

15
Chapter 1: Getting Started with iPhone Development
@
#
$
%
9 0 !
A certificate signing request is like an application form for a certificate. The request contains the information that
you entered, such as your name and email address, as well as your public key. In the steps here, you created a
private key file, which is not included in the request but is used to digitally sign the entire request.
If you have done any Web site administration before, you may have some experience with creating a certificate
signing request. The same process is used when applying for an SSL certificate so that your Web server can
communicate over a secure socket layer (SSL). SSL technology protects Web sites and allows visitors to trust that
their data is properly encrypted.
Processing credit card information for an online shopping site, logging in, and submitting personal information
such as drivers’ license numbers or banking information are all examples of when you would use or interact
with SSL.
In most modern Web browsers, a lock icon will appear in or near the address bar, signaling that the site is using a
secure certificate. Clicking this lock will give you more information about the certificate and what type of encryption
it is using.
@ Type your email address followed by
a comma.
# Type CN=, your name, such as Julian
Dolce, and then a comma.
$ Type C= and your country code, such
as US.
% Close the quotes and press the Enter key.
Your certificate signing request is
created.
9 Type openssl req –new –key.
0 Type the name of your .key file, such as
mykey.key.
! Type –out CertificateSigningRequest.
certSigningRequest –subj “/
emailAddress=.
03_622049-ch01.indd 1503_622049-ch01.indd 15 11/6/10 12:08 AM11/6/10 12:08 AM

16
3
1
4
The Current Development Certificates
page appears.
4 Click Request Certificate.
1 In a Web browser, go to the iPhone
Developer Program Portal Web site,
http://developer.apple.com/iphone/
manage/overview/index.action.
2 Login into the portal.
The Welcome page appears.
3 Click Certificates.
Upload Your Certificate Signing Request
A
fter you have created a certificate signing
request, in the form of a .csr file, you are able
to send it to Apple. If you have not created a
certificate signing request file, see the earlier section
“Generate a Certificate Signing Request on Mac OS X”
or “Generate a Certificate Signing Request in Windows,”
depending on your operating system type.
You can upload your request through the iPhone
Developer Program Portal in the Certificates section. Make
sure that you are on the Development tab before clicking
the Request Certificate button. You can now select the
.certSigningRequest file that you created when creating
your certificate signing request and upload it to Apple.
After Apple has verified your CSR, it will create a digital
certificate file from the information that was included in
your request. However, before you can download it, your
request will go to your team agent and any team admins
who have the authority and responsibility to approve and
reject your request. Chances are, if you signed up as an
individual, you are the team agent and can approve your
own certificate. However, if you are part of a bigger team,
you may have to wait until your certificate is approved by
one of them in order for you to download it. For a better
understanding of the roles and responsibilities of the
different types of team members, download the Program
Portal User Guide on the home page of the Program
Portal. Your team agent and team admins will receive an
email notifying them that they need to approve your
certificate. After it is approved, you will be sent an email
notifying you that it is ready to be downloaded from the
Program Portal.
Upload Your Certificate
Signing Request
03_622049-ch01.indd 1603_622049-ch01.indd 16 11/6/10 12:08 AM11/6/10 12:08 AM

17
Chapter 1: Getting Started with iPhone Development
5
8
9
The iPhone Developer Program Portal allows you to administer the development of your applications. It contains
the ability to add and remove team members and request and create all the necessary files that you need in order to
install your application on your device. It is also host to a wealth of information that will help you get started in
creating applications. I highly encourage you to watch the videos and read the users’ guides that can be accessed
from the Program Portal home page. You can also request support from Apple. With each developer account, you
receive two engineering consultations per membership year. Also, there is a fairly extensive frequently asked
questions area on various topics that pertain to the iPhone Developer Program. If you ever have any questions
about a topic, be sure to check these, as there is a good chance that you will find your answer there.
There is also an App Store resources section that has information on helping you promote your application,
becoming an iTunes affiliate so that you can earn commission on your sales, and app sales and trends.
Your certificate signing request is
uploaded to Apple.
9 To download your certificate, click
Download on the Current Development
Certificates page.
The Create iPhone Development
Certificate page appears.
5 Click Choose File.
A dialog box appears.
6 Browse to the CSR file that you created
in section “Generate a Certificate Signing
Request on Mac OS X” or “Generate a
Certificate Signing Request in Windows.”
7 Click OK.
You are returned to the Create iPhone
Development Certificate page.
8 Click Submit.
03_622049-ch01.indd 1703_622049-ch01.indd 17 11/6/10 12:08 AM11/6/10 12:08 AM

18
3
5
4
2
6
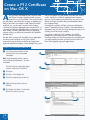
5 Right-click the private key that you
installed.
6 Click Export “Key Name,” in which Key
Name is the name of your key.
1 In a Finder window, double-click the
certificate file that you downloaded
from Apple.
Note: See the preceding section, “Upload
Your Certificate Signing Request,” for more
information.
The Keychain Access application opens,
and your certificate is installed in it.
2 Click login.
3 Click Keys in the Category list.
4 Click here to expand your private key.
Create a P12 Certificate on Mac OS X
A
fter you have downloaded your certificate from
the iPhone Developer Program Portal, you can
convert it to a P12 certificate. This is the file that
you will add to your Flash files in order to digitally sign
them. If you have not created a valid iPhone developer
certificate yet, see the earlier section in this chapter
“Generate a Certificate Signing Request on Mac OS X” or
“Generate a Certificate Signing Request in Windows” for
more details. Find the instructions for your operating
system, as there are different instructions for Windows
and Mac OS X.
For Mac OS X, you use the Keychain Access application
to convert your certificate to a P12 one. Before
conversion, you can find your CSR in the login items
under the Keychains category. In the listing of keys, you
will see the public key and private keys that you created
earlier, during the certificate signing request creation
process. If you expand your private key, you will see the
iPhone developer certificate that you downloaded from
the Program Portal.
Selecting the certificate will give you more information
about it, particularly when it expires. This information is
important, and you will need to go through the process of
creating a new one when it expires.
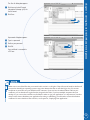
As you are creating the P12 certificate, you will be
prompted to create a password to associate with your
certificate. Make sure that the password is something that
you will remember because you will need it in order to
have Flash digitally sign your applications.
Create a P12 Certificate
on Mac OS X
03_622049-ch01.indd 1803_622049-ch01.indd 18 11/6/10 12:08 AM11/6/10 12:08 AM

19
Chapter 1: Getting Started with iPhone Development
7
8
9
0
!
Make sure to save all the files that you created in this section in a safe place. They will come in handy in the future if
you need to reinstall your operating system at any point. Because the files are not that big in size, you can even
email them to yourself in case your hard drive fails. However, if you ever have a hardware failure and lose your
certificate, you can download it again from the Program Portal. Also, if you have multiple computers that you
develop on, you can use the same files on all of them in order to sign your applications. It is important to note that
when it comes time to distribute your application for testing or submitting, you will need to create a distribution
certificate. For more details on how to do this, see Chapter 18, “Deploying Your Application.”
A password dialog box appears.
9 Type in a password.
0 Confirm your password.
! Click OK.
Your certificate is converted to
a P12 one.
The Save As dialog box appears.
7 Click here and select Personal
Information Exchange (.p12) for
the file format.
8 Click Save.
03_622049-ch01.indd 1903_622049-ch01.indd 19 11/6/10 12:08 AM11/6/10 12:08 AM

20
2
1
3
4
5 6 7 8 9
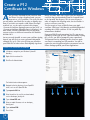
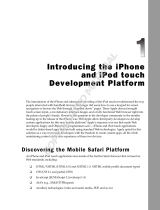
The Administrator window appears.
4 Navigate to the bin directory of your OpenSSL
install, such as cd C:/OpenSSL/bin.
5 Type openssl x509 –in.
6 Enter the path to the .cer file you downloaded,
such as developer_identity.cer.
7 Type –inform DER –out.
8 Enter an output filename, such as developer_
identity.pem.
9 Type –outform PEM.
0 Press Enter.
1 In Explorer, navigate to your Windows System32
directory.
2 Right-click the cmd.exe file.
3 Click Run As Administrator.
Create a P12 Certificate in Windows
A
fter you have downloaded your certificate from
the iPhone Developer Program Portal, you can
convert it to a P12 certificate. This is the file that
you will add to your Flash files in order to digitally sign
them. If you have not created a valid iPhone developer
certificate yet, see the earlier section in this chapter
“Generate a Certificate Signing Request on Mac OS X” or
“Generate a Certificate Signing Request in Windows” for
more details. Find the instructions for your operating
system, as there are different instructions for Windows
and Mac OS X.
Just as you used OpenSSL to create your certificate signing
request, you will use it to create a personal information
exchange file (.p12). This is the file that you will add to
your Flash files in order to have Flash digitally sign them.
Before you start, make sure to place your development
certificate that you downloaded from the Program Portal
to the OpenSSL bin directory. This is not necessary in
order to complete the following tasks, but it will make it
easier to reference your files.
The first step is to create a PEM file from your Apple
certificate. PEM is an X.509 Base64 encoded distinguished
encoding rules (DER) certificate. X.509 is a public key
infrastructure standard.
From your PEM file and your private key file, you can use
OpenSSL to create your .p12 file. Upon successfully creating
the .p12 file, you will be prompted to enter a password.
This password can be anything you like; however, make
sure that it is something you will remember. You will be
required to enter this password when you want to have the
iPhone Packager publish your iPhone applications.
Create a P12
Certificate in Windows
03_622049-ch01.indd 2003_622049-ch01.indd 20 11/6/10 12:08 AM11/6/10 12:08 AM

21
Chapter 1: Getting Started with iPhone Development
*
! @ # $ %
&
Make sure to save all the files that you created in this section in a safe place. They will come in handy in the future if
you need to reinstall your operating system at any point. Because the files are not that big in size, you can even
email them to yourself in case your hard drive fails. However, if you ever have a hardware failure and lose your
certificate, you can download it again from the Program Portal. Also, if you have multiple computers that you
develop on, you can use the same files on all of them in order to sign your applications. It is important to note that
when it comes time to distribute your application for testing or submitting, you will need to create a distribution
certificate. For more details on how to do this, see Chapter 18.
& Create a password.
* Confirm your password.
Your certificate is converted to
a P12 one.
! Type openssl pkcs12 –export
–inkey.
@ Enter the path to your key file,
such as mykey.key.
# Type –in and enter the path to
your .pem file, such as
developer_identity.pem.
$ Type –out.
% Enter a name for the .p12 that
will be created, such as iphone_
dev.p12.
^ Press the Enter key.
03_622049-ch01.indd 2103_622049-ch01.indd 21 11/6/10 12:08 AM11/6/10 12:08 AM
Page is loading ...
Page is loading ...
Page is loading ...
Page is loading ...
Page is loading ...
Page is loading ...
Page is loading ...
Page is loading ...
-
 1
1
-
 2
2
-
 3
3
-
 4
4
-
 5
5
-
 6
6
-
 7
7
-
 8
8
-
 9
9
-
 10
10
-
 11
11
-
 12
12
-
 13
13
-
 14
14
-
 15
15
-
 16
16
-
 17
17
-
 18
18
-
 19
19
-
 20
20
-
 21
21
-
 22
22
-
 23
23
-
 24
24
-
 25
25
-
 26
26
-
 27
27
-
 28
28


Wiley 978-0-470-62204-9 Datasheet
- Category
- Software manuals
- Type
- Datasheet
Ask a question and I''ll find the answer in the document
Finding information in a document is now easier with AI
Related papers
-
 Wiley 978-1-1180-0759-4 Datasheet
-
 Wiley 978-0-470-87870-5 Datasheet
-
 Wiley 978-1-1180-1254-3 Datasheet
-
 Wiley 978-0-470-63782-1 Datasheet
-
 Wiley 978-0-470-25155-3 Datasheet
-
 Wiley 978-0-470-55651-1 Datasheet
-
 Wiley 978-0-470-34472-9 Datasheet
-
 Wiley 978-1-1180-2197-2 Datasheet
-
 Wiley 978-0-470-54966-7 Datasheet
-
 Wiley 978-0-470-56552-0 Datasheet


Other documents
-
Adobe FLEX 2-PROGRAMMING ACTIONSCRIPT 3.0 User manual
-
-
-
 UrbanUtilities Developer Services Portal How To Operating instructions
-
MACROMEDIA FLASH 8-FLASH Develop Manual
-
Geovision GV-AI Assistant Mobile App Installation guide
-
Aiphone IX Install Manual
-
-
-
Siemens Sony User manual
