Veho VDC-001-KZ1-F User manual

Category
Drive recorders
Type
User manual

Veho VDC-001-KZ1-F is a feature-rich dashcam that captures crisp videos in full HD 1080p resolution. With a 120-degree wide-angle lens and Sony STARVIS sensor, it provides an expansive view of the road, ensuring you capture every detail. The built-in G-sensor automatically detects sudden impacts and locks the footage, protecting it from being overwritten. The device supports microSD cards up to 128GB, allowing for ample storage of your recordings.

Veho VDC-001-KZ1-F is a feature-rich dashcam that captures crisp videos in full HD 1080p resolution. With a 120-degree wide-angle lens and Sony STARVIS sensor, it provides an expansive view of the road, ensuring you capture every detail. The built-in G-sensor automatically detects sudden impacts and locks the footage, protecting it from being overwritten. The device supports microSD cards up to 128GB, allowing for ample storage of your recordings.

1
VDC-001-KZ1-F
32
EN
1. What’s in the box?Introduction
The Muvi Drive Cam is perfect to capture your journey in full HD 1080p. This manual will
show you how to operate the camera, the Muvi Drive Cam app, and maintenance tips for
your camera.
Please read and follow this manual carefully to ensure that you maximise every capability
of the Drive Cam. Keep this manual safe for future reference.
Veho cannot guarantee that all incidents will be captured by the Muvi Drive Cam.
1. Muvi Drive Cam camera
2. 12v Power adapter
3. Adhesive windscreen bracket
4. Quick start guide
5. Software/manual CD
1
2
3
54
EN
2. Guide to controls
1. Mode
2. Power button
3. AV in
4. Micro USB/Power port
5. MicroSD slot
6. Reset
7. HDMI output slot
8. Arrow keys
9. Snapshot
10. Volume
11. SOS file lock
12. Menu/Return
13. Wifi
14. Rec/OK
15. Microphone
16. Display sleep
Mode Switch between recording or playback modes
Power button Switch on/off
AV in Rear camera connection port
Micro USB/Power port For supplied power adaptor or USB data cable
MicroSD slot Supports Class 10 (up to 128GB capacity)
Reset Force camera to reboot
HDMI output Outputs to external display
Arrow keys Navigate menus and select videos for playback,
or forward/rewind during playback
Snapshot Capture snapshot of current recording
Volume Change notification/alert volume
SOS file lock Protects file from being overwritten
Menu/Return Press while recording to activate parking surveillance
Wifi Turn on wifi access
Rec/OK Stop/start recording, pause/play in playback,
OK button in menu
Microphone To turn audio recording on/off
Display sleep Press & hold to turn on/off display.
This will not affect the recording status
1234
5
8 12
13
14
11
15
9
10
16
7
6
76
EN
4. Charging the Drive Cam3. Installing the Drive Cam
1. Ensure both the inside and outside of the windscreen are clean and dry, this will
ensure the mount sticks securely, and that the cameras view is not obstructed.
2. Position camera so that it will not obstruct the drivers view (we recommend
behind the rear-view mirror).
3. Stick the mount into position, ensuring it is fully secure.
We recommend fully charging the Muvi Drive Cam before its first use. To charge the camera
use the 12v cable supplied, attach the corresponding ends into the corresponding ports.
We recommend leaving the camera connected to a power source at all times when in use.
Suggested cable roung for front camera.
12v
12v
98
EN
5. LED indicators 6. Using the Drive Cam
Power on/Power off
Press the ‘Power Button’ once to power on the
camera; a solid red indicator light will appear and
the device loading screen will turn on.
When using the camera for the first time you will
be prompted to set the language, time, and date.
The GPS will sync automatically. Once on, press the
‘Power Button’ once to view ‘Path Analysis’ screen.
This will show you the statistics of your drive.
Powering off the camera is done by pressing and holding the ‘Power Button’ for
approximately two seconds; the red indicator light will disappear and the screen will
shut down before the camera turns off.
Video recording
When on the home screen to begin recording
press the ‘Record Button’ for approximately
one second; the indicator LED will flash slowly
and the timer will appear on the screen.
The camera will also automatically switch on and
begin recording when connected to the power
source.
Understanding the LED indicator lights:
Steady blue Unit is off and charging
Steady pink Unit is on and charging but not recording
Steady red Unit is on but not charging or recording
Flashing red Unit is recording and battery is full
Flashing between Unit is recording and charging
blue and pink
Flashing blue Charging malfunction
1110
EN
To stop recording press the ‘Record Button’ once again, the file will be saved to the
microSD card automatically; the LED indicator will turn solid red and the timer will stop.
The camera automatically loop records, overwriting the oldest footage on the card
replacing it with new footage. If you wish to save footage from the SD card, you will
need to save it externally.
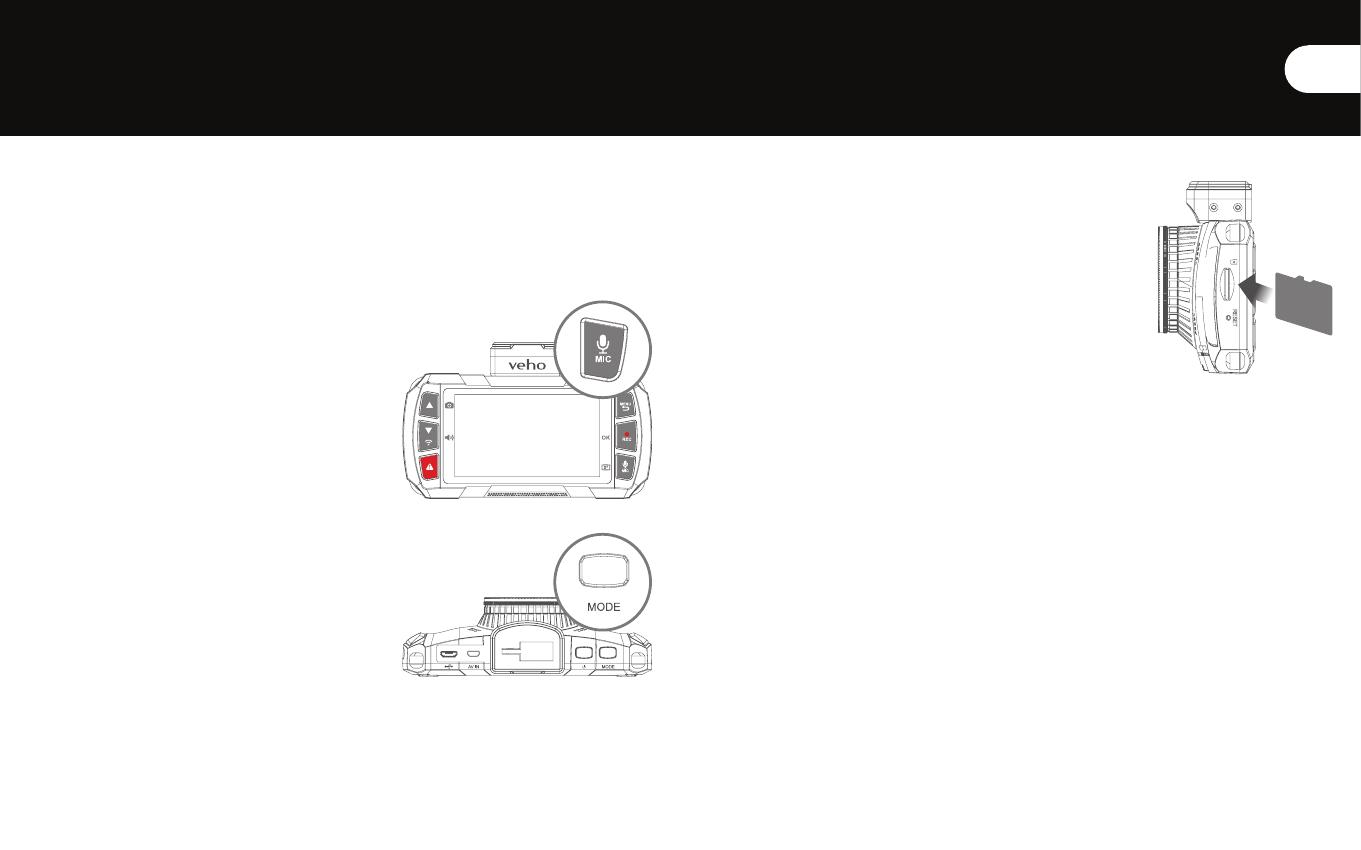
Audio recording
Press the ‘MIC Button’ to mute or unmute the
microphone. A microphone icon will appear on
the screen indicating whether the microphone
is on or off.
You can also use the ‘MIC Button’ to turn the
display on or off by holding it down for two
seconds.
Playback mode
To playback footage on the camera press the ‘Mode
Button’ once, this will bring up the latest recorded
file; use the up and down arrows to scroll through
all the saved footage.
To play footage press the ‘OK Button’, to pause
the footage at any point please press the ‘OK
Button’ again.
To get back to the home screen press the ‘Menu Button’.
MicroSD card
Before using a new microSD card you will need to format the
card in the camera settings. We recommend formatting your
microSD card at least once every two weeks, this will ensure
invisible memory is cleared and also reduce the risk of file
corruption. Formatting the card will completely wipe all data
from the card, ensure that any files you wish to keep are
saved externally. If formatting through a computer ensure
the card is in FAT32 format.
Supports microSD cards up to 128GB.
Please note Veho is not responsible for the loss of any data.
1312
EN
To access the camera settings press the ‘Menu
Button’. Browse the menus by using the ‘Up and
Down’ arrows. To select a category press the
‘OK Button’.
Below are some of the settings you can edit:
n Date/Time
n Volume
n Language
n Screen Saver
n Display Brightness
n Flicker Reduction
n Format Memory Card
n Factory Reset
n Firmware Version
To exit the menu press the ‘Menu Button’ again, this will return you to the home screen.
8. Drive Cam App7. Settings
Downloading and installing
On your mobile device, turn the wifi on and download the
‘Muvi Drive Cam’ app from Google Play or Apple Store.
Connecting to the App
1. Firstly, press and hold the ‘Wifi Button’ on the camera until you see a wifi activation
message.
2. Go to wifi settings on your mobile device, find and select the network ‘MuviDriveCam’,
enter the password: ‘12345678’. A blue LED indicator light will appear on the camera
and the screen will read ‘Wifi Connected’.
3. Launch the Muvi Drive Cam app and click on the ‘Camera Button’ in the app. The first
time you use the app you may be asked to set preference settings.
4. You can now use the Muvi Drive Cam app.
5. To disconnect the wifi, press the up or down arrow.
WARNING
DO NOT USE THE APP WHILST DRIVING!
1514
EN
Using the App
Once you have successfully selected the camera, the home screen will open displaying
a live view from the camera. Use the following icons to navigate the app.
Screen Display Choose which cameras are shown on the home screen.
You can select split screens to view more than one camera.
Snapshot Capture a real time image during recording.
Dimmer Switch Dim the brightness of the app.
Microphone Mute or unmute the microphone.
Connection Control Panel Select which cameras are connected, also use to
browse saved files and change each camera setting.
Browse Files Browse footage or images previously captured.
Record Start or stop recording. Can also be used for capturing images when
in photo mode.
Camera Settings View or edit settings, these can be adjusted to your personal
preferences or according to the driving conditions.
Map View your current location on the map.
1716
EN
9. Drive Cam Player
Installing the Player
To install the Muvi Drive Cam Player insert the supplied software CD into your PC; if you do
not have a CD drive you can download the software from our website at:
https://veho-world.com/downloads
Connecting to the Player
Use the supplied Micro USB data cable to connect your Muvi Drive Cam to your PC. Next,
open the Muvi Drive Cam Player, the shortcut icon should be on your home screen.
Using the Player
Once open, use the player to browse previously recorded footage using the dropdown
menu File > Open, the footage will open in the player window. Use the icons to play, skip
forward, skip backwards, pause, capture screenshots and view route map.
Note: If you can not see the files when browsing try changing the search to ‘MP4’ files.
Icons
Play or pause footage
Skip forward 10 seconds
Skip back 10 seconds
Capture a screenshot
View all captured screenshots
Open route map
Adjust volume
Change player settings
Add files to the player
Remove files from the player
Export files from the player
1918
EN
10. Specifications
Camera
Image sensor Sony STARVIS - 2 Mega Pixels CMOS
Lens 6G six element sharp lenses
Lens aperture f1.6
Lens angle 120°
Screen 3.0” 16:9 TFT LCD
ISO sensitivity Up to ISO 12800
G-Sensor 3 Axis
Video
Video resolution Full HD 1080@60fps
Auto record Yes
Video format MP4
AV In Mini 8Pin
Photo
Photo resolution 1920 x 1080
Photo format JPEG
Storage
Media Micro SDHC (up to 128GB)
Connectivity
Wifi 2.4G 802.11b/g/n
GPS 10HZ
Power
Battery 900mAh
Car charger DC 12v -24v
Other
Dimensions 114.4mm x 71.9mm x 37mm
Weight 149.6g
Working temp -25°C to 65°C
Storage temp -30°C to 70°C
2120
EN
11. Maintenance tips
n Do not disassemble, repair, modify your camera or power related accessories.
n Do not adjust or operate camera whilst driving.
n Avoid installing the camera where it may obstruct the drivers view or airbag
deployment.
n Avoid exposing your camera to extended periods of humidity and/or heat. This may
reduce the products lifespan.
n Do not spray water or cleaning agents directly onto the camera. This may cause a fire,
electric shocks, or other malfunctions.
n Only use the Muvi Drive Cam power adapter supplied with your camera. Other power
adapters may create a safety hazard or damage the camera.
n Do not use damaged power adapters or cables.
n In certain cars, the power may be constantly supplied to the camera even with the
engine turned off. This may drain the vehicle’s battery.
n Keep the camera away from heaters or other hot objects. Store at lower temperatures
to reduce the rate of self-discharge of the battery.
n Do not leave the camera in the car when not in use.
Other Veho products
Pebble Endurance 15,000mAh
Portable Power Bank
VPP-008-E
Muvi Rear Facing Dash Camera
VDC-002-KZR
Cave Smart Home
Starter Kit
VHS-001-SK
In the event you need to contact Veho for support or troubleshooting for your
Muvi Drive Cam, please contact us via our Live Chat on our website at:
veho-world.com
Support
  • Page 1 1
  • Page 2 2
  • Page 3 3
  • Page 4 4
  • Page 5 5
  • Page 6 6
  • Page 7 7
  • Page 8 8
  • Page 9 9
  • Page 10 10
  • Page 11 11
  • Page 12 12

Veho VDC-001-KZ1-F User manual

Category
Drive recorders
Type
User manual

Veho VDC-001-KZ1-F is a feature-rich dashcam that captures crisp videos in full HD 1080p resolution. With a 120-degree wide-angle lens and Sony STARVIS sensor, it provides an expansive view of the road, ensuring you capture every detail. The built-in G-sensor automatically detects sudden impacts and locks the footage, protecting it from being overwritten. The device supports microSD cards up to 128GB, allowing for ample storage of your recordings.

Ask a question and I''ll find the answer in the document

Finding information in a document is now easier with AI