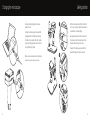
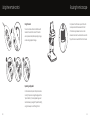
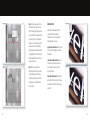
Veho VMS-008-DX3 is a portable microscope that allows you to explore the microscopic world, useful for students, teachers, laboratory research, medical analysis, repair services or hobbyists. With 10x or 220x magnification, you can capture still images or video footage using the 3.5-megapixel image sensor. The 2.4" LCD screen and HDMI/TV output let you view your work in real-time. Use the included software to calibrate the microscope, measure objects, and add drawings or text to your images.
Veho VMS-008-DX3 is a portable microscope that allows you to explore the microscopic world, useful for students, teachers, laboratory research, medical analysis, repair services or hobbyists. With 10x or 220x magnification, you can capture still images or video footage using the 3.5-megapixel image sensor. The 2.4" LCD screen and HDMI/TV output let you view your work in real-time. Use the included software to calibrate the microscope, measure objects, and add drawings or text to your images.


-
 1
1
-
 2
2
-
 3
3
-
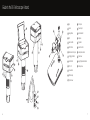 4
4
-
 5
5
-
 6
6
-
 7
7
-
 8
8
-
 9
9
-
 10
10
-
 11
11
-
 12
12
-
 13
13
-
 14
14


Veho VMS-008-DX3 is a portable microscope that allows you to explore the microscopic world, useful for students, teachers, laboratory research, medical analysis, repair services or hobbyists. With 10x or 220x magnification, you can capture still images or video footage using the 3.5-megapixel image sensor. The 2.4" LCD screen and HDMI/TV output let you view your work in real-time. Use the included software to calibrate the microscope, measure objects, and add drawings or text to your images.
Ask a question and I''ll find the answer in the document
Finding information in a document is now easier with AI
Related papers
Other documents
-
Sony SLV-N700 Installation guide
-
Reflecta DigiMicroscope Professional Specification
-
Bresser 5914170 Owner's manual
-
 EZPole EZL21B User manual
-
 Andonstar ADSM201 User manual
-
 Vividia SS-550 User manual
-
 ViTiny UM12 User manual
-
Easypix DigiScope Owner's manual
-
Levenhuk 61023 User manual
-
Celestron 44316 User manual


