Page is loading ...

INSTALL INSTRUCTIONS
Applicaon : 2018+ Jeep Wrangler JL
2020+ Jeep Gladiator JT
JL / JT FRONT FENDER FLARE: 518AFF0B

2018+ JEEP JL / JT FRONT FENDER FLARES Page ( 2 of 6)
www.ROADARMOR.com
INSTALL INSTRUCTIONS
SAFETY FIRST!
• FOLLOW ALL INSTRUCTIONS, YOUR SAFETY AND THE SAFETY OF OTHERS IS MOST IMPORTANT.
• WEAR APPROPRIATE EYE PROTECTION AND EXERCISE CAUTION WHEN DRILLING / CUTTING
REQUIRED TOOLS
INCLUDED HARDWARE
I WARNING
Read the instrucons completely before beginning installaon. Before ghtening bolts,
drilling or cung where required, check to make sure there are no obstrucons such as
brake, fuel or electrical lines which may be damaged. Also keep in mind this is an aer-
market product and MAY require minor shimming and/or trimming, reaming, etc. for
proper t. Road Armor is not responsible for any damages to vehicle.
IMPORTANT NOTICE
• Be sure to inspect and test t your product to ensure proper tment before having it coated, painted, bed
lined, etc.
• Road Armor will not be responsible for the cost of coang your unit if any problems with t or nish are not
noted and addressed beforehand.
Metric and SAE Socket Sets and Wrenches
Drill & Unibit
Cut-O Wheel
(2) 8” Accent Lights and Harness
(4) 10-24x1/2” Bolts
(4) 10-24 Flange Nuts
(4) 5/16”x1” Carriage Bolts
(12) 5/16”x1” Bolts
(16) 5/16” Flange Nuts
(4) 5/16” Push Retainer Washers
(12) 5/16” Washers
118” Rubber Edge Trim
(1) PSG FENDER FLARE
(1) DVR FENDER FLARE
(1) DOT REFLECTIVE STRIP

2018+ JEEP JL / JT FRONT FENDER FLARES Page ( 3 of 6)
www.ROADARMOR.com
INSTALL INSTRUCTIONS
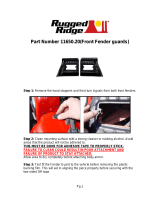
1 Using 8mm & 10mm sockets, remove bolts securing OEM fenders.
2 Remove two OEM push clips that secure fender liners
3 Remove rear fender assembly by rmly pulling on one end of fender unl all 10 clips “pop o”.
4 Unclip and unplug OE fender light harness from inner fender well. REMOVE OE FENDER VENT
1
2
5 Using cut-o wheel, remove both OEM fender
mounts and paint edges to protect as show below.
5
4
5

2018+ JEEP JL / JT FRONT FENDER FLARES Page ( 4 of 6)
www.ROADARMOR.com
INSTALL INSTRUCTIONS
1 Mark and Drill 8 holes to 3/8” as shown below.
2 Install 8” ACCENT LIGHT into FENDER FLARES using 2 - #10-24 BOLTS and FLANGE NUTS.
3 Assembly FRONT FENDER using 2 - 5/16” CARRIAGE BOLTS and PUSH RETAINING WASHERS.
1
3
2

2018+ JEEP JL / JT FRONT FENDER FLARES Page ( 5 of 6)
www.ROADARMOR.com
INSTALL INSTRUCTIONS
1 Install EDGE TRIM along main fender edge to protect body. (Trim ribbed side on boom.)
1
2 Install FENDER FLARE by inserng 2 - 5/16” CARRIAGE BOLTS into boom rear holes rst.
3 Loosely installing one of 4 - 5/16” BOLT and FLANGE NUT through FENDER FLARE “top center” to
hold/support FENDER FLARE onto OE fender while installing remaining 5/16” Hardware.
2
3

2018+ JEEP JL / JT FRONT FENDER FLARES Page ( 6 of 6)
www.ROADARMOR.com
INSTALL INSTRUCTIONS
1 Connue installing FENDER FLARES using 2 - 5/16” HARDWARE as shown below and *TIGHTEN ALL*
1
2
3 Safely secure accent light harness with zip es
and plug into factory plug.
NOTE If Required: Install 1x1 Inch DOT REFLECTIVE TAPE to side of each fender provide in kit.
2 Push kit EDGE TRIM against body for nished look.
FINISHED!
/