Page is loading ...

Rev. 5/12 Page 1 of 15 SB
PLEASE READ AND UNDERSTAND ALL INSTRUCTIONS BEFORE YOU BEGIN.
11634.10
XJ O-Road Flare kit
NOTICE: Body modication is required for the installation of these ares. Cutting of the body
panels is required.
Trimming of body moulding or modication of ares will be needed for a proper t.
CAUTION: Body and eye protection must be worn during installation of the ares.
Note:
1. Verify tment of ares to the vehicle. Some sanding or cutting may be necessary to
ensure proper tment.
2. Modications to exhaust system may be necessary. A minimum of four inches of clearance
between ares and exhaust system is required.
3. Bare metal will need to be treated and painted before installation of ares.
Note: Some procedures will be dierent depending on year and body trim. Please be sure to
follow the steps carefully that applies to your model year.

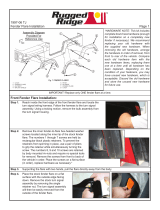
Rev. 5/12 Page 2 of 15 SB
Step 1. Remove the factory ares and wheel well
liners from the front wheel wells. The ares
are held in by 10mm nuts inside and on
the ends of the wheel opening.
Step 3. Unbolt the front airdam from the supports
on each front lower section of the fender.
The supports will be cut out in later steps.
Step 2. Remove the front bumper end caps. The
end caps are held on by one 10mm head
bolt on top and bottom and push nut on
the back side. Removal is needed for
trimming of the front fenders.
11634.10
Note: 1984-96 only. 1997-2001 will not need the
front section of the fender to be cut.

Rev. 5/12 Page 3 of 15 SB
Step 4. Carefully remove all emblems from the
front fenders. Use of a putty knife may be
needed. Use caution when removing to
prevent damage to the paint. All adhesive
will need to be removed before the
ares are attached to the vehicle.
Step 5. Draw a horizontal line on the front fender
starting at the bottom of the front
headlight bezel continuing to the edge of
the fender well. Repeat for opposite side.
Step 6. Using the line previously drawn measure
5 Inches in towards the wheel well starting
from the headlight bezel and place a mark.
Repeat for opposite side.
11634.10
Note:
1984-1996: Require steps 5 thru 8 for cutting front
fenders.
1997-2001: Do not require cutting.

Rev. 5/12 Page 4 of 15 SB
Step 7. Following the contour of the raised area
on the fender, trace a line upwards to the
top of the third factory mounting hole.
Repeat for opposite side.
Step 8. Trace a horizontal line from the previous
line in step 7 toward the inside of the
fender well at the top of the third factory
mounting hole. Repeat for opposite side.
Step 9. Mark a line 5 1/4” from the edge of the
fender at the front door jam towards the
fender well at the bottom of the vehicle.
Repeat for opposite side.
11634.10

Rev. 5/12 Page 5 of 15 SB
Step 12. Begin trimming the marked areas. Use
of an air saw or grinder will be needed.
You must wear eye and ear protection
when cutting metal. Gloves should be
worn when handling sharp metal. Use
caution when cutting metal. Do not over
cut. Ensure the are no obstructions on
the back side of the metal being cut.
11634.10
Step 10. Starting at the mark made in the previous
step draw a line upward following the
contour of the raised area on the fender
to the top of the third factory bolt hole.
Repeat for opposite side.
Step 11. Draw a horizontal line from the contour
line inward towards the wheel well at
the top of the third bolt hole. Repeat for
opposite side.

Rev. 5/12 Page 6 of 15 SB
11634.10
Step 15. Trim the inner seam at the rear of each
front fender well. The inner seam should
match the outer cut fender. The cut
piece from the outer fender can be used
as a template. A sanding wheel should
be used to even out the cut areas.
Step 14. When cutting is nished the front fenders
should look like the image. All edges
should be smoothed and free of burrs. All
exposed metal must be treated before
ares are installed.
Step 13. Cut the lower fender brace close to the
frame. Repeat for both sides.

Rev. 5/12 Page 7 of 15 SB
11634.10
Step 16. Bare metal must be treated. A primer
surfacer is recommend before painting.
Step 17. Re-install the front wheel well liners. Mark
the front of the liner with a horizontal line
starting from the headlight bezel going
towards the wheel well. Next trace a line
following the cut portion of the fender
onto the wheel liner. Trim this area out.
Do not trim below the front of the fenders
near the bumper, this will be done in the
next step.
Step 18. Fold the wheel well liner ap forward
near the front bumper. Draw a line on the
inside of the liner from the corner of the
fender by the marker light diagonally
down to the outside of the rst mounting
hole. Trim on the line that was created. It
may be necessary to secure the front area
of the liner to the inside of the wheel well.

Rev. 5/12 Page 8 of 15 SB
11634.10
Note: Depending on the model and year of the
vehicle the body trim will vary. On newer
models it may be necessary to trim the
are to t over the body moulding.
Step 19. Hold the are against the body using
slight pressure to check tment. Some
trimming and sanding may be
necessary.
Step 20. Mark the area of trim to be cut by pressing
the are against the body in the desired
position for mounting.
1984-1996 models with low prole trim.
Step 21. Using a putty knife lift the body trim o
of the body enough to cut with a razor
knife.

Rev. 5/12 Page 9 of 15 SB
11634.10
Step 22. Once tment is complete hold the ares
in place and mark the mounting holes on
the body using the pre-drilled holes in
the are as a guide.
Step 23. Drill the mounting holes using a 3/16”
drill bit.
Step 24. Clean inside mounting lip edge with
rubbing alcohol. Install edge trim as
shown by removing red vinyl tape
covering only a few inches at a time.
Do not stretch the trim while being
applied, this may cause shrinkage after
installation.

Rev. 5/12 Page 10 of SB
Step 27. Place the are against the body and align
the screws into the drilled holes in the
body. Tighten the screws. Do not torque
over 24 inch pounds.
11634.10
Step 25. Clean inside mounting lip edge with
rubbing alcohol. Install edge trim as
shown by removing red vinyl tape
covering only a few inches at a time.
Do not stretch the trim while being
applied, this may cause shrinkage after
installation.
Step 26. Place a washer on each bolt and insert
them into the pre-drilled holes in the
are. Place a rubber spacer on each bolt
on the inside of the are.

Rev. 5/12 Page 11 of 15 SB
11634.10
Step 28. Remove the rear factory ares. The ares
are held in by 10mm nuts inside and on
the ends of the wheel opening.
Step 29. At the bottom front of the rear wheel well
opening measure forward 2 inches and
place a mark. Repeat for opposite side.
Step 30. Starting at the mark made in the previous
step continue following the contour up
maintaing a 2 inch distance from the
wheel well. The line shall continue to 1
inch past the door opening. Repeat for
opposite side.
REAR FLARE INSTALLTION PROCEDURES

Rev. 5/12 Page 12 of 15
SB
11634.10
Step 31. Mark a vertical line 1 inch from the door
edge toward the rear of the vehicle. The
line should intersect the line in the
previous step and continue down to the
wheel opening. Repeat for opposite side.
Step 32. At the bottom of the rear portion of the
wheel well housing measure a distance
of 1 5/8 inch from the the wheel well
towards the rear of the vehicle.
Maintaining the same distance trace a
line around the wheel well up to the third
mounting hole. Draw the line straight
down intersecting the mounting hole.
Repeat for opposite side.
Step 33. Measure 3/8 inch up from the edge
of the fender well and draw a horizontal
line along the fender connecting the two
lines made in the previous steps. Repeat
for opposite side.

Rev. 5/12 Page 13 of 15 SB
11634.10
Step 34. Cut out the rear fender in the order shown.
Starting with #1 area trim the 3/8 inch lip
from the fender. Area’s # 2, 3 only trim
down to the body moulding area. Area
# 5 only cut the outer skin in this area.
See next steps for areas # 4, 5. Repeat for
opposite side.
Step 35. Cut area # 4 carefully. Start by cutting
3/8 inch from the line and grind the rest
of the way. A ller putty or silicone is
needed to ll the gap between the
sheet metal. Repeat for opposite side.
Step 36. Cut area # 5 in steps. Trace a line
following the contour of the raised are
out of the body. Trim only the outer skin
in the area outlined. The remaining
area should be cut through both layers
and removed. Repeat for opposite side.

Rev. 5/12 Page 14 of 15 SB
11634.10
Step 37. Fold the metal ap created to close the
gap between the inner and outer sheet
metal. All edges should be smoothed
and free of burrs. All exposed metal must
be treated before ares are installed. A
ller putty may be used to seal the area.
Repeat for opposite side.
Step 38. Install the dog leg shaped trim piece on
the door edge. At the rear door opening
t the trim against the body. Secure the
trim in place with the supplied self
tapping screws. Use the dimples in the
plastic as guides for the screws. Do not
overtighten. Repeat for opposite side.
Note: Depending on the model and year of the
vehicle the body trim will vary. On newer
models it may be necessary to trim the
are to t over the body moulding.
Step 39. Refer to steps 19 thru 27 for are
mounting procedures.

Rev. 5/12 Page 15 of 15 SB
11634.10
Step 40. The kit comes with additional self
tapping screws that if desired may be
used in the area indicated for additional
securement.
Step 41. Use of the trim tool may need to be used
on any parts of the trim that have been
misaligned during installation. To seat
the trim against the body, the curved
side will be used. To seat the trim side
against the are the at side will be used.
It may be necessary to start at one end
and run the tool the full length of the
are.
For Technical Assistance Contact:
OMIX-ADA Tech Support
Phone: 1-800-449-6649
Email: techsupport@omix-ada.com
Web: www.Omix-Ada.com
Copyright Omix-Ada 2011
/