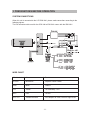
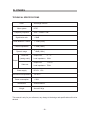
Initial CDS-166 is a versatile DVD player that offers high-definition playback and compatibility with various disc formats, including DVD, CD, and MP3. With its multi-angle and multi-language capabilities, you can enjoy unique perspectives and audio tracks. Parental lock provides content control, while fast forward, reverse, slow play, frame play, and repeat play functions enhance your viewing experience. You can also select subtitles and angles to customize your viewing preferences. Additionally, the player features an English OSD for clear navigation and content display.
Initial CDS-166 is a versatile DVD player that offers high-definition playback and compatibility with various disc formats, including DVD, CD, and MP3. With its multi-angle and multi-language capabilities, you can enjoy unique perspectives and audio tracks. Parental lock provides content control, while fast forward, reverse, slow play, frame play, and repeat play functions enhance your viewing experience. You can also select subtitles and angles to customize your viewing preferences. Additionally, the player features an English OSD for clear navigation and content display.


-
 1
1
-
 2
2
-
 3
3
-
 4
4
-
 5
5
-
 6
6
-
 7
7
-
 8
8
-
 9
9
-
 10
10
-
 11
11
-
 12
12
-
 13
13
-
 14
14
-
 15
15
-
 16
16
-
 17
17
-
 18
18
-
 19
19
-
 20
20
-
 21
21
-
 22
22
-
 23
23
-
 24
24
-
 25
25
-
 26
26
-
 27
27
-
 28
28
-
 29
29
-
 30
30
-
 31
31
-
 32
32
-
 33
33


Initial CDS-166 is a versatile DVD player that offers high-definition playback and compatibility with various disc formats, including DVD, CD, and MP3. With its multi-angle and multi-language capabilities, you can enjoy unique perspectives and audio tracks. Parental lock provides content control, while fast forward, reverse, slow play, frame play, and repeat play functions enhance your viewing experience. You can also select subtitles and angles to customize your viewing preferences. Additionally, the player features an English OSD for clear navigation and content display.
Ask a question and I''ll find the answer in the document
Finding information in a document is now easier with AI
Related papers


Other documents
-
 plawa-feinwerktechnik GmbH & Co.KG 7X User manual
-
Insignia NS-MVDS7 User manual
-
Magnavox 26MD255V User manual
-
-
Audiovox D1530 User manual
-
Polaroid PDV-0560M User manual
-
Power Acoustik PMD-83CMTV Owner's manual
-
Akura ACLTDVD1921W User manual
-
-
