Page is loading ...

INSTALLATION
8371/8372
Electromagnetic Locks
Instructions
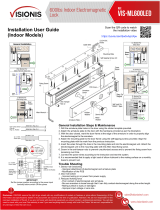
1. Please read template mounting instructions and use template that is provided for installing the
electromagnetic lock.
2. Connecting wire should be of sufficient gauge to prevent line loss.
3. The 8371/8372 electromagnetic lock requires either 12 or 24 VDC for correct operation.
The voltage is jumper selectable. (See Fig. 1)
For 12-volt operation two jumpers are used; contact pins one to two and three to four are jumpered.
For 24-volt operation only one jumper is used; contact pins two to three are jumpered. Note:
The 8371/8372 is shipped with jumpers installed for 24-volt operation.
12 or 24 VDC Supply
Connect the positive (+) lead from the power supply to TB1-1. Connect the negative (-) lead from the power supply
to TB1-2. For wiring installation, refer to Figure 1.
4. Do not tighten the armature plate tightly against the door. The armature plate must remain movable to
allow surface alignment with the magnet face. The magnetic lock will lose holding force without this
floating alignment.
5. Do not trim the rubber washer mounted on the head of the armature center bolt.
Trimming this rubber washer will adversely affect the operation of the electromagnetic lock.
Optional LSS
(
Lock Sensor Status Remote Indication
)
Magnet Locked – When the magnet is locked, the common contact (TB1-3) and the normally open contact
(TB1-5) are closed. The normally closed contact (TB1-4) would be open.
Magnet Unlocked – When the magnet is unlocked, the common contact (TB1-3) and the normally closed contact
(TB1-4) are closed. Note: The LSS relay contacts are rated 24 VDC @ 1 amp maximum.
The optional LSS includes a local Light Emitting Diode (LED) indication: no LED – no power;
red LED – lock is unlocked; green LED – lock is locked.
Switching Accessories
RCI also carries a full line of switching devices and other accessories to interface with the
8300 series electromagnetic locks.
®
©2006 RUTHERFORD CONTROLS INT’L CORP. WWW.RUTHERFORDCONTROLS.COM
USA: 2697 INTERNATIONAL PARKWAY, PKWY 5, VIRGINIA BEACH, VA 23452 • CANADA: 210 SHEARSON CRESCENT, CAMBRIDGE, ON N1T 1J6
PHONE • 1.800.265.6630 • 519.621.7651 • FAX: 1.800.482.9795 • 519.621.7939 • E-MAIL: SALES@RUTHERFORDCONTROLS.COM
IS8371/72
R02/06 DA
P07/06 DA
In or Out... we make it Easy!
®

8371/ 8372 Electromagnetic Lock Installation Instructions (Continued)
Figure 1. Wiring Schematic
Problem Possible Cause Solution
Door will not lock Absence of DC voltage at Check power supply and wiring.
(no magnetic attraction) magnet terminals
Reduced holding force Inadequate contact between Ensure mating surfaces are clean and in proper
armature plate and face of magnet. alignment. Armature floats freely. Check for low voltage.
Delay in lock release Circuit not broken (open) between Reposition switch so that it is between power supply
power supply and magnetic lock. and magnetic lock.
Secondary diode installed Remove (not necessary).
LED status incorrect Misalignment of armature plate Check to see that alignment agrees with template.
To Ensure Instant Magnetic Release
• Wire the DC filtered power to the line side of the power switch to avoid simulated delays on unlocking.
The local “ON/OFF” switch must be wired between the DC source voltage and magnet, as shown below.
• All solid state switches or switching devices must be installed between the DC power source and the
positive (+) line of the magnetic lock.
Note: All RCI magnets have MOV surge suppression as a standard feature.Additional suppression (i.e., diodes) may cause a delay in release.
Troubleshooting
LSS Light Emitting Diode
(
LED
)
Magnet power from
Power Supply
+12/24VDC input
-
(
Ground
)
Common
N.C.
N.O.
Lock Status Sensor
Output contacts SPDT rated
24VDC @ 1A maximum
Jumper
12VDC
Jumper
24VDC
(
preset
)
TB1
NOTE: Specifications are subject to change without notice.
©2006 RUTHERFORD CONTROLS INT’L CORP. WWW.RUTHERFORDCONTROLS.COM
USA: 2697 INTERNATIONAL PARKWAY, PKWY 5, VIRGINIA BEACH, VA 23452 • CANADA: 210 SHEARSON CRESCENT, CAMBRIDGE, ON N1T 1J6
PHONE • 1.800.265.6630 • 519.621.7651 • FAX: 1.800.482.9795 • 519.621.7939 • E-MAIL: SALES@RUTHERFORDCONTROLS.COM
-
+
-
+
INCORRECT
CORRECT

Maintenance
Contacting surfaces of the electromagnetic lock and armature plate must be kept free of contaminating
materials. Surfaces should be cleaned periodically with a non-abrasive cleaner.
We recommend all mounting fasteners be inspected/tightened regularly to prevent them from loosening
through normal vibration of the door and frame.
RCI offers a full line of listed power supplies, switching devices and other accessories to interface with
the 8300 series electromagnetic locks.
NOTE: 8300 series electromagnetic locks should be powered with filtered and regulated UL listed
power supplies.
Voltage
These locks are now shipped with the default voltage set for 24VDC. If you need to change the voltage to
12VDC, see detailed instructions included.This change was made to prevent damage to the lock when
24VDC is applied with the jumpers set to 12VDC.
Anti-Tamper Screws
We are currently shipping 8371 and 8372 Electromagnetic Locks with new anti-tamper screws installed in
the front face of the housing. These screws, when in place, prevent the insertion of an Allen wrench into the
mounting screw openings on the underside of the lock. These screws will need to be removed prior to
installing the lock so as to allow the mounting plate to be removed from the top of the lock. The cavity
cover screw needs to be removed to access the security screw on the right hand side, while the screw on
the left is clearly visible on the face of the lock.
©2006 RUTHERFORD CONTROLS INT’L CORP. WWW.RUTHERFORDCONTROLS.COM
USA: 2697 INTERNATIONAL PARKWAY, PKWY 5, VIRGINIA BEACH, VA 23452 • CANADA: 210 SHEARSON CRESCENT, CAMBRIDGE, ON N1T 1J6
PHONE • 1.800.265.6630 • 519.621.7651 • FAX: 1.800.482.9795 • 519.621.7939 • E-MAIL: SALES@RUTHERFORDCONTROLS.COM
8371/ 8372 Electromagnetic Lock Installation Instructions (Continued)

©2006 RUTHERFORD CONTROLS INT’L CORP. WWW.RUTHERFORDCONTROLS.COM
USA: 2697 INTERNATIONAL PARKWAY, PKWY 5, VIRGINIA BEACH, VA 23452 • CANADA: 210 SHEARSON CRESCENT, CAMBRIDGE, ON N1T 1J6
PHONE • 1.800.265.6630 • 519.621.7651 • FAX: 1.800.482.9795 • 519.621.7939 • E-MAIL: SALES@RUTHERFORDCONTROLS.COM
REFERENCE CHART
WIRE GAUGE SELECTION
®
Total One-Way
Length of Wire
Run (ft.)
Load Current @ 24V
1/4A 1/2A 3/4A 1A 1-1/4A 1-1/2A 2A 3A
100 24 20 18 18 16 16 14 12
150 22 18 16 16 14 14 12 10
200 20 18 16 14 14 12 12 10
250 18 16 14 14 12 12 12 10
300 18 16 14 12 12 12 10 —
400 18 14 12 12 10 10 — —
500 16 14 12 10 10 — — —
750 14 12 10 10 — — — —
1000 14 10 10 — — — — —
1500 12 10 — — — — — —
Total One-Way
Length of Wire
Run (ft.)
Load Current @ 12V
1/4A 1/2A 3/4A 1A 1-1/4A 1-1/2A 2A 3A
100 20 18 16 14 14 12 12 10
150 18 16 14 12 12 12 10 —
200 16 14 12 12 10 10 — —
250 16 14 12 10 10 10 — —
300 16 12 12 10 10 — — —
400 14 12 10 — — — — —
500 14 10 10 — — — — —
750 12 10 — — — — — —
1000 10 — — — — — — —
1500 10 — — — — — — —
Wire Gauge Chart courtesy of Electronic Locking Devices by John L. Schum
In or Out... we make it Easy!
®
/