Page is loading ...

© 2018 A&D Company, Limited. All rights reserved.
No part of this publication may be reproduced, transmitted,
transcribed, or translated into any language in any form by
any means without the written permission of
A&D Company, Limited.
The contents of this manual and the specifications of the
instrument covered by this manual are subject to change for
improvement without notice.
Charging stand for four MPAs
AX-ST-CH-M4
Instruction manual
1WMPD4003079B
Safety Use
Please note the following items when the device is used.
△
!
CAUTION
1. Introduction
This manual describes how the AX-ST-CH-M4 charging stand for four
MPAs works. To fully understand and make use of the product,
please read this manual carefully before use. Also, please read the
instruction manual for the MPA.
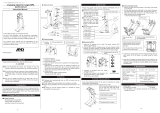
2. Package Contents and Each Part Name
■
Charging stand for four MPAs
■ Stand base
■ Screw (2 pcs)
■ AC adapter for MPA (AX-TB283)
■ Instruction manual (This document)
A Type S Type C Type BF Type
* The A-type plug is initially attached to the AC adapter for use in
Japan. For use outside of Japan, please change it to the type
appropriate for your country.
Charging terminals : Receive an MPA for charging.
Power indicator LED : Lights up in green when power is supplied
to the charging stand.
3. Features
■ Charging starts automatically when an MPA is hooked onto the
charging stand.
■ Power supply stops automatically when charging is complete.
■ Space saving installation (200 mm×200 mm)
■ It is possible to charge four MPAs at the same time.
4. How to Use
1. Securely mount the charging stand for four MPAs onto the
stand base with the screws (2 pcs)
-Securing the post to the stand base-
2. Prepare the provided AC adapter.
3. Connect the power cable (USB- Type A) connected to the
charging stand to the AC adapter, and insert the AC adapter
into an outlet. The four power indicator LEDs (Green) will light up.
4. Hook the MPAs onto the
charging sections to start
charging. Once charging
starts, the battery indicator
at the bottom left of the MPA
display will blink as shown in
the figure on the right.
5. Charging is complete when the MPA
battery indicator is fully lit.
6. The MPAs can continue to be hooked to the charging stand after
they are fully charged. (They will not be overcharged.)
5. Specifications
Input
(Specified adapter)
100 VAC/0.3 A (50/60 Hz)
Input section /
output section
5 VDC
Connectable devices Electronic pipette MPA series
Dimensions 195(W)×350(H)×195(D) mm
Net weight
Approx. 1430 g
(Excluding the AC adapter)
6. Accessories
■ Linking cable・・・・・・・・・・・・・・AX-KO4730-10
■ AC adapter for MPA・・・・・・・・・・・・・AX-TB283
■ Do not disassemble the device. Any damage or loss of
functions caused by disassembly is not covered by
warranty.
■
Do not link multiple charging stands, as it may cause fire or
damage the units or the MPA series of electronic pipettes
(hereinafter called MPA).
■ Use the provided AC adapter, as otherwise the charging
stand, the MPA, or the power supply devices may be
damaged.
-4-
-3-
-2-
-1-
( 日本語の取扱説明書は反対面をご覧ください。)
Power indicator LED
Charging terminals
Charging stand for four MPAs
Stand base
Screws
AC adapter for MPA
Screws
Stand base
Charging stand for four
MPAs
Charging stand for four MPAs
(assembled)
USB-Type A
AC adapter
Power cable
When fully charged
/