Page is loading ...

307–809
Rev. T
Supersedes N
and PCN R
(includes Rev
. S
changes)
First
choice when
quality counts.
01921
Model
220–569
Shown
INSTRUCTIONS-PARTS
LIST
INSTRUCTIONS
This
manual contains important
warnings and information.
READ AND KEEP FOR REFERENCE.
LOW PRESSURE, MEDIUM VOLUME
HIGH-FLO
Pumps
NOTE:
Stainless steel pumps are severe-duty and electropolished,
for use with water-base coatings
Refer to page 2 for the Table of Contents.
For Pump Model Nos., Ratios and Working Pressures,
refer to page 3.
NOTE:
Refer to manual 307–837 for adapter kits for mounting
the displacement pump to an existing motor.
Patent
Pending
GRACO INC. P.O. BOX 1441
MINNEAPOLIS, MN
55440–1441
COPYRIGHT
1987, GRACO INC.
Graco
Inc. is registered to I.S. EN ISO 9001

Table
of Contents
Pump
Models
3.
. . . . . . . . . . . . . . . . . . . . . . . . . . . . . . . . .
Warnings 4
. . . . . . . . . . . . . . . . . . . . . . . . . . . . . . . . . . . . . .
Installation
All
Pumps
7.
. . . . . . . . . . . . . . . . . . . . . . . . . . . . . . . . .
Air-Powered
Pumps
8.
. . . . . . . . . . . . . . . . . . . . . . . .
Hydraulic-Powered
Pumps
10.
. . . . . . . . . . . . . . . . .
Operation
All
Pumps
12.
. . . . . . . . . . . . . . . . . . . . . . . . . . . . . . . .
Air-Powered
Pumps
13.
. . . . . . . . . . . . . . . . . . . . . . .
Hydraulic-Powered
Pumps
14.
. . . . . . . . . . . . . . . . .
Maintenance 15
. . . . . . . . . . . . . . . . . . . . . . . . . . . . . . . . . .
Troubleshooting 17
. . . . . . . . . . . . . . . . . . . . . . . . . . . . . . .
Service 18
. . . . . . . . . . . . . . . . . . . . . . . . . . . . . . . . . . . . . .
Parts
President
Pumps
24.
. . . . . . . . . . . . . . . . . . . . . . . . . .
Quiet
Senator Pumps
28.
. . . . . . . . . . . . . . . . . . . . . .
Quiet
Bulldog Pumps
29.
. . . . . . . . . . . . . . . . . . . . . .
Viscount
Pumps
31.
. . . . . . . . . . . . . . . . . . . . . . . . . . .
Carbon
Steel Displacement Pumps
32.
. . . . . . . . . .
Electropolished
Stainless Steel
Displacement Pumps
34.
. . . . . . . . . . . . . . . . . . . . . .
Repair
Kits
36.
. . . . . . . . . . . . . . . . . . . . . . . . . . . . . . . . . .
Dimensions 37
. . . . . . . . . . . . . . . . . . . . . . . . . . . . . . . . . . .
Accessories 38
. . . . . . . . . . . . . . . . . . . . . . . . . . . . . . . . . .
Technical
Data and Performance Charts
President Pumps
40.
. . . . . . . . . . . . . . . . . . . . . . . . . .
Senator
Pumps
42.
. . . . . . . . . . . . . . . . . . . . . . . . . . .
Bulldog
Pumps
45.
. . . . . . . . . . . . . . . . . . . . . . . . . . . .
Viscount
Pumps
46.
. . . . . . . . . . . . . . . . . . . . . . . . . . .
Warranty 48
. . . . . . . . . . . . . . . . . . . . . . . . . . . . . . . . . . . . .
Graco
Phone Number
48.
. . . . . . . . . . . . . . . . . . . . . . . . .

Pump
Models
NOTE:
These pumps are not suitable for metering. Contact your Graco distributor for more information.
CARBON STEEL MODELS
Maximum
Air
(or Hydraulic*)
W
orking Pressure
Maximum Fluid
W
orking Pressure
Model No. Series Ratio and Type (parts list pages)
MPa, bar (psi) MPa, bar (psi)
220–559 A
1.5:1 President (24)
1.2, 12 (180) 1.9, 19 (270)
220–560 A
2:1 President (24)
1.2, 12 (180) 2.5, 25 (360)
220–561 A
3:1 President (24) 1.1, 1
1 (166)
3.4, 34 (500)
237–223 A
3:1 President, w/PTFE
packings (24)
1.1, 1
1 (166)
3.4, 34 (500)
220–574 B
3:1 President with drum cover
,
agitator
, and return tube (26, 27)
1.1, 1
1 (166)
3.4, 34 (500)
220–565 A
3.5:1 Quiet Senator (28)
0.7, 7.0 (100)
2.4, 24 (350)
220–566 A
5:1 Quiet Senator (28)
0.7, 7.0 (100)
3.4, 34 (500)
220–567 A
2.5:1 Quiet Senator (28)
0.7, 7.0 (100)
1.7, 17 (250)
220–577 A
4:1 Quiet Bulldog (29)
0.7, 7.0 (100)
2.8, 28 (400)
236–601 A V
iscount I+ (31)
10.3, 103 (1500)*
3.1, 31 (450)
236–605 A V
iscount I+ (31)
10.3, 103 (1500)*
2.1, 21 (300)
236–712 A V
iscount I+ (31)
10.3, 103 (1500)*
1.5, 15 (225)
SEVERE-DUTY ELECTROPOLISHED STAINLESS STEEL MODELS
Maximum
Air
(or Hydraulic*)
W
orking Pressure
Maximum Fluid
W
orking Pressure
Model No. Series Ratio and Type (parts list pages)
MPa, bar (psi) MPa, bar (psi)
220–562 A
1.5:1 President (24)
1.2, 12 (180) 1.9, 19 (270)
220–563 A
2:1 President (24)
1.2, 12 (180) 2.5, 25 (360)
220–564 A
3:1 President (24) 1.1, 1
1 (166)
3.4, 34 (500)
239–819 A
3:1 President (24) 1.1, 1
1 (166)
3.4, 34 (500)
237–222 A
3:1 President, w/
PTFE packings (24)
1.1, 1
1 (166)
3.4, 34 (500)
220–575 B
3:1 President with drum cover
,
agitator
, and return tube (26, 27)
1.1, 1
1 (166)
3.4, 34 (500)
220–568 A
3.5:1 Quiet Senator (28)
0.7, 7.0 (100)
2.4, 24 (350)
220–569 A
5:1 Quiet Senator (28)
0.7, 7.0 (100)
3.4, 34 (500)
220–570 A
2.5:1 Quiet Senator (28)
0.7, 7.0 (100)
1.7, 17 (250)
220–578 A
4:1 Quiet Bulldog (29)
0.7, 7.0 (100)
2.8, 28 (400)
239–815 A
4:1 Quiet Bulldog (29)
0.7, 7.0 (100)
2.8, 28 (400)
236–602 A V
iscount I+ (31)
10.3, 103 (1500)*
3.1, 31 (450)
236–606 A V
iscount I+ (31)
10.3, 103 (1500)*
2.1, 21 (300)
236–713 A V
iscount I+ (31)
10.3, 103 (1500)*
1.5, 15 (225)

4 307-809
Symbols
Warning Symbol
WARNING
This
symbol alerts you to the possibility of serious
injury or death if you do not follow the instructions.
Caution Symbol
CAUTION
This
symbol alerts you to the possibility of damage to
or destruction of equipment if you do not follow the
instructions.
WARNING
INSTRUCTIONS
EQUIPMENT MISUSE HAZARD
Equipment
misuse can cause the equipment to rupture or malfunction and result in serious injury
.
This equipment is for professional use only
.
Read all instruction manuals, tags, and labels before operating the equipment.
Use the equipment only for its intended purpose. If you are uncertain about usage, call your Graco
distributor.
Do not alter or modify this equipment. Use only genuine Graco parts and accessories.
Check equipment daily
. Repair or replace worn or damaged parts immediately
.
Do not exceed the maximum working pressure stated on the equipment or in the
T
echnical Data
for your equipment. Do not exceed the maximum working pressure of the lowest rated component
in your system.
Use fluids and solvents which are compatible with the equipment wetted parts. Refer to the
Tech-
nical Data
section of all equipment manuals. Read the fluid and solvent manufacturer
’
s warnings.
Do not use hoses to pull equipment.
Route hoses away from traffic areas, sharp edges, moving parts, and hot surfaces. Do not expose
Graco hoses to temperatures above 82
C (180
F) or below –40
C (–40
F).
W
ear hearing protection when operating this equipment.
Do not lift pressurized equipment.
Comply with all applicable local, state, and national fire, electrical, and safety regulations.
MOVING
P
ARTS HAZARD
Moving
parts, such as the air motor piston, can pinch or amputate your fingers.
Keep clear of all moving parts when starting or operating the pump.
Before servicing the equipment, follow the
Pressure Relief Procedure
on page 12 to prevent the
equipment from starting unexpectedly.

307-809 5
WARNING
FIRE AND EXPLOSION HAZARD
Improper
grounding, poor ventilation, open flames or sparks can cause a hazardous condition and re
-
sult in a fire or explosion and serious injury
.
Ground the equipment and the object being sprayed. Refer to
Grounding
on page 7.
If there is any static sparking or you feel an electric shock while using this equipment,
stop spray-
ing/dispensing immediately
.
Do not use the equipment until you identify and correct the problem.
Provide fresh air ventilation to avoid the buildup of flammable fumes from solvents or the fluid be
-
ing sprayed/dispensed.
Keep the spray/dispense area free of debris, including solvent, rags, and gasoline.
Electrically disconnect all equipment in the spray/dispense area.
Extinguish all open flames or pilot lights in the spray/dispense area.
Do not smoke in the spray/dispense area.
Do not turn on or of
f any light switch in the spray/dispense area while operating or if fumes are
present.
Do not operate a gasoline engine in the spray/dispense area.
TOXIC FLUID HAZARD
Hazardous
fluid or toxic fumes can cause serious injury or death if splashed in the eyes or on the skin,
inhaled, or swallowed.
Know the specific hazards of the fluid you are using.
Store hazardous fluid in an approved container
. Dispose of hazardous fluid according to all local,
state and national guidelines.
Always wear protective eyewear
, gloves, clothing and respirator as recommended by the fluid and
solvent manufacturer
.

6 307-809
Notes

Installation
(All Pumps)
Typical Installation
The T
ypical Installations shown in Figs. 2 and 3, and
the following installation information are only guides.
Proper sizing of the pump, accessories and lines is
essential to get the maximum performance from your
system. Contact your Graco distributor for assistance
in designing a system to meet your needs.
Mount the Pump
This
pump can be mounted on a floor stand, cart, wall
bracket, or drum. The floor stand shown in the T
ypical
Installation is Part. No. 220–581.
Instructions for mounting the pump are supplied with
the mounting accessory
.
Plumbing
The pump has a 1–1/2 in. npt(f) fluid inlet and a 1 in.
npt(f) fluid outlet. Use a minimum 25 mm (1 in.) diame
-
ter pipe or hose between the pump outlet and any
supply line accessories. Use a minimum 38 mm (1–1/2
in.) diameter pipe or hose between the mix tanks and
pump inlet.
When using a stainless steel pump, use stainless steel
plumbing to maintain a corrosion-resistant system.
Grounding
WARNING
FIRE AND EXPLOSION HAZARD
Before operating the pump, ground the
system as explained below
. Also read
the section
FIRE AND EXPLOSION
HAZARD
on page 5.
1.
Pump:
use the ground wire and clamp. See Fig. 1.
Loosen the grounding lug locknut (W) and washer
(X). Insert one end of a 12 ga (1.5 mm
) minimum
ground wire (Y) into the slot in lug (Z) and tighten
the locknut securely
. Connect the other end of the
wire to a true earth ground. For a ground wire and
clamp, order Part No. 237–569.
W
Y
X
Z
Fig. 1
0720
2.
Air and fluid hoses:
use only electrically conductive
hoses.
3.
Air compressor or hydraulic power supply:
follow
manufacturer’
s recommendations.
4.
Surge tank:
use a ground wire and clamp.
See Fig. 1.
5.
Spray gun:
ground through connection to a prop
-
erly grounded fluid hose and pump.
6.
Fluid supply container:
follow your local code.
7.
Object being sprayed:
follow your local code.
8.
Solvent pails used when flushing:
follow your local
code. Use only metal pails, which are conductive,
placed on a grounded surface. Do not place the
pail on a nonconductive surface, such as paper or
cardboard, which interrupts the grounding continu
-
ity.
9.
T
o maintain grounding continuity when flushing or
relieving pressure
, hold a metal part of the spray
gun firmly to the side of a grounded
metal
pail,
then trigger the gun.

Installation
(Air-Powered Pumps)
Air Line to Motor
WARNING
A
bleed-type master air valve (D) is required in
your system, to help reduce the risk of serious
injury including splashing fluid in the eyes or on the
skin, and injury from moving parts if you are adjust
-
ing or repairing the pump.
The bleed-type master air valve relieves air trapped
between this valve and the pump after the air is
shut of
f. T
rapped air can cause the pump to cycle
unexpectedly
. Locate the valve close to the pump.
Order Part No. 1
13–333.
1.
The air line lubricator (N) automatically lubricates
the air motor to prevent corrosion. See Fig. 2.
2.
The bleed-type master air valve (M) relieves air
trapped between itself and the motor
, when the
valve is closed. Install one valve close to the
pump, downstream from the air regulator
. Install a
second bleed valve upstream from all other air line
accessories, to isolate the accessories for servic
-
ing.
3.
The air regulator (L) controls pump speed.
4.
The pump runaway valve (P) shuts of
f the air to
the pump if the pump speed exceeds your pre-ad
-
justed setting. Running a pump too fast can dam
-
age it.
5.
The air filter (K) removes harmful dirt and moisture
from the compressed air supply
.
6.
The air supply line (J) must be large enough to
supply the proper volume of air to the motor
.
Fluid Line from Pump
WARNING
A
fluid drain valve (J) is required in your system, to
help reduce the risk of serious injury including
splashing in the eyes or on the skin if the pump
cycles unexpectedly
.
Locate one valve downstream from the pump outlet
and another valve downstream from the surge tank
(G). These drain valves are used to relieve fluid
pressure in the pump and surge tank during shut
-
down.
1.
The surge tank (G) reduces fluid surging to pre
-
vent backflow into the pump. Mounting instructions
are supplied with the tank.
2.
The shutoff valves (D) before and after the surge
tank, and between each mix tank and the pump
fluid inlet, isolate these components for servicing.
3.
Be sure the supply line (C) between the pump and
mix tanks is level.

Installation
(Air-Powered Pumps)
Fig.
2
KEY
A Mix
T
ank
B
Pump Stand
C
Fluid Supply Line; 38 mm (1–1/2 in.)
minimum diameter
D
Fluid Shutof
f V
alve
E
Fluid Line; 25 mm (1 in.)
minimum diameter
F
Surge Tank Stand
G
Surge T
ank
H
Ground Wire (required;
see page 7 for installation)
J
Air Supply Line
K
Airline Filter
L
Air Regulator and Gauge
M Bleed-T
ype Master Air V
alve (required)
N
Airline Lubricator
P
Pump Runaway Control V
alve
Q
Fluid Drain V
alve (required)
E
D
A
D
B
F
KJ
L
H
G
M
C
D
D
MN
P
Q
H
Q
A
01923

10 307-809
Installation
(Hydraulic-Powered Pumps)
Hydraulic Power Supply
CAUTION
The
Hydraulic Power Supply must be kept clean at
all times to avoid damage to the motor and hydraulic
power supply
.
1.
Blow out hydraulic lines with air and flush thor
-
oughly before connection to the motor
.
2.
Plug hydraulic inlets, outlets, and line ends when
disconnecting them for any reason.
1.
Be sure the power supply can provide suf
ficient
power to the motor
.
2.
Be sure the power supply is equipped with a
suction filter to the hydraulic pump.
Hydraulic Supply to Motor
NOTE:
The motor’
s hydraulic inlet is 3/4 in., 37
flare.
Use a minimum 13 mm (1/2 in.) ID hydraulic supply
line (L).
1.
The shutof
f valve (R) isolates the motor when
servicing the system. See Fig. 3.
2.
The hydraulic fluid pressure gauge (Q) monitors
the hydraulic oil pressure to the motor
. This helps
avoid overpressurizing the motor or displacement
pump.
3.
The pressure- and temperature-compensated flow
control valve (S) prevents the motor from running
too fast, which can damage it.
4.
The pressure reducing valve (P) which has a drain
line (M) running to the return line (K), controls the
hydraulic pressure to the motor
.
Hydraulic Return from Motor
NOTE: The motor’
s hydraulic outlet is 7/8 in., 37
flare. Use a minimum 16 mm (5/8 in.) ID hydraulic
return line (K).
1.
The shutof
f valve (R) isolates the motor when
servicing the system.
CAUTION
T
o avoid damage to the pump, never use the return
line shutof
f valve to control the hydraulic flow
. Do not
install any flow control devices on the hydraulic re
-
turn line.
2.
The 10 micron size return filter (J) removes resi
-
due from the hydraulic fluid to help keep the sys
-
tem running smoothly
.
Fluid Line from Pump
WARNING
A
fluid drain valve (J) is required in your system, to
help reduce the risk of serious injury including
splashing in the eyes or on the skin if the pump
cycles unexpectedly
.
Locate one valve downstream from the pump outlet
and another valve downstream from the surge tank
(G). These drain valves are used to relieve fluid
pressure in the pump and surge tank during shut
-
down.
1.
The surge tank (G) reduces fluid surging to pre
-
vent backflow into the pump. Mounting instructions
are supplied with the tank.
2.
The shutoff valves (D) before and after the surge
tank, and between each mix tank and the pump
fluid inlet, isolate these components for servicing.
3.
Be sure the supply line (C) between the pump and
mix tanks is level.

307-809 11
Installation
(Hydraulic-Powered Pumps)
01924
Fig.
3
KEY
A Mix
T
ank
B
Pump Stand
C
Fluid Supply Line;
38 mm (1–1/2 in.)
minimum diameter
D
Fluid Shutof
f V
alve
E
Fluid Line; 25 mm (1 in.)
minimum diameter
F
Surge Tank Stand
G
Surge T
ank
H
Ground Wire (required; see
page 7 for installation)
J
10 Micron Return Filter
K
Hydraulic Return Line; 16 mm
(5/8 in.) minimum diameter
L
Hydraulic Supply Line; 13 mm
(1/2 in.) minimum diameter
M
Drain Line
P
Pressure Reducing V
alve
Q
Hydraulic Pressure Gauge
R
Hydraulic Shutof
f V
alve
S
Flow Control V
alve
T
Fluid Drain V
alve (required)
A
E
D
F
K
J
L
HG
D
B
C
T
A
S
PQ R
M
C
D
DD
D
D D
H
H
H
S
E
G
J
T
T
F
R
PQ
R
R
K
K
KL
L
E
E
E
E
M
T
C

12 307-809
Operation
(All Pumps)
Before
Y
ou Start the Pump
Read
and follow all instruction manuals, labels and
tags supplied with this pump and with all the accesso
-
ries you add to the system, before operating the sys
-
tem.
Flush the Pump Before First Use
The
pump was tested in lightweight oil. If the oil will
contaminate the fluid you are pumping, flush it out with
a compatible solvent.
Pressure Relief Procedure
WARNING
PRESSURIZED
EQUIPMENT HAZARD
The system pressure must be manually relieved to
prevent the system from starting or spraying acci
-
dentally. T
o reduce the risk of an injury from acci
-
dental spray from the gun, splashing fluid, or
moving parts, follow the
Pressure Relief Proce
-
dure
whenever you:
are instructed to relieve the pressure,
stop spraying,
check or service any of the system equipment,
or install or clean the spray nozzle.
1.
Shut of
f the power to the pump.
2.
In an air-powered system, close the air regulator
and close the bleed-type master air valve.
3.
In a hydraulic-powered system,
close the hy
-
draulic supply line shutof
f valve first, then the
return line shutof
f valve. In a multi-pump system,
do this at each pump to isolate the pumps.
4.
Close the fluid shutof
f valves from the supply
tanks.
5. T
rigger the gun at the last gun station to relieve
fluid pressure. Maintain firm metal-to-metal contact
between the gun and a grounded waste pail.
Repeat for all gun stations.
6.
Open the pump drain valve to relieve fluid pres
-
sure which may be trapped in the pump or hose.
If you suspect that pressure is not fully relieved after
following the steps above, wrap a fitting near the pump
outlet with a rag, and slowly and carefully loosen the
fitting to relieve pressure. Be careful to protect your
eyes from splashing.

307-809 13
Operation
(Air-Powered Pumps)
Starting and Adjusting the Pump
1. Charge
the surge tank, if you are using one. See
the separate instruction manual, 307–707.
2.
Open all shutof
f valves (D).
3.
Open the dispensing valve/spray gun at the last
gun station and keep it open while starting the
pump.
4.
Open the bleed-type master air valves (M).
5.
Adjust the air regulator (L) to the minimum pres
-
sure necessary for the pump to cycle slowly
.
6.
When fluid is flowing smoothly from the gun,
release the gun trigger
.
7.
One at a time, open any other guns in the system
to purge air from the lines.
8.
Adjust the pump runaway valve (P) according to
the instructions supplied with it.
9.
Adjust the lubricator (N) according to the instruc
-
tions supplied with it.
NOTE:
In a circulating system, the pump operates
continuously until the power supply is shut of
f. In a
direct supply system, the pump starts when the gun/
valve is opened, and stops when the gun/valve is
closed. The pump always stops on the downstroke due
to the vented inlet seat (32).
WARNING
COMPONENT RUPTURE HAZARD
T
o reduce the risk of overpressurizing
your system, which could cause
component rupture and serious injury
,
never exceed the specified maximum air input
pressure to the pump
(see
T
echnical Data
on
pages 40–45).
Shutdown
WARNING
T
o reduce the risk of serious injury whenever you
are instructed to relieve pressure, always follow the
Pressure Relief Procedure
on page 12.
Relieve the pressure.

14 307-809
Operation
(Hydraulic-Powered Pumps)
Starting and Adjusting the Pump
1. Charge
the surge tank, if you are using one. See
the separate instruction manual, 307–707.
2.
Open all shutof
f valves (D).
3. T
urn on the hydraulic power supply
.
4.
Open the flow control valve (S) all the way
.
5.
Open the return line shutof
f valve
first,
then open
the supply line shutof
f valve.
6.
Open the dispensing valve/spray gun at the last
gun station and keep it open while starting the
pump.
7.
Adjust the pressure reducing valve (P) until you
get the desired fluid pressure.
8.
When fluid is flowing smoothly from the gun,
release the gun trigger
.
9.
One at a time, open any other guns in the system
to purge air from the lines.
10.
With a gun triggered open (dead-end systems
only) or with the pump running in a circulating
system, count the cycle rate of the pump for one
minute. Close the flow control valve (S) until the
cycle rate drops to below the desired cycle rate.
11.
Open the flow control valve (S) slowly until the
cycle rate and fluid pressure return to the desired
level. This method of setting the hydraulic controls
ensures proper pump operation and prevents
pump runaway and damage if the fluid supply runs
dry.
12.
Release the gun trigger
.
NOTE:
In a circulating system, the pump operates
continuously until the power supply is shut of
f. In a
direct supply system, the pump starts when the gun/
valve is opened, and stops when the gun/valve is
closed. The pump always stops on the downstroke due
to the vented inlet seat (32).
WARNING
COMPONENT RUPTURE HAZARD
T
o reduce the risk of overpressurizing
your system, which could cause
component rupture and serious injury
,
never exceed the specified maximum hydraulic
input pressure to the pump
(see
T
echnical Data
on page 46).
Shutdown
WARNING
T
o reduce the risk of serious injury whenever you
are instructed to relieve pressure, always follow the
Pressure Relief Procedure
on page 12.
Relieve the pressure.
Always shut of
f the supply line shutof
f valve
first,
and
then the return line shutof
f valve. This is to prevent
overpressurizing the motor or its seals.

307-809 15
Maintenance
The operating conditions of your particular system
determine how often maintenance is required. Estab
-
lish a good maintenance schedule during the first
several weeks of operation by recording when and
what kind of maintenance is needed, and then deter
-
mine a regular schedule for checking your system.
Y
our maintenance schedule should include the follow
-
ing:
Flushing
WARNING
FIRE AND EXPLOSION HAZARD
Before flushing, read the section
FIRE
AND EXPLOSION HAZARD
on page
5. Be sure the entire system and flush
-
ing pails are properly grounded. Refer to
Grounding
on page 7.
1.
Flush before shutting down the system for an
extended period of time.
2.
Flush before repairing the pump, if possible.
3.
Flush before the fluid you are pumping can dry out,
settle or set up in the pump and hoses.
Packing Nut Tightness
The
packing nut (21) should be tight enough to stop
leakage, but no tighter. Overtightening compresses
and damages the packings, and may cause the pump
to leak, reducing performance. See Fig. 4.
T
o check the adjustment of the packing nut, first re
-
lieve fluid pressure. If you have a torque wrench,
tighten the packing nut to 34–40 N
m (25–30 ft–lb).
Excessive Leaking at Throat
To
monitor leaking at the throat, remove one of the
small plugs (31) from the packing nut (21). Place one
end of a drain tube in the hole and the other end in a
container
. See Fig. 4. Monitor the drainage. If it seems
excessive, and tightening the packing nut does not
help, replace the throat packings. See page 20.
Fig. 4
01925
21
3131
1
Torque
to 34–40 N
m
(25–30 ft–lb).
1

16 307-809
Maintenance
Air Line Lubricator
Keep
properly filled for automatic air motor lubrication.
Air Line Filter
Drain
and clean as necessary
.
Hydraulic Power Supply Check
Carefully
follow the hydraulic power supply manufac
-
turer’
s recommendations on reservoir and filter clean
-
ing, and periodic changes of hydraulic fluid.
Mix Tank Volume
Don’t
let the mix tank run dry
. When the tank is empty
,
the pump demands more power as it tries to suck in
some fluid. This causes the pump to run too fast,
which can seriously damage the pump.
Stop the Pump at the Bottom of Its Stroke
WARNING
To
reduce the risk of serious injury whenever you
are instructed to relieve pressure, always follow the
Pressure Relief Procedure
on page 12.
Whenever you stop the pump for any reason, relieve
the pressure. Stop the pump on the downstroke,
before the air motor changes over
. If the pump is
stopped on the upstroke a pressure relief seat causes
the piston to creep until it reaches the up position.
Following the
Pressure Relief Procedure
helps stop
the pump at the bottom of its stroke.
CAUTION
Failure to stop the pump at the bottom of its stroke
allows fluid to dry on the piston rod, which can cause
damage to the throat packings when the pump is
restarted.

307-809 17
Troubleshooting
WARNING
T
o reduce the risk of serious injury whenever you
are instructed to relieve pressure, always follow the
Pressure Relief Procedure
on page 12.
1.
Relieve the pressure.
2.
Check all possible problems and solutions before
disassembling pump.
PROBLEM CAUSE SOLUTION
Pump output low on both strokes.
Restricted air or hydraulic supply
lines.
Clear
any obstructions; be sure all shut
-
off
valves are open; increase pressure,
but do not exceed maximum working
pressure.
Exhausted
fluid supply
.
Refill and reprime pump.
Clogged fluid outlet line, valves, etc.
Clear.
W
orn piston packing (15).
Replace. See page 20.
Pump output low on only one
stroke.
Held
open or worn check valve.
Check and repair
.
W
orn piston packing (15).
Replace. See page 20.
Pump operates erratically
.
Exhausted fluid supply
.
Refill and reprime pump.
Held open or worn check valves.
Check and repair
.
W
orn piston packing (15).
Replace. See page 20.
Excessive
hydraulic fluid supply pres
-
sure
to V
iscount motor
.
See V
iscount motor manual.
Pump will not operate.
Restricted air or hydraulic supply
lines.
Clear
any obstructions; be sure all shut
-
off
valves are open; increase pressure,
but do not exceed maximum working
pressure.
Exhausted
fluid supply
.
Refill and reprime pump.
Clogged fluid outlet line, valves, etc.
Clear.
Damaged air motor or hydraulic mo-
tor.
See
motor manual.
Fluid dried on piston rod (17).
Disassemble and clean pump (see
page
20). In future, stop pump at bottom
of
stroke.
Pump will not prime.
Suction line clogged.
Clear
. Flush more frequently
.
Held open or worn check valves.
Check and repair
.
Piston assembled with wrong nut.
Use only the large, round, special nut
(12).
Excessive
throat leakage.
Worn piston rod (17) or throat pack-
ings.
Replace.
See page 20.

18 307-809
Service
Disconnecting the Displacement Pump
NOTE:
In stand or wall-mounted installations, you do
not have to remove the entire pump from its mounting.
WARNING
T
o reduce the risk of serious injury whenever you
are instructed to relieve pressure, always follow the
Pressure Relief Procedure
on page 12.
1.
Relieve the pressure.
2.
Disconnect the hoses from the displacement pump
and plug the ends to prevent fluid contamination.
3.
Disconnect the displacement pump from the motor
as follows:
For Senator and Bulldog air-powered pumps:
Unscrew the coupling nut (A). Unscrew the lock
-
nuts (B) from the tie rods (C). Pull the displace
-
ment pump (D) of
f the motor (E). Remove the pin
(F) and screw the coupling (G) of
f the piston rod
(H). See Fig. 5.
For President air-powered pumps:
Unscrew the coupling nut (K) of the coupling rod
(G) from the piston rod (H). Unscrew the locknuts
(B) from the tie rods (C). Pull the displacement
pump (D) of
f the motor (E). See Fig. 6.
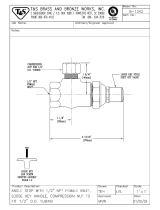
For V
iscount hydraulic-powered pumps:
Unscrew the coupling nut (K) of the coupling rod
(G) from the piston rod (H). Unscrew the locknuts
(B) from the tie rods (C). Pull the displacement
pump (D) of
f the motor (E). See Fig. 7.
Reconnecting the Displacement Pump
1. Reconnect
the displacement pump to the motor as
follows:
For Senator and Bulldog air-powered pumps:
Make sure the o-ring (J) is in place in the coupling
(G). Screw the coupling onto the piston rod (H)
and install the pin (F). Orient the displacement
pump (D) to the motor (E) as shown in Fig. 5.
Position the displacement pump (D) on the tie rods
(C). Lubricate the threads of the tie rods. Screw
the locknuts (B) onto the tie rods loosely
. Screw
the coupling nut (A) onto the motor shaft and
torque to 102–109 N
m (75–80 ft-lb). T
orque the
tie rod locknuts to 68–75 N
m (50–55 ft-lb).
For President air-powered pumps:
Orient the
displacement pump (D) to the motor (E) and
adapter plate (L) as shown in Fig. 6. Position the
displacement pump (D) on the tie rods (C). Lubri
-
cate the threads of the tie rods. Screw the locknuts
(B) onto the tie rods loosely
. Screw the coupling
nut (K) onto the piston rod (H) and torque to
102–109 N
m (75–80 ft-lb). T
orque the tie rod
locknuts to 68–75 N
m (50–55 ft-lb).
For V
iscount hydraulic-powered pumps:
Orient
the displacement pump (D) to the motor (E) and
adapter plate (L) as shown in Fig. 7. Position the
displacement pump (D) on the tie rods (C). Lubri
-
cate the threads of the tie rods. Screw the locknuts
(B) onto the tie rods loosely
. Screw the coupling
nut (K) onto the piston rod (H) and torque to
102–109 N
m (75–80 ft-lb). T
orque the tie rod
locknuts to 68–75 N
m (50–55 ft-lb).
2.
Flush and test the pump before reinstalling it in the
system. Connect hoses for flushing. Flush the
pump. While it is pressurized, check for smooth
operation and leaks. Adjust or repair as necessary
before reinstalling in the system. Reconnect the
pump ground wire before operating.
Reassembling a Motor with an Adapter
Plate
If
your motor has an adapter plate, use this procedure
when reassembling the motor and pump, to ensure
proper alignment of the motor shaft to the piston rod.
1.
Loosen the screws (M) holding the adapter plate
(L) to the motor (E). See Fig. 8.
2.
Screw the tie rods (C) into the adapter plate (L)
and torque to 68–75 N
m (50–55 ft-lb).
On V
iscount I+ pumps,
the tie rods will engage
threaded holes in the base of the motor
.
3.
Fill the cavity in the bottom of the motor shaft with
grease. Screw the coupling (G) into the motor
shaft until the pin holes align. Install the pin (F) in
the
second hole
from the end of the coupling for
President pumps, and in the
first hole from the
end of the coupling for V
iscount pumps.
4.
Align the tie rods (C) with the displacement pump
and loosely install the locknuts (B).
5.
Screw the coupling nut (K) onto the piston rod (H)
and torque to 102–109 N
m (75–80 ft-lb).
6. T
orque the screws (M) holding the adapter plate
(L) to the motor (E) to 20–23 N
m (15–17 ft-lb).
T
orque the tie rod locknuts (B) to 68–75 N
m
(50–55 ft-lb).

307-809 19
Service
Fig. 5
1
3
2
Lubricate
threads.
T
orque to 102–109 N
m
(75–80 ft-lb).
T
orque to 68–75 N
m
(50–55 ft-lb).
Model
220–569
Senator Pump
Shown
1
3
2
01926
D
B
C
A
J
E
G
F
H
Fig. 6
1
3
2
Model 220–564
President Pump Shown
Lubricate
threads.
T
orque to 102–109 N
m
(75–80 ft-lb).
T
orque to 68–75 N
m
(50–55 ft-lb).
1
3
2
01927
L
G
K
H
E
C
B
D
Model
236–601
V
iscount I+ Pump Shown
01928
Fig. 7
1
3
2
Lubricate
threads.
T
orque to 102–109 N
m
(75–80 ft-lb).
T
orque to 68–75 N
m
(50–55 ft-lb).
E
L
C
B
G
K
H
D
1
3
2
01929
Fig.
8
1
3
4
2
Torque
to 20–23 N
m
(15–17 ft-lb).
For President Pumps,
install in second hole
from end of coupling (G);
for V
iscount Pumps,
use first hole.
Model
220–564
President Pump Shown
Lubricate
threads.
T
orque to 102–109 N
m
(75–80 ft-lb).
T
orque to 68–75 N
m
(50–55 ft-lb).
5
4
5
2
1 3
3
F
H
G
K
M
L
C
B
E

Service
Repair Kits
A
pump seal kit is available for each pump size. Throat
packing kits are also available, one for UHMWPE/
leather pumps and one for
PTFE pumps. The piston
seals may also be converted to PTFE. Refer to page
36 for ordering.
Parts supplied in the pump seal kit are marked with
one asterisk in the text and drawings, for example (2*).
Parts supplied in the throat packing kit are marked with
a symbol, for example (19
). For the best results, use
all the parts in the kit.
Disassembling the Displacement Pump
1. Remove
the pump from the motor as explained on
page 18.
2.
Secure the displacement pump intake housing (10)
in a vise.
3.
Refer to Fig. 9. Remove the four capscrews (9)
and washers (8) from around the pump outlet
housing (22).
4.
Remove the outlet housing (22), balls (23), seats
(24) and gaskets (7).
5.
Remove the three tie bolts (13) and lockwashers
(14). Lift of
f the upper pump housing (1), along
with the fluid tubes (3), cylinder (4), and piston
assembly (16).
6.
Remove the packing nut (21), glands (19, 26) and
packings (20, 25) from the upper housing (1).
NOTE:
Model 237–220 and 237–221 displacement
pumps use 5
PTFE v-packings in the throat, instead of
3 UHMWPE (20) and 2 leather (25).
7.
Remove the tubes (3) and cylinder (4) from the
housing.
8.
Remove the intake housing (10) from the vise.
9.
Remove the four capscrews (9) and washers (8)
from the intake housing (10). Use a flatblade
screwdriver inserted between the lower pump
housing (1
1) and the intake housing (10) to sepa
-
rate the parts.
10.
Remove the balls (5), seats (6 and 32) and gas
-
kets (7).
NOTE:
One of the seats (32) has a vent hole. T
ake
note of the side of the pump in which this seat is used
(the left side when viewed as shown in Fig. 9).
WARNING
COMPONENT RUPTURE HAZARD
The vented ball seat (32) must be in
-
stalled at the fluid inlet. This valve
relieves pressure trapped in the pump
cylinder when the pump is shut of
f, and reduces
the risk of pump overpressurization. The seat
cannot relieve pressure if installed in any other
position.
NOTE:
Inspect the parts of the piston assembly (items
12, 15 and 16) in place before disassembling the
piston. The piston seal (15) is included in the Seal
Repair Kit. If it or any other parts of the piston show
wear or damage, proceed to step 1
1. If no damage is
apparent, it is not necessary to disassemble the piston.
11.
Place the flats of the piston nut (12) in a vise.
Unscrew the rod (17) from the nut. Disassemble
the two halves of the piston (16) and remove the
seal (15).
Cleaning and Inspecting Parts
Clean
all parts in a compatible solvent. Inspect all
parts for wear or damage. If you are using a repair kit,
use all the new parts in the kit, discarding the old ones
they replace. Replace any other parts as needed.
W
orn or damaged parts may cause the pump to per
-
form poorly or cause premature wear of the new seals
and packings.
/