Page is loading ...

ELEVATION FRONT BUMPER
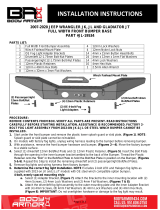
1994-02 DODGE RAM 2500-3500
Page 1 of 4 4/11/23 (DP)
PARTS LIST:
1
Elevation Front Bumper Assembly
16
12-1.75mm x 45mm Hex Bolts
1
Driver/left Frame Mounting Bracket
14
12mm x 37mm x 3mm Large Flat Washers
1
Passenger/right Frame Mounting Bracket
20
12mm x 24mm x 3mm STD Flat Washers
1
Driver/left Support Bracket
18
12mm Lock Washers
1
Passenger/right Support Bracket
18
12mm Hex Nuts
2
License Plate Mounting Plugs
4
6mm x 20mm Hex Bolts
2
12mm Fish Wires
8
6mm x 22mm x 2mm Flat Washers
2
12mm Plastic Retainers
4
6mm Nylon Lock Nuts
2
12mm Bolt Plates
PROCEDURE:
1. REMOVE CONTENTS FROM BOX. VERIFY ALL PARTS ARE PRESENT. READ INSTRUCTIONS
CAREFULLY BEFORE STARTING INSTALLATION. BUMPER IS HEAVY, ASSISTANCE IS HIGHLY
RECOMMENDED.
2. Start installation from under the driver/left front of the vehicle. Remove the outer bumper brace from the
outside of the frame to the end of the bumper. Repeat to remove the passenger/right bumper brace.
3. Models with factory fog lights: Unplug the wiring harness from the back of the bumper. Move the
wiring harness out of the way.
4. Support the bumper with stands or blocks. Locate the factory bumper bolts attaching the bumper
brackets to the end of the frame. Remove hex bolts and with assistance, remove the bumper assembly,
(Figure 1).
5. Select the driver/left Frame Mounting Bracket, (Figure 2). Line up (3) of the slots in the Bracket with the
corresponding mounting holes for the factory bumper bracket. NOTE: Frame Mounting Bracket is
equipped with several slots to allow fitment on multiple model years. Attach the Mounting Bracket to the
frame with (3) 12mm x 45mm Hex Bolts, (6) 12mm x 24mm STD Flat Washers, (3) 12mm Lock
Washers and (3) 12mm Hex Nuts, (Figure 2). Leave hardware loose at this time.
6. Next, select the driver/left Support Bracket, (Figure 3). Hold the Bracket up in position against the front
of the cross member. Line up the mounting slot in the back of the Bracket with the correct hole in the
cross member. Insert (1) 12mm Bolt Plate through the back of the cross member, (Figure 3). Attach the
(2) License
Plate Plugs
Passenger/right Frame Bracket
Driver/left
Frame Bracket
Passenger/right
Support Bracket
Driver/left Support Bracket
(2) 12mm Bolt Plates
(2) 12mm Plastic
Retainers
(2) 12mm Fish Wire

ELEVATION FRONT BUMPER
1994-02 DODGE RAM 2500-3500
Page 2 of 4 4/11/23 (DP)
Bracket to the Bolt Plate with (1) 12mm x 37mm Large Flat Washer, (1) 12mm Lock Washer and (1)
12mm Hex Nut. Leave loose at this time.
IMPORTANT: On some models or model years, the cross member is reinforced, and the Bolt Plate
cannot be inserted through the back of the crossmember. On these models, select (1) 12mm Fish Wire,
(Figure 4). Insert the coiled end of the Fish Wire through the hole in the cross member for the Support
Bracket. Feed the Fish Wire either down through the slot in the bottom or back out through the larger
hole toward the center of the cross member if equipped. Thread the Bolt Plate into the coiled end. Pull
the straight end of the Fish Wire back through the cross member until the threaded end of the Bolt Plate
extends out of the smaller hole in the cross member. Hold the Bolt Plate and remove the Fish Wire.
Thread (1) 12mm Plastic Retainer onto the Bolt Plate to help hold it in place, (Figure 4). Repeat the
previous Step to attach the Support Bracket to the Bolt Plate.
7. Line up the top of the Support Bracket with the mounting flange on the Frame Mounting Bracket. Attach
the Support Bracket to the Frame Bracket with (2) 12mm x 45mm Hex Bolts, (4) 12mm x 24mm STD
Flat Washers, (2) 12mm Lock Washers and (2) 12mm Hex Nuts, (Figure 5). Tighten the (2) Hex Bolts
attaching the Support Bracket to the Frame Bracket, then only snug tighten the Bolt Plate and the
Frame Bracket hardware.
8. Repeat Steps 5—7 to install the passenger/right Frame Mounting Bracket and Support Bracket.
9. Models with factory fog lights:
a. Carefully remove the driver/left light assembly from the bracket on the back of the bumper.
b. Attach the light assembly to the mounting tab on the back of the HD Bumper with the included
(2) 6mm x 20mm Hex Bolts, (4) 6mm Flat Washers and (2) 6mm Nylon Lock Nuts, (Figure 6).
Do not overtighten 6mm hardware or damage to the light assembly may result.
c. Repeat to install the passenger/right fog light assembly.
d. Remove wiring harness from factory bumper. Attach the wiring harness to the back of the HD
Bumper and fog lights.
10. With assistance, carefully position the Bumper Assembly up to the Brackets, (Figure 7). Temporarily
support the weight of the Bumper. WARNING: To avoid possible injury or damage to the vehicle, do not
proceed until the bumper is fully and safely supported.
11. Line up the (3) holes in the driver/left side of the Bumper with the (3) holes in the Frame Bracket. Attach
the Bumper to the Bracket with the included (3) 12mm x 45mm Hex Bolts, (6) 12mm x 37mm Large Flat
Washers, (3) 12mm Lock Washers and (3) 12mm Hex Nuts, (Figure 7). Do not fully tighten hardware at
this time. Repeat to attach the passenger/right side of the Bumper to the Bracket.
12. Level and adjust the bumper to the vehicle and fully tighten all 12mm hardware to 65-70ft-lbs.
13. Use the included (2) push-in Plastic Nuts to attach the front license plate, (if required), to the (2) holes
in the front bumper, (Figure 8).
14. Reattach the wiring harness for the fog lights if equipped.
15. Do periodic inspections to the installation to make sure that all hardware is secure and tight.
To protect your investment, Do not use any type of polish or wax that may contain abrasives that could damage the
finish. Mild soap may be used to clean the Bumper Assembly.

ELEVATION FRONT BUMPER
1994-02 DODGE RAM 2500-3500
Page 3 of 4 4/11/23 (DP)
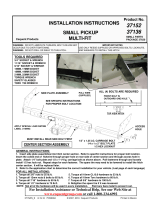
Driver/left Side Installation Pictured
(Fig 1) Remove factory bumper and brackets
(Fig 2) Attach driver/left Frame Bracket to inside
of end of frame. Line up slots in Bracket with
mounting holes for factory bumper bracket
Front
Front
(3) 12mm x 45mm Hex Bolts
(6) 12mm STD Flat Washers
(3) 12mm Lock Washers
(3) 12mm Hex Nuts
(Fig 3) Insert 12mm Bolt Plate through hole in
cross member if accessible. Attach driver/left
Support Bracket to Bolt Plate
(Fig 4) On models with reinforced cross
member, insert coiled end of Fish Wire
through hole in front of cross member (A).
Feed the Fish Wire either down through slot in
bottom of cross member or to large round
hole toward center of cross member (if
equipped).
Thread Bolt Plate into coiled end of Fish Wire
(B).
Pull Bolt Plate back through cross member
and out hole (C).
Remove Fish Wire and thread 12mm Plastic
Retainer onto the Bolt Plate to help hold it in
place (C)
Front
12mm Bolt Plate
12mm Plastic Retainer
12mm x 37mm Large Flat Washer
12mm Lock Washer
12mm Hex Nut

ELEVATION FRONT BUMPER
1994-02 DODGE RAM 2500-3500
Page 4 of 4 4/11/23 (DP)
Driver/left Side Installation Pictured
(Fig 7) Attach Bumper assembly to
driver/left Frame Mounting Bracket
(Fig 5) Attach Support Bracket to Frame
Bracket and Bolt Plate in cross member
(Fig 6) Attach fog light assembly
to mounting tab if equipped
Front
Front
(Fig 8) Attach License Plate to Bumper
(2) Plastic
Plugs
Front
(2) 12mm x 45mm Hex Bolts
(4) 12mm STD Flat Washers
(2) 12mm Lock Washers
(2) 12mm Hex Nuts
12mm Bolt Plate
12mm Plastic Retainer
12mm x 37mm Large Flat Washer
12mm Lock Washer
12mm Hex Nut
Front
(3) 12mm x 45mm Hex Bolts
(6) 12mm x 37mm Large Flat Washers
(3) 12mm Lock Washers
(3) 12mm Hex Nuts
/