Page is loading ...

STEELCRAFT EXTREME HEAVY DUTY GRILLE GUARD
2022 NISSAN FRONTIER
Page 1 of 711/23/22 (DP)
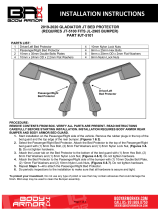
PARTS LIST:
1
XHD Grille Guard
4
12mm Hex Nuts
1
Driver/Left Frame Mounting Bracket
2
10-1.5nn x 35mm Hex Bolts
1
Passenger/Right Frame Mounting Bracket
4
10mm x 30mm x 2.5mm Flat Washers
1
Driver/Left Frame Top Inner Mounting Bracket
2
10mm Nylon Lock Nuts
1
Passenger/Right Top Inner Mounting Bracket
2
8mm Nut Plates
1
Driver/Left Top Outer Support Bracket
6
8-1.25mm x 30mm Hex Bolts
1
Passenger/Right Top Outer Support Bracket
10
8mm x 24mm x 2mm STD Flat Washers
4
12-1.25mm x 45mm Special Fine Thread Hex Bolts
2
8mm Lock Washers
4
12-1.75mm x 35mm Coarse Thread Hex Bolts
4
8mm Nylon Lock Nuts
12
12mm x 37mm x 3mm Flat Washer
1
4mm Wrench
8
12mm Lock Washer
PROCEDURE:
REMOVE CONTENTS FROM BOX. VERIFY ALL PARTS ARE PRESENT. READ INSTRUCTIONS
CAREFULLY BEFORE STARTING INSTALLATION. MINOR CUTTING MAY BE REQUIRED. ASSISTANCE
IS RECOMMENDED. INSTALLATION MAY INTERFERE WITH FRONT SENSOR OPERATION.
1. Determine if vehicle is equipped with lower splash guard, (Figure 1).
Models with splash guard.
a. Start installation from the driver/left wheel opening. Remove the hardware attaching the inner
fender liner to the edge of the fender, (Figure 2). Remove the screws attaching the end of the
lower splash guard to the bottom of the fender, (Figure 3).
b. Repeat previous Step to release the passenger/right end of the splash guard.
c. Continue across the bottom of the vehicle and remove the rest of the hardware to remove the
splash guard, (Figures 1 & 4).
Models without splash guard. (Pro 4X model for example-see Figure 5). Skip to Step 2.
2. Remove the driver/left factory tow hook, if equipped, (Figures 1 & 5).
3. Select the driver/left Frame Mounting Bracket, (Figure 6). Attach the Bracket to the tow hook location
on the bottom of the frame channel with the included (2) 12mm x 45mm Fine Thread Hex Bolts, (2)
Driver/Left Frame
Bracket
Passenger/Right
Frame Bracket
Driver/left
Mounting Bracket
Driver/left
Support Bracket
Passenger/right
Mounting Bracket
Passenger/right
Support Bracket
(2) 8mm Nut
Plates

STEELCRAFT EXTREME HEAVY DUTY GRILLE GUARD
2022 NISSAN FRONTIER
Page 2 of 7 11/23/22 (DP)
12mm Lock Washers and (2) 12mm Flat Washers, (Figures 6 & 7). NOTE: Models with tow hooks,
reinstall tow hook with Bracket between tow hook and frame. Do not fully tighten hardware.
4. Repeat Steps 2 & 3 for the passenger/right side Mounting Bracket installation, (Figure 8).
5. Next, open the front hood. Remove the plastic cover from the top of the grille and radiator, (Figure 9).
Remove the hardware attaching the top of the grille to the radiator core support. Release the clips
along the bottom and side of the grille and pull outward to remove the grille from the grille opening,
(Figure 10).
6. Remove the (2) fasteners attaching the top of the plastic bumper cover to the inner steel bumper
support brackets, (Figure 11).
7. Select the driver/left Support Mounting Bracket, (Figure 12). Hold (1) 8mm Nut Plate up under the steel
support bracket. Attach the Mounting Bracket to the top of the plastic bumper cover with (1) 8mm x
30mm Hex Bolt, (1) 8mm Lock Washer and (1) 8mm Flat Washer, (Figure 13). Snug but do not fully
tighten hardware at this time. Repeat this Step to attach the passenger/right Support Mounting Bracket
8. Place the grille assembly in position but do not fully reinstall. Guide the Support Mounting Brackets
through the openings in the bottom of the grille, (Figure 14).
9. Attach the driver/left Support Bracket to the bottom of the Support Mounting Bracket with the included
(2) 8mm x 30mm Hex Bolts, (4) 8mm Flat Washers and (2) 8mm Nylon Lock Nuts, (Figures 15 & 16).
Repeat this Step to attach the passenger/right Support Bracket.
10. Carefully unwrap the Grille Guard.
11. With assistance, hold the Grille Guard up to the outside of the Frame Brackets. Attach the Grille Guard
to the Brackets with the included (4) 12mm x 35mm Coarse Thread Hex Bolts, (8) 12mm Flat Washers,
(4) 12mm Lock Washers and (4) 12mm Hex Nuts, (Figure 17). Snug but do not fully tighten hardware.
12. Attach the outer end of the driver/left Support Bracket to the inside of the Grille Guard upright with the
included (1) 10mm x 35mm Hex Bolt, (2) 10mm Flat Washers and (1) 10mm Nylon Lock Nut, (Figure
18 & 19). Repeat this Step to attach the passenger/right Support Bracket to the Grille Guard.
13. Level and adjust the Grille Guard properly and fully tighten all hardware including the Support Mounting
Bracket hardware. Fully reattach the grille.
Models with splash guard:
a. Hold the splash guard up in place against the bottom of the Brackets, (Figure 20). Mark the
Bracket location onto the splash guard, (Figure 21). Use a knife or hacksaw blade to cut slots
out of the splash guard to clear the Brackets.
b. Reinstall splash guard, (Figure 22).
14. Do periodic inspections to the installation to make sure that all hardware is secure and tight.
To protect your investment, Do not use any type of polish or wax that may contain abrasives that could damage the
finish. Mild soap may be used to clean the Grille Guard.

STEELCRAFT EXTREME HEAVY DUTY GRILLE GUARD
2022 NISSAN FRONTIER
Page 3 of 7 11/23/22 (DP)
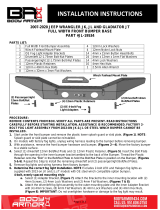
Driver/left Side Installation Pictured
(Fig 1) Model with splash guard (arrows)
(Fig 4) Splash guard removed. Driver/left side
of model without tow hook pictured
Front
(Fig 5) Remove tow hooks if equipped. PRO4X
model not equipped with splash guard
pictured from below
Front
(Fig 2) Model with splash guard, remove
hardware attaching end of cover to fender
liner (arrow-driver/left side pictured)
(Fig 3) Pull fender liner back to locate and
remove inner screws attaching outer ends of
splash guard (arrows)

STEELCRAFT EXTREME HEAVY DUTY GRILLE GUARD
2022 NISSAN FRONTIER
Page 4 of 7 11/23/22 (DP)
Driver/left Side Installation Pictured
(2) 12-1.25mm x 45mm
Fine Thread Hex Bolts
(2) 12mm Lock Washers
(2) 12mm Flat Washers
(Fig 6) Attach driver/left side Bracket
(Fig 7) Driver/left side Bracket installed.
Models with tow hooks, insert Bracket
between tow hook and frame
Front
Front
Front
(Fig 10) Factory grille removed
(Fig 8) Frame Brackets installed
(Fig 9) Remove plastic cover
and grille assembly

STEELCRAFT EXTREME HEAVY DUTY GRILLE GUARD
2022 NISSAN FRONTIER
Page 5 of 7 11/23/22 (DP)
Driver/left Side Installation Pictured
8mm x 30mm Hex Bolt
8mm Lock Washer
8mm Flat Washer
(Fig 12) Hold 8mm Nut Plate up from
below steel bumper support bracket.
Attach driver/left side Inner Top Mounting
Bracket to top of bumper and Nut Plate
(Fig 14) Reinstall grille but leave loose.
Guide Top Mounting Brackets through
openings in grille (arrows)
Front
(Fig 13) Attach driver/left side Top
Mounting Bracket to top of bumper
Front
Front
8mm Nut
Plate
(Fig 11) Remove fasteners attaching top of
bumper cover to steel bumper brackets (arrows)

STEELCRAFT EXTREME HEAVY DUTY GRILLE GUARD
2022 NISSAN FRONTIER
Page 6 of 7 11/23/22 (DP)
Driver/left Side Installation Pictured
Front
(2) 12mm x 35mm Hex Bolts
(4) 12mm Flat Washers
(2) 12mm Lock Washers
(2) 12mm Hex Nuts
10mm x 35mm Hex Bolt
(2) 10mm Flat Washers
10mm Nylon Lock Nut
(2) 8mm x 30mm Hex Bolts
(4) 8mm Flat Washers
(2) 8mm Nylon Lock Nuts
(Fig 18) Attach driver/left Top Support
Bracket to inside of Grille Guard upright
(Fig 15) Attach driver/left Top Support
Bracket to bottom of Mounting Bracket
(Fig 17) Attach Grille Guard to outside
of driver/left Frame Mounting Bracket
Front
(Fig 16) Driver/left Top
Support Bracket installed
(Fig 19) Attach driver/left Top Support
Bracket to inside of Grille Guard upright
Front
Front
Front

STEELCRAFT EXTREME HEAVY DUTY GRILLE GUARD
2022 NISSAN FRONTIER
Page 7 of 7 11/23/22 (DP)
Driver/left Side Installation Pictured
(Fig 21) Cut slots to clear the Brackets
(dashed line for example only )
(Fig 20) Mark Bracket location
onto splash guard
Front
Complete Installation
(Fig 22) Reinstall splash guard
/