Edision PICCO T265 User manual

Type
User manual

This manual is also suitable for

Edision PICCO T265 is a Full HD Digital Terrestrial Receiver that supports DVB-T2 broadcasts. With its advanced features, it offers a variety of possibilities for watching and recording TV programs. You can connect a USB storage device to record your favorite shows or use the media player to enjoy movies, music, and photos. The electronic program guide (EPG) provides detailed information about current and upcoming programs, and the parental control feature allows you to restrict access to certain channels or programs.

Edision PICCO T265 is a Full HD Digital Terrestrial Receiver that supports DVB-T2 broadcasts. With its advanced features, it offers a variety of possibilities for watching and recording TV programs. You can connect a USB storage device to record your favorite shows or use the media player to enjoy movies, music, and photos. The electronic program guide (EPG) provides detailed information about current and upcoming programs, and the parental control feature allows you to restrict access to certain channels or programs.

picco T2
Full HD Digital Terrestrial Receiver DVB-T2
User’s Guide
Support
2Version of 20 August 2019
The CE certificate of the product is available on our webpage, by visiting this link: https://www.edision.gr/en/support
For information about EDISION Hardware or Software matters, please contact [email protected]
Version of 20 August 2019 3
CONTENTS
►Safety ................................................................................................................ 4-5
►Remote control ................................................................................................... 6
►Description .........................................................................................................7
►Features ............................................................................................................... 8
►Information bar (InfoBar) ..................................................................................9
►EDIVISION – Your electronic program guide ............................................10-11
►Installation ........................................................................................................12
Terrestrial Scan ....................................................................................................................12
►Channel ..............................................................................................................13
Organizing Services ..............................................................................................................13
Organizing Favourites ...........................................................................................................15
►System ...............................................................................................................17
Language ..............................................................................................................................17
Software Update ...................................................................................................................18
A/V Control ............................................................................................................................ 19
Time Setting ..........................................................................................................................19
Timer ....................................................................................................................................20
Parental Control ....................................................................................................................21
Miscellaneous Settings .........................................................................................................21
Default setting .......................................................................................................................22
Information ............................................................................................................................22
►Media / Internet ..................................................................................................23
File List .................................................................................................................................. 23
Storage Information ...............................................................................................................23
PVR setting .......................................................................................................................... 24
USB Speed Test .................................................................................................................... 24
Remove USB Device Safely .................................................................................................25
Ethernet Settings ..................................................................................................................25
YouTube ...............................................................................................................................27
Weather Forecast ..................................................................................................................27
Rss Reader ...........................................................................................................................27
4Version of 20 August 2019
►Important safety instructions
1) Please read these instructions carefully.
2) Keep these instructions in a safe place for future reference.
3) Pay extra attention to «warning» points.
4) Follow all instructions.
5) Do not use the device near water.
6) Clean with a dry cloth only.
7) Do not use near heat sources, such as radiators, heat accumulators, ovens or other devices (including
ampliers) generating heat.
8) Only operate this product with the type of power source indicated on the label. If you are unsure about the
type of power supply you use at home, ask your electricity supplier. Disconnect the device from the mains
before maintenance or installation procedure.
9) Protect the mains cable from damage.
10) Only use auxiliary devices/accessories specied by the manufacturer.
11) Disconnect the device during thunderstorms or extended periods of non-use.
12) All maintenance work should be carried out by qualied service personnel. Maintenance is required when
the device is damaged in any way, including damage to the mains cable or mains plug. Also in case the
device becomes exposed to liquids or moisture, was dropped or does not function properly.
13) Make sure that the ventilation slots are always unobstructed.
14) Attention should be paid to the environmental aspect of battery disposal.
15) Only use the device in moderate climate.
WARNING: In order to avoid the risk of re or electric shock, do not expose this device to rain or moisture.
WARNING: The batteries should not be exposed to excessive heat and heat sources such as direct sunlight,
re, etc.
Version of 20 August 2019 5
This symbol indicates that there is risk of electric shock.
This symbol indicates that the operating instructions contain important operating and maintenance
information.
This symbol indicates that the product has a double insulation between voltage and user accessible
parts. Only use parts provided by the manufacturer during repair.
This symbol on the product or in the operating instructions indicates that the electrical or electronic
device must be disposed of separately from household waste at the end of the service life. Separate
collection systems exist for recycling.
For further information, please contact your local authorities or your dealer where you purchased the product.
6Version of 20 August 2019
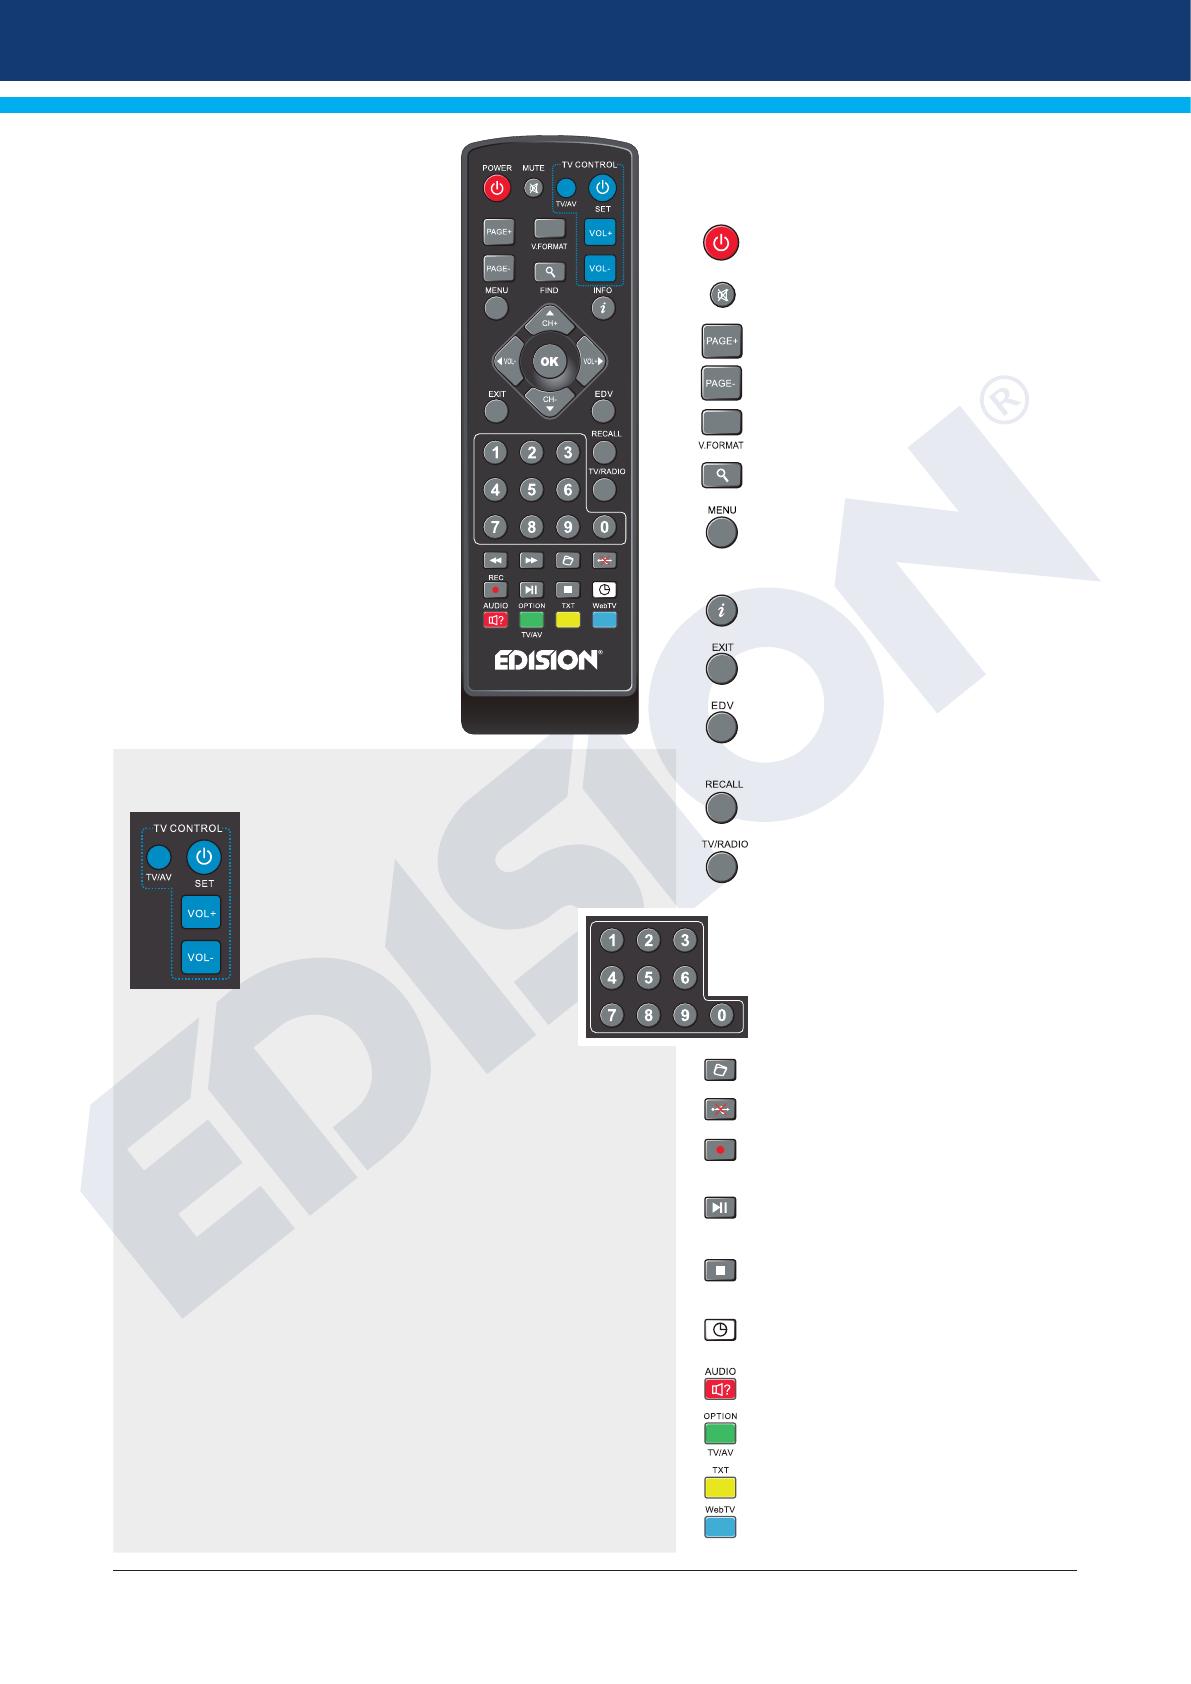
►Remote control
ADJUSTMENT OF TELEVISION FUNCTIONS
Your set-top-box remote control has 4 learning-function keys, in the up
right hand side TV
keypad panel area. Each one can be used accordingly as the following
example:
1. Turning your TV set ON/OFF [SET]
2. Increasing/decreasing volume [VOL+ , VOL-]
3. Switching between TV/AV mode [TV/AV]
The other 39 keys are for the control of the EDISION
set-top-box.
Press [SET] key in the up right hand side TV keypad panel area con-
tinuously for 5 Sec. until the LED lights up and keep lighting, then
release the key. This means the remote control is in the learning mode.
Within 10 seconds, press the key in the original TV IR control, which needs to be
learned, for example the [POWER] key, then the red LED is flashing. It means this
button is ready to receive the learning signal.
Aim the emission port of the original TV remote control at the front at the emission
port at the front of your set-top box remote control (distance between these two ports
has to be about 2~3 CM).
Then press the key which is to be learned in your original TV remote control, for exam-
ple the [POWER] key of your original TV remote control continuously for 3 seconds.
If the red LED flashes quickly for three times and keep lighting, it means the set-top
box remote control has succeeded in receiving the signal and you have completed the
learning procedure of ON/OFF [TV POWER] key.
Then release the [POWER] key of your original TV remote control.
If the copying procedure fails , the red LED will blink and stay OFF. In this case please repeat
the procedure.
For the next programmable function, please repeat steps 1 to 2:
• Switching between TV/AV mode [TV/AV]
• Increasing/decreasing volume [VOL+ , VOL-]
Now you can operate your TV with the 4 programmed by you keys of your set-top box remote
control.
During the operation, the LED will flash to indicate that the signal is transmitted!
Power
Switches between operation and standby
Mute
Mutes or unmutes the audio temporarily
PAGE+ / PAGE -
Scrolls the channel-list forward or backwards
V. FORMAT
Changes the display TV standard
FIND
For searching for programms in lists
Menu
Open main menu & select sub menu
using by navigation button
INFO
Displays the information bar
EXIT
Stops a menu/pop-up window
EDV
Selection of the electronic program support
EDIVISION
RECALL
Returns to previous channel
TV/RADIO
Switch to TV mode. Switch to Radio mode
NUMERIC KEY (0-9)
Control the numerical operation
and change the Channel/Service
number directly
Displays a le-list
Safe USB Removal
REC
Activates immediately recording-option
PLAY/PAUSE
Play start/pause
Stops timeshift, recording or playing
Allows you to set the time
at which the Receiver autom.
switches to standby mode
Activates the audio-menu
Option button. Switching between
TV/AV mode (Not in HDMI mode)
Activates the menu “Subtitle/teletext”
Web TV key
Version of 20 August 2019 7
►Description
Front Panel
1
/ USB: Connection for USB storage devices
2
Display LED, displays current information
3
Infrared sensor for the reception of remote control commands
4 CH- / CH+ buttons: for moving in the program lists
5 POWER button: Activates/Deactivates the device
Back Panel
6 ANT IN: Input for connecting the signal
from the antenna
7 S/PDIF: Audio interface for amplier/audio console
8 HD OUT: Connection to an HDTV quality TV
9 SCART: For connecting to a TV set,
using SCART cable [not for HD TV]
10
Connection for an adapter (DC 5V)
Subpages
11
IR IN: Infrared connection port
Connecting and switching on
Note: For trouble-free signal reception your antenna
and cable installation should be calibrated and inspected
by a qualied professional with a digital
TV-level-measuring instrument.
Connect the receiver using HDMI cable
via the HD OUT output port to your TV’s HDMI input port
Then connect the coaxial cable from
the terrestrial antenna to the ANT IN
input of the receiver.
Insert the batteries into
the remote control.
Notes on the remote control can be
found on the back of these
instructions.
Connect the receiver to the power supply.
The receiver starts with the BOOT process
and is operational within a short time
1
23 4
5
67
8
910
IR
11
1
HDMI in
2
HD mi
kabel
HDMI
kabel
Power socket
HD OUT:
Output receiver
HDMI cable
TV set connection panel
Use an HDMI input!
ANT IN:
coaxial-wire
input from terrestrial
antenna.
coaxial-wire Antenna
After the rst start,
choose your language
8Version of 20 August 2019
►Features
Type: Digital Terrestrial Receiver for DVB-T2 with Dolby Support & WiFi
Full HD H.264 decoding support
Resolution: 480p, 576p, 720p/50Hz, 720p/60Hz, 1080i/50Hz, 1080i/60Hz, 1080p/50Hz, 1080p/60Hz TV Standard
1 x HDMI output for High denition video/audio
1 x Scart
1 x IR in (jack)
1 x S/PDIF output
1 x USB
1 x LED Display
1 x ANT IN
USB WiFi Support
Applications: YouTube, RSS News, Weather
6000 TV/Radio channels memory
PAL/NTSC auto-switch
Multilingual OnScreenDisplay
EDIVISION electronic program guide
Supports Picture In Grak (PIG)
Channel Edit and Favourite Lists
Auto and Manual channel search
Auto-timer Οn/Off
PVR via USB
Τime Shift function
Subtitle support
Teletext support
Last channel auto save
Software upgrade & backup/channel list, via USB
Supports FAT 16/32, NTFS
Parental control
100 ~ 240V Voltage,50Hz/60Hz
Media player MP3/JPEG/BMP/AVI/DivX/VOB/MKV
Front Panel:
Display: LED
Display Buttons: Power, Channel -/+
1 x USB 2.0 slot
Side Panels:
1 x Jack to IR
Back Panel:
Input ANT-IN: 1x IEC-type
Connection TV: 1x HDMI, 1x Scart
Video output: 1x HDMI, 1x Analog
Video
Audio output: Coaxial (S/PDIF)
1 x DC for Power Supply
Package includes:
IR remote control 2in1
5v external power supply unit
2 x «ΑΑΑ» batteries
Mini Manual GR/EN/D
General:
Dimensions: (W x H x D):
125x120x35 (mm)
Weight: 0,5 kg
Color: black
Warranty: 2 years
Support
Version of 20 August 2019 9
►Information bar (InfoBar)
When in the TV/Radio mode, the ‘INFO’ button displays an information bar (InfoBar) at the lower edge of the
screen. This bar is faded-in up to 10 seconds.
How to change the duration of fading of the information bar:
1. Press the ‘MENU’ button to open the main menu.
2. Use the left/right arrow buttons to navigate to the ‘System’ item.
3. Use the up/down arrow buttons to navigate to the ‘Other settings’ menu item and press
the OK button.
4. Use the left/right arrow buttons to select the value in seconds you want to set (max. 10s)
in the ‘OSD time exceeded’ item.
5. Press the EXIT button to exit the menu.
The InfoBar in TV or Radio mode shows the following information about the current program and selected
station:
- the place in the program list
- the name of the station
- the current program (as far as information is available) including start time
- the following program (as far as information is available) including start time
- the name of the favourite list
- the time
- indicates the availability of Teletext for the current program
- indicates if the transmitted program is encrypted
- indicates if subtitles are available
- indicates if the sound broadcasted is in stereo or mono format, left or right balance
- indicates if the program is blocked (child protection)
- indicates that the station is present in a favourite list
- indicates if the program is transmitted in HD
- indicates if Wi-Fi network connection exists
Functions and settings:
If the InfoBar is displayed, detailed information about the current program can be displayed (if available) by
(repeated) pressing the ‘INFO’ button. If multiple information pages are available, scroll through these pages
by using the ‘PAGE+’/’PAGE-’ buttons. Use the left/right arrow buttons to switch between the information
of the current and next program. Use the red button to display further (technical) information. Use the EXIT
button to exit the menu with the detailed information.
Use the EXIT button again to switch off the InfoBar.
10 Version of 20 August 2019
►EDIVISION - Your electronic program guide
Standard: EDIVISION is an electronic program guide with its own OSD menu. EDIVISION presents the
information provided by the service provider in detailed views. In addition, up to 8 time-controlled recordings
(Timer) can be programmed from here. Note that not all channels/program providers provide program-related
information.
Use the EDIVISION button on the remote control to start your program guide.
Functions and settings:
The window of ‘EDIVISION’ is
structured differently, depending
on in which mode you are.
The mode (now, next, more,
timetable) can be changed with
the green button.
Information can be found at the
top left in the modes ‘Now’ and
‘Next’ on the current or next
program and on the channel in
text format, at the top right, the
current TV picture (in TV mode).
In the lower area, the current
program list can be found which
can be navigated with the up/
down arrow buttons and another
channel can be chosen with the
OK button. If the channel provides program-related information, it will be displayed in the list (e.g. duration
of the program in form of bars, program title). Press the OK button to display detailed information about the
program, if available. Use the left/right arrow buttons to switch between ‘Now’ and ‘Next EDIVISION modes.
The ‘More’ mode displays
program information in chart
form and chronological order.
Use the left/right arrow buttons
to navigate between a channel’s
temporal program information and
use the up/down arrow buttons
to move the cursor (yellow
marking) in the channel list. The
OK button may possibly has to
be pressed if another channel
was selected and the program-
related information should be
displayed (if available). If the
cursor is located on the right-
hand side of a program title,
detailed information about this
program can be displayed by
pressing the OK button.
The ‘Timetable’ mode displays the currently selected program list in chart form on the left and program
information in weekly format on the right. Use the left/right arrow buttons.
Version of 20 August 2019 11
EDIVISION window in
‘Timetable’ mode
To navigate in the channel list
and by using the PREV/NEXT
buttons to navigate with daily
overview.
Use the up/down arrow
buttons to navigate between
the weekdays in the respective
list. If the cursor is located on
the right-hand column side
of a program title, even more
detailed information about this
program can be displayed (if
available) by pressing the OK
button.
The following functions and buttons can be used in all modes:
The red button displays an overview of the existing channel lists (groups). Use the arrow buttons to
navigate through this overview and the OK button to set the channel list to be used by EDIVISION.
The green button calls up a menu allowing to switch between the different views of EDIVISION by using the
up/down arrow buttons and the OK button.
The yellow button calls up a Popup Timer Menu. Select the ‘VCR’ item to program time-based events (e.g.
recordings). Select the item Timer List to see the programmed events.
If you want to make a recording on a certain date in the future, select the item ‘USB/HDD Recorder’. Use the
up/down arrow buttons in the following window to navigate between the menu items and the left/right arrow
buttons and OK button to set the values. The following settings can be made in the menu ‘Timer’.
Timer number: Calling up the timer menu automatically switches to the next (available) programmable timer.
Use the left/right arrow buttons the OK button and the up/down arrow buttons to switch between timers. Up
to 8 different events can be programmed.
Timer mode: Set the recording mode here. Choose whether the recording is carried out once, daily,
weekly or monthly.
Timer service: Set the service entry ‘Recording TV channel’ here for a TV recording and ‘Recording Radio
channel’ for a radio recording.
Station: Set the channel here.
Date: Set the start date of the recording here.
Start time: Set the start time here.
Duration: Set the duration of the recording here (recording length).
After making changes and in order to keep them, conrm with ‘Yes’ in the appearing dialogue window. Exit
the timer menu with the EXIT button.
Note: An error message appears under certain circumstances. As a rule, an incorrect start time or start date
was given. Check the information!
Also note that a recording is only possible if a corresponding USB memory device is already connected to
the receiver.
Exit ‘EDIVISION’ by pressing the EXIT button
12 Version of 20 August 2019
►Menu program
► Installation
► Channel
► System
► Media / Internet
►Ιnstallation
► Terrestrial Scan
Terrestrial Scan
Press [OK] key to enter the
selected item.
1 You can select the
Bandwidth by region
(country).
2 You can set the Tuner
Power ON/OFF.
3 Press [Red] key can
directly into blind scan
mode to scan the current
programs.
4 Press [Green] key to enter
the following menu.
Scan Mode
1 There are two modes. You can scan channel by channel or by frequency”.
2 When scan band is UHF and region is “France”, the range of Ch No. is from 21 to 69.
3
When scan Band is VHF and region is “France”, the range of Ch No. is from 1 to 9. (it’s according to region)
4 Press [Red] key to enter blind scan menu, or press [Green] key to enter TP scan menu.
5 Press [Exit] key to exit the scanning.
Version of 20 August 2019 13
► Channel
► Organizing Services
► Organizing Favourites
Organizing Services
Your channel list(s) for TV
or Radio channels can be
customized in this menu.
Notes: Make sure the receiver
is in the correct mode. If wanting
to edit radio channel lists, the
receiver must be in radio mode.
The TV/Radio button enables
switching between TV and Radio
mode.
Standard: The left column of
the menu window shows the list
of the channels of the currently
selected channel list, the right
column shows the symbols for
‘Move’, ‘Lock’, ‘Delete’, ‘Rename’ and ‘Skip’.
Functions and settings in the menu:
Use the left/right arrow buttons to switch back and forth between the columns in the menu window, the up/
down arrow buttons to move the cursor up or down in the respective column.
Mark one or more channels in the left column by pressing the OK button. Use the red button to display
an overview of all channel lists/channel groups and enable an appropriate selection. The window overview
displays the list in which you currently are.
The green button displays other possible options. The following options are available:
Select all: All channels are selected.
Deselect all: All channels are deselected.
Select other: All channels are selected that were previously not selected.
Select TP: All channels of a transponder can be selected here.
The ‘FIND’ button allows quick search for channel (names). A search window appears after pressing this
button. Entry into the search eld is done via a letter or numeric eld actuated with the arrow buttons and
by pressing the OK button. Provided that channels with appropriate initial characters are found in the current
list, they will be displayed on the left-hand side. Exit the search window with the EXIT button.
How to move a channel:
1. Move the cursor (yellow bar) in the channel list to the channel to be moved.
2. Change now with the right arrow button in the right part of the menu and navigate the cursor with
the up/down buttons to the ‘Move’ symbol. The symbol is highlighted in colour.
3. Press the OK button.
4. Use now the up/down arrow buttons to move the selected channel in the list. It is also possible
to use the page buttons.
5. By pressing the OK button, the channel remains at the new position and exits the ‘Move’ mode.
14 Version of 20 August 2019
Tip: It is possible to move multiple channels simultaneously by selecting the respective channels rst in the
channel list (left menu page) with the OK button and then carrying out steps 2-5 as explained above.
How to lock a channel:
1. Move the cursor (yellow bar) in the channel list to the channel to be locked.
2. Change now with the right arrow button in the right part of the menu and navigate the cursor with
the up/down buttons on the ‘Lock’ symbol. The symbol is highlighted in colour.
3. Press the OK button. The ‘Lock’ symbol appears now in the channel list behind the channel name.
Tip: It is possible to lock multiple channels simultaneously by selecting the respective channels rst in the
channel list (left menu page) with the OK button and then carrying out steps 2-3 as explained above.
How to unlock a channel:
1. Move the cursor (yellow bar) in the channel list to the locked channel.
2. Change now with the right arrow button in the right part of the menu and navigate the cursor
to the ‘Lock’ symbol. The symbol is highlighted in colour.
3. Press the OK button. Enter 0000 or the code specied by you and the channel is unlocked.
The ‘Locked’ symbol is removed from the channel list.
Tip: It is possible to unlock multiple channels simultaneously by selecting the respective channels rst in the
channel list (left menu page) with the OK button and then carrying out steps 2-3 as explained above.
How to delete a channel:
1. Move the cursor (yellow bar) in the channel list to the channel to be deleted.
2. Change now with the right arrow button in the right part of the menu and navigate the cursor
to the ‘Delete’ symbol. The symbol is highlighted in colour.
3. Press the OK button. The channel is removed from the list.
Tip: It is possible to delete multiple channels simultaneously by selecting the respective channels rst in the
channel list (left menu page) with the OK button and then carrying out steps 2-3 as explained above.
How to name a channel:
1. Move the cursor (yellow bar) in the channel list to the channel to be renamed.
2. Change now with the right arrow button in the right part of the menu and navigate the cursor
to the ‘Rename’ symbol. The symbol is highlighted in colour.
3. Press the OK button.
4. A window appears with the input eld. Select the character and letter with the arrow buttons
and OK button. The last character (your input) can be deleted by navigating the cursor to the ‘<’
character in the letter eld. A space is added by navigating with the arrow buttons to the character.
Conrm your entry by navigating with the arrow buttons to the ‘OK’ area. The new name is now
added to the channel list. The input window can be exited at all times by using the EXIT button
and thereby cancelling the process.
Skip channel
If a channel in the list should not be deleted and also not be displayed, simply skip this channel when
scrolling through the list.
How to select a channel to be skipped:
1. Move the cursor (yellow bar) in the program list to the channel selected to be skipped
(not to be displayed).
2. Change now to the right part of the menu and navigate the cursor to the ‘Skip’ symbol.
The symbol is highlighted in colour.
3. Press the OK button. The program list now displays the ‘Skip’ character behind the channel name,
i.e. when scrolling through the list during TV or Radio mode, the channel will be skipped.
Version of 20 August 2019 15
Exit the ‘Edit channel’ menu by pressing the EXIT button. If changes were made, a dialogue window
appears prompting you to conrm these changes. The changed settings are saved by selecting ‘Yes’.
Note: Channel is only deleted, moved and/or locked upon conrmation with ‘Yes’. NO changes are saved
when selecting ‘No’.
Organizing Favourites
Your favourite lists for TV
or Radio programs can be
customized in this menu in order
to suit your personal choices.
Standard: This menu is divided
into 3 columns. The list of the
available channels can be found
on the left side, depending on
the overview selected. The
currently selected favourite list
can be found on the right side.
The ‘Add’, ‘Remove’, ‘Move’ and
Rename’ symbols can be found
in the centre.
Functions and settings in the menu:
Use the left/right arrow buttons to switch back and forth between the columns in the menu window, the up/
down arrow buttons to move the cursor up or down in the respective list. Select one or more channels by
pressing the OK button.
When in the left column, it is possible to display an overview of all lists (except the favourite list) with the
red button and select another group/list with the arrow buttons and OK button. The title of the left column
shows the list currently displayed.
The green button displays other possible options for channel lists. The following options are available:
Select all: All channels are selected.
Deselect all: All channels are deselected.
Select other: All channels are selected that were previously not selected.
Select TP: All channels of a transponder can be selected here.
When in the left column, the ‘FIND’ button enables quick search of channel names. The search window
appears after pressing this button. Entry into the search eld is done via a letter or numeric eld actuated
with the arrow buttons and by pressing the OK button. Provided that channels with appropriate initial
characters are found in the list, these will be displayed on the left-hand side. Exit the search window with the
EXIT button.
The ‘FAV’ button enables switching of the favourite list in order to view or edit it. Press the ‘FAV’ button,
to display the overview of the favourite lists. Use the up/down arrow buttons and OK button to select the
favourite list to be edited. The list will then appear on the right side of the menu. The channels are marked on
the left side with a symbol already available in the selected favourite list.
How to add a channel to a favourite list:
1. Move the cursor (yellow bar) in the channel list in the left menu window to the channel to be added.
2. Change now to the central part of the menu and navigate the cursor to the ‘Add’ symbol.
The symbol is highlighted in colour.
16 Version of 20 August 2019
3. Press the OK button. The channel is inserted at the end of the favourite list. The channel
is marked with a symbol on the left side of the menu.
Tip: It is possible to add multiple channels simultaneously to the favourite list by selecting the respective
channels rst in the channel list (left menu page) with the OK button and then carrying out steps 2-3 as
explained above.
How to remove a channel from a favourite list:
1. Move the cursor (yellow bar) in the favourite list in the right menu window to the channel you want
to be removed.
2. Change now to the central part of the menu and navigate the cursor to the ‘Remove’ symbol.
The symbol is highlighted in colour.
3. Press the OK button. The channel is removed from the favourite list. The channel
is no longer marked with a symbol on the left side of the menu.
Tip: It is possible to remove multiple channels simultaneously from the favourite list by selecting the
respective channels rst in the favourite list (right menu page) with the OK button and then carrying out steps
2-3 as explained above.
How to move a channel in a favourite list:
1. Move the cursor (yellow bar) in the favourite list in the right menu window to the channel
to be moved.
2. Change now to the central part of the menu and navigate the cursor to the ‘Move’ symbol.
The symbol is highlighted in colour.
3. Press the OK button.
4. Use now the up/down arrow buttons to move the selected channel. The channel now moves up
and down in the list.
5. By pressing the OK button, the channel remains at the new position and exits the ‘Move’ mode.
Tip: It is possible to move multiple channels simultaneously by selecting the respective channels rst in the
channel list (left menu page) with the OK button and then carrying out steps 2-5 as explained above.
How to name a favourite list:
1. Press the ‘FAV’ button and select the favourite list to be renamed.
2. Change now to the central part of the menu and navigate the cursor to the ‘Rename’ symbol.
The symbol is highlighted in colour.
3. Press the OK button.
4. A window appears with the input eld. Select the character and letter with the arrow buttons
and OK button. The last character (your input) can be deleted by navigating the cursor to the
‘<-’ character in the letter eld. A space is added by navigating with the arrow buttons to the
character ‘--‘. Conrm your entry by navigating with the arrow buttons to the ‘OK’ area. The input
window can be exited at all times by using the EXIT button and thereby cancelling the process.
Exit the ‘Edit favourites’ menu by pressing the EXIT button. If changes were made, a dialogue window
appears prompting you to conrm these changes. The changed settings are saved by selecting ‘Yes’.
Note: Upon conrmation with ‘Yes’, channels are only deleted, moved and/or added from/to favourite lists or
names of favourite lists are changed. NO changes are saved when selecting ‘No’.
Version of 20 August 2019 17
►System
► Language
► Software Update
A/V Control
► Time Setting
► Timer
► Parental Control
► Miscellaneous Settings
► Default setting
► Information
Language
Functions and settings in the
menu:
Menu language: Select the
language in which the Menu is
displayed.
First audio: Set the
audio language here for the rst
channel.
Second audio:
Set the audio language here for
the second channel.
Audio priority:
Specify here which preferred
audio mode (if available) should
be used.
EDIVISION: Specify the language here in which the electronic program guide EDIVISION (EDV)
should be displayed. (The program provider must support the language).
Subtitle language: Specify the language here in which the subtitle information will be displayed.
(Language must be supported by the service provider).
Teletext: Specify the language here in which the teletext/video text information
will be displayed. (Language must be supported by the service provider).
Exit the ‘Language’ menu by pressing the EXIT button.
Minors’ protection
This menu is only accessible by entering a PIN code. The default setting of the PIN code is: 0000.
Functions and settings in the menu:
Menu lock: Set here whether to allow or deny access to the menu. If the ‘On’ value is selected
18 Version of 20 August 2019
in this item, accessing the menu is only possible via PIN code. Channel bar,
EDIVISION and favourite lists are exempt.
Channel lock: Specify here whether or not channels can be locked in general.
New password: Specify a new password here.
Conrm password: Repeat the new password.
Exit the ‘Youth Protection’ menu by pressing the EXIT button.
Software Update
Standard: This menu is only
accessible if a suitable USB
data storage is connected and
recognized by the receiver.
Otherwise, this menu is not
accessible.
Another prerequisite for an
‘Update of USB/HDD’ is that
the appropriate software file
is located on the USB data
storage. This file, with the
‘.abs’ file extension, can be
downloaded from the Edision
website via a PC with Internet
connection:
http://www.edision.gr
Save the file downloaded from your PC onto the USB data storage and plug this data storage into the USB
port of ‘picco T2’.
Note: In these circumstances, the upload speed via USB depends on the Organisation of the data on the
USB memory. It is recommended to prepare the USB memory first via the ‘HDD formatting’ item in the
‘USB’/’Memory Information’ menu (to format, start with the yellow button) and then save the software file
(.abs) thereon.
Functions and settings in the menu:
Open file: If the receiver has found files on the USB memory device to be updated, it will
display them. It is possible to specify the file to be updated with the arrow buttons or
OK button. If no files were found, it will be indicated graphics.
Update Mode: Use the arrow buttons or OK button to set the parts of the software to be updated.
Start: Once the software file and update mode have been specified, navigate with the up/
down arrow buttons to the ‘Start’ item. Press the OK button and the update process
starts.
Attention: The software update starts immediately after pressing the OK button and must not be interrupted.
Exit the ‘Update of USB/HDD’ menu by pressing the EXIT button.
Version of 20 August 2019 19
A/V Control
Functions and settings in the
menu:
Display Mode: Select
here between the options
Auto, By Native TV, 720p_50,
720p_60, 1080i_50 or 1080i_60.
Aspect Mode: Determine
here the aspect ratio with which
the image will be displayed.
(16:9, 4:3PS, 4:3LB, AUTO)
Video Output: Select
the colour mode for image
reproduction.
Digital Audio Out: Specify
here the mode in which the
digital audio output should work
.
Time Setting
Functions and settings in the
menu:
GMT user: Select ‘On’ here
and the receiver automatically
obtains the current time and
date (via satellite signal). When
the ‘Off’ option is selected
here, date and time can be
self-determined in the following
items.
Adjust GMT: This item can only
be reached when the ‘On’ option
was set for the ‘GMT user’ item.
It will be possible to specify here
the difference between your
local time and GMT (Greenwich
Mean Time). For Germany/Austria/Switzerland/ Luxembourg applies: UTC+01:00. For Athens/Bucharest/
Istanbul applies: UTC+02:00. Scroll with the left/right arrow buttons to the value you want to set.
Summer: Specify here whether daylight saving time should be considered.
Date: This item can only be reached when the ‘Off option was set for the ‘GMT User item. Enter the date
via the number buttons.
Time: This item can only be reached when the ‘Off’ option was set for the ‘GMT User item. Enter the time
via the number buttons.
Time display: Specify whether (On) or not (Off) the time should be displayed in the front display of the
receiver.
Exit the ‘Time Settings’ menu by pressing the EXIT button.
20 Version of 20 August 2019
Timer
Up to 8 time-based events can
be programmed in this menu.
In addition to programming
recordings of Radio or TV
channels, it is also possible to
display events, such as a nice
birthday or anniversary greeting
at a certain time or specify to
which channel to be woken
up. Information on recordings
can also be found in section
EDIVISION.
Functions and settings in the
menu:
Timer number: Calling up
the timer menu automatically switches to the next (available)
programmable timer. Use the left/right arrow buttons or OK button and
the up/down arrow buttons to switch between (programmed) timers.
Timer mode: Set the recording mode here. Choose whether the recording is carried
out once, daily, weekly or monthly.
Timer service: Specify a service here. Select the item ‘Recording TV Channel’ or
‘Recording Radio Channel’ for recordings. If wanting to be woken with
a specic channel, select the ‘TC Channel’ or ‘Radio Channel’ here.
Select the ‘Message’ input if wanting to display a message on the
screen at a certain time. Wake-up message: This item only appears
when coming across the ‘Message’ setting in the previous item. This
allows to choose between ‘Birthday’, Anniversary’ or ‘General’.
Station: This item does NOT appear when coming across the ‘Message’
setting in the ‘Timer Service’ item. Otherwise, set the channel here to
be recorded or to which to be woken up.
Date: Set the (start) date of the recording here.
Start time: Set the start time here.
Duration: This item is only changeable if the ‘Recording TV Channel’ value or
‘Recording Radio Channel’ value was set at the ‘Timer Service’ item.
Then set the duration of the recording here (recording length).
Standby at the end: This item is only changeable if the ‘Recording TV Channel’ value or
‘Recording Radio Channel’ value was set at the ‘Timer Service’ item. It
is then possible to determine whether the receiver should switch into
standby mode after recording.
Exit the timer menu with the EXIT button. After making changes and wanting to keep them, conrm with
‘Yes’ in the appearing dialogue window.
Note: An error message appears under certain circumstances. As a rule, an incorrect start time or start date
was given. Check the information!
Note: A recording is only possible if a compatible USB memory device is connected to the receiver.
Note: A list of all programmed Timers can be found as follows: Press the EDIVISION button in the TV mode
and then the yellow button, and then select ‘Timer List’ in the appearing menu window.
  • Page 1 1
  • Page 2 2
  • Page 3 3
  • Page 4 4
  • Page 5 5
  • Page 6 6
  • Page 7 7
  • Page 8 8
  • Page 9 9
  • Page 10 10
  • Page 11 11
  • Page 12 12
  • Page 13 13
  • Page 14 14
  • Page 15 15
  • Page 16 16
  • Page 17 17
  • Page 18 18
  • Page 19 19
  • Page 20 20
  • Page 21 21
  • Page 22 22
  • Page 23 23
  • Page 24 24
  • Page 25 25
  • Page 26 26
  • Page 27 27
  • Page 28 28

Edision PICCO T265 User manual

Type
User manual
This manual is also suitable for

Edision PICCO T265 is a Full HD Digital Terrestrial Receiver that supports DVB-T2 broadcasts. With its advanced features, it offers a variety of possibilities for watching and recording TV programs. You can connect a USB storage device to record your favorite shows or use the media player to enjoy movies, music, and photos. The electronic program guide (EPG) provides detailed information about current and upcoming programs, and the parental control feature allows you to restrict access to certain channels or programs.

Ask a question and I''ll find the answer in the document

Finding information in a document is now easier with AI